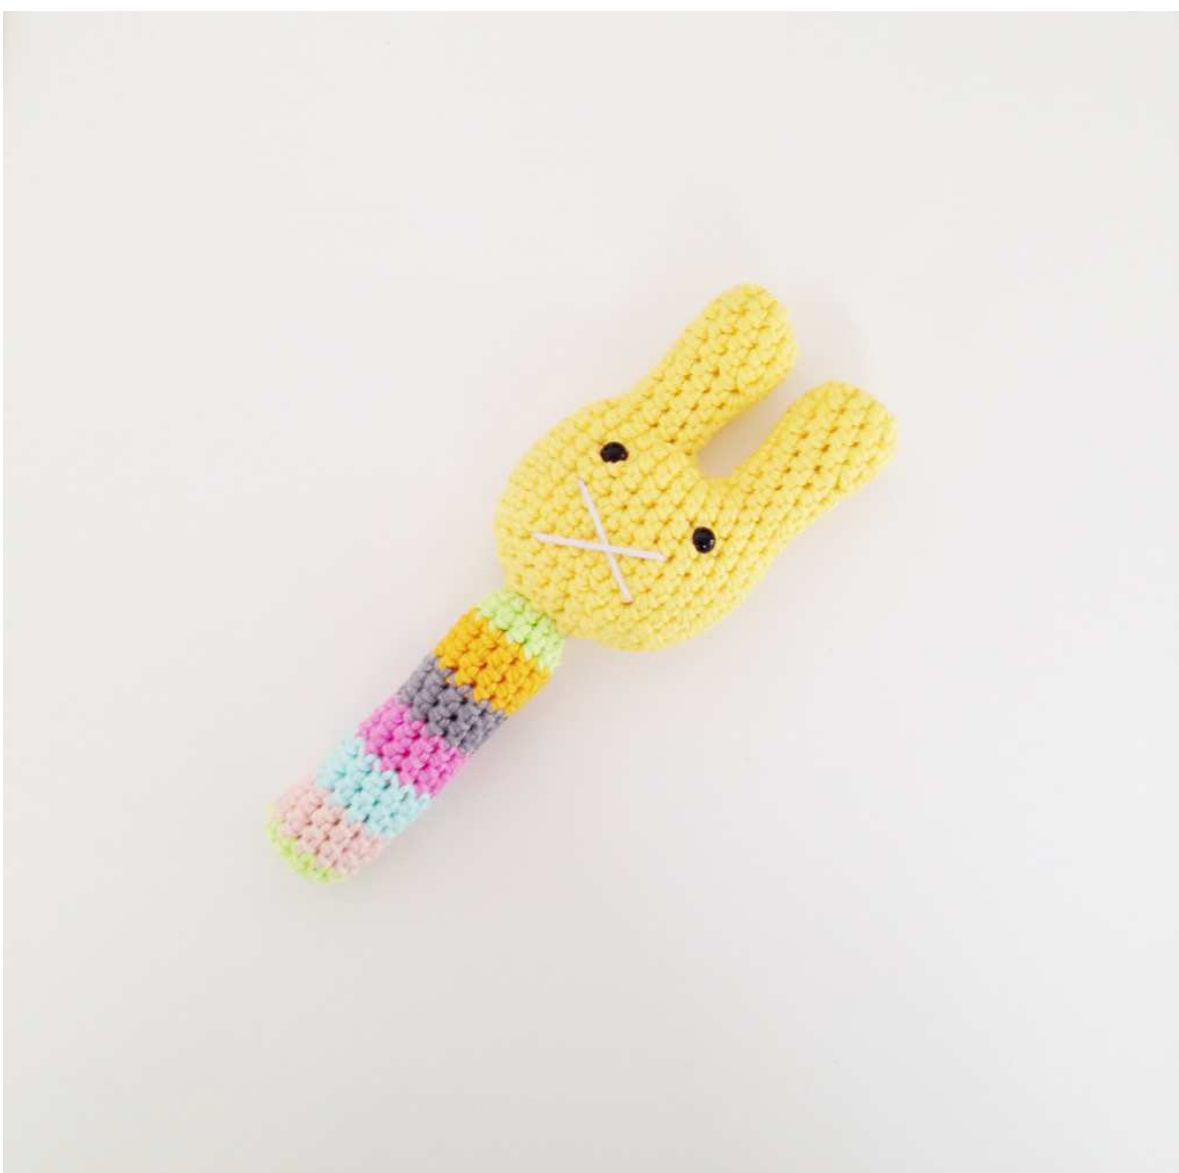
Hello! Thank you for buying one of my patterns. On this page I'll tell you about the materials you need to make this rattle and everything else you need to know before you get started. For this pattern you will need: - A crochet hook, size 3mm. - Different colours of yarn or cotton, suitable for crochet hook 3mm. I used Phil Cotton 3 by Phildar. - A pair of safety eyes, 6mm. - A pair of scissors and a needle. -Fyberfill I used the following yarn: http://www.lovecrochet.com/phildar-phil-coton-3 in the colors: Lavande (59), Melon (70), Chanvre (22), Soleil (45), Berlingot (76), Jade (58) and Pistache (43). Ofcourse you can use any other yarn you like, but please note that different yarns can make your rattle larger or smaller. All my patterns are in US crochet terms. I use the following abbreviations: st: stitch CH: chain SC: single crochet SS: slip stitch INC: increase DEC: decrease If the pattern says: "INc" it means you have to do 2SC all in the same next stitch. If the pattern says: "DEC" it means you have to decrease in the next stitch. If the pattern says: " 9Dc" it means you have to do 1DC in each of the next 9 stitches. Well, this should be a good start for your lovely sweater project! Should you have any questions, don't hesitate to contact me. I'm happy to help you out if necessary. You can reach me at: annemarieshaakblog@hotmail.com And don't forget to check my blog: www.annemarieshaakblog.blogspot.com. There are a lot of (free) crochet patterns on my blog and every now and then I have fun giveaways. Good luck with your project! Annemarie
PATTERN
Start with the first ear. Just make one, the other one will follow 1. 6SC in a magic ring. 2. 2SC in every stitch. (12) 3. 12SC. 4. 12SC. 5. 12SC. 6. DEC, 4SC, DEC, 4SC.(10) 7. 10SC. 8. 10SC. 9. 10SC. Fasten off. Now you've finished the first ear. As from here you'l start working on the rest of the head with the rest of the head. Make another ear, so repeat rows 1-9 of the first ear. Don't fasten off. 1. Chain 3, SC10 in row 9 of the first ear you've made, chain 3, SC10 in the 2nd ear. (26) 2. 26SC.(26) (note: so also 1SC in each chain stitch of row 2) 3. 8SC, INC, 12SC, INC, 6SC.(28) 4. 28SC.(28) 5. 28SC. (28) 6. 27SC, INC. (29) 7. 14SC, INC, 14SC. (30) 8. 30SC.(30) 9. 30SC. (30) 10. \*\*3SC, DEC\*\*, repeat 5 more times. (24) 11. \*\*2SC, DEC\*\*, repeat 5 more times. (18) 12. \*\*1SC, DEC\*\*, repeeat 5 more times. (12) Now close the open space between the ears with a piece of yarn and a sewing needle. Attach the safety eyes and fill the ears and the rest of the head with fyberfill. If you like, you can put a little bell inside the head to make it a rattle. 14. DEC around. (6) 15. Change colour here. 16. INC around. (12) As from here, you can change colour where ever you like. I changed colour after every three rows. 17.12SC. 18. 12SC. 19.12SC. 20. 12SC. 21.12SC. 22.12SC. 23.12SC. 24.12SC. 25. 12SC. 26. 12SC. 27. 12SC. 28. 12SC. 29. 12SC. Now fill the rest of the rattle with fyberfill. 30. DEC around (6SC). Fasten off and sew a nose with a little bit of grey yarn.
Last but not least
Designing crochet patterns is a time-consuming and difficult job. I'd love to see you make as many rattles as you like for yourself or to give as a gift. But please do not make copies of this pattern, don't distribute this pattern, don't share it and don't sell it as if it is your design. If you post your own rattle somewhere on the WorldwideWeb, I'd love it if you refer to my shop.


