Nata's Knitivity Donkey
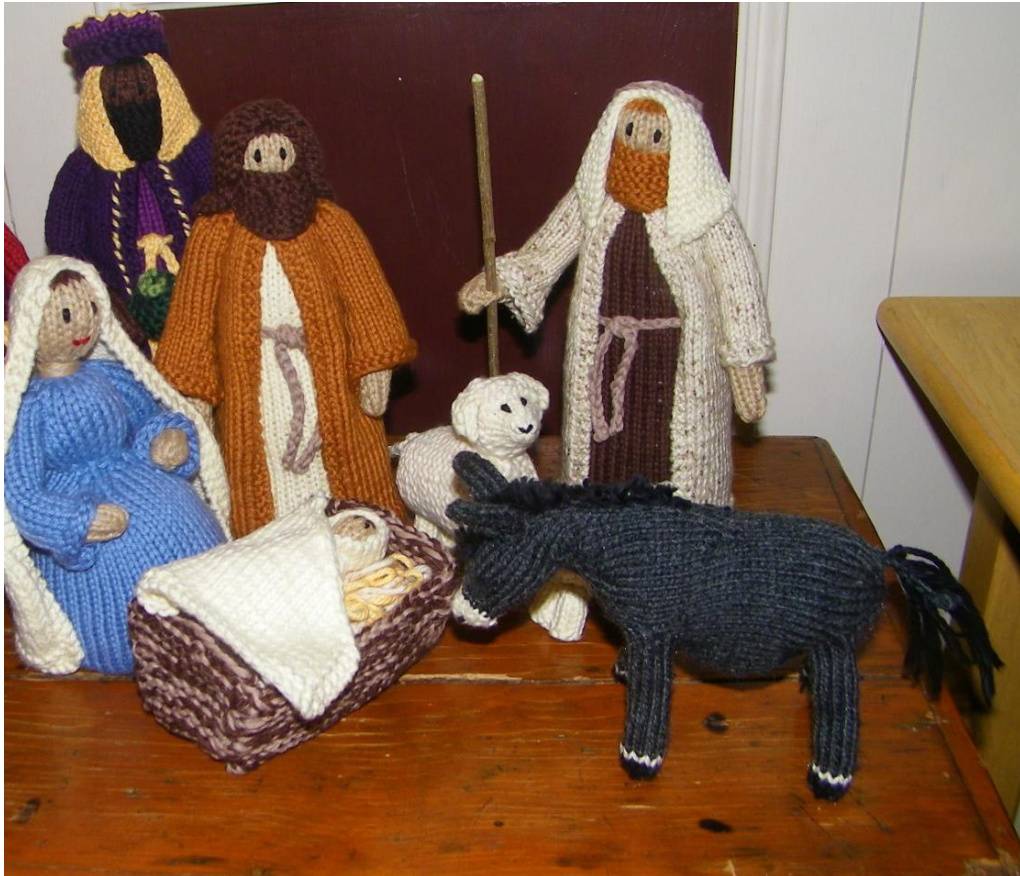
By Renata Brenner I wanted to knit a Donkey for this Nativity and couldn't find a pattern I was happy with so I decided I'd try using what I had learned about shaping while knitting the figures in Jean Greenhowe's Christmas Crib. I am absolutely delighted with how she turned out and thought I'd share the pattern. Unlike the figures in the Christmas Crib, this pattern is worked in the round, and except for the ears, is completely seamless. This makes knitting, and stuffing a bit more complicated, but I think the result is worth the extra effort. I have used paired lifted increases and paired decreases for symmetry and to make them less obvious. Links to tutorials are provided.
Size
Height 4" to shoulder 5" to top of ears Length 6.5"” nose to tail Gauge 26 st over 4"/10cm in stockinet
Yarn
About loz of gray DK (or worsted weight yarn) A few yards each of white and black yarn If you use DK weight yarn, use US size 2 (or the same size needles you used for the other figures.) I knit tightly using worsted weight yarn and size 2 needles and my Christmas Crib figures are the specified size. If you use worsted weight yarn and you don't want to knit tightly, use smaller needles.
Notions
Double Pointed Needles (dpn) sizes US 1 & 2 Small crochet hook Tapestry needle 4 Safety Pins or locking stitch markers to hold stitches. Stitch holders are too big and will get in the way. Polyester Filling and a chopstick or pencil to push stuffing in
Notes
I am assuming that you have knitted in the round on dpns before and can move stitches from one needle to the other if two stitches of a decrease are on adjacent needles or the distribution of stitches becomes awkward. The donkey is worked in the round from nose to tail with no seams. Live stitches for the legs are held on safety pins. Stitches for legs are picked up and the legs are also worked in the round. Stuffing needs to be added as the donkey progresses. I stuffed very aggressively, especially before drawing up and tying off the body and the legs are stuffed very firmly to give the rigidity. Adding stuffing in lots of small pieces increases firmness. I have suggested points during the knitting when you might add stuffing but you are not limited to those points. All ends except the tail are hidden by using a tapestry needle to pass the end through the body to come out between stitches, passed over one bar between stitches and back through the body a few times. When the end is snipped off close to the body it will disappear into the body. I recommend using Jean Greenhowes's Join for all yarn joins
Abbreviations
st Stitch Kknit Ppurl K2tog knit 2 stitches together (right leaning decrease) SSK Slip two stitches separately K wise. Insert left needle into front loops and knit together (left leaning decrease). RLI Right lifted increase: Lift first leg of st below the next st onto left needle and knit this stitch. LLI Left lifted increase: Lift last leg below last knitted st onto left needle and knit this stitch. (Lifted increases leave no purl bump or hole; see tutorial here http://www.youtube.com/watch?v=KRjxgN-7FNU)
Head
Using White yarn and larger needles, Cast on 5 st using Emily Ocker's Circular Cast On Do not pull tight and tie off until you have knitted several rows. Distribute st on 3 dpns Rowl Kall (5) Row 2 RLI all(10) Row 3-4 K all Join gray yarn Row 5-6 K all Row 7 RLI, K8, LLI (12) Row 8-9 K all Row 10 K2,(RLI)x4, (LLI)x4, K2 (20) Row 11-18 K all
Neck & Chest
Row 19 K4, (K2tog)x6, K4(14) Row 20 and all unspecified rows K all Row 21 K, RLI, K12, LLI, K (16) Row23 K, (RLI)x2, K12, (LLI)x2, K (20) Row 25 K, (RLI)x3, K3, (K2tog)x3, K3, (LLI)x3, K (23) Row 27 K,(RLI)x3, K3, (K2tog)x5, K2, (LLI)x3, K (24) Row 29 K,(RLI)x3, K5, (K2tog)x6, K5, (LLI)x3, K (24) Row 31 K, (RLI, K)x3, K11, (LLI, K)x3, K1 (30) Row 33 K, (RLI, K)x3, K20, (LLI,1)x3,K (36) Row 34-41 K all Stuffhead andneck Foreleg Set Up -Cast on using backward loop Row 42 K2, Place 4 st on Safety pin, CO3, K24, Place 4 st on Safety pin, CO3, K2 (34) Belly Row 44 K, (RLI)x2, K28, (LLI)x2,K (38) Row 46 K, (RLI)x2, K32, (LLI)x2,K (42) Row 48 K, (RLI)x2, K14, (K2tog)x2, K14, (LLI)x2,K (44) Row 49-56 K all Row 57 K, (SSK)x2, K34, (K2tog)x2, K (40) Row 59 K, (SSK)x2, K30, (K2tog)x2, K (36) Stuffchestandbelly Hind leg Set up- Cast on using backward loop Row 60 K2, Place 4 st on Safety pin, CO4, K7, SSK, K2, K2tog, K7, Place 4 st on Safety pin, CO4, K2 (30) Hindquarters Row 62 K,(SSK)x2, K5, (K2tog)x2, K2, (SSK)x2, K5, , (K2tog)x2, K (22) Row 64 K,(SSK)x2, K, (K2tog)x2, K2, (SSK)x2, K1 , (K2tog)x2, K (14) Row 66 K, SSK, K, K2tog, K2, SSK, K, K2tog, K (10) Stuffhindquarters Cut thread leaving 12” and draw thread through all remaining stitches with tapestry needle. Finish stuffinghind quarters Pull tight and tie off, then run thread to tail location, 4 stitches up from tie off
Tail
Make a loop by passing needle under an the stitch above it and place loop on crochet hook. With crochet hook chain 1.5"' or desired length and tie off. With a tapestry needle, draw short strands of black yarn through the chain stitches, knot each, and separate the plies with the tapestry needle.
Fore & Hind Legs
Do forelegsfirst Place st on holder on smaller dpn. With gray yarn and a small crochet hook draw up 6 st around opening placing 3st on 2 larger dpns Leave a 12" tail on the outside of the leg. (If you need more stitches to close holes decrease on the inner side of the leg in the first few rows.) Using 4 larger needles work tightly for the first few rows - it will be a bit awkward. Row 1-20 K all(10) Push filling in very firmly, pushing stuffing up into joint between body and leg (leg length to this point should equal distance between front and back legs- add/subtract rows if necessary)
Hooves
Join White on inside of leg Row 21 K all Join Black on inside of leg Row 22-23 K all Row 24 (K2tog)x5 Stuff Hoof Cut thread and draw thread through allremaining stitches with tapestry needle, knot and hide end in leg. The 12” tail lest when you picked up for the leg can be used to close up any holes where leg and body join. If the legs are splayed, use a tapestry needle and run one tail to inside of leg and the other tail under chest stitches to first leg. Make a single overhand knot and draw up to pull the legs closer together. Tie a second knot to fasten. Hide ends in body If legs are not stuffed adequately and bend try pushing a plastic toothpick (wood is not slippery enough)up through the bottom of the hoof into the leg.
Ears
Ears are worked from tip to base - make 2 Use 2 of the smaller dpns and gray yarn. Using a long tail Cast on, CO 3 sts. Row 1Pall (3) Row 2 LLI, RLI, K (5) Row 3 P all Row 4 K all Row 5 K all Row 6: LLI, K2, RLI, K (7) Row 7-13 Continue in stockinet. Bind off in Knit leaving a 12" tail. Weave the tail from casting on along the edge of ear on P side. Fold bound off edge in half K side outside Sew bound off edges together leaving a tail to attach ears
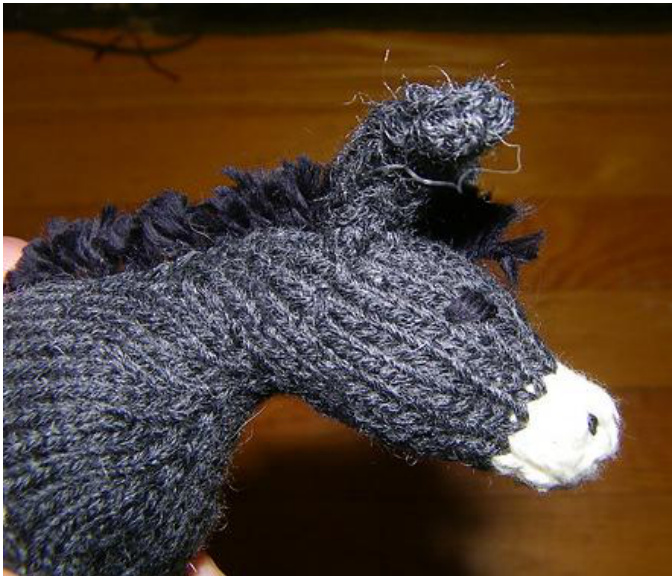
With pins position the ears, P side facing out, with the front edge just behind the neck decreases with 4 stitches between them. Adjust for symmetry to match the photograph. Using the tail, sew the bound off edge of the ears to the side of the head and then working between the ears sew the row before the bound off row to the next row towards the center of the head leaving 2 rows exposed between the ears,
Mane
For the mane I used an embroidery stitch called Ghiordes Knot or Turkey Work; there's a tutorial here: http://www.needlenthread.com/2009/04/turkey-work-embroide... Locate the 2 rows of stitches that run along the spine and place pins to mark the ends; 8 rows back from the where the gray is joined on the face and directly above the back of the forelegs. Thread a tapestry needle with about 2′ of black yarn. Working under and over the bars between knit stitches, work a row of I/2” loops from the shoulders to the face. If desired you may work additional rows on either side of this row. I worked a 2nd row only between the ears to fillit out a bit. Carefully cut each loop with scissors and the as with the tail separate the plies with a tapestry needle. With very sharp scissors trim the mane and tail a little at a time until it looks good to you. If you get overzealous, unlike at the hairdresser's, you can always pull it out and start over.
Eyes & Nostrils
With pins mark the position of the inside corner each eye 1 row back from the row off increases and 3 stitches from the center of the head. With pins mark the position of nostrils just behind the center of the cast on with 3 stitches between them. Adjust pins for symmetry and to match the photographs. With black yarn and a tapestry needle, knot the yarn insert the needle under the chin between stitches at the pin and pull the knot through hiding the knot in the head. Make a small stitch diagonally across one whole stitch away from the center of the face and the nose make a second stitch over the first to finish the eye coming out at the pin for the second eye. Repeat for the second eye finishing with the needle coming out at the pin for a nostril. Work a small backstitch between the columns of stitches coming out at the pin for the second nostril. Repeat for the second nostril and hide end in head coming out in the mane. For additional photographs you can visit my project page here http://www.ravelry.com/projects/renatabrenner/natas-knitivity-donkey


