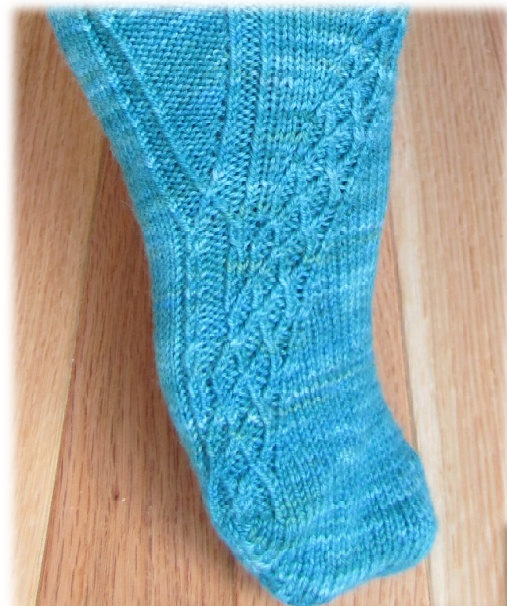
Cabley Socks
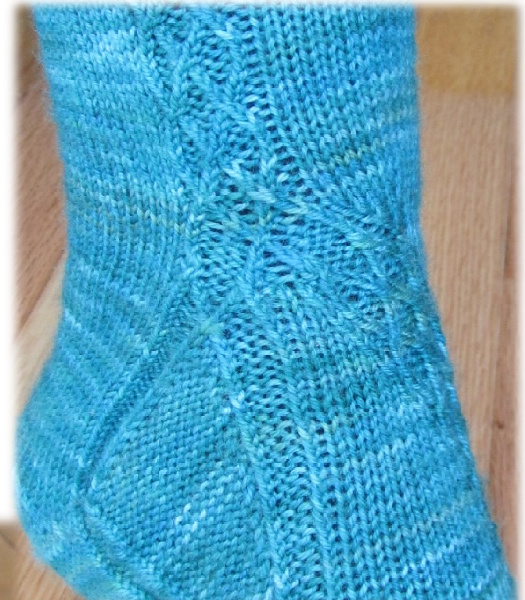

Cabley Socks
Yarn: approx. 375-400 m fingering weight yarn. Needle: US 0 $\left(2.0\mathsf{m m}\right)$ or size needed to obtain gauge Size: $7\%{-}8\%^{\prime\prime}$ in width, length adjustable Gauge: 8 sts/in, 11 rows/inch in stockinette stitch Notions: tapestry needle, cable needle (if needed, see notes), markers - 1 distinct individually distinct for start of round, 2 distinct for gusset increases and if desired 6 other markers to mark cable patterns
Toe
Using Judy's Magic Cast-on cast on 60 sts (30 sts on each needle). Row 1: Knit 29 sts, wrap and turn Row 2: Sl 1 purlwise, purl 28 sts, wrap and turn Row 3: Sl 1 knitwise, knit 27 sts, wrap and turn Row 4: Sl 1 purlwise, purl 26 sts, wrap and turn Repeat rows 3 & 4 working one fewer st each row until you have 16 live sts between the wrapped sts and 8 wrapped sts on eachside. Row 17: Sl 1 purlwise, knit 16 sts to first wrapped st, pick up wrap(s) and knit together with next st, wrap and turn Row 18: Sl 1purlwise, purl 17 sts to first wrapped st, pick up wrap(s) and purl together with next st, wrap and turn Repeat rows 17 & 18 working one more st each row until you have work all the wrapped sts. (60 sts) Row 33: Sl 1 purlwise, knit 60 sts around being careful to knit the cast on so that the stitches aren't twisted. Row 34: Knit 56 sts around, pm, use this marker as the beginning of the round for the rest of the sock
Instep
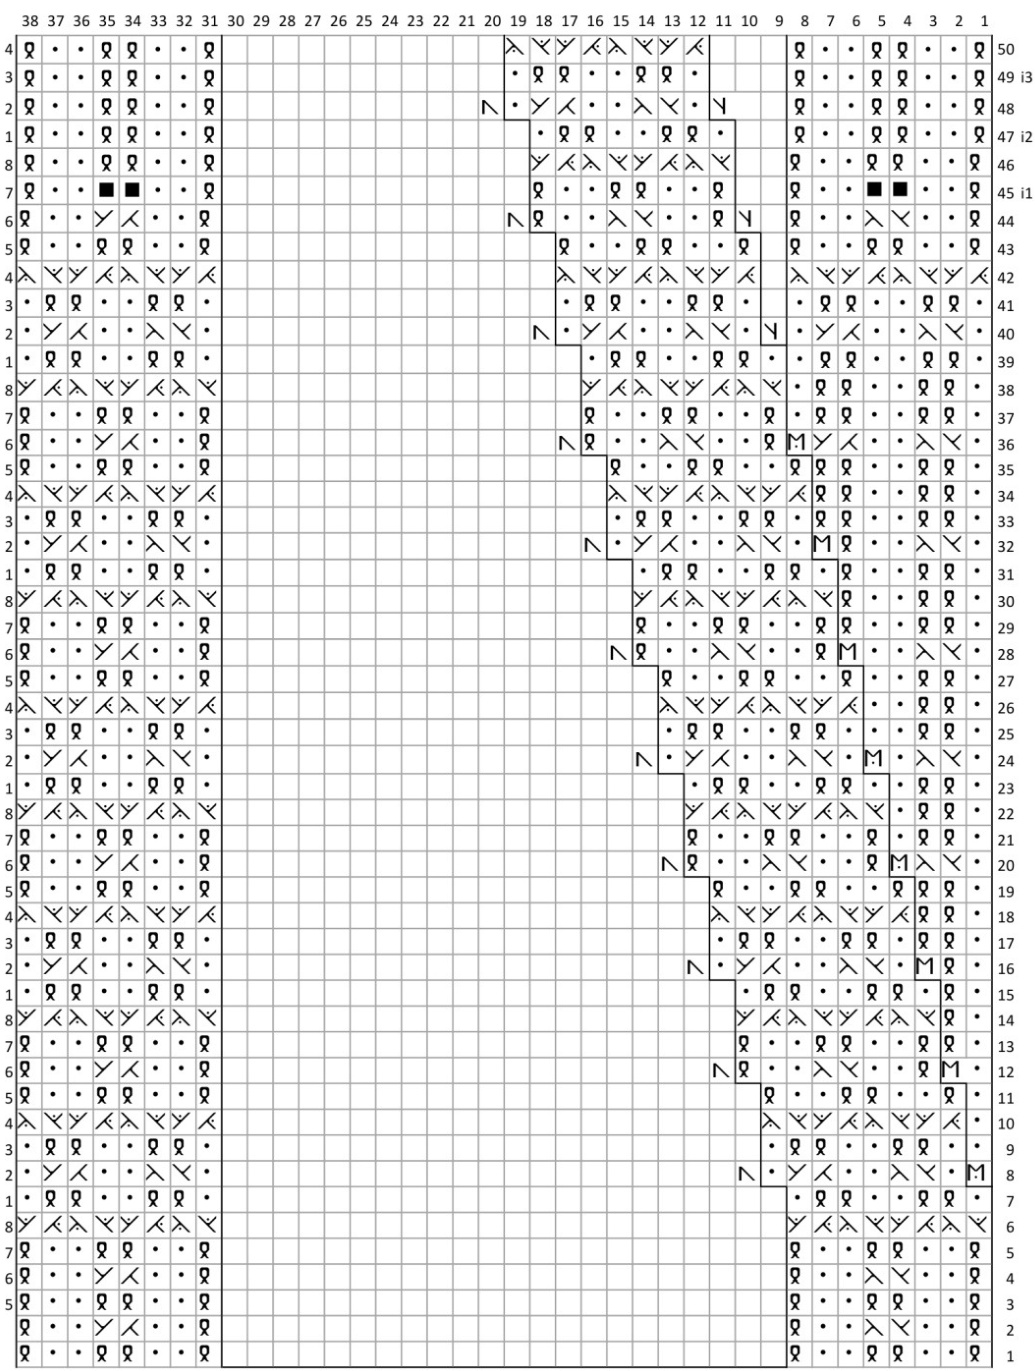
Starting on row 1, work cable chart A for appropriate sock (left or right foot) working until the end of round 44. For the left and right leaning increases I suggest using Cat Bordhi's La-link & La-rink increases (see notes for link to explanation)
Gusset
While working the gusset, continue to work the appropriate row of the cable chart A each round, adding the increases between the stitches indicated on the chart. Next Rnd, Rnd 45: Work 4 sts in cable pattern as shown on chart, make 1 purl st, pm, work in pattern across to $2^{\mathsf{n d}}$ cable pattern (not travelling cable pattern), work 4 sts, pm, make 1 purl st, work in pattern to end of round. Rnd $46\,\&$ all even rnds: work all sts in pattern, purling previously increased sts Rnd $47\,\&$ all odd rnds: Work in pattern to $1^{\mathfrak{s t}}$ marker, purl across previously increased sts, make 1 purl st (La-link) before marker, work in pattern to $2^{\mathsf{n d}}$ marker, make 1 purl st (La-rink) after marker, purl across previously increased sts, work in patterntoendofround Rnd 74: Work first 4 sts in cable pattern, work across 15 increased purl sts, work in pattern to $2^{\mathsf{n d}}$ marker, work across 15 increased purl sts, work 4 sts in cable pattern, stop here. (90 sts) You'll now work the heel turn back and forth on the 22 sole sts.
Heel
Row 1: Knit 21 sts, wrap and turn Row 2: Sl 1 st purlwise, purl 19 sts, wrap and turn Row 3: Sl 1 knitwise, knit 18 sts, wrap and turn Row 4: Sl 1 purlwise, purl 17 sts, wrap and turn Repeat rows 3 & 4 working one fewer st each row until you have 12 live sts between the wrapped sts and 5 wrapped sts on each side. Row 11 (transition row: worked in the round): Sl 1 purlwise, knit 11 sts to first wrapped st, pick up wrap and knit together with st 5 times, work next 4 sts in pattern, p15 (right gusset), work 32 sts in pattern, p15 (left gusset), work 4 sts in pattern, pick up wrap and knit together with st through the back loop 5 times (90 sts). Now you'll start the heel flap and picking up the gusset sts working back and forth again. While doing the heel flap do not wrap the next st when you turn. Row 1: Knit 17 sts, work 3 sts in cable pattern, k2tog tbl, turn Row 2: Sl 1 purlwise, work 3 sts in cable pattern, purl 22 sts, work 3 sts in cable pattern, p2tog, turn Row 3: Sl 1 knitwise, work 3 sts in cable pattern, work 22 sts following heel flap pattern (chart 3), work 3 sts in cable pattern, k2 tog tbl, turn Row 4: Sl 1 purlwise, work 3 sts in cable pattern, work 22 sts in heel flap pattern, work 3 sts in cable pattern, p2tog, turn Repeat rows 3 & 4 until all gusset sts have been picked up (60 sts). At this point you can remove the gusset markers Row 31: Sl 1 knitwise, work 3 sts in cable pattern, knit 22 sts
Ankle
Continue working appropriate row from cable chart A (starting with row 76) until you have reached the end of the chart. After this, continue the cable by working from cable chart B (for appropriate sock) repeating until sock is $1.5^{\prime\prime}$ shortof desired length. Cuff Work Ribbing Chart over the 2 cable pattern areas (8 sts each) then 2x1 twisted ribbing (2 purls, 1 knit tbl) over the noncabled area for $1.5^{\prime\prime}$ BO using preferred toe-up bind off.
Cable Stitch Glossary
Cable 1 right (knit both sts tbl)
Slip 1 stitch to cable needle, hold in back, knit next stitch through the back loop, knit stitch from cable needle through the back loop
Cable 1 left (knit both sts tbl)
Slip 1 stitch to cable needle, hold in front, knit next stitch through the back loop, knit stitch from cable needle through the back loop
Y|K| Cable 1 over purl right (knit tbl)
Slip 1 purl stitch to cable needle, hold in back, knit next stitch through the back loop, purl stitch from cable needle
》K Cable 1 over purl left (knit tbl)
Slip 1 stitch (knit) to cable needle, hold in front, purl next stitch, knit stitch from cable needle through the back loop
Notes
Cables may be done with or without a cable needle. I personally find doing them without the cable needle a lot quicker. There is a good tutorial on how to do this here: http://www.grumperina.com/cables.htm or in Yarnissima's Firestarters pattern A great new toe-up bind off is Jeny's Surprisingly Stretchy Bind-off which can be found here: http://www.knitty.com/ISSUEfall09/FEATjssbo.php Cat Bordhi explains her La-link and La-rink increases in a video tutorial here: http://www.youtube.com/watch?v $:=$ SYOYMJBGXrW The pattern may appear fuzzy on your computer screen; printing out the pattern should make a clearer copy. Sorry about this! If you have any questions, suggestions, problems with this pattern, or if you find a mistake please let me know! cheryl_mcleod21@hotmail.com or Cheryl21 on Ravelry
RightSock CableChartA
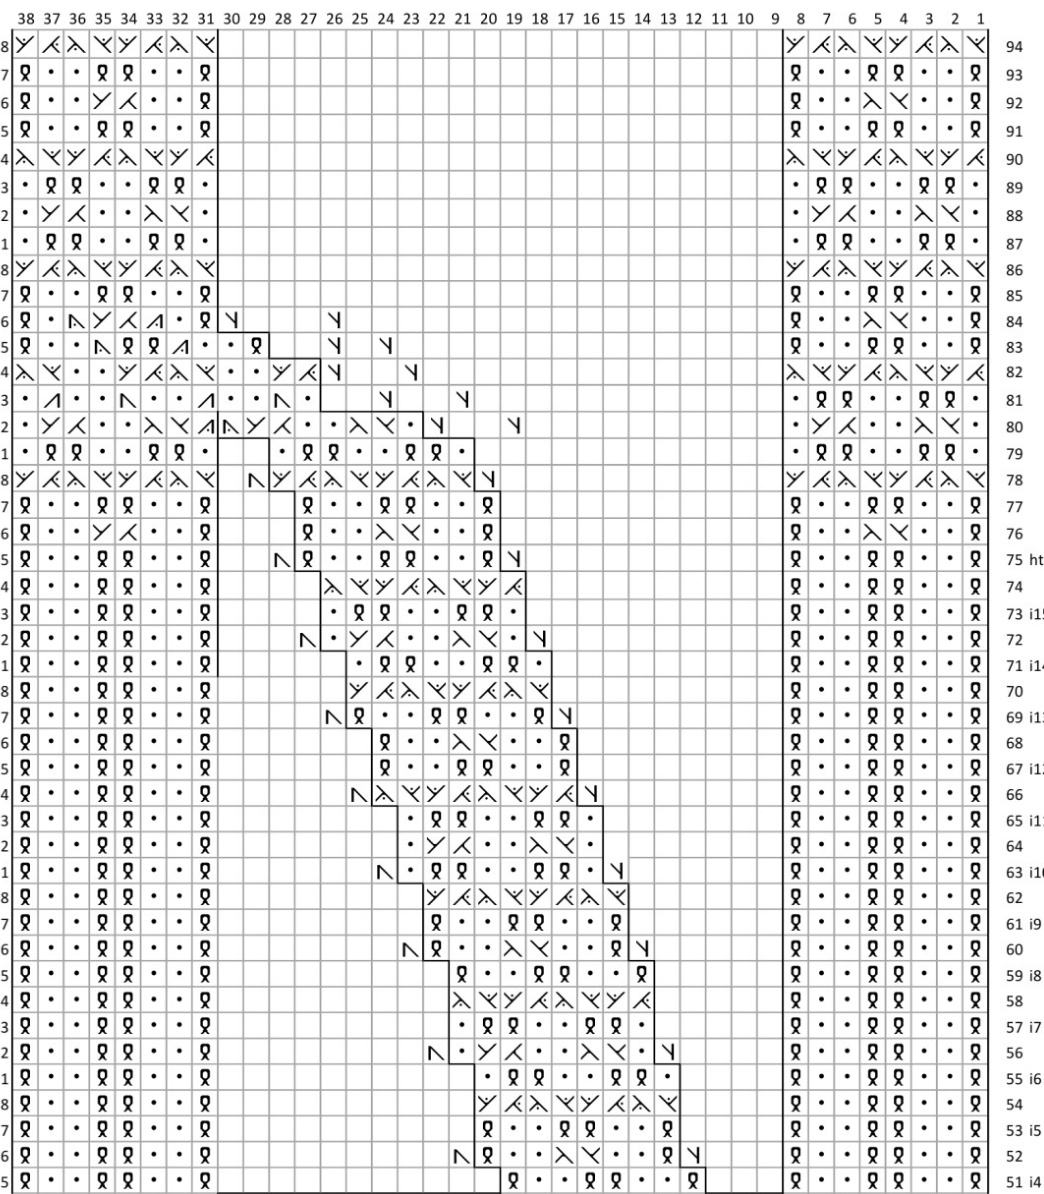
Left Sock CableChartA

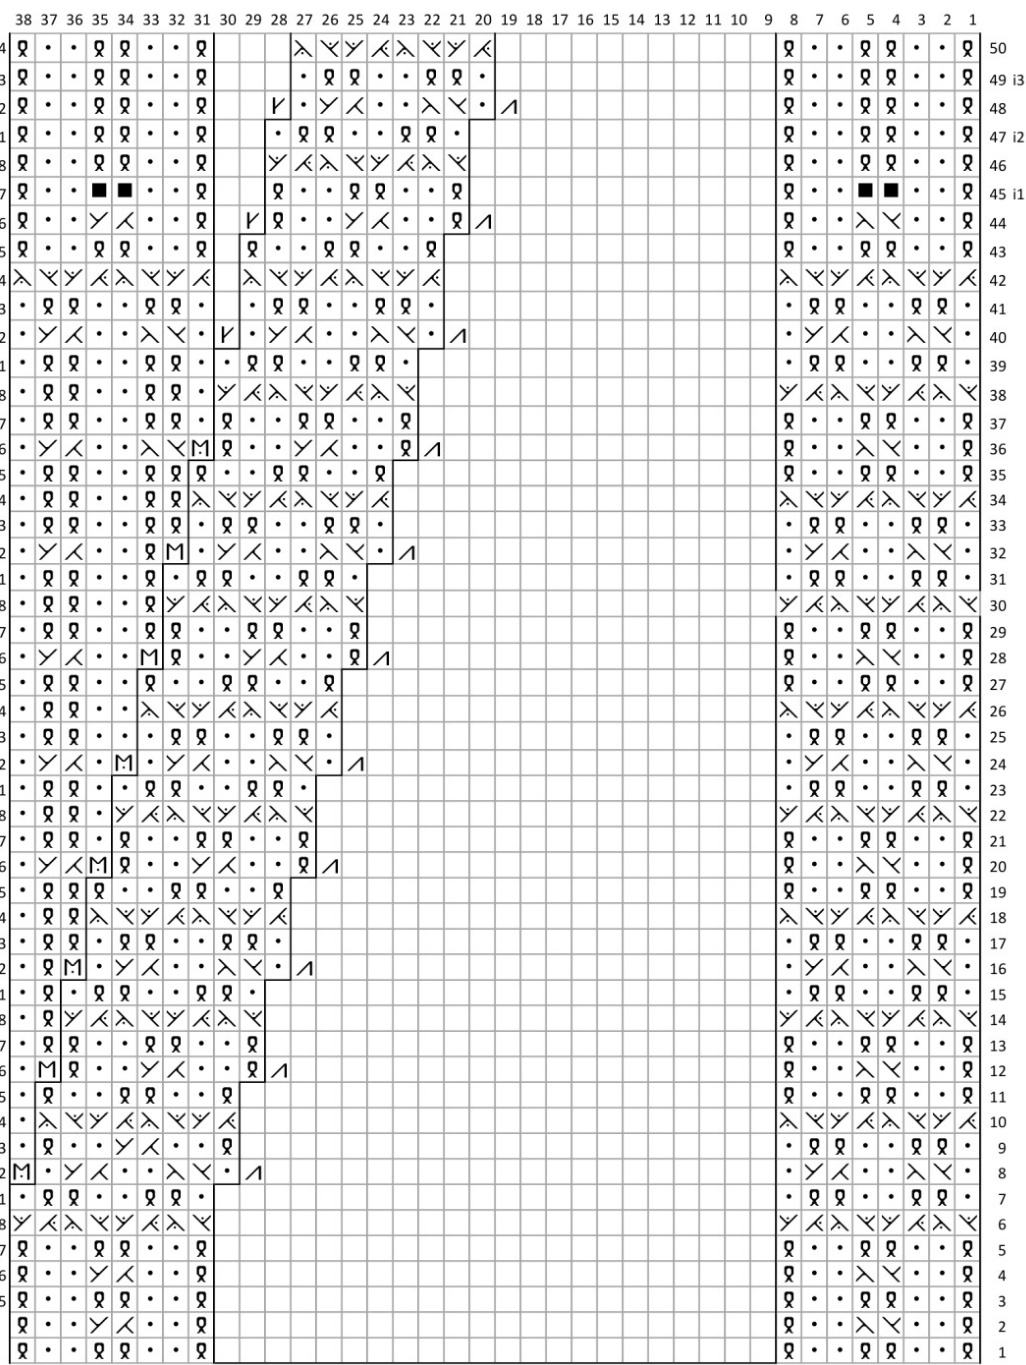
Chart Legend
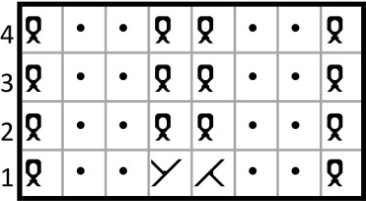
Cable Chart B
Right side of sock
Left side of sock
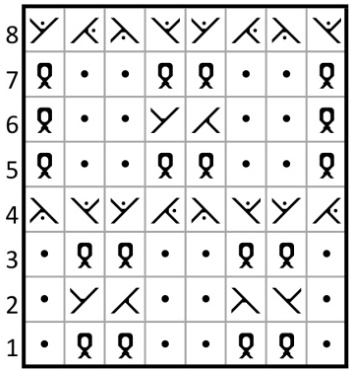
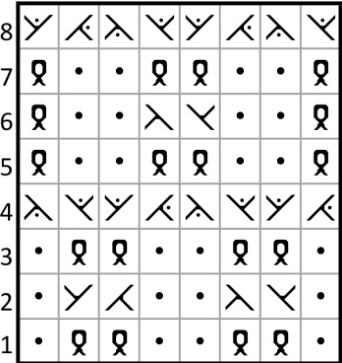
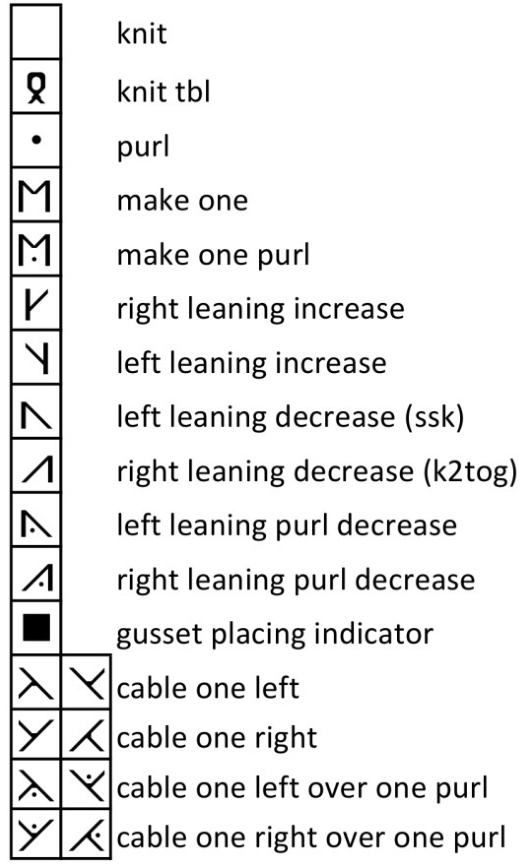
Chart C Ribbing Chart