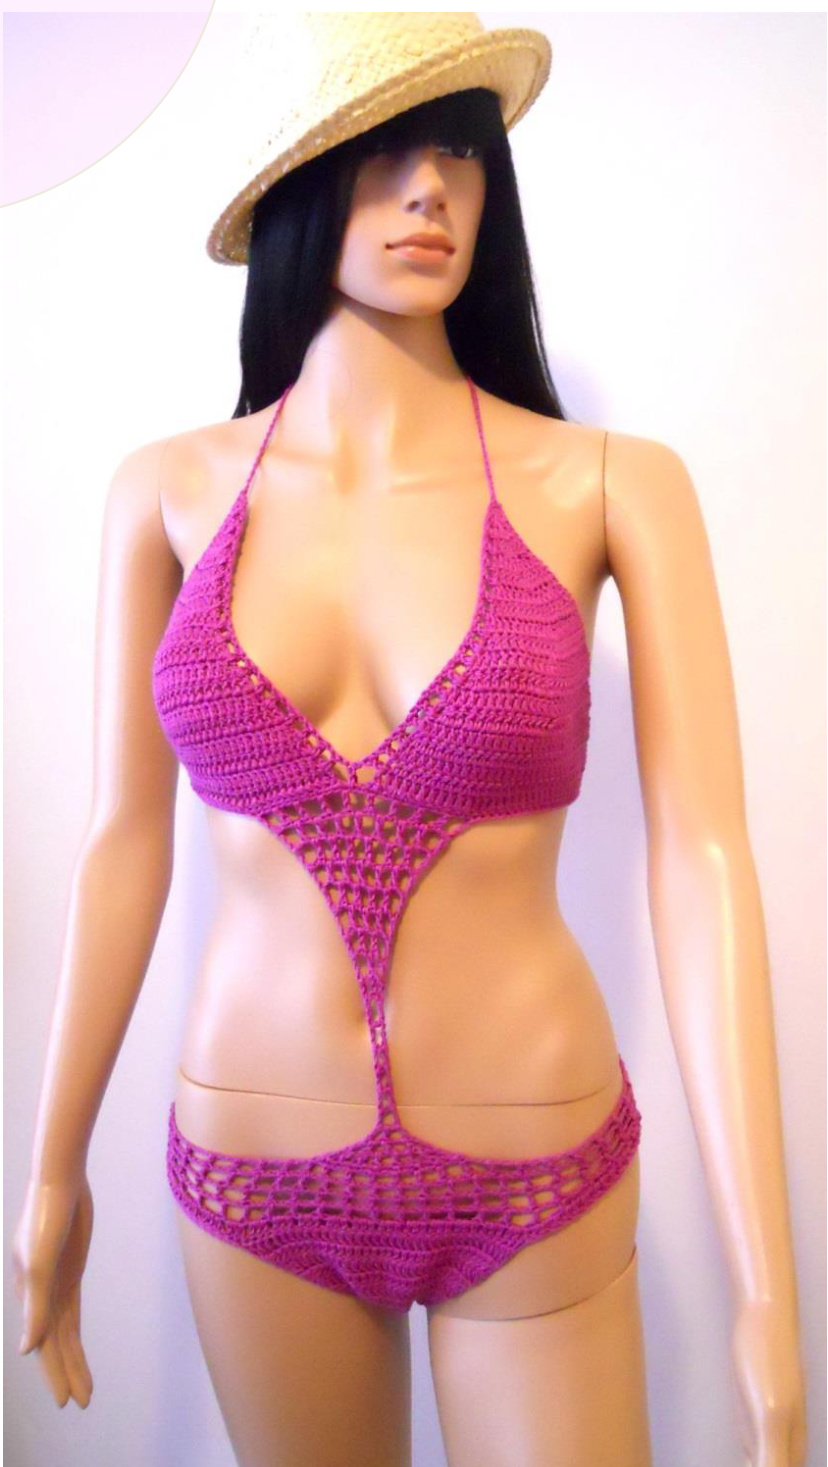
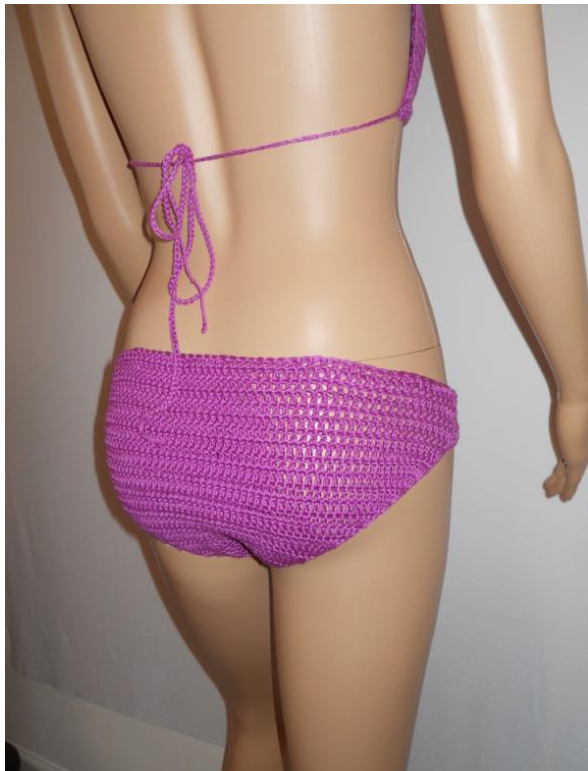
Crochet Monokini Swimsuit
Our new Peek-A-Boo Monokini is bold, fun and flirty. This sexy swimsuit features a halter inspired top that ties at the neck and back with a Peek-A-Boo Trellis Center for added "flirt" appeal. The modified Brazilian cut bottom with the Trellis trim makes this Monokini super fun & dancer friendly! Designed by: Gu'Chet
Getting Started
FINISHED MEASERMENTS:
Bra (s): Small Medium Large Bust (in) 32-34 36-38 40 - 42 Bust (cm) 81-86 91.5-96.5 101.5-106.5 Cup Size A/B B/C C/D Bottom: Small Medium Large Waist (in) 25 -26.5 28 - 30 32-34 Waist (cm) 63.5- 67.5 71-76 81.5-86.5 Panties Size 5 6 7 YARN: Sport weight #3 Shown in: Lion Brand-Microspun 2.5oz/70g/168yd/154m- 2 (3, 4) skeins
CROCHET HOOK:
US D/3 (3.25mm) -Or size needed to obtain gauge.
NOTIONS:
Yarnneedle Thread to match color of yarn Sewingneedle Lining (fabric) to match color of yarn (or desired color)
GAUGE:
21 sts and 12 rows= 4"/10cm over double crochet stitch pattern using size US D/3 (3.25mm) hook
PATTERN NOTES:
· IMPORTANT- Count Stitches at the end of EACH row to ensure you end with the correct stitch count as stated in pattern. If your stitch count is not exact, we can't guarantee consistency in shaping. When working this pattern, you don't need to worry with which side of the suit is the right or wrong side until you've completed the swimsuit. Once you've finished, you can decide which side you want to use as your "right side" and proceed accordingly. When shaping bra cups, at the beginning of each row we use hdc instead of dc to reduce spaces or "gaps" and tc allow a natural rounding of each cup. SPECIAL STITCHES USED: dc2tog -Double crochet 2 together -[Yarn over, insert hook in next st and pullup a loop, yarn over and draw through 2 loops] twice, yarn over and draw through 3 loops on hook.
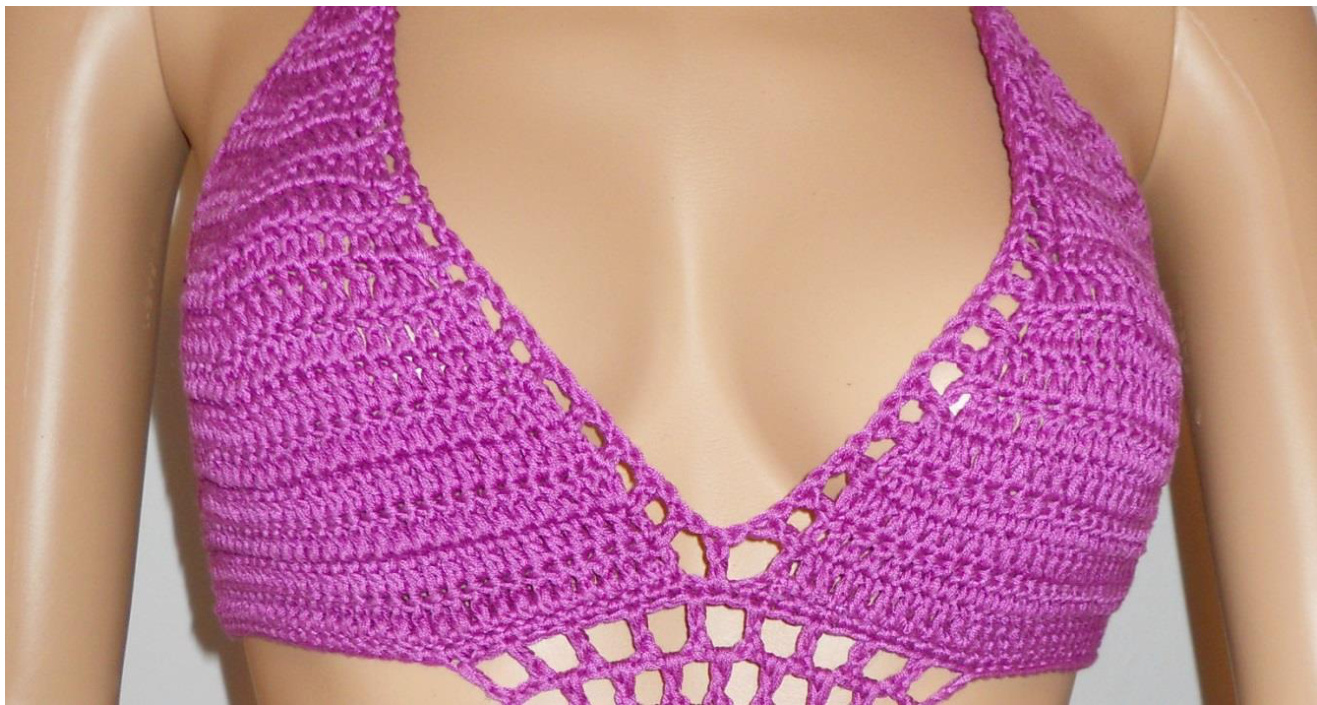
Bra Cup (make 2)
Ch 38 (40, 42) sts. Row 1: Dc in 4th ch from hook (counts as first dc) and in each ch across, turn—36 (38, 40) sts. Rows 2 - 3: Ch 2 (counts as first hdc now and throughout), turn; dc in second dc from hook and in each st across. End with dc in top of ch 3 made at beg of prev row-36 (38, 40) sts. Note: Ch 2 is used at the beginning of ea row (instead of dc) to reduce spacing (or gaps) to allow a natural rounding of eachcup. Row 4: Ch 2, turn; dc2tog, dc in each st across. End with dc in top of ch 2 made at beg of previous row-35 (37, 39) sts. Row 5: Ch 2, turn; dc in each st across, working ONE dc2tog evenly across row to last 2 sts, dc2tog—33 (35, 37) sts. Row 6: Ch 2, turn; dc2tog, dc in each st across, working ONE dc2tog evenly across. End with dc in top of ch 2 made at beg of previous row-31 (33, 35) sts. Row 7: Ch 2, turn; dc in each st across, working ONE dc2tog evenly across row to last 2 sts, dc2tog-29 (31, 33) sts. Row 8: Ch 2, turn; dc2tog, dc in next st and in each st across, working ONE dc2tog evenly across. End with dc in top of ch 2 made at beg of previous row-27 (29, 31) sts. across, working ONE dc2tog evenly across row to last 2 sts, dc2tog—25 (27, 29) sts. Row 10: Ch 2, turn; dc2tog, dc in each st across, working ONE dc2tog evenly across to last dc, leave last dc unworked22 (24, 26) sts. Row 11: Ch 2, turn; dc2tog, dc in each st acros, working ONE dc2tog evenly across row to last 2 sts, dc2tog-19 (21, 23) sts. Row 12: Ch 2, turn; dc2tog, dc in each st across, working TWO dc2tog evenly across row to last 4 sts, dc2tog-TWICE—14 (16, 18) sts. Note: Total of 5 sts decreased. Row 13: Ch 2, turn; dc2tog, dc in each st across, working ONE dc2tog evenly across row to last 2 sts, dc2tog—11 (13, 15) stsmade. Row 14: Ch 2, turn; dc in each st across, working ONE dc2tog evenly across row to last 2 sts, dc2tog-9 (11, 13) sts. Row 15: Ch 2, turn; dc2tog, dc in each st across, working TWO dc2tog evenly across row. End with dc in top of ch 2 made at beg of previous row--6 (8, 10) sts.
SHAPING BRA CUP-SIZE SMALL ONLY
7: Ch 2, turn; dc2tog. End with dc in top of ch 2 made at beg of previous row -3 sts Row 18: Ch 2, turn; dc2tog—2 sts. Row 19: Ch 1. Fasten off.
SHAPINGBRACUP-SIZEMEDIUMONLY
Row 16: Ch 2, turn; dc2tog, dc in each st across to last 2 sts, dc2tog-6 sts. Row 17: Ch 2, turn; dc in each st across working ONE dc2tog evenly across row to last 2 sts, dc2tog-—4 sts. Row 18: Ch 2, turn; dc2tog. End with dc in top of ch 2 made at beg of previous row -3 sts. Row 19: Ch 2, turn; dc2tog—2 sts. Row 20: Ch 1. Fasten off.
SHAPING BRA CUP-SIZE LARGE ONLY
Row 16: Ch 2, turn; dc2tog, dc in each st across to last 2 sts, dc2tog-8 sts. Row 17: Ch 2, turn; dc in each st across working ONE dc2tog evenly across row to last 2 sts, dc2tog—6 sts. Row 18: Ch 2, turn; dc2tog TWiCE, dc in each st across. End with dc in top of ch 2 made at beg of previous row-4 sts. Row 19: Ch 2, turn; dc2tog. End with dc in top of ch 2 made at beg of previous row-3 sts. Row 20: Ch 2, turn; dc2tog—2 sts. Row 21: Ch 1. Fasten off.
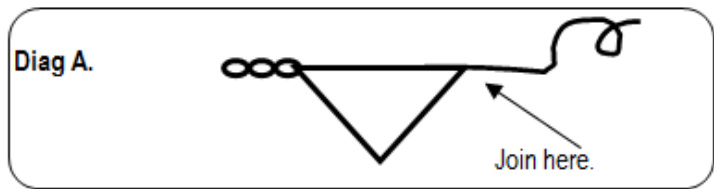
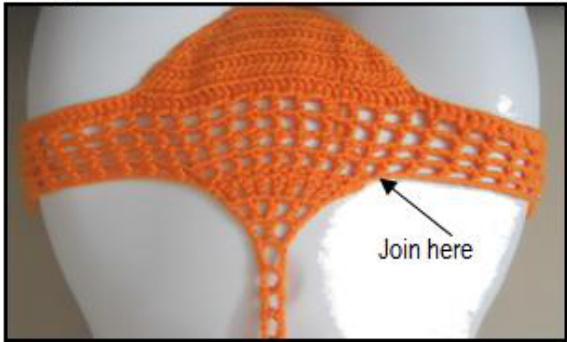
Joining Back Ties
Ch 140 (150, 160)-Counts as first back tie. Working with bra cups facing down, join ch 140 (150, 160) to the outside corner of right bra (see Diag A below).
Sc in next dc-sp and in each dc-sp across, end with sc in last dc-36 (38, 40) sts across bra cup, ch 3. (see Diag B below).

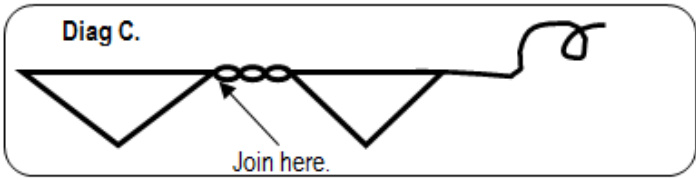
Join ch 3 with a sl st to inside corner of left bra (see Diag C below).
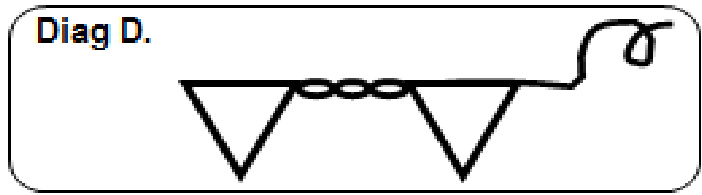
Sc in next dc-sp and in each dc-sp across, end with sc in last dc-36 (38, 40) sts across bra cup (see Diag D below).
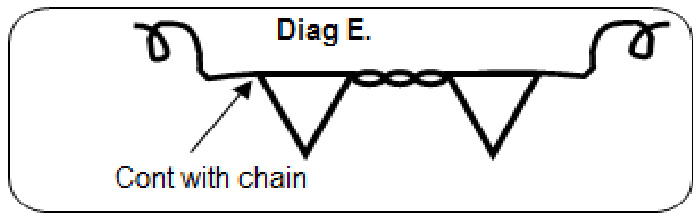
Ch 140 (150, 160)-Counts as second back tie (see Diag E below). Fastenoff.
End with--355 (379, 403) sts, (includes: right & left bra, ch 3 gap and both back ties).
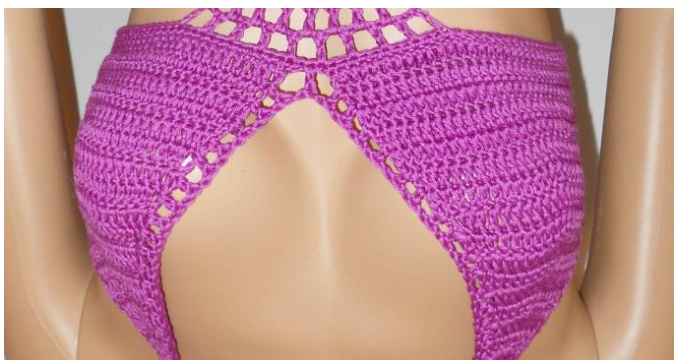
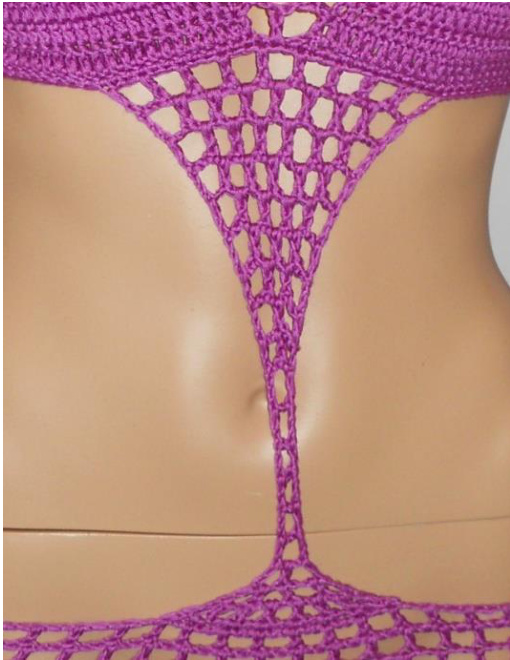
Peek-A-Boo Monokini
Center Trellis
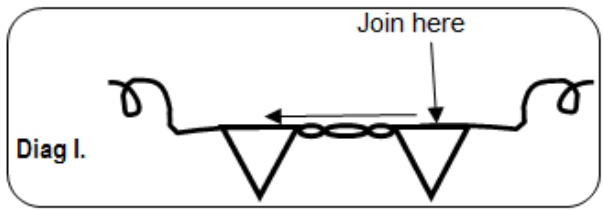
ps facing down (see Diag I), starting with right bra cup, join yarn to the 23 (25, 27)st Row 1: In same st, ch 5, (counts as 1 dc and 1 ch-2 sp), skip next 2 sts, dc in next sc, \*ch 2, skip next 2 sts, dc in next sc\*. Repeat from \* to \* 7 (8, 8) more times. Leave rem 23 (25, 27) sts unworked, turn—9 (10, 10) ch-2 sps. Row s 2 - 8: Ch 5 (counts as 1 dc and 1 ch-2 sp), turn; skip first ch-2 sp, dc in next ch-2 sp, \*ch 2, dc in next ch-2 sp\*. Repeat from \* to \* across. End with dc in third ch of ch 5 at beg of prev row—2 (3, 3) ch-2 sps.
CENTER TRELLIS-SIZE SMALL ONLY
Row 9: Ch 4, turn; dc in first dc, ch 1, dc in 3rd ch of ch 5 at beg of prev row(2) ch-2 sps. Row 10: Ch 5, turn; dc in third ch of ch 4 made at beg of prev row—(1) ch-2 sp. Rows 11 - 14: Ch 5, turn; dc in third ch of ch 5 at beg of prev row—(1) ch-2 sp. Row 15: Ch 5, turn; dc in first ch-2 sp, ch 2, dc in third ch of ch 5 at beg of prev row-(2) ch-2 sps. Row 16: Ch 5, turn; dc in first ch-2 sp, ch 2, dc in next dc, ch 2, dc in next ch-2 sp, ch 2. End with dc in third ch of ch 5 made at beg of prev row—(4) ch-2 sps. Row 17: Ch 5, turn; dc in first ch-2 sp, \*ch 2, dc in next dc, ch 2, dc in next ch-2 sp\*. Rep from \* to \* two times, ch 2, dc in third ch of ch 5 made at beg of prev row-(8) ch-2 sps. Fasten off.
CENTERTRELLIS-SIZEMEDIUM&LARGE ONLY
Row 9: Ch 5 (counts as 1 dc and 1 ch-2 sp), turn; skip first ch-2 sp, dc in next ch-2 sp, \*ch 2, dc in next ch-2 sp\*. Repeat from \* to \* across. End with dc in third ch of ch 5 at beg of prev row-2 ch-2 sps. Row 10: Ch 4, turn; dc in first dc, ch 1, dc in 3rd ch of ch 5 at beg of prev row—-(2) ch-2 sps. Row 11: Ch 5, turn; dc in third ch of ch 4 made at beg of prev row—-(1) ch-2 sp. Rows 12 - 15: Ch 5, turn; dc in third ch of ch 5 at beg of prev row—(1) ch-2 sp. Row 16: Ch 5, turn; dc in first ch-2 sp, ch 2, dc in third ch of ch 5 at beg of prev row—(2) ch-2 sps. Row 17: Ch 5, turn; dc in first ch-2 sp, ch 2, dc in next dc, ch 2, dc in next ch-2 sp, ch 2. End with dc in third ch of ch 5 made at beg of prev row-(4) ch-2 sps. Row 18: Ch 5, turn; dc in first ch-2 sp, \*ch 2, dc in next dc, ch 2, dc in next ch-2 sp\*. Rep from \* to \* two times, ch 2, dc in third ch of ch 5 made at beg of prev row-(8) ch-2 sps. Fasten off.
BASE ROW & TRELLIS TRIM-S (M, L)
Ch 27 (30, 33), DO NOT FASTEN OFF, Working with center trellis facing up (See Diag 1), join ch 27 (30, 33), to outside corner of right ch-2 sp. \*Ch 2, sk next ch-2 sp, sc in next dc\*. Repeat from \* to \* 6 (6, 6) more times, ch 2, sc in 3rd ch of ch 5 made at beg of prev row, DO NOT FASTEN OFF, Ch 29 (32, 35) -(8) ch-2 sps. Row 1: Dc in 6th ch from hook, (counts as first dc and one ch-2 sp), \*ch 2, skip next 2 sts, dc in next sc\*. Repeat from \* to \* acros, ending with ch 2, d in first sc at beg of prev-26 (28, 30) ch-2 sps. Rows 2 - 4: Ch 5 (counts as first dc and one ch-2 sp), turn; skip first ch-2 sp, dc in next dc, \*ch2, skip next ch-2 sp, dc in next dc\*. Repeat from \* to \* across row, ending with ch 2, dc in 3rd ch of ch 5 at beg of prev row-26(28,30) ch-2sps made. Row 5: Ch 3, turn; dc in first ch-2 sp, \*dc in next dc, 2 dc in next ch-2 sp\*. Repeat from \* to \* across, ending with one dc in last ch-2 sp, dc in 3rd ch of ch 5 at beg of prev row-77 (83, 89) sts.
Diag 1.
SHAPING CROTCH- S (M, L)
Row 6: Ch 1, turn; sl st in second dc from hook and next 21 (23,25) sts, dc in next 33 (35, 37) sts. Leave rem 22 (24, 26) sts unworked-33 (35, 37) sts made. Row 7: Ch 3, turn; dc2tog, dc in each st across to last 2 sts, dc2tog—31 (33, 35) sts. Row 8 - 11: Ch 3, turn; dc2tog TWICE, dc in each st across to last 4 sts, dc2tog TWICE—15 (17, 19) sts.
SHAPINGCROTCH&BOTTOM-SIZESMALLONLY
Row 12: Ch 3, turn; dc2tog, dc in each st across to last 2 sts, dc2tog—(13) sts. Rows 13 - 19: Ch 3, turn; dc in each st across. End with dc in top of ch 3 made at beg of prev row—(13) sts. Rows 20 - 21: Ch 3, turn; dc in same st (counts as increase), dc in next dc and in ea dc across to last st, 2 dc in last st (counts as increase)-(17) sts. Rows 22 - 35: Ch 3, turn; dc in same st, 2 dc in next dc, dc in next dc and in ea dc across to last 2 sts, 2 dc in ea of last 2 sts-(73) sts.Note:4 total increasesPER row. Rows 36 - 42: Ch 3, turn; dc in each st across. End with dc in top of ch 3 made at beg of prev row-(73) sts. Row 43: Ch 3, turn; dc in each st across working FIFTEEN dc2tog evenly across row. End with dc in top of ch 3 made at beg of prev row-(58) sts. Note: To make tighter around waist area add additional dc2tog evenly across row 43. Fasten off.
SHAPINGCROTCH&BOTTOM-SIZEMEDIUMONLY
2: Ch 3, turn; dc2tog TWICE, dc in each st across to last 4 sts, dc2tog TWICE—(13) st irn; dc in each st across. End with dc in top of ch 3 made at beg of prev row—(13) st Rows 20-21: Ch 3, turn; dc in same st (counts as increase), dc in next dc and in ea dc across to last st, 2 dc in last st (counts as increase)-(17) sts. Rows 22-36: Ch 3, turn; dc in same st, 2 dc in next dc, dc in next dc and in ea dc across to last 2 sts, 2 dc in ea of last 2 sts, turn--(77) sts. Note: 4 total increases PER row. Rows 37-44: Ch 3, turn; dc in each st across. End with dc in top of ch 3 made at beg of prev row—(77) sts Row 45: Ch 3, turn; dc in each st across working FIFTEEN dc2tog evenly across row. End with dc in top of ch 3 made at beg of prev row-(62) sts. Note: To make tighter around waist area add additional dc2tog evenly across row 45. Fastenoff.
SHAPING CROTCH&BOTTOM-SIZE LARGE ONLY
Row 12: Ch 3, turn; dc2tog TWICE, dc in each st across to last 4 sts, dc2tog TWICE-15sts. Row 13: Ch 3, turn; dc2tog TWICE, dc in each st across to last 2 sts, dc2tog, turn-13 sts. Rows 14-20: Ch 3, turn; dc in each st across. End with dc in top of ch 3 made at beg of prev row—(13) sts. Row 21: Ch 3, turn; dc in same st (counts as increase), dc in next dc and in ea dc across to last st, 2 dc in last st (counts as increase)—(15) sts. RowS 22-37: Ch 3, turn; dc in same st, 2 dc in next dc, dc in next dc and in ea dc across to last 2 sts, 2 dc in ea of last 2 sts, turn—(79) sts. Note: 4 totalincreasesPERrow.
Rows 38-44: Ch 3, turn; dc in each st across. End with dc in top of ch 3 made at beg of prev row—-(79) sts Row 45: Ch 3, turn; dc in each st across working FIFTEEN dc2tog evenly across row. End with dc in top of ch 3 made at beg of prev row--(64) sts. Note: To make tighter around waist area add additional dc2tog evenly across row 45. Fastenoff.
Joining Neck Ties And Bra Trim
Ch 75 (counts as first neck tie), working with bra cups facing down (See Diag F below), join ch 75 to inside corner of left bra, ch 2, dc in corner of next row, \*ch 1, dc in corner of next row\*. Repeat from \* to\* down the inside edge of left cup until you reach the ch 3 gap (See Diag G below), ch 1, dc in center of gap, ch 1, dc in corner of next row working up the inside edge of right cup, ch 2, sc in top corner of right bra cup, ch 75 (counts as second neck tie). Will make approximately 34-36 ch-1 sps.

Finishing
Sew in all loose ends.
Lining (Optional)
Step 1: Lay the lining material out on a large, hard surface. The side of the lining that will touch the Garment should be facing up. Step 2: Lay the garment on top of the lining. Place the garment piece right side up. Pin the lining to the garment fabric using straight pins. Step 3: Trace the pattern of the garment onto the lining using chalk. Make sure that the fabric from the garment stays stationary while you are tracing the lining. If the pattern is crooked or just a little off, the lining won't fit properly. Make sure that you only mark the lining. Mark the lining pieces so you can keep them straight. Step 4: Cut along the lines you traced. Use the sharpest scissors possible because this will make your cuts smoother than if you use dull scissors. Step 5: Attach the lining to each piece of the garment fabric using the appropriate setting on your sewing machine for the fabric of the garment (if no sewing machine is available, you can sew by hand). You should use the smallest stitches possible and sew as close to the edge as possible. Step 6: Sew the garment together. Make sure that the stitches from sewing the lining in the garment are on the inside of the garment when you sew it together. Step 7: Check the seams of the garment to make sure that they are smooth.
LET'S KEEP IN TOUCH!
Emaill crochetbyguchet@gmail.com Visit our StoreI http://www.Etsy.com/GuChet Facebookl https://www.facebook.com/crochetbyguchet Twitter, Instagram, Pintrest IGuChet Youtube| http://www.youtube.com/Guchetdesigns


