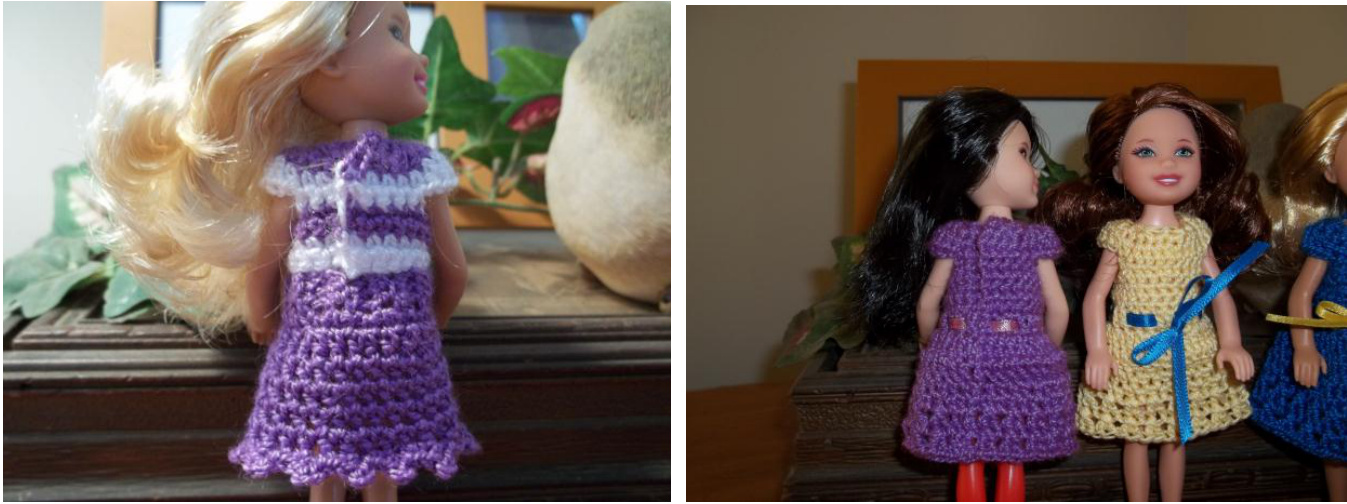
OUTFITS FOR CHELSEA
By Vicki Johnson (December 2013) This pattern includes instructions for a skirt with or without a border (the blue skirt above does not have a border); a top with or without little sleeves, with or without a border (the green top above is sleeveless and has a ruffle type border. Also included is a dress pattern with little cap sleeves and a ribbon belt. The yellow dress is the same pattern made with size 10 crochet cotton and the blue dress incorporates the alternate fuller Skirt. I have listed some measurements in lieu of a gauge. The outfits are small and work up quickly. The main thing is to try it on your doll to see how it fits. I didn't find any measurable difference between using the size 5 thread and the size 10 thread. The size 10 thread outfits are a little more delicate.
Materials:
·Bernat Handicrafter Crochet Thread No. 5 or Aunt Lydia's Crochet Cotton #10 ·Size 5 Steel Hook (1.90 mm) · Small snaps or Velcro dots (l've been using very small Velcro dots and attaching them with fabric glue. So far it seems to be working well.) You will need one for the dress and one for the top. Abbreviations: (American terminology) Sc - single crochet Hdc - half double crochet Dc - double crochet St(s) - stitch(s) Ch - chain
Skirt Instructions:
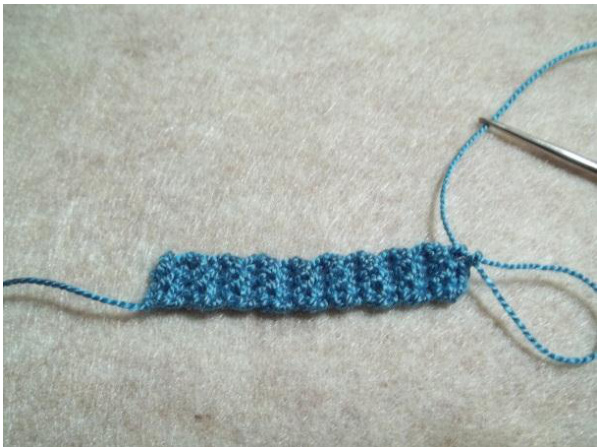
This skirt features a stretch waistband that is worked first flat, joined and then the rest of the skirt is worked in the round around the waistband. I've included some pictures for the waistband. · Row 1 - Ch 4, sc in 2nd chain from hook and in remaining two sts (3 sc) ch 1 turn · Row 2 - 18: sc in each st across in the back loop ( doing the single crochet in the back loop on each row will give the waistband some stretch) At this point the waistband measures (unstretched) approximately 2-1/4" or 5.5 cm. This is what it looks like at the end of 18 rows:
Now you're going to join the two short ends to form the waistband. Slip stich each of the three sc stitches together from each side, in other words join the 1"t stitch from the working side to the corresponding 1st stitch on the opposite side. This willbe the wrong side of the fabric or the side that will be on the inside of the skirt.
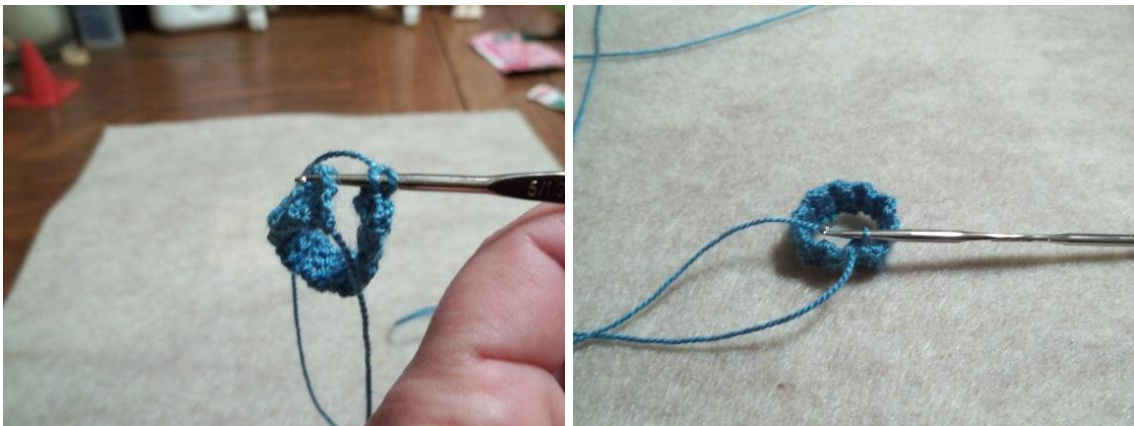
The first picture shows the start of the slip stitches and the second picture shows what it looks like when you're finished the slip stitches and then turn your work so that the slip stitches are "inside". Think of turning a pillowcase inside out. For the skirt: · Row 1 - Ch 2 (counts as first hdc here and for the rest of the rounds), working along one side of the waistband in the end of each of the 18 rows work 2 hdc in next st, \*hdc in next st, 2hdc in next st\* around. (27 hdc) Join, ch 2 Rows 2 - 4: (or to desired length) work hdc in each st around. Join ch 2 except for row 4. You can finish off or work a border. (skirt measures approx.. 1-1/4" or 3 cm at this point) · Optional border: Ch 1, sc in 1st two sts, ch 3 and slip stitch in same stitch, \*Sc in next two stitches, ch = and slip stitch in the same stitch as the last single crochet\* around. Finish off.
Top with Cap Sleeves:
● Row 1: Work 14 foundation crochet stitches. Ch 1 turn (This will give you an overlap at the back for snapsorVelcro) · Row 2: Work 2sc in each stitch across (28 sts) ch 1 turn ● Row 3: Sc in first 5 sts; hdc in next st; 2 dc in next 2 sts; hdc in next st; sc in next 10 sts; hdc in next st; 2 dc in next 2 sts; hdc in next st; sc in last 5 sts. Ch 1 turn (This row forms the little caps) ● Row 4: Sc in first 5 sts; ch 4 and skip the next 6 sts; sc in next 10 sts; ch 4 and skip the next 6 sts; sc in last 5 sts. Ch 1 turn · Row 5: Sc in each st and ch across (28 sc) ch 1 turn ● Row 6: Sc in first 8 sts; sc decrease over the next 2 sts; sc in next 3 sts; sc decrease over the next 2 sts; sc in the next 3 sts; sc decrease over the next 2 sts; sc in the last 8 sts (25 sc) ch 1 turn · Rows 7 - 8: Sc in each st across. Ch 1 turn for row 7. After row 8, join and finish off. Attach Velcro or snaps to back. (top measures approx. 6/8" or 2.2 cm from neckline to bottom of last row)
Sleeveless Top:
· Row 1: Work 14 foundation crochet stitches. Ch 1 turn (This will give you an overlap at the back for snapsorVelcro) · Row 2: Work 2sc in each stitch across (28 sts) ch 1 turn ● Row 3: Sc in first 5 sts; ch 4 skip 4 sts; sc in next 10 sts; ch 4 skip 4 sts; sc in last 5 sts · Row 4: Sc in each st and ch st across (28 sts) ch 1 turn · Row 5: Sc in first 8 sts; sc decrease over the next 2 sts; sc in next 3 sts; sc decrease over the next 2 sts; sc in the next 3 sts; sc decrease over the next 2 sts; sc in the last 8 sts (25 sc) ch 1 turn · Rows 6 - 8: Sc in each st across. Ch 1 turn for rows 6 and 7. After row 8 finish off and attach Velcro or snaps to back. (top measures approx.. 1" or 2.5 cm from neckline to bottom of last row) Optional Border: After row 8 ch 3 turn; 2dc in each stitch in the back loop across to last st, dc in last stitch. Join and fasten off.
Dress:
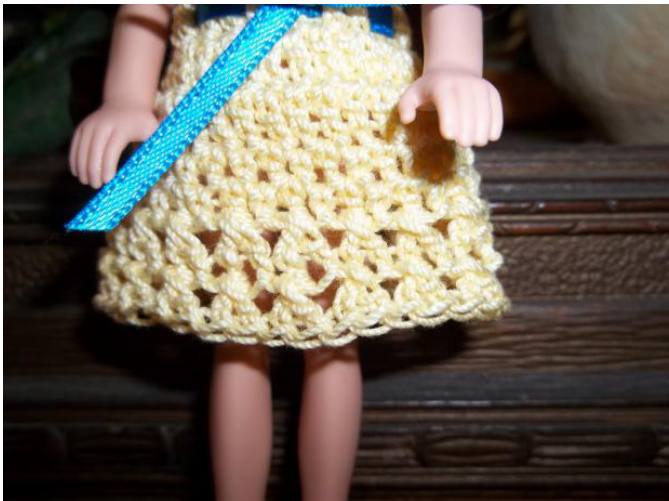
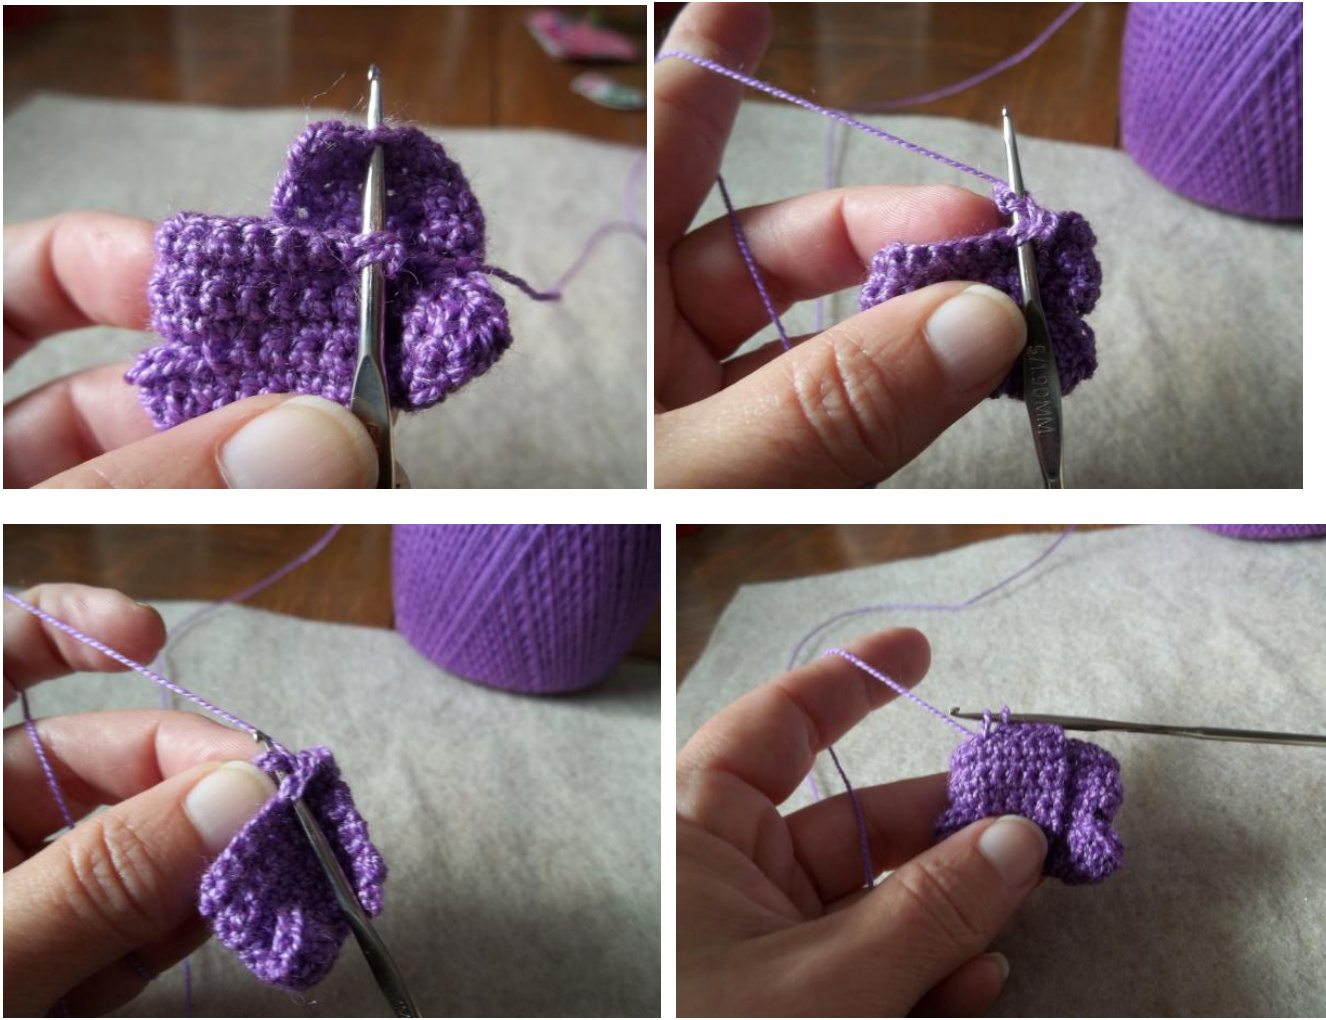
This dress measures approximately 2-1/4" (6 cm) from neckline to hem. · Row 1: Work 14 foundation crochet stitches. Ch 1 turn (This will give you an overlap at the back for snapsorVelcro) · Row 2: Work 2sc in each stitch across (28 sts) ch 1 turn ● Row 3: Sc in first 5 sts; hdc in next st; 2 dc in next 2 sts; hdc in next st; sc in next 10 sts; hdc in next st; 2 dc in next 2 sts; hdc in next st; sc in last 5 sts. Ch 1 turn (This row forms the little caps) ● Row 4: Sc in first 5 sts; ch 4 and skip the next 6 sts; sc in next 10 sts; ch 4 and skip the next 6 sts; sc in last 5 sts. Ch 1 turn ·Row 5: Sc in each st and ch across (28 sc) ch 1 turn Row 6: Sc in first 8 sts; sc decrease over the next 2 sts; sc in next 3 sts; sc decrease over the next 2 sts; sc in the next three sts; sc decrease over the next 2 sts; sc in the last 8 sts (25 sc) ch 1 turn Rows 7 - 8: Sc in each st across. Ch 1 turn for row 7. After row 8, ch 1 turn and make sure you are working from the right side. You are going to be overlapping the 1st three stitches over the last three stitches of the row to form a flap for the top portion of the dress. Single crochet the 1st stitch with the 3rd stitch from the end; single crochet the 2nd stitch with the 2nd stitch from the end; single crochet the 3'd stitch with the last stitch; single crochet in the remaining 19 sts for a total of 22 sc. Join; ch 3 (you do not need to turn for the remainder of the skirt portion) First, second and third picture show the three stitches being connected. The fourth picture shows how it looks after it's joined and continuing the sc's for the rest of the round.
Skirt portion: (all rows are joined) · Row 1: Dc in each st around. This row will be used to weave ribbon over and under the dc stitches for a belt. (22 dc) ch 3 · Row 2: Dc in same st as ch 3, \*Dc in next st; 2 dc in next st\* around, 2 dc in last st (34 dc) ch 3 For a fuller skirt: Alternate Row 2: 2 dc in each st around (44 dc) ch 3
Continuing:
·Row 3: Dc in each st around. Ch 2 · Row 4: sc in next st, \*hdc in next st, sc in next st\* around. Ch 1 ● Row 5: \* sc in 1st st, hdc in next st\* around ( you will be doing a sc in previous hdc, and hdc in previous sc). Ch 3 Row 6: skip next st, dc in next stitch, then dc in skipped stitch; \*skip next st and dc in next st, then dc in skipped st\* around. Dc in last stitch. Ch 3 Row 7: Repeat row 6. Finish off. Weave in ribbon on row 1 of skirt portion. I weaved the ribbon over and under 2 stitches. Attach snap or Velcro dot at the neckline of the top. Enjoy dressing your little girls! The backs of the outfits and the bottom of the skirt portion of the dress.