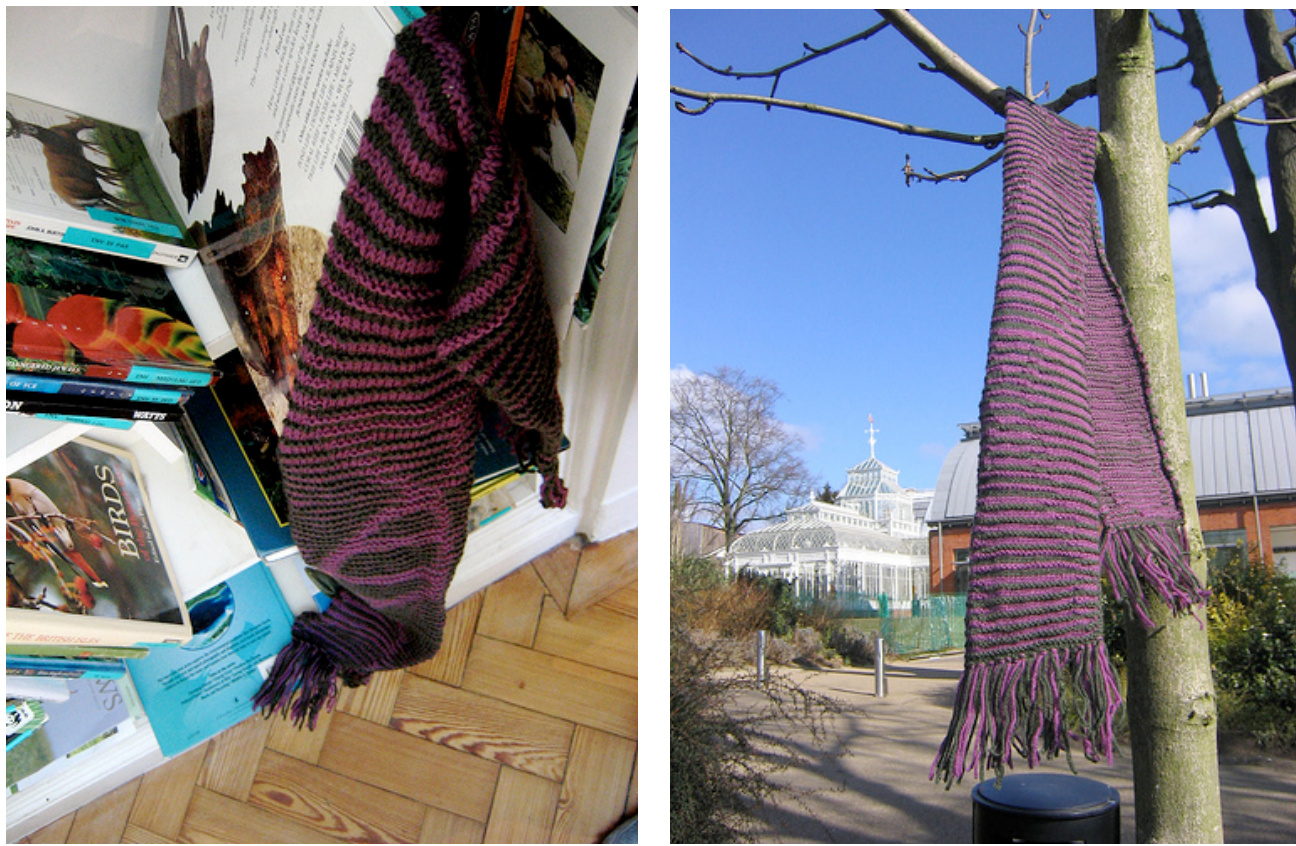
Rosalind
(an illusion scarf)
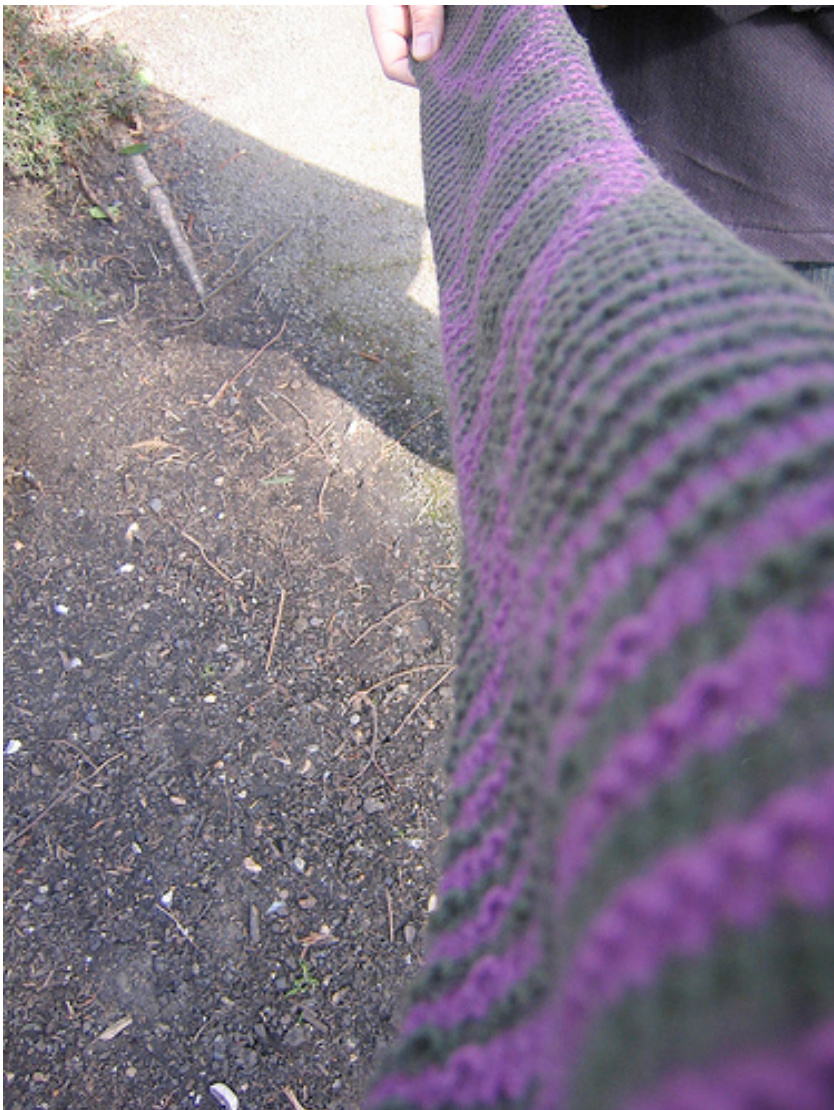
llusion knitting - a technique that provides you with a secret image when viewed at an angle : may look complex but is about the simplest form of patterned colour-work going. At heart, its just alternating patches of garter and stockinet. If you can purl, you can illusion knit. DNA and illusion knitting could be made for one another. Looking across the scarf, the ladders of the striping pattern twist round those of the helix as purls and knits start to bunch together to display a regular shape (at least for those initiated on how to look). This pattern originally was featured in Magknits, and Kerrie challenged me to develop a pattern that works to a variety of yarn choices. I agree - you should be able to make a geneticsbased pattern your own. Choose the materials you like, work around the loose set of rules I've outlined below and see what sort of beautiful mutant you turn out. I've made several versions of this now, one as a baby blanket, and another onsocks. The title is after Rosalind Franklin (google it), and, because I thought a family reference would be appropriate, a cousin of mine. However, I should emphasis this scarf is versatile enough for any gender.
Materials
Jaeger Matchmaker DK, 100% Merino Wool, 120 m (132 yards) per 50 g ball, one ball 655 “burgundy", one ball 730 “loden". ·Set of 3.25mm needles · Crochet hook, tapestry needle. Gauge: 24 stitches/ 32 rows in stocking stitch over 10cm/ 4inch square gage swatch.
A note on yarn substitutes
The most important thing to remember for illusion knitting is to choose two yarns of the same gage, preferably of the same texture/ material and of contrasting colours. For illusion knitting I recommend against variegated yarns and in favour of those with good stitch definition. When viewing the scarf to see the illusion, the “MC" is the background colour and the CC the double helix, it is worth considering which of the two of your chosen colours is the more dominant when working out which one to cast on with. Choose needles that will give you a reasonably tight gage for your yarn. For example, I'd use 2mm's with 4ply. Using 3.25mm's with DK gave me quite a loose gage for illusion knitting, which I wanted to make a looser, lighter spring scarf, but if you want the illusion to be very obvious you would need be to tighter (but then you might not want it too obvious - again, all these decisions are a matter of your personal taste).
Sizes
The finished DK scarf pictured measured 12cm/ 5inches by 130cm/ 50inches (not including fringe). However you can knit it to whatever length you wish, and make adjustments for width too. Think about your desired size when you are deciding what yarn and which chart to use. The small DK one pictured used the small chart for a small spring/ autumn scarf. Using the same chart in aran/ heavy worsted would make for a wider, warmer winter garment.
Pattern notes
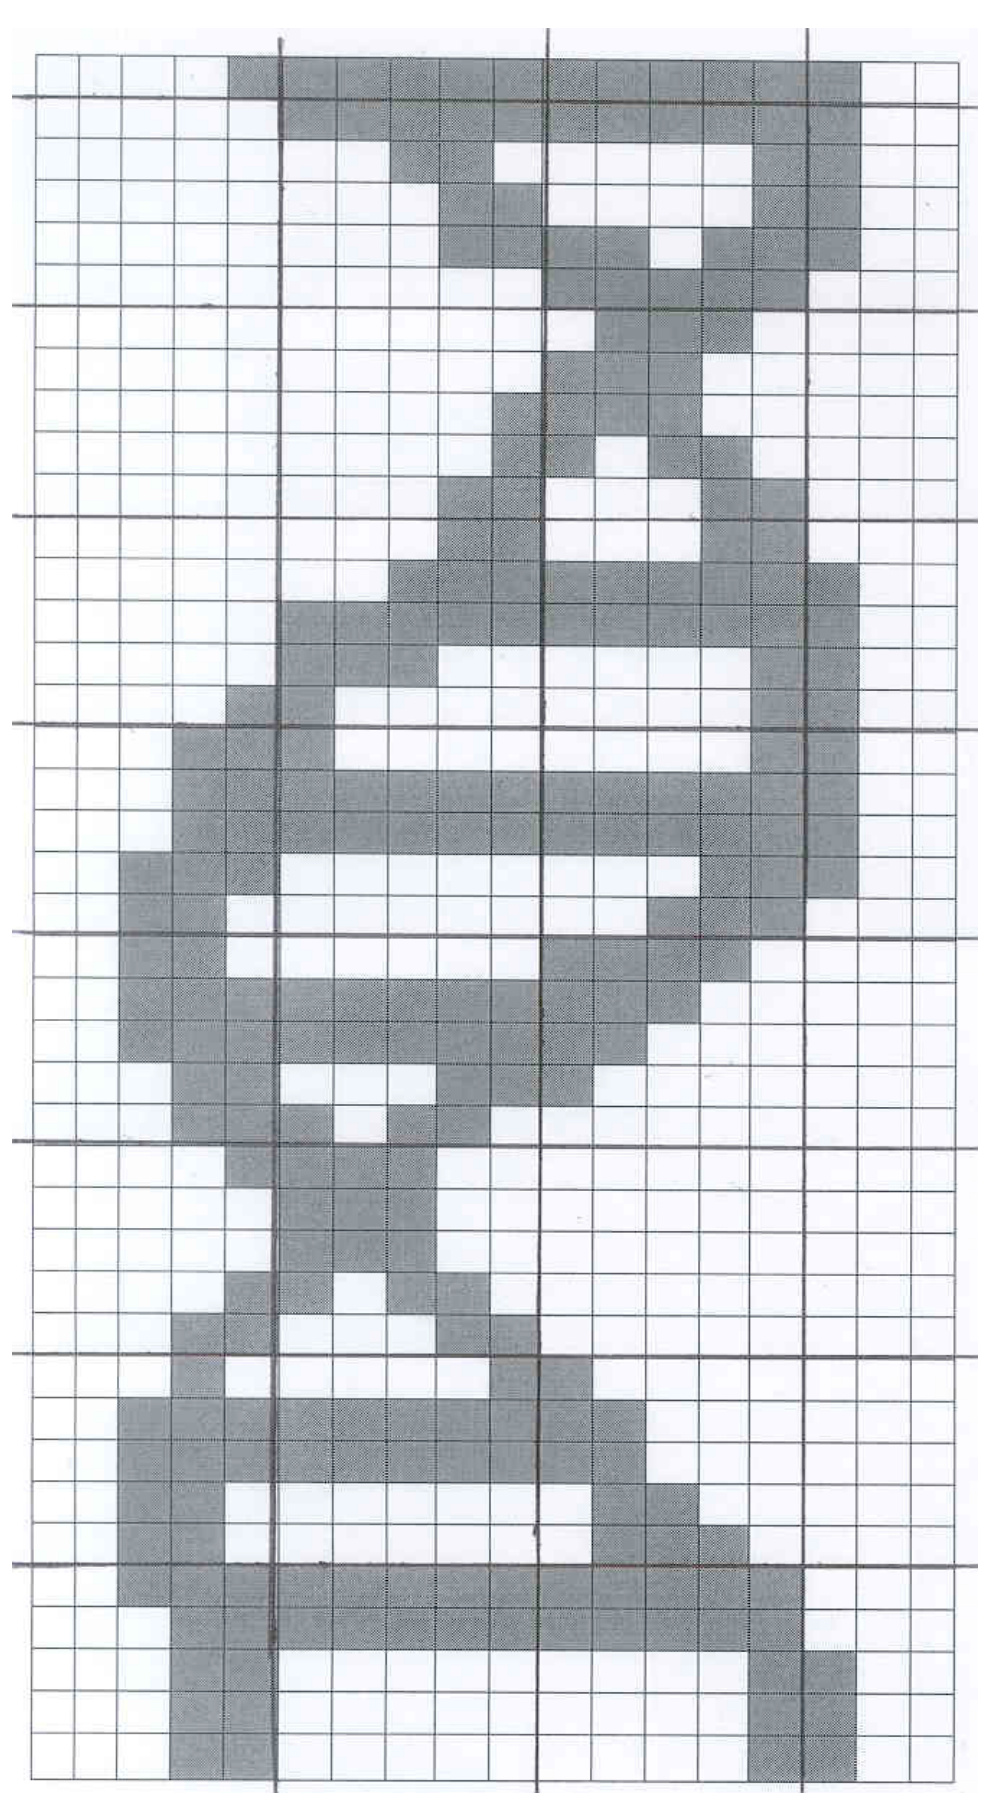
You can choose from two different versions of the chart, depending on gauge. The more detailed version has been written out in knitters language (for those who won't or can't use charts). See the appendixes. Each row of the chart is actually four rows of knitting, one double-rowed stripe of each the MC and CC. The CC is, at heart, stocking stitch, giving a nice flat surface, where as the MC is based on the bobbles of garter. By swapping the MC to stocking you create a little valley, looking at the work from an angle you see through the valley onto the next “mountain" of garter stitch, which you provide by a corresponding swap of stitches in the next CC stripe. Illusion knit pattern for following the chart: Row one (RS): with MC, knit Row two (WS): [knit the blank boxes, purl the ones filled in] Row three (RS): change to CC, knit Row four (WS): [purl the blank boxes, knit the ones filled in] I read the chart from left-right, as its only on the WS rows you need to look at it, but it doesn't really matter other than I should warn you that if you do it rightleft your scarf will be a mirror image of what you see on the chart. The chart is repeatable; once you have finished the last row, go back to row one. You can finish the scarf on any row of the chart. Please read the modification notes at the end for advice on choosing which chart, non-scarf project ideas for it, adjusting for curling and “splicing" for a keyhole version.
Pattern
You do not need to fringe this scarf, but if you do measure out the fringe-yarn first. This way you can knit the body of the scarf until you run out of yarn without fear of frogging. Using MC, loosely CO the number of stitches you've decided on (dependent on which chart you use and whether you are adding a boarder). \*Knit two rows in MC. Change to CC. Knit one row CC, purl one row CC\*\*. When swapping colours between stripes just carry the yarn up, no need to weave in that many ends. Work the chart, using the row notes to follow it, until you have nearly run out of yarn or almost achieved desired length. Every few chart-rows, stop and have a look at the illusion. Everybody's taste and knitting is different and you might want to play with the chart a bit - it may look huge but the shape is simple enough you can swap a purl to a knit here and there to suit yourself. Repeat from \* to \*\* once more, and finish with two knit rows of MC.
Finishing
CO in Mc. If you adding a fringe its worth casting off loosely, swapping to larger needles can help. Weave in ends and, if desired, work fringe at each end. Block. Next, if you haven't already, make the cable DNA scarf because it's just a work of genius.
Modification notes
Adjusting for curling
There's enough stocking stitch in the scarf to make it curl slightly around the helix. I actually like this, and frogged the version I did with a garter stitch boarder. But some people just hate curl, if you would rather a more flat effect simply cast on an extra few stitches and work a work them in garter stitch either side of the chart pattern. For the double knit version I found an extra six stitches worked fine (three each side). Remember this will use more yarn per row. If the scarf seems to curl too much while you are knitting it, remember blocking will make a huge difference.
Choosing which chart to use
The chart comes in “doubleknit" and “chunky" sizes, reflecting the yarns I tested them on, but should work another weight of yarn, just use the chart closest in gage to your yarn choice. If you want to use a lighter yarn than double knit (e.g. 4ply) I suggest you use the medium chart, and work a good extra 30 sts plain garter stitch next to it, s0 the double helix runs along side one side of the scarf. I did try a sockweight chart, but once I'd knitted up more than a few inches it became clear it wouldn't be nearly as nice as the other ones. Contrary to what I assumed, the detail provided by such a small gage took something from the regularities of the shapes. You could use 4ply with the chunky chart to make a tiny helix which would look great worked into a sock or mitten pattern.
Keyhole version
You can “splice” the double helix and turn it into a keyhole scarf. These have a sort of large buttonhole at one end, through which you can tuck the other end of the scarf to fasten it round your neck. I would suggest this for a short scarf (shorter than the example one) made with reasonably lightweight yarn. If you want a keyhole wait till you are about half way through the scarf before you plan how you are going to fit it. Then try on the scarf to work out roughly where you'll want the hole. Next measure how wide your scarf is, roughly half that distance will be how long you want the keyhole to be, and by then you should have enough worked to see how many rows will achieve that distance. When you reach the point the hole should start work half the stitches in the row, then continue with new yarn (working from both ends of a centre-pull ball is recommended), so you are working both sides of the scarf at once but with different ends of yarn. Do the same when you move to the next colour and continue in pattern until the hole is large enough, then you seal it up simply by going back to working just the one end of yarn.

Designer: A life-long Londoner, Alice learnt to knit when she got board of looking out the windows on the bus. She blogs at http://slippedstitch.blogspot.com. Email: alicerosebell@gmail.com. Ravelry username: slippedstitch. Copy-right: Please note this pattern is published under a non-commercial unported license. You can share it (copy, distribute and transmit the wok), you can remix it (adapt away). But you must attribute it to me, and you may not use this work for commercial purposes. This includes selling yarn or classes that include this as 'free', and selling items applying the pattern.
Appendix 1: DK Chart
| AppehaixT.Dkcnait | ||||||||||||||||||||||||||
Appendix 2: Chunky Chart
Appendix 3: DK Version Written Out
MC - main colour CC - contrast colour Row 1 - MC - knit Row 2 - MC, k4, p2, k18, p2, k4 Row 3 - CC - knit Row 4 - CC, p4, k2, p18, k2, p4 Rows 5-20 - Repeat rows 1-4 four times Row 21 - MC, knit Row 22 - MC - k4, p22, k4 Row 23 - CC, knit Row 24 - CC - p4, k22, p4 Row 25 - MC knit Row 26 - MC -k5, p 21,k4 Row 27 - CC - knit Row 28 - CC - p5, k21, p4 Row 29 - MC knit Row 30 - MC - k6, p2, k16, p2, k4 Row 31 - CC - knit Row 32 - CC - p6, k2, p16, k2, p4 Row 33 - MC - Knit Row 34 - MC -k7, p2, k15, p2, k4 Row 35 - CC - Knit Row 36 - CC - p7, k2, p15, k2, p4 Row 37 - MC - Knit Row 38 - MC -k7, p5, k12, p2, k4 Row 39 - CC - Knit Row 40 - CC - p7, k5, p12, k2, p4 Row 41 - MC - Knit Row 42 - MC - k8, p6, k10, p2, k4 Row 43 - CC - Knit Row 44 - CC- p8, k6, p10, k2, p4 Row 45 - MC - Knit Row 46 - MC -k11,p15, k4 Row 47 - CC - Knit Row 48 - CC - p11, k15, p4 Row 49 - MC - Knit Row 50 - MC - k12, p14, k4 Row 51 - CC - Knit Row 52 - CC -p12, k14, p4 Row 53 - MC - Knit Row 54 - MC - k13, p2, k9, p2, k4 Row 55 - CC - Knit Row 56 - CC- p13,k2, p9, k2, p4 Row 57 - MC - Knit Row 58 - MC - k13, p3, k8, p2, k4 Row 59 - CC - Knit Row 60 - CC - p13, k3, p8, k2, p4 Row 61 - MC - Knit Row 62 - MC - k14, p2, k7, p3, k4 Row 63 - CC - Knit Row 64 - CC - p14, k2, p7, k3, p4 Row 65 - MC - Knit Row 66 - MC - k15, p4,k2, p4, k5 Row 67 - CC - Knit Row 68 - CC -p15,k4, p2,k4, p5 Row 69 - MC - Knit Row 70 - MC - k16, p7, k7 Row 71 - CC - Knit Row 72 - CC - p16, k7, p7 Row 73 - MC - Knit Row 74 - MC - k17, p5, k8 Row 75 - CC -Knit Row 76 -CC - p17,k5, p8 Row 77 - MC - Knit Row 78 - MC - k17, p6, k7 Row 79 - CC - Knit Row 80 - CC - p17, k6, p7 Row 81 - MC - Knit Row 82 - MC - k15, p3, k3, p4, k5 Row 83 - CC - Knit Row 84 - CC - p15, k3, p3, k4, p5 Row 85 - MC -Knit Row 86 - MC - k15, p2, k6, p3, k4 Row 87 - CC - Knit Row 88 - CC- p15, k2, p6, k3, p4 Row 89 - MC - Knit Row 90 - MC - k14, p3, k7, p2, k4 Row 91 - CC - Knit Row 92 - CC - p14, k3, p7, k2, p4 Row 93 - MC - Knit Row 94 - MC - k13, p3, k8, p2, k4 Row 95 - CC - Knit Row 96 - CC - p13, k3, p8, k2, p4 Row 97 - MC - Knit Row 98 - MC - k12, p14,k4 Row 99 - CC - Knit Row 100 - CC - p12, k14, p4 Row 101 - MC - Knit Row 102 - MC - k9, p17, k4 Row 103 - CC - Knit Row 104 - CC - p9, k17, p4 Row 105 - MC - Knit Row 106 - MC - k7, p5, k12, p2, k4 Row 107 - CC - Knit Row 108 - CC - p7,k5, p12, k2, p4 Row 109 - MC - Knit Row 110 - MC - k6, p5, k13, p2, k4 Row 111 - CC - Knit Row 112 - CC - p6, k5, p13, k2, p4 Row 113- MC - Knit Row 114 - MC - k5, p3, k16, p2, k4 Row 115 - CC - Knit Row 116 - CC - p5, k3, p16, k2, p4 Row 117 - MC - Knit Row 118 - MC - k5, p2, k17, p2, k4 Row 119 - CC - Knit Row 120 - CC - p5,k2, p17, k2, p4 Row 121 - MC - Knit Row 122 - MC - k4, p2, k17, p3, k4 Row 123 - CC - Knit Row 124 - CC - p4, k2, p17, k3, p4 Row 125 - MC - Knit Row 126 - MC -k4, p22, k4 Row 127 - CC - Knit Row 128 - CC - p4, k22, p4 Row 129 - MC -Knit Row 130 - MC -k4, p22, k4 Row 131 - CC - Knit Row 132 - CC - p4, k22,p4 Row 133 - MC - Knit Row 134 - MC - k4, p3, k16, p3, k4 Row 135 - CC - Knit Row 136 - CC - p4, k3, p16, k3, p4 Row 137 - MC - Knit Row 138 - MC - k4, p2, k16, p3, k5 Row 139 - CC - Knit Row 140 - CC - p4, k2, p16, k3, p5 Row 141 - MC -Knit Row 142 - MC - k4, p2, k15, p3, k6 Row 143 - CC - Knit Row 144 - CC - p4, k2, p15, k3, p6 Row 145 - MC - Knit Row 146 - MC - k4, p2, k14, p3, k7 Row 147 - CC - Knit Row 148 - CC - p4, k2, p14, k3, p7 Row 149 - MC -Knit Row 150 - MC - k4, p2, k13, p3, k8 Row 151 - CC - Knit Row 152 - CC - p4, k2, p13, k3, p8 Row 153 - MC - Knit Row 154 - MC - k4, p17, k9 Row 155 - CC - Knit Row 156 - CC - p4, k17, p9 Row 157 - MC - Knit Row 158 - MC - k4, p16, k10 Row 159 - CC - Knit Row 160 - CC - p4, k16, p10 Row 161 - MC - Knit Row 162 - MC - k5, p2, k9, p3, k11 Row 163 - CC - Knit Row 164 - CC - p5, k2, p9, k3, p11 Row 165 - MC - Knit Row 166 - MC - k5, p2, k9, p2, k12 Row 167 - CC -Knit Row 168 - CC -p5, k2, p9, k2, p12 Row 169 - MC -Knit Row 170 - MC -k5, p2, k8, p2, k13 Row 171 - CC - Knit Row 172 - CC - p5, k2, p8, k2, p13 Row 173 - MC - Knit Row 174 - MC - k6, p2, k5, p4, k13 Row 175 - CC - Knit Row 176 - CC - p6, k2, p5, k4, p13 Row 177 - MC - Knit Row 178 - MC - k7, p9, k14 Row 179 - CC - Knit Row 180 - CC - p7,k9, p14 Row 181 - MC - Knit Row 182 - MC - k7, p7, k16 Row 183 - CC - Knit Row 184 - CC - p7, k7, p16 Row 185 - MC - Knit Row 186 - MC - k6, p7,k17 Row 187 - CC - Knit Row 188 - CC - p6, k7, p17 Row 189 - MC - Knit Row 190 - MC - k4, p4, k3, p3, k16 Row 191 - CC - Knit Row 192 - CC - p4, k4, p3, k3, p16 Row 193 - MC - Knit Row 194 - MC - k4, p3, k5, p4, k14 Row 195 - CC - Knit Row 196 - CC - p4, k3, p5, k4, p14 Row 197 - MC - Knit Row 198 - MC - k4, p2, k8, p4, k12 Row 199 - CC - Knit Row 200 - CC - p4, k2, p8, k4, p12 Row 201 - MC - Knit Row 202 - MC - k4, p2, k10, p3, k11 Row 203 - CC - Knit Row 204 - CC - p4, k2, p10, k3, p11 Row 205 - MC - Knit Row 206 - MC - k4, p2, k10, p4, k10 Row 207 - CC - Knit Row 208 - CC - p4, k2, p10, k4, p10 Row 209 - MC - Knit Row 210 - MC - k4, p2, k11, p5, k8 Row 211 - CC - Knit Row 212 - CC - p4, k2, p11, k5, p8 Row 213 - MC - Knit Row 214 - MC -k 4, p20, k6 Row 215 - CC - Knit Row 216 - CC - p4, k20, p6 Row 217 - MC - Knit Row 218 - MC - k4, p22, k4 Row 219 - CC - Knit Row 220 - CC - p4,k22, p4


