Year of lllusion
By Knit-O-Rama Designs

Materials
Yarn: Needles: Lion Brand Wool Ease, approx. one quarter skein each of two colors Size US 6, or size needed to obtain gauge (llusion knitting is most successful if you use needles a size smaller than usual.) Tapestry needle for weaving in ends
Gauge
47 stitches and 78 rows blocked will yield an 11-inch square. This is about 4 stitches and 7 rows per inch. Make your swatch by alternating two rows of stockinette stitch with two rows of garter stitch. The width is pretty close to 11 inches even before blocking. If this block needs to match the 2010 Square a Month afghan, and you're getting even slightly fewer than 4 stitches per inch, go down another needle size. You can add more length if needed by adding rows 1-4 at the top and bottom.
Welcome to the World of lllusion
This is a really fun and easy technique that yields the most amazing results! When viewed from straight on, it looks like a simple stripe pattern, nothing special.
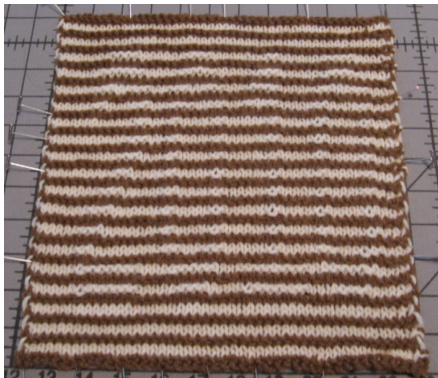
But when viewed from an angle, your secret is revealed!
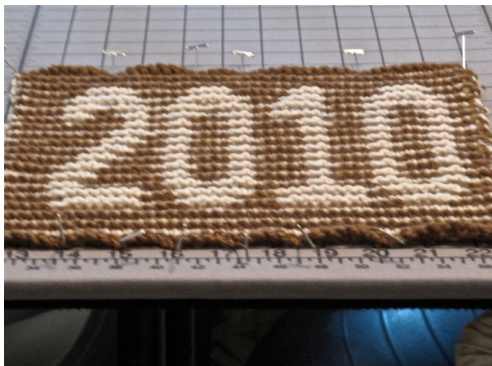
Both of these pictures are of the exact same square. Honest!
How It's Done
As I said, it's really pretty simple. You're working with two colors, but only one at a time. With Color 1, work two rows. After you finish the second row, simply drop Color 1, pick up Color 2, and work two rows. And that's it for color work! Just keep alternating color every tworows. But wait, it gets simpler! Every odd-numbered, right-side row is Knit only, no matter which color! All the action happens on the wrong side, and the "action" consists of nothing more than a combination of knits and purls. So whenever you start with a new color, you know you're going to be working Knit all the way across the row, and nothing else. Note that Color 1 will be the background color of the illusion, and the image will appear in Color 2. Be sure to cast on with the color you want for the background of your illusion (in my case, brown).
Instructions and Tips
With Color 1 (the background of the illusion), cast on 47 stitches. This counts as Row 1. Keep this in mind when deciding which method to use. Chained cast ons and long-tail cast onsworkwell. Three simple things are needed to create a neat edge. 1. Slip the first stitch of each row. (The "V" symbols in the chart.) Notice that the last stitch of wrong-side rows is always purled. This helps make a nice chain. 2. Always bring the new color under the strand of the old color when making the change. This will create a neat, twisting strand along the back of the Work.
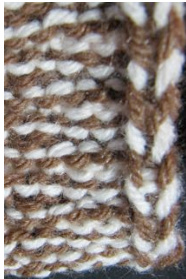
3. Carry the colors up l-o-o-s-e-l-y or else the edge will pucker. Of course, to0 loose and the right edge of the square will look sloppy. I strike a balance by making the first worked stitch (after the slipped stitch) ridiculously loose, then working one more stitch and giving a very slight tug on the yarn before working the third worked stitch. After casting on, follow the chart, beginning with Row 2. In this case, we're beginning with garter stitch, so you'll knit back across the row with Color 1. Remember that the chart is for working flat, so when you're working the wrong side, purl the blank squares (so that they are knit stitches when seen from the right side) and knit the squares with dashes (purls as seen from the right side). And you're offto the races! Keep following the chart, bind offloosely, weave in ends. Enjoy! A note about the lack of a symbol key for the chart A software glitch is preventing me from being able to add a symbol key. The first stitch of every odd row is slipped with the yarn in back. On even rows, slip with yarn in front. From the right side, all stitches are knit, except the 2 edge stitches. Neither does the software allow me to enlarge the row and column numbers along the edge, or print them along the bottom of the chart. I'm anxiously awaiting the update!
Questions or Comments
Please feel free to contact me via email at andrea@3dmonkey.net, or on Ravelry as beachparty64.
Chart
| TE | |||||||||||||||||||||||
| SE | |||||||||||||||||||||||
| 第 | |||||||||||||||||||||||
| 2 2 | |||||||||||||||||||||||
| 43 | |||||||||||||||||||||||
| 3E | |||||||||||||||||||||||
| 5 | |||||||||||||||||||||||
| 29 | |||||||||||||||||||||||
| 22 | 13 | ||||||||||||||||||||||
| 14 12 10 | |||||||||||||||||||||||


