Dalilah S Shawl
Dalilah S is the smaller version of Dalilah shawl. This version still have 4 sections to wrap the body confortably. Yarn: Approx. 1030 to 1100 yds / 942 to 1005 m (The yardage was estimated by the gauge with Madelinetosh DK yarn and Us6 / 4mm needles) Needles: US 6 / 4mm straight or circulars 47" Gauge: 20 sts and 28 rows in 4"x 4"in St st.
Notions:
8 stitch makers (l find it easier to be on track using different stitch marker colors. Ex.: one color for the 2 borders st markers, another color for the pair of st markers at the center line of the shawl and another color for the 4 final st markers - 2 at each side sections. If you don't like to use stitch markers, please feel free disregard this suggestion!) Darning needle and Blocking pins Note: Please consider that the chart on this pattern represents one of the four parts of this shawl. All four parts are equally knitted, except for the border stitches, beginning the first part and ending the fourth part with three knit stitches that not accounted for in the charts or the instructions.
Schematic:
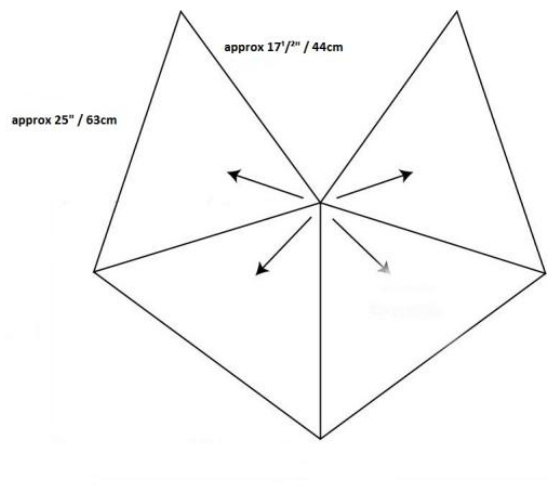
This is a top down and 4 sections shawl and each section has the same measurements. The measurements vary depending on the way you block your finished piece and on the gauge you use. (\*\*\*approx measurements before blocking)
Created by Paula Pereira - Jul 2011 This pattern is for unlimited personal and noncommercial use. I hope that you have fun with this project! peaceknitlove.com
Directions:
Cast on 3 stitches. Knit 6 rows. Turn work 90 degrees and pick up and knit 3 stitches along garter stitch edge. Again, turn work 90 degrees and pick up and knit more 3 stitches from cast on edge. (9 sts total). Knit in front and back the next 4 stitches, K1, Knit front and back until the end (17 sts total). On the Row 1 there are indications to place markers (pm) between the borders and sections. The use of stitch markers is a matter of choice! On the Row 2, the stitches in red will become the raglan increase stitch for each section, and will signify the beginning or end of a charted section. would also like to highlight that the Row 1 stars like the wrong side of the projec Row1 (WS): K3, pm, P2, pm, P1, pm, P2, pm, P1, pm, P2, pm, P1, pm, P2, pm, K3 Row2 (RS): K3, slm, YO, K2, YO, slm, K1, slm, YO, K2, YO, slm, K1, slm, YO, K2, YO, slm, K1, slm, YO, K2, YO, slm, K3 Row3: K3, P all sts and slip all the markers until the last 3 border sts, K3. (25 sts total) Repeat rows 2 and 3 two more times until 41 stitches total as follows: 3 sts (border) + 8 sts (section) + 1 st (raglan increase stitch) + 8 sts (section) + 1 st (raglan increase stitch) + 8 sts (section) + 1 st (raglan increase stitch) + 8 sts (section) + 3 sts (other border) = 41 sts total.
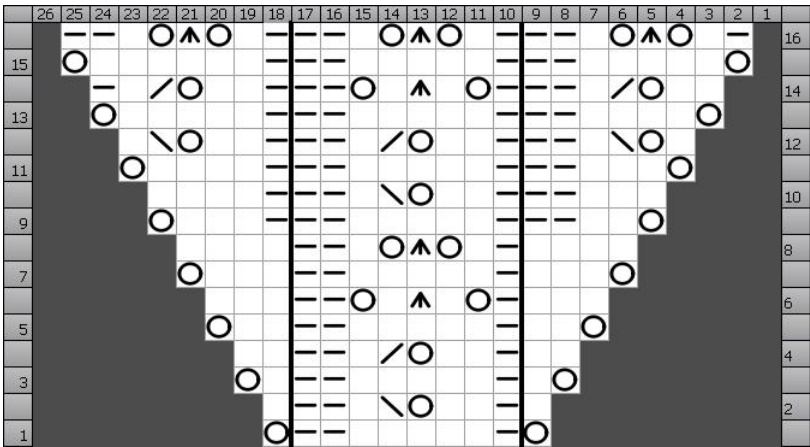
Begin working Chart 1
Notes: 1) The first row on the chart is read from left to right. 2) Keeping first and last three stitches of each row in garter stitch (borders), repeat Chart 1 three times total, to 56 stitches between markers in each shawl section. At the end there will be 3 sts (border) + 56 sts (section) + 1 st (raglan increase stitch) + 56 sts (section) + 1 st (raglan increase Created by Paula Pereira - Jul 2011 This pattern is for unlimited personal and noncommercial use.I hope that you have fun with this project! stitch) + 56 sts (section) + 1 st (raglan increase stitch) + 56 sts (section) + 3 sts (other border) = 233 sts total.
Chart 1
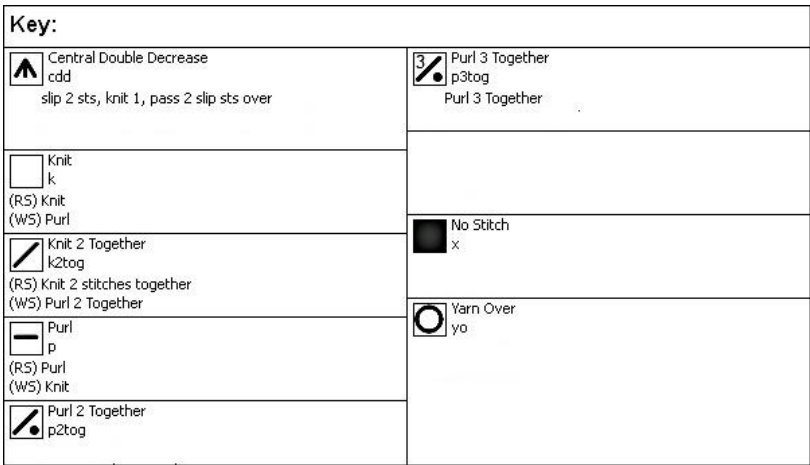
Legend:
| Key: | |
| Central Double Decrease cdd (RS)sp2sts,kit1,pass2sipssover (w5)sp2ststogethet,purnext st,pass2sip stitchesove | Slip Slip Knit ss (RS)sip,sip,knit spped stsbogether (w5)sip,slip,purl sipped stsbogether |
| Knit k (RS)Knit | NoSitc (RS)NoStitch (wS)No Stikch |
| (w5) Purl Knit 2 Together kztog (RS)Krit 2stitches together | Yarn Over yo (RS)YarnOver (WS}YamOver |
| (wS) Purl 2 Together Purl p (RS)Pud | |
Chart 1 Written Instructions:
Notes: Repeat instructions for each row four times. (One for each section of the shawl.) 2) Begin each row with K3 and end each row with K3 = borders. 3) The first row on the chart is read from left to right. 4) In red and between brackets are the written instructions from chart's highlighted sections that are repeated from the second chart repetition. Created by Paula Pereira - Jul 2011 This pattern is for unlimited personal and noncommercial use. I hope that you have fun with this project! peaceknitlove.com Row1: yo, [p2, k5, p1], yo Row2: p1, [k1, p2, yo, ssk, p1, k2],p1 Row3: yo, k1, [p2, k5, p1], k1, yo Row4: p2, [k1, p2, Yo, k2tog, p1, k2], p2 Row5: yo, k2, [p2, k5, p1],k2, yo Row6: p3, [k1, yo, p1, cdd, p1, yo, k2], p3 Row7: yo, k3, [p2, k5, p1], k3, yo Row8: p4, [k1, p1, yo, cdd, yo, p1, k2], p4 Row9: yo, k3, p1, [p2, k5, p1], p2, k2, yo Row10: p3, k2, [k1, p2, yo, ssk, p1, k2], k1, p4 Row11: yo, k4, p1, [p2, k5, p1], p2, k3, yo Row12: p1, yo, ssk, p1, k2, [k1, p2, Yo, k2tog, p1, k2], k1, p2, yo, ssk, p1 Row13: yo, k5, p1, [p2, k5, p1], p2, k4, yo Row14: p2, yo, k2tog, p1, k2, [k1, yo, p1, cdd, p1, yo, k2], k1, p2, yo, k2tog, p1, k1 Row15: yo, k6, p1, [p2, k5, p1], p2, k5, yo Row16: k1, p1, yo, cdd, yo, p1, k2,[k1, p1, yo, cdd, yo, p1, k2], k1, p1, yo, cdd, yo, p1,k2 Repeat rows 1 to 16 for more 2 times (3 times total)
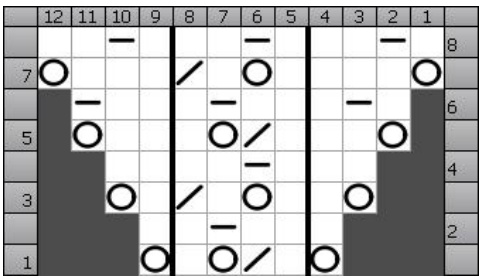
Begin Chart 2A
Notes:
1) The first row on the chart is read from left to right. 2) Keeping first and last three stitches of each row in garter stitch (borders), repeat Chart 2 three times total, to 80 stitches between markers in each shawl section. At the end there will be 3 sts (border) + 80 sts (section) + 1 st (raglan increase stitch) + 80 sts (section) + 1 st (raglan increase stitch) + 80 sts (section) + 1 st (raglan increase stitch) + 80 sts (section) + 3 sts (other border) = 329 sts total.
Chart 2A
Legend
Created by Paula Pereira - Jul 2011 This pattern is for unlimited personal and noncommercial use. I hope that you have fun with this project!
peaceknitlove.com
| Key: |
| Knit k (RS)Knit (WS) Purl |
| Knit2Together k2tog (RS)Knit 2stitchestogether |
| (WS)Purl 2Together Purl P (RS)Purl |
| (WS)Knit No Stitch x (RS)No Stitch |
| (WS) No Stitch YarnOver yo (RS)Yarn Over (WS) Yarn Over |
Chart 2A Written Instructions:
Notes: 1) Repeat instructions for each row four times. (One for each section of the shawl.) 2) Begin each row with K3 and end each row with K3 = borders. 3) The first row on the chart is read from left to right 4) In red and between brackets are the written instructions from chart's highlighted sections that are repeated more than once. Row1: yo, [k1, yo, k2tog, k1],yo Row2: p1, [p2, k1, p1], p1 Row3: yo, k1, [k2tog, k1, yo, k1], k1, yo Row4: p2, [p1, k1, p2], p2 Row5: yo, k2, [k1, yo, k2tog, k1], k2, yo Row6: p1, kl, p1, [p2, k1, p1], p2, k1 Row7: yo, k3, [k2tog, k1, yo, k1], k3, yo Row8: p1, k1, p2, [p1, kl, p2], p1, k1, p2 Repeat rows 1 to 8 for more 2 times (3 times total).
Begin Chart 2B
Notes: 1) The first row on the chart is read from left to right. Created by Paula Pereira - Jul 2011 This pattern is for unlimited personal and noncommercial use. I hope that you have fun with this project! 2) Keeping first and last three stitches of each row in garter stitch (borders), follow Chart 2B to 84 stitches between markers in each shawl section. At the end there will be 3 sts (border) + 84 sts (section) + 1 st (raglan increase stitch) + 84 sts (section) + 1 st (raglan increase stitch) + 84 sts (section) + 1 st (raglan increase stitch) + 84 sts (section) + 3 sts (other border) = 345 sts total.
Chart 2B
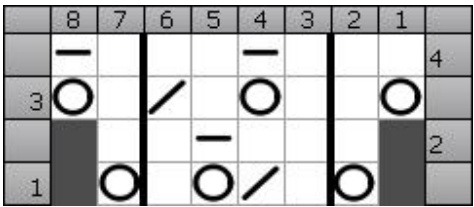
Legend (same as Chart 2A) Chart 2A Written Instructions: Notes: 1) Repeat instructions for each row four times. (One for each section of the shawl.) 2) Begin each row with K3 and end each row with K3 = borders. 3) The first row on the chart is read from left to right. 4) In red and between brackets are the written instructions from chart's highlighted sections that are repeated more than once. Row1: yo, [k1, yo, k2tog, k1] ,yo Row2: p1, [p2, k1, p1], p1 Row3: yo, k1, [k2tog, k1, yo, k1], k1, yo Row4: p2, [p1, k1, p2], p2
Begin Chart 3
Notes:
1) The first row on the chart is read from right to left. 2) Keeping first and last three stitches of each row in garter stitch (borders), follow Chart 3 to 124 stitches between markers in each shawl section. At the end there will be 3 sts (border) + 124 sts Created by Paula Pereira - Jul 2011 This pattern is for unlimited personal and noncommercial use. I hope that you have fun with this project! (section) + 1 st (raglan increase stitch) + 124 sts (section) + 1 st (raglan increase stitch) + 124 sts (section) + 1 st (raglan increase stitch) + 124 sts (section) + 3 sts (other border) = 505 sts total.
Chart 3:
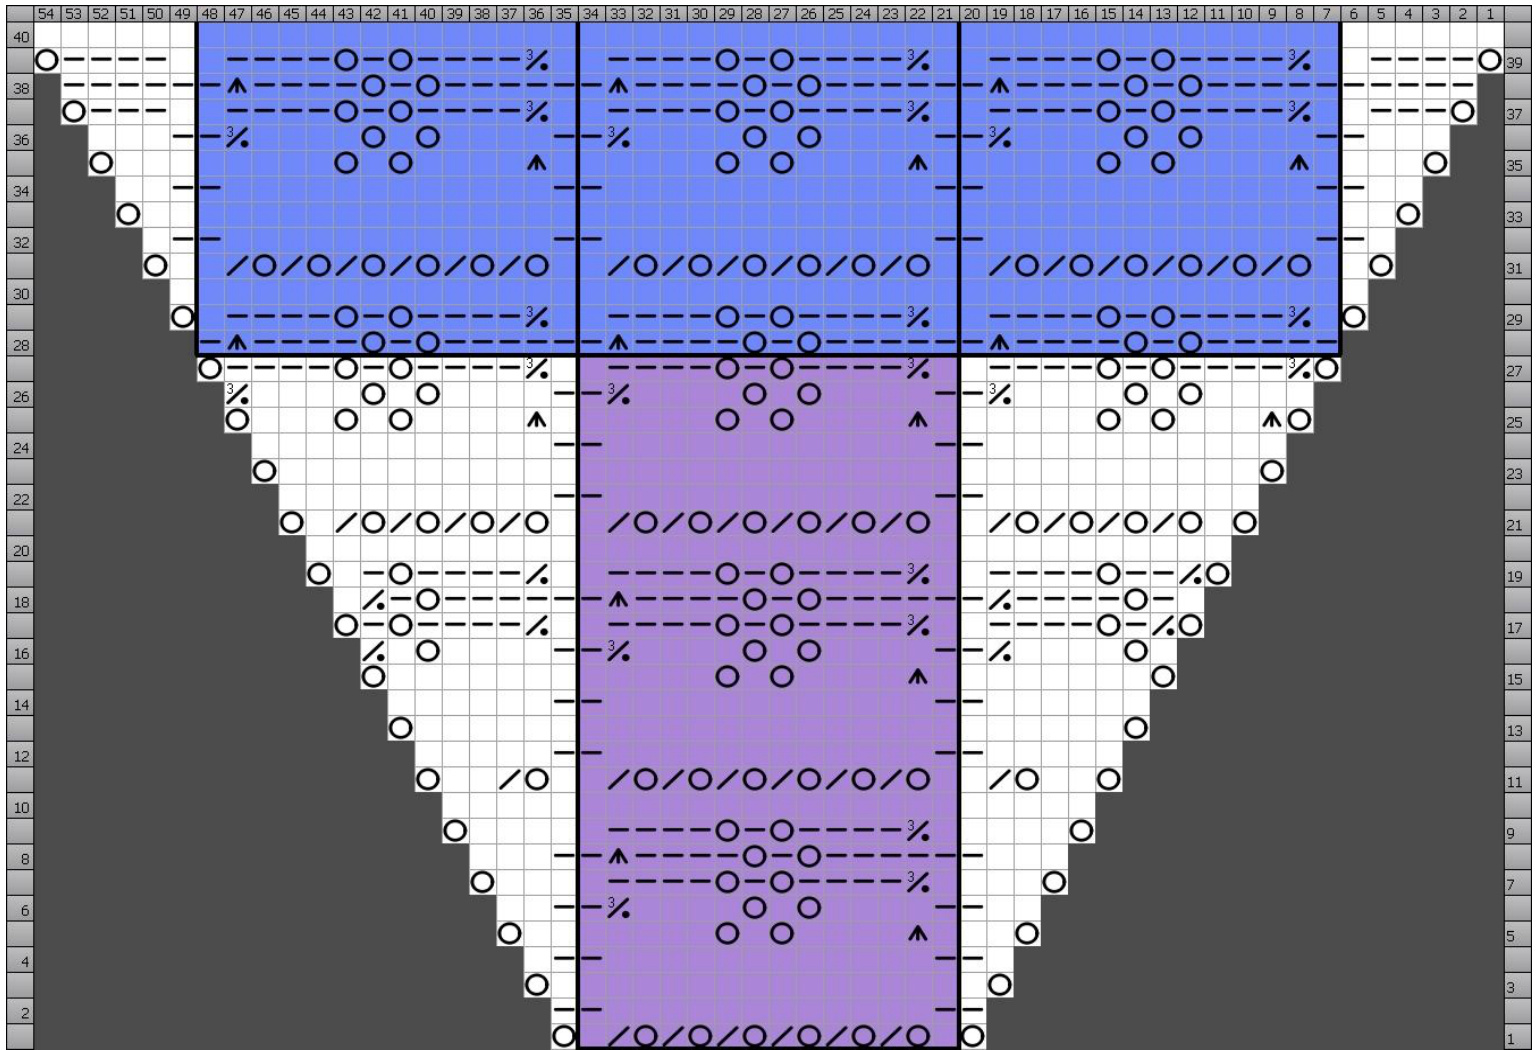
Legend:
Created by Paula Pereira - Jul 2011 This pattern is for unlimited personal and noncommercial use. I hope that you have fun with this project!
Chart 3 Written Instructions:
Notes: 1) Repeat instructions for each row four times. (One for each section of the shawl.) 2) Begin each row with K3 and end each row with K3 = borders. 3) The first row on the chart is read from right to left. 4) The instructions between brackets must be repeated as follows: [purple = 8 times, []blue = 10 times as in represented in Chart 3. Row1: yo,[ k1, (yo, k2tog) 6 times, k1] 8times, yo Row2: k1, [k1, p12, k1] , k1 Row3: yo, k1, [k14] , k1, yo Row4: p1, k1, [k1,p12, k1] ,k1, p1 Row5: yo, k2, [k1, cdd, k4, yo, k1, yo, k5] ,k2, yo Row6: p2, k1, [k1,p3tog, p4, yo, p1, yo, p4, k1] ,kl, p2 Row7: yo, k3, [k1,p3tog, p4, yo, p1, yo, p4, k1] ,k3, yo Row8: p3, k1, [k1, cdd, k4, yo, k1, yo, k5] ,k1, p3 Row9: yo, k4, [k1, p3tog, p4, yo, p1, yo, p4, k1] ,k4, yo Row10: p122 = purl all sts Row11: yo, k2, yo, k2tog, k1, [k1, (yo, k2tog) 6 times, k1] ,k1, yo,k2tog, k2, yo Row12: p5, k1, [k1, p12, k1] ,k1, p5 Row13: yo, k124, yo Row14: p6, k1, [k1, p12, k1] ,k1, p6 Row15: yo, k7, [k1, cdd, k, 4, yo, k1, yo, k5] , k7, yo Row16: p2tog, p1, yo, p4, k1, [k1, p3tog, p4, yo, p1, yo, p4, k1] ,k1, p2tog, p4, yo, p1 Row17: yo, p2tog, p1, yo, p4, k1, [k1, p3tog, p4, yo, p1, yo, p4, k1] ,k1, p2tog, p4, yo, p1, yo Row18: p1, p2tog, k1, yo, k5, [k1, cdd, k4, yo, k1, yo, k5] ,k1, p2tog, k4, yo, k1, p1 Row19: yo, p2tog, p2, yo, p4, k1, [k1, p3tog, p4, yo, p1, yo, p4, k1] , k1, p2tog, p4, yo, p1, k1, yo Row20: p 132 = purl all sts Row21: yo, k1, (yo, k2tog) 4 times, k1, [k1, (yo, k2tog) 6 times, k1] ,k1, (yo, k2tog)4 times, k1, yo Row22: p10, k1, [k1, p12, k1] ,k1, p10 Row23: yo, k134, yo Row24: p11, k1, [kl, p12, k1] ,k1, p11 Row25: yo, cdd, k3, yo, k1, yo, k5, [k1, cdd, k4, yo, k1, yo, k5] , k1, cdd, k4, yo, k1, yo, k3, yo Row26: p3tog, p4, yo, p1, yo, p4, k1 [k1, p3tog, p4, yo, p1, yo, p4, k1] ,k1, p3tog, p4, yo, p1, yo,p< Row27: yo, p3tog, p4, yo, p1, yo, p4, k1, [k1, p3tog, p4, yo, p1, yo, p4, k1] ,k1, p3tog, p4, yo, pl, y Row28: [k1, cdd, k4, yo, k1, yo, k5] 10 times Row29: yo, [k1, p3tog, p4, yo, p1, yo, p4, k1] ,yo Created by Paula Pereira - Jul 2011 This pattern is for unlimited personal and noncommercial use. I hope that you have fun with this project! peaceknitlove.com Row30: p 142 = purl all sts Row31: yo, k1, [k1, (yo, k2tog) 6 times, k1] , k1,yo Row32: p1, k1, [k1, p12, k1] ,k1, p1 Row33: yo, k 144, yo Row34: p2, k1, [k1, p12, k1] ,k1, p2 Row35: yo, k3, [k1, cdd, k4, yo, k1, yo, k5] ,k3, yo Row36: p3, k1, [k1, p3tog, p4, yo, p1, yo, p4, k1] ,k1, p3 Row37: yo, p3, k1, [kl, p3tog, p4, yo, p1, yo, p4, k1] ,kl, p3, yo Row38: k5, [k1, cdd, k4, yo, k1, yo, k5] ,k5 Row39: yo, p4, k1, [k1, p3tog, p4, yo, p1, yo, p4, k1] ,k1, p4, yo Row40: p 152
Finishing
Bind off loosely as follows: K2 \* return both stitches to left needle and K2 together through the back of the loop, K1, repeat from \* until al stitches have been bound off. Weave in ends.
Blocking
For Dalilah, were used 2 different tensions at blocking to enhance the Chart 3 motif: The main body of the shawl (Charts 1 and 2) was severely blocked, while the border (Chart 3 part) was slightly blocked to maintain the motif's volume. Created by Paula Pereira - Jul 2011


