StarLite Mittens
by Amanda B. Doody Difficulty: Advanced Beginner/Intermediate
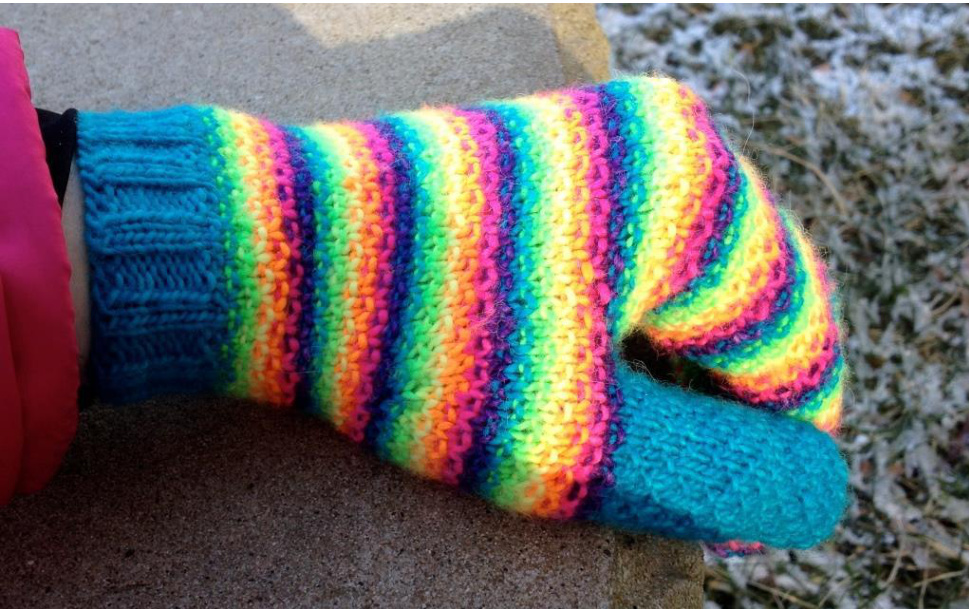
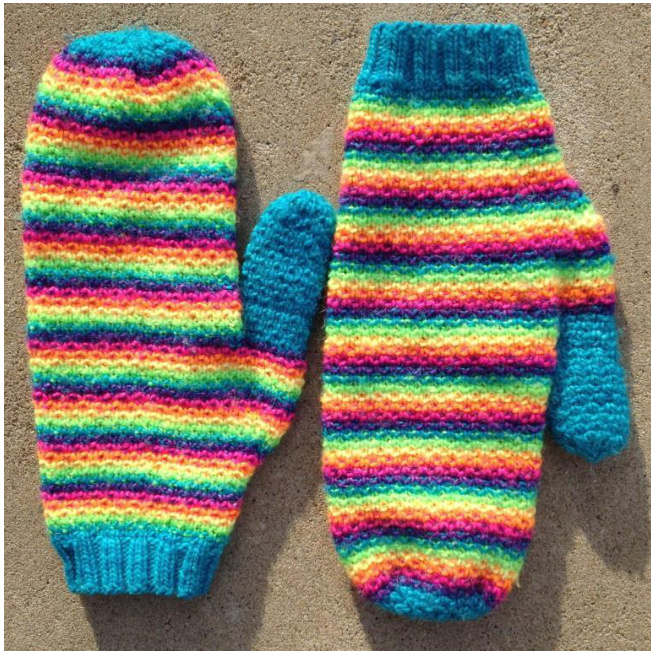
I am addicted to neon colors. I just can't help it. They are so vibrant and lovely that I cannot look away. Wouldn't it be wonderful to have ALL THE COLORS in a single project? Using less than 100 yds of each color, StarLite incorporates all of the neon colors I could lay my hands on, while gently blending and making them twinkle like starlight. Not to mention, they make me think of rainbows and sunshine and Sprites, which I don't think could ever be a bad thing. Of course, these mittens do not have to be made in neon colors, or even using as many colors as I used. Depending on your leftover bits of yarn and patience for weaving in ends, you can use any number of colors that you desire. The stitch pattern neatly blends and shows off the colors that you use, and you can vary the width and repeats of the stripes for even more options. Suggested stripe patterns are included. The pattern is designed with leftover sock yarn in mind. Suggested color combinations include rainbow, warm or cool colors, and multiple shades of the same color. Alternatively, you can use a single skein of one color for simple, textured mittens. Not only is StarLite graded from Adult XS to Adult Large to give you the perfect fit, but instructions are also included for Newborn to Child sizes so your little one can have some happy colors to match!
SIZE
Newborn (Baby, Toddler, Child/Adult XS) {Adult S, Adult M, Adult L}
FINISHEDMEASUREMENTS
Palm Circumference: 3.5 (4.5, 5.5, 6.5/6.5) {7.5, 8.5, 9.5} inches Cuff to Tip: 4.0 (5.0, 6.0, 7.0/9.0) {9.5, 10.25, 10.75} inches
YARN
Cuff Color (A): approx. 100 yards / 92 meters fingering weight yarn for middle sizes Stripe Colors (B-F): approx. 50 yards / 46 meters fingering weight yarn each color for middle sizes Shown in Madelinetosh Feather (Fingering, 80% Merino, 10% Alpaca, 10% Nylon, 420 yards / 384 meters per 4 oz skein) Oceana (A), Neon Lime (B), Edison Bulb (C), Push Pop (D), Fluoro Rose (E), and Ultramarine Violet (F).
NEEDLES
Size US #1.5 (2.5 mm) DPNs (set of 5) or circular needle (32" / 82 cm or longer) for knitting in the round. Use the needle size that gives you the correct gauge.
GAUGE
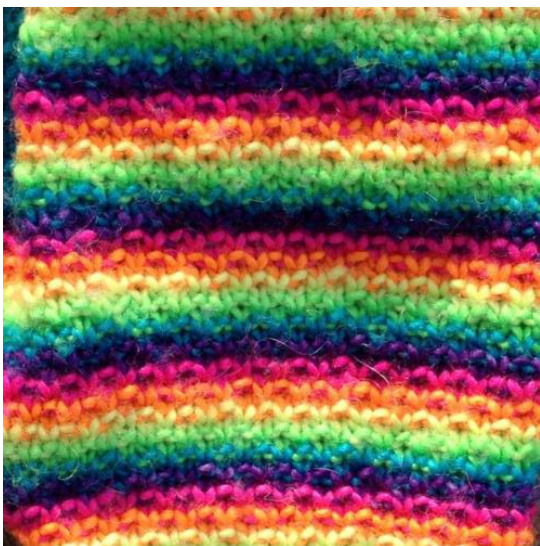
32 stitches = 4 inches (10 cm) in pattern. Gauge is measured after blocking. See Cuff instructions rnds 1-4 for pattern details (worked in the rnd).
NOTIONS
two stitch markers of one color, one stitch marker of another color smooth waste yarn for holding thumb sts tapestry needle
ABBREVIATIONS
beg (beginning) k (knit) k2tog (knit two stitches together; one stitch decreased) kfb (knit into the front and then into the back of the next st; one stitch increased) m (marker) p (purl) pm (place marker) rnd(s) round(s) sm (slip marker) ssk (slip, slip, knit two slipped stitches together through back loop)
PATTERN NOTES
1. Although the two-row stripes do not create an obvious jog, if you do wider stripes, you may wish to use a jogless color change by using a stationary slipped stitch, where the first stitch of the second round of a color change is slipped. See this post by TechKnitter for a picture tutorial. 2.Sizing: StarLite adult XS to adult L sizes are designed to fit with neutral ease. Choose the size whose palm circumference most closely matches the circumference of the widest part of the hand (not including the thumb). For a looser fitting garment, choose the next size up.StarLite newborn to child sizes are designed to give growing hands some room to move, and the pattern already includes an extra bit of space. For instance, a four-month old baby's hand is about 3.75" around, so the finished baby-sized mitten would be 4.5" around. A range of sizes is given, but they are easily customizable. You can increase or decrease your stitch count by four to get in-between sizes. Suggested lengths are given for each size. If the intended wearer is available, I encourage you to try on the mittens before separating for the thumb and before beginning decreases in order to get a custom length. 3. If you use six colors, you will have lots of bits of yarn hanging around. When knitting the rainbow mitts, I carried the yarn up on the inside in order to avoid a billion ends to weave in. To make this neat, sort your skeins of yarn on the table in front of you, with the color you are knitting with all the way to the right and the color you will use next all the way to the left. When you knit two rounds, the five strands that you are carrying will become twisted. After finishing the two rounds, rotate the mitt counterclockwise twice, then move the working yarn around the now untwisted strands twice in order to untwist it. When you begin knitting with the next color, move the skein on the left under the strands and put it all the way to the right. This is now your working yarn. Note: I knit with my yarn held in my right hand. If you hold your yarn in your left hand, you may wish to reverse the order of the skeins. 4.Stripe Patterns: Note: You can use just about any striping patern you can think of, as long as you use an even number of rnds per color in each section ofthat color. The follwing options are just suggestions. Al use approximately the same amount of each color within a repeat (between \*\*). Option 1 (shown): \*2 rnds A, 2 rnds B, 2 rnds C, 2 rnds D, 2 rnds E, 2 rnds F\* Option 2: \*2 rnds A, 2 rnds B, 2 rnds A, 2 rnds B, 2 rnds C, 2 rnds B, 2 rnds C, 2 rnds D, 2 rnds C, 2 rnds D, 2 rnds E, 2 rnds D, 2 rnds E, 2 rnds F, 2 rnds E, 2 rnds F, 2rnds A, 2 rnds F\* Option 3: \*6 rnds A, 4 rnds B, 2 rnds C, 4 rnds D, 6 rnds E, 4 rnds F, 2 rnds A, 4 rnds B, 6 rnds C, 4 rnds D, 2 rnds E, 4 rnds F\*
PATTERNINSTRUCTIONS:LEFT MITTEN
Cuff:
With A, CO 24 (32,40,48/48) {56, 64, 72} sts. Divide sts on needles to work in the rnd as follows: needle 1: 2 (4, 6, 8/8) {10, 12, 14} sts , needle 2-4: 6 (8,10, 12/12) {14,16,18} sts each. Leave remaining 4 sts on the fifth needle. You will begin by working these sts onto needle 1. Join to work in the rnd, place beg of rnd m. Work in k2, p2 rib until the piece measures one inch, then knit one round even. Note: Placement of beginning of round marker and stitch distribution is designed to make color changes occur on a flat part of the knitting, rather than between needles. This helps with maintaining tension when carrying yarn and changing colors. If you are working on a circular needle using the Magic Loop method, divide sts similarly, so that the first four sts of the rnd are worked onto the second needle. Starting with A, begin stripe pattern (see Pattern Note 3) by working two rnds in each color. Maintain stripe pattern throughout. Rnd 1: \*k1, p1\* to end. Rnd 2: knit all sts. Rnd 3: \*p1, k1\* to end. Rnd 4: knit all sts. Maintaining stripe pattern, repeat rounds 1-4 until piece measures 1.5 (1.5, 1.75, 1.75/2.0) {2.0, 2.25, 2.25) inches from cast-on edge or until desired cuff length is reached. End with a rnd 4.
Thumb Increases:
Maintaining stripe pattern, work thumb increases as follows: Rnd 5: kfb twice, \*k1, p1\* to end of rnd. [2 sts increased, 26 (34,42, 50/50) {58,66, 74} sts total] Rnd 6: knit all sts. Rnd 7: \*p1, k1\* to end of rnd. Rnd 8: knit all sts. Rnd 9: k1, p1, pm, kfb twice, pm, \*k1, p1\* to end of rnd. [2 sts increased, 28 (36, 44, 52/52) {60, 68, 76} sts total] Rnds 10-12: Work as for rnds 6-8. Rnd 13: k1, p1, sm, kfb four times, sm, \*k1, p1\* to end of rnd. [4 sts increased, 32 (40, 48, 56/56) {64, 72, 80} sts total] Rnds 14-16: Work as for rnds 6-8. Rnd 17: k1, p1, sm, kfb twice, (k1, p1) two times, kfb twice, sm, \*k1, p1\* to end of rnd. [4 sts increased, 36 (44, 52, 60/60) {68, 76, 84} sts total] Rnds 18-20: Work as for rnds 6-8. Rnd 21: k1, p1, sm, kfb twice, (k1, p1) four times, kfb twice, sm, \*k1, p1\* to end of rnd. [4 sts increased, 40 (48, 56,64/64) {72, 80, 88} sts total] Rnds 22-24: Work as for rnds 6-8. For Sizes Toddler, Child/Adult XS, Adult S, Adult M, and Adult L ONLY: Rnd 25: k1, p1, sm, kfb twice, (k1, p1) six times, kfb twice, sm, \*k1, p1\* to end of rnd. [4 sts increased, -- (--, 60, 68/68) {76, 84, 92} sts total] Rnds 26-28: Work as for rnds 6-8. For Sizes Adult S, Adult M, and Adult L ONLY: Rnd 29: k1, p1, sm, kfb twice, (k1, p1) eight times, kfb twice, sm, \*k1, p1\* to end of rnd. [4 sts increased, -- (--, --, --/ --) {80, 88, 96} sts total] Rnds 30-32: Work as for rnds 6-8. For Size Adult L ONLY: Rnd 33: k1, p1, sm, kfb twice, (k1, p1) eight times, kfb twice, sm, \*k1, p1\* to end of rnd. [4 sts increased, 100 sts total] Rnds 34-36: Work as for rnds 6-8. For ALL sizes: Work rnds 1-4 even until piece measures 2.75 (2.75, 3.5, 3.75/4.5) {4.75, 5.0, 5.25} inches from cast-on edge, ending with a rnd 4.
Separate Thumb:
Rnd 1: k1, p1, remove marker, place 16 (16, 20, 20/20) {24, 24, 28} sts on waste yarn, remove marker, CO 4 sts using backwards-loop cast-on. Rejoin to work in the round, \*k1, p1\* to end of rnd. [28 (36,44, 52/52) {60, 68, 76} sts total] Rnd 2: knit all sts.
Palm:
Maintaining stripe pattern, work palm as follows: Rnd 3: \*p1, k1\* to end of rnd. Rnd 4: knit all sts. Rnd 5: \*k1, p1\* to end of rnd. Rnd 6: knit all sts. Repeat rnds 3-6 until mitten measures approximately 3.5 (4.5, 5.5, 6.5/8.5) {9.0, 9.75, 10.25} inches or one-half inch less than desired length. End with rnd 4. Note: For fingerless mitts, work to O.5"less than desired length, then work in k2, p2 rib for 0.5"and bind off loosely.
Mitten Top Shaping & Decreases:
Note: For a solid block of color to match the cuff, use color A (or desired color) for remaining rnds. Rnd 1: \*k1, p1\* to end of rnd. Rnd 2: k2, \*ssk, k2tog, k3 (5, 7, 9/9) {11, 13, 15}\* three times, ssk, k2tog, k1 (3, 5, 7/7) {9, 11, 13}. [8 sts decreased, 20 (28, 36, 44/44) {52, 60, 68} sts remaining] Rnd 3: \*p1, k1\* to end of rnd. Rnd 4: k1, \*ssk, k2tog, k1 (3, 5, 7/7) {9, 11, 13}\* three times, ssk, k2tog, k0 (2, 4, 6/6) {8, 10, 12}. [8 sts decreased, 12 (20, 28, 36/36) {44, 52, 60} sts remaining] Rnd 5: \*k1, p1\* to end of rnd. Rnd 6: \*ssk, k2tog, k0 (1, 3, 5/5) {7, 9, 11}\* to end of rnd. [6 (8, 8, 8/8) {8, 8, 8} sts decreased, 6 (12, 20, 28/28) {36, 44, 52} sts remaining] For newborn size only: cut yarn and pull through remaining sts. Weave in ends. Rnd 7: \*p1, k1\* to end of rnd. Rnd 8: \*k2tog\* to end of rnd. [-- (6, 10, 14/14) {18, 22, 26} sts decreased, --(6, 10, 14/14) {18, 22, 26} sts remaining] For baby size only: cut yarn and pull through remaining sts. Weave in ends. Rnd 9: \*k1, p1\* to end of rnd. Rnd 10: \*k2tog\* to end of rnd. [-- (--, 5, 7/7) {9, 11, 13} sts decreased, --(--, 5,7/7) {9, 11,13} sts remaining] For all other sizes: Cut yarn and pull through remaining sts. Weave in ends.
Thumb:
Note: For a solid block of color to match the cuff, use color A (or desired color) for entire thumb. Transfer sts from waste yarn to needles. Rnd 1: \*k1, p1\* to end of rnd, pick up and knit six sts.[22(22,26, 26/26) {30,30, 34} sts total] Rnd 2: k to last five sts, k2tog, ssk, k1. [2 sts decreased, 20 (20, 24, 24/24) {28,28,32} sts total] Rnd 3: \*p1, k1\* to last four sts, k2tog, ssk. [2 sts decreased, 18 (18, 22, 22/22) {26, 26, 30} sts total] Rnd 4: knit all sts. Rnd 5: \*k1, p1\* to end of rnd. Rnd 6: knit all sts. Rnd 7: \*p1, k1\* to end of rnd. Rnd 8: knit all sts. Repeat rnds 5-8 until thumb measures 1.0 (1.25, 1.5, 1.75/2.0) {2.25, 2.5, 3.0} inches or desired length. It doesn't matter which rnd of the repeat you end with. Next rnd: \*k2tog\* to end of rnd. 9 (9, 11, 11/11) {13, 13, 15} sts decreased, 9(9, 11, 11/11) {13, 13, 15} sts total] Next rnd: k3tog, \*k2tog\* to end of rnd. [5 (5, 6, 6/6) {7, 7, 8} sts decreased, 4 (4, 5, 5/5) {6, 6, 7} sts total] Cut yarn and pull through remaining sts. Weave in ends.
PATTERNINSTRUCTIONS:RIGHT MITTEN
Cuff:
Work as for left mitten.
Thumb Increases:
Maintaining stripe pattern, work thumb increases as follows: Rnd 5: \*k1, p1\* to last two sts, kfb twice. [2 sts increased, 26 (34,42, 50/50) {58, 66, 74} sts total] Rnd 6: knit all sts. Rnd 7: \*p1, k1\* to end of rnd. Rnd 8: knit all sts. Rnd 9: \*k1, p1\* to last four sts, pm, kfb twice, pm, k1, p1. [2 sts increased, 28 (36,44, 52/52) {60, 68, 76} sts total] Rnds 10-12: Work as for rnds 6-8. Rnd 13: \*k1, p1\* to m, sm, kfb four times, sm, k1, p1. [4 sts increased, 32 (40, 48, 56/56) {64, 72, 80} ststotal] Rnds 14-16: Work as for rnds 6-8. Rnd 17: \*k1, p1\* to m, sm, kfb twice, (k1, p1) two times, kfb twice, sm, k1, p1. [4 sts increased, 36 (44, 52, 60/60) {68,76,84} sts total] Rnds 18-20: Work as for rnds 6-8. Rnd 21: \*k1, p1\* to m, sm, kfb twice, (k1, p1) four times, kfb twice, sm, k1, p1. [4 sts increased, 40 (48, 56, 64/64) {72, 80, 88} sts total] Rnds 22-24: Work as for rnds 6-8. For Sizes Toddler, Child/Adult XS, Adult S, Adult M, and Adult L ONLY: Rnd 25: \*k1, p1\* to m, sm, kfb twice, (k1, p1) six times, kfb twice, sm, k1, p1. [4 sts increased, -- (--, 60, 68/68) {76, 84, 92} sts total] Rnds 26-28: Work as for rnds 6-8. For Sizes Adult S, Adult M, and Adult L ONLY: Rnd 29: \*k1, p1\* to m, sm, kfb twice, (k1, p1) eight times, kfb twice, sm, k1, p1. [4 sts increased, -- (--, - -, --/ --){80, 88, 96} sts total] Rnds 30-32: Work as for rnds 6-8.
For Size Adult L ONLY: Rnd 33: \*k1, p1\* to m, sm, kfb twice, (k1, p1) eight times, kfb twice, sm, k1, p1. [4 sts increased, 100 sts total] Rnds 34-36: Work as for rnds 6-8.
For ALL sizes:
Work rnds 1-4 even until piece measures 2.75 (2.75, 3.5, 3.75/4.5) {4.75, 5.0, 5.25} inches from cast-on edge, ending with a rnd 4.
Separate Thumb:
Rnd 1: \*k1, p1\* to m, remove marker, place 16 (16, 20, 20/20) {24, 24, 28} sts on waste yarn, remove marker, CO 4 sts using backwards-loop cast-on. Rejoin to work in the round, k1, p1. [28 (36, 44, 52/52) {60, 68, 76} sts total] Rnd 2: knit all sts.
Palm:
Work as for left mitten.
Mitten Top Shaping & Decreases:
Note: For a solid block of color to match the cuff, use color A (or desired color) for remaining rnds. Rnd 1: \*k1, p1\* to end of rnd. Rnd 2: k1 (3, 5,7/7) {9, 11, 13}, ssk, k2tog, \*k3 (5,7, 9/9) {11, 13, 15}, ssk, k2tog\* to last two sts, k2. [8 sts decreased, 20 (28, 36, 44/44) {52, 60,68} sts remaining] Rnd 3: \*p1, k1\* to end of rnd. Rnd 4 (newborn): remove beg rnd m, sl1, pm, \*k2tog, k2, ssk\* to end. [8 sts decreased, 12 sts remaining] Rnd 4 (all other sizes): k-- (2, 4, 6/6) {8, 10, 12}, ssk, k2tog, \*k-- (3, 5, 7/7) {9, 11, 13},ssk, k2tog\* to last st, k1. [8 sts decreased, -- (20, 28, 36/36) {44, 52, 60} sts remaining] Rnd 5: \*k1, p1\* to end of rnd. Rnd 6 (baby): remove beg rnd m, sl1, pm, \*k2tog, k2, ssk\* to end. [8 sts decreased, 12 sts remaining] Rnd 6 (all other sizes): \*k0 (--, 3, 5/5) {7, 9, 11}, ssk, k2tog\* to end of rnd. [6 (--, 8, 8/8) {8, 8, 8} sts decreased, 6(--, 20, 28/28) {36, 44, 52} sts remaining] For newborn size only: cut yarn and pull through remaining sts. Weave in ends. Rnd 7: \*p1, k1\* to end of rnd. Rnd 8: \*k2tog\* to end of rnd. [-- (6, 10, 14/14) {18, 22, 26} sts decreased, --(6, 10, 14/14) {18, 22, 26} sts remaining] For baby size only: cut yarn and pull through remaining sts. Weave in ends. Rnd 9: \*k1, p1\* to end of rnd. Rnd 10: \*k2tog\* to end of rnd. [-- (--, 5, 7/7) {9, 11, 13} sts decreased, --(--, 5, 7/7) {9, 11,13} sts remaining] For all other sizes: Cut yarn and pull through remaining sts. Weave in ends.
Thumb:
Work as for left mitten.


