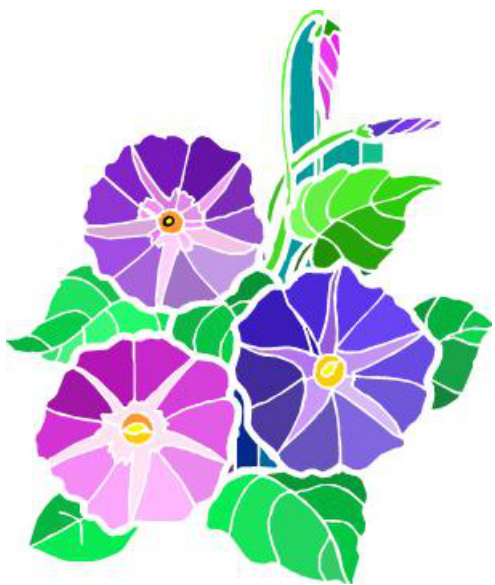
LISERON
This is a very easy cuff down stranded sock. Since the flower pattern is small pick some very contrasting yarn colors if you want to motif to stand out.
Materials:
MC Barking Dog yarns Sirius in Asphalt jungle (socks shown used 60g/220 meters) CC Barking Dog yarns Sirius in Raspberry (socks shown used 35g/130meters) [Or any other sock yarn that will givegauge]
Needles:
2.25 mm circular needle (80cm) Tapestry needle Stitch markers One 2.25mm dpn
Gauge:
9.5 STS and 11 rows per 2.5 cm over blocked stranded pattern with 2.25 mm needle

Size:
Women medium stretches to fit foot circumference of 25 cm.For foot/leg length, it is possible to add or remove rows in multiples of6.
Chart symbols:

Abbreviations:
CO:CastOn MC: Main color ( dark grey in sock shown) CC: Contrasting Color (raspberry in sock shown) RS: Right side WS:Wrong side K: Knit P: Purl SM:slipmarker ST(S): stitch (es) PU: Pick up K2TOG:Knit 2 stitches together SL1K: slip 1 stitch knitwise SL1P: slip 1 stitch purl wise SM: slip marker SSK:Slip2 stitches as if toknit one at a time tothe right needle and knit those 2 stitches together \* \* instructions are to be repeated
Instructions
Cuff
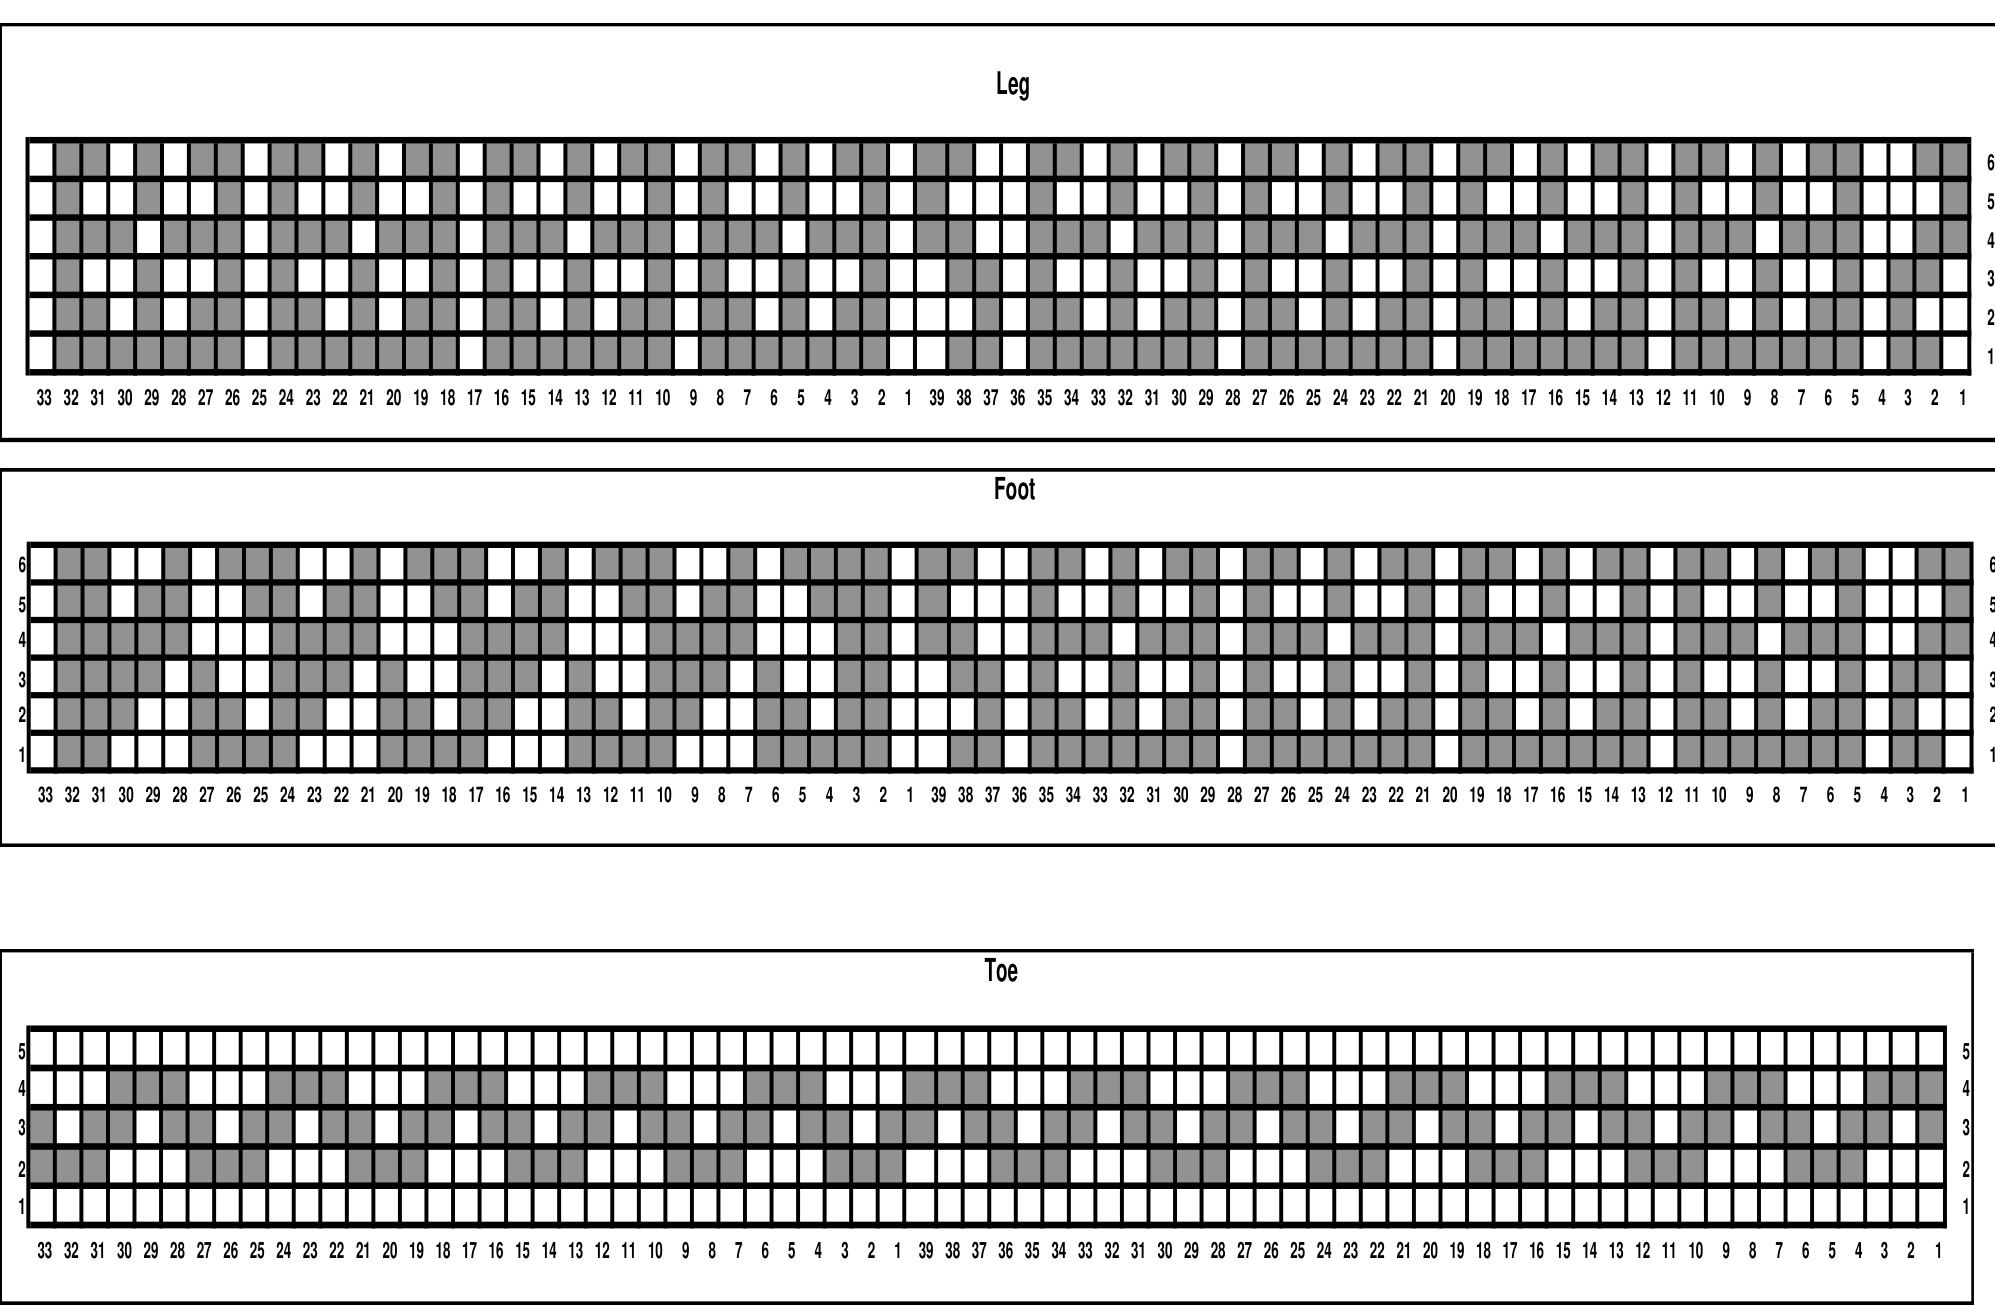
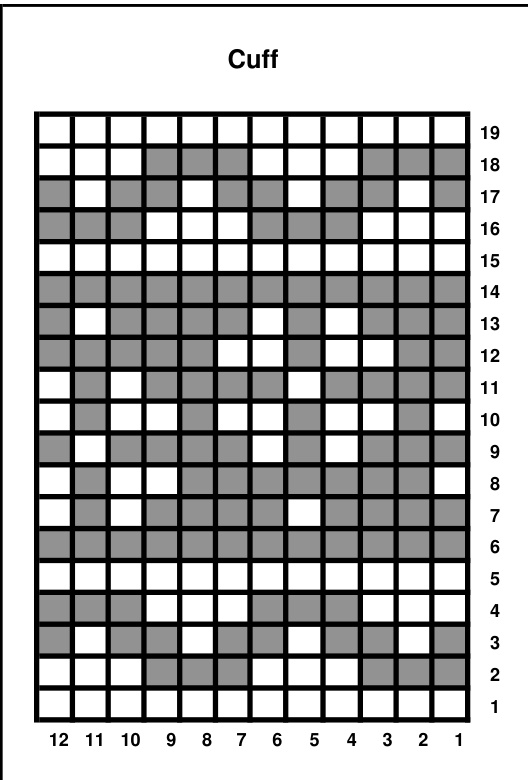
With MC using twisted German cast on over 2 needles, CO 72 STS (or you can use your favorite cast on). Arrange STS to have 39 STS on the front/instep needle and 33 STS on the back/heel/sole needle. Beginning of round is the first ST of the front needle. Knit 12 rounds in K1P1 ribbing. Knit one row in MC, join CC and then work cuff as per chart. Chart is repeated a total of 6 times horizontally per round and once vertically for a total of 19 rounds. Leg: Work Leg chart on page 5 until piece measures approximately 15cm from cast on edge ending after working a row 6 (if you want a shorter or longer leg, work for length needed; just make sure to end after working row 6 of chart). Move the first and last ST of the back needle to the front needle. Front needle now has 41 STS and the back needle has 31 STS.
Heel Flap
Heel flap is worked on back needle only in rows (the one with 31 STS) with MC. Do not cut CC you will pick it up after the heel turn. Work back and forth in rows. Sock is made with an Eye of Partridge heel. Row 1: (WS): K1, purl to last ST, SL1P with yarn in front, turn Row 2: (RS): K1, \* K1, SL1K with yarn in back rep from\* to last 2 stitches, K1, SL1P with yarn in front, turn Row 3: (Ws): K1, purl to last ST, SL1P with yarn in front, turn Row 4: (RS): K1, \* SL1K with yarn in back, K1 rep from\* to last 2 stitches, SL1K with yarn in back, SL1P with yarn in front, turn Repeat row 1 to 4, until flap is 6.5 cm or desired length making sure to end after a RS row ready to work a WS row.(sock shown has a heel flap 36 rows total)
Heel Turn
Continue working back and forth; use short rows to turn heel as follows: Row 1: (WS) K1, P16, P2tog, P1 turn Row 2: (RS) SL1P with yarn in back, K4, SSK, K1, turn Notice that there is a small gap that forms between the working STS and the unworked STs. Row 3: (WS) SL1P with yarn in front, purl to within 1 ST of gap, P2tog (1 ST on each side of gap, you are closing the gap), P1, turn Row 4: (RS) SL1P with yarn in back, knit to within 1 ST of gap, SK, K1, turn Repeat row 3 and 4, working 1 additional knit or purl ST after SL1P until all STS have been worked, ending with a right side row. On the last two decreasing rows, you will omit the last P1 and the last K1. You will have 17 remaining STS. Cut MC leaving a 15 cm tail to be weaved in later. Slip the heel STS on the spare dpn.
Gusset shaping
With the sole side of the sock facing you (opposite end of where you left your CC yarn in waiting), at the start of the sole needle with Mc (first row of heel flap) pickup two additional STS to close the gap, one ST on each side at join between heel and leg up, knit those 2 STS together then pick up and knit 1 ST for each slipped edge ST. Knit the heel STS. On the other side of the heel flap, pick up and knit 1 ST for each slipped edge ST and 2 extra STS to close the gap at heel join and knit those 2 STS together. Move the first and last ST of the front needle to the back needle (the ones you had moved the front needle before starting the heel flap). Back needle now starts and ends with CC. On the back needle, put a marker on each side of the 33 center STS you will need the same number of STS on each side of the marker; if not, simply do a decrease by doing K2TOG anywhere on the next round on a dark colored ST so that you have the same number of stitches on each side of the marker.
Pinstripe Gusset decreases
le of the 2 set-up rounds depending on how many STS you have on each side of the marke Set-up round if you have an even number of STs on each side of marker Needle A: Instep (top of foot), Knit in pattern using Foot chart see page 5. Needle B: Sole \*Knit 1 ST in CC and one ST in MC\* called pinstripe pattern until marker, SM, knit the next 33 STS according to foot chart page 4, SM knit in pinstripe but this time starting with knit 1 ST in MC and 1 ST in CC until end of round Set-up round if you have an odd number of STs on each side of marker Needle A: Instep (top of foot), Knit in pattern using Foot chart see page 5. Needle B: Sole Knit 1 ST in CC and 2 ST in MC and then\*K1 in CC, K1 MC called pinstripe pattern repeat from\* until marker, SM, knit the next 33 STS according to foot chart, SM knit in pinstripe but this time starting with knit 1 ST in MC and 1 ST in CC until the last 3 STS, Knit 2 in MC and 1 in CC
Work the next 2 rounds until you are back at 72 STS total.
Needle1: Instep (top of foot), Knit in pattern using Foot chart. Needle2: Sole Knit one St in CC, SSK in MC and then knit in established pinstripe until marker, knit as per the last 33 STS of foot chart, slip marker, knit in established pinstripe pattern until you reach 3 STS before marker, K2TOG in MC and K1 CC
Round 2 (regular round)
Needle1: Instep, Knit in established pattern as per chart. Needle2: Sole, Knit in established pinstripe pattern until marker, SM knit in pattern as per chart, SM knit in established pinstripe pattern Note: Your SsK and K2TOG do not change colors as you decrease they are always done in MC. When you are back at a total of 72 STs (39 on foot and 33 on sole) remove markers.
Foot
Work in established pattern according to the foot chart until sock measures 7 cm short of total desired sock length from the back of the heel turn ending after a row 1.
Toe
Knit Toe chart once.
Cut CC leaving a 15 cm tail to be woven in. Toe will be worked in MC only.
Set up round:
Needle 1: Knit 2T and then move those 2STS tothe back neede, knit until the lastST, do not knit thislast ST, move itto the back needle. You should have 36 Sts per needle Needle 2: Knit .
Knit 3 more rnds.
Decrease for toes as per the following 2 rnds: Round 1: decrease round Needle 1: K1, SSK, knit to last 3 STS, K2TOG, K1 Needle 2: K1, SSK, knit to last 3 STS, K2TOG, K1 Round 2: regular round For both needle 1 and 2, Knit.
Repeat rounds 1 and 2 until you have a total of 20 STS left (10 STS per needle). Graft STS together with Kitchener ST, weave in all yarn ends and block. Enjoy your new sock@