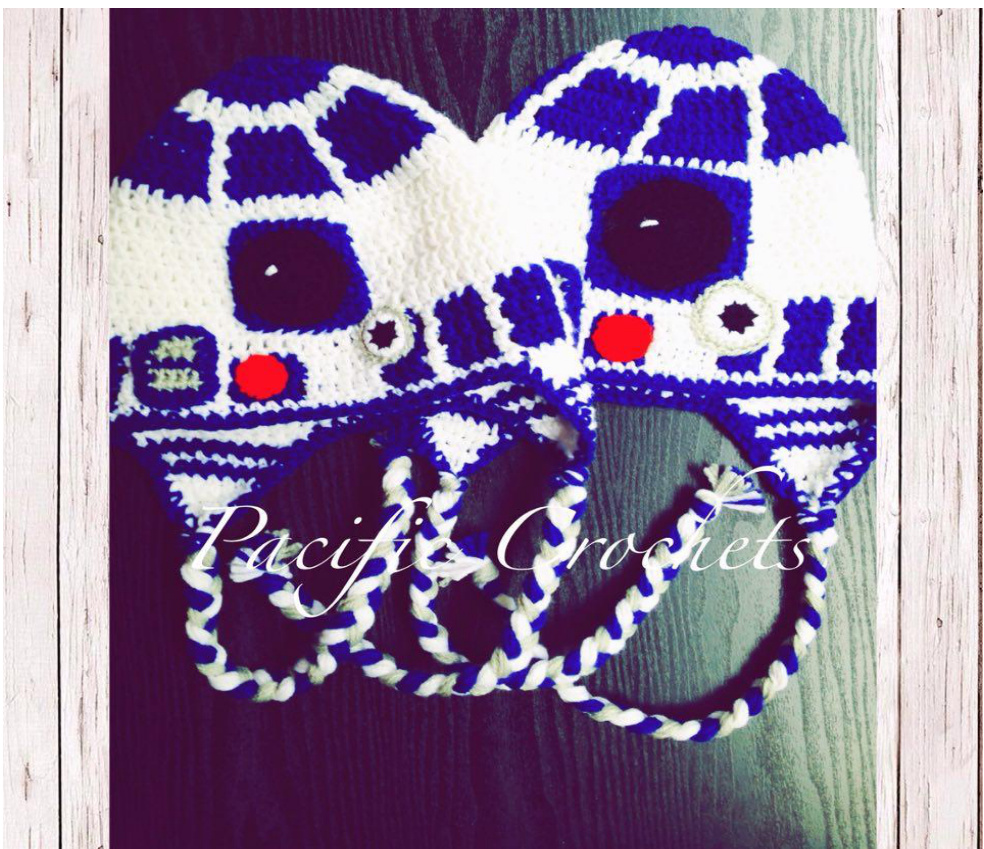
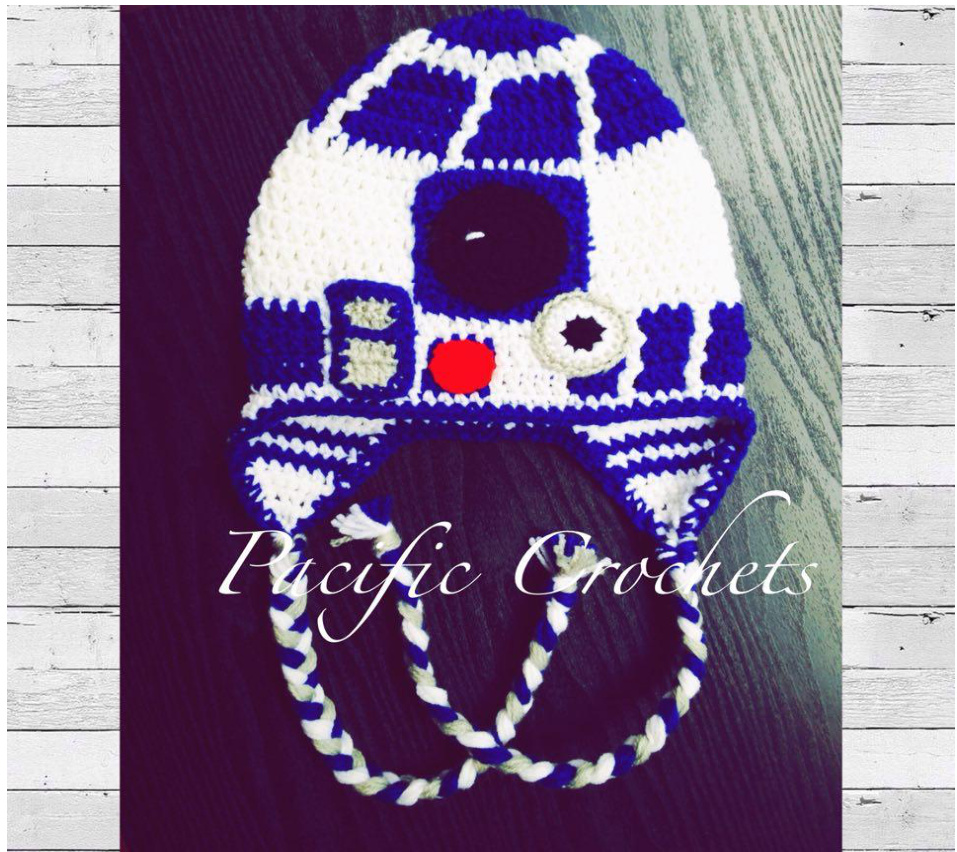
CROCHET R2D2 EARFLAP HATS!
By: Jordew Morrisow
Materials needed: Sizes F/3.75mm, G/4.0mm and H/5.0mm crochet hooks. Red heart super saver yarn \*\*WHITE\*\* Red heart super saver yarn \*\*ROYAL BLUE\*\* Red heart super saver yarn \*\*BLACK\*\* Red heart super save yarn \*\*RED\*\* Red heart super save yarn \*\*LIGHT GREY\*\* Yarn needle for sewing in ends. Scissors Measuring Tape
SIZING:
Newborn: 20 stitches 6-9 Months: 30 Stitches Toddler: 40 Stitches Child: 50 Stitches Small Teen / Adult: 60 Stitches.
DIRECTIONS FOR HAT:
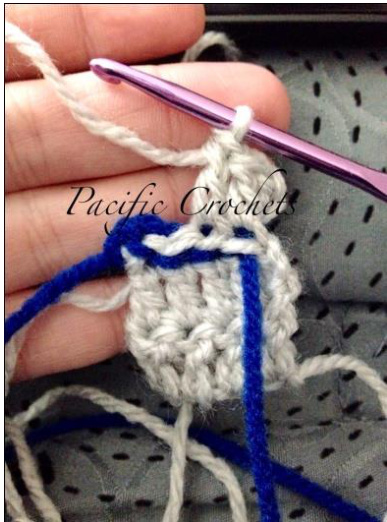
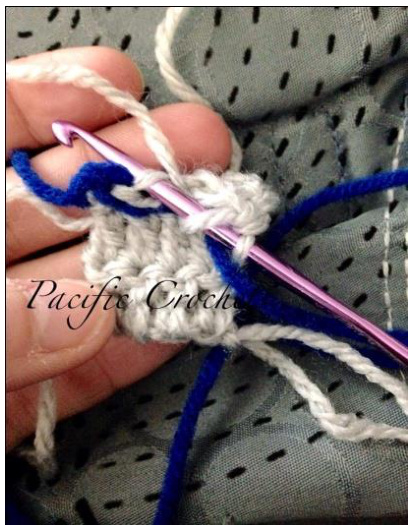
Starting with size H hook and Royal blue RHSS, create a magic circle... Chain 2, 10 Double crochets (DC) into the circle. Pull tight to close circle and join to 1st Double crochet not chain two. Join with slip stitch. (10) Round 2: Chain 2, 2 DC into same space as chain 2. 2 DC into each stitch around. Join to 1st Double crochet not to chain two. Join with slip stitch. (20) Change yarn to white: Round 3: Starting with white yarn, Chain 2, 2DC into joining space and one DC into next stitch. \*2DC into next stitch, 1 DC into next stitch\* Repeat \*to\* around. (30) Round 4: Continue with white, Chain 3 OR double crochet into same joining space without chain, method that I will be using. With white, 1 DC into same space as joining. Change yarn to blue: Note, I cut my yarn after each color change. You can continue to work along without cutting if you choose. With blue yarn, 2DC into next stitch and 1 DC into the next 3 stitches (this completes one post of white and 1 block of blue) ...
This pattern will repeat for the rest of the row.
\*1 DC of white, change yarn to blue, 2DC into next st, 1 DC into the next 3 sts.\* Repeat from \*to\* for this row. Ending with 6 blocks of blue with 5 stitches of blue AND 6 post of white (1DC). On the last DC of blue before joining, change yarn to white and join to the top of the first DC made. (36)
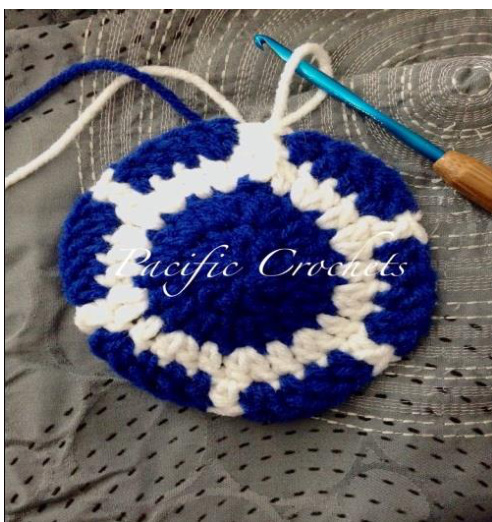
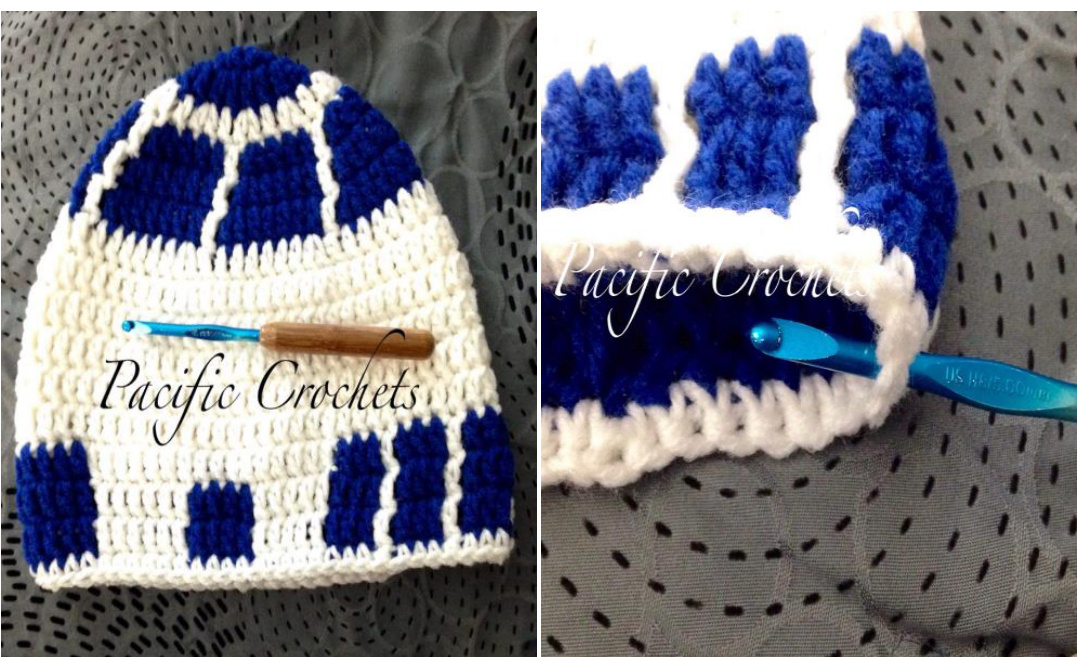
This is what you should have. Round 5: Starting with white, DC into joining space. Change yarn to blue and 2 DC in next stitch (increase from pervious row) and 1 DC into next 4 blue stitches. This pattern will repeat for the rest of the row. \*1DC with white onto white DC from pervious row. 2DC into 1st blue stitch and 1DC into next 4 blue stitches\* Repeat from \*to\* ending with 6 blocks of blue with 6sts of blue AND 6 post of white (1DC). On the last DC of blue, before joining, change yarn to white and join to the top of first DC made. (42) Round 6: Starting with white, Dc into joining space. Change yarn to blue and 2 DC into next stitch (increase from pervious row) and 1 DC into next 5 blue stitches. This pattern will repeat for the rest of the row. \*1DC with white onto white Dc from pervious row. 2DC into 1st blue stitch and 1 DC into next 5 blue stitches\* Repeat from \*to\* ending with 6 blocks of white with 7 stitches of blue AND 6 post of white (1DC). On the last DC of blue, before joining, change yarn to white and join to the top of first DC made. (48) NOTE: At any point you can stop increasing. I am making a teen/ small adult hat. If you are making a smaller hat I would go by head charts for that size and stop increasing when I reached that measurement. Round 7: This row you will only be using white yarn. Chain 2, 2DC into same space as joining, 1 Dc into next 6 stitches, 2DC into next stitch. \*1DC into next 7sts, 2DC into next stitch\* continue around until you reach last block of blue. After last increase (2DC) you will do 1 DC into next 8 sts. Join to 1st DC not chain 2. (54) Round 8: Starting with white yarn, Chain 2, 2DC into same space as joining, DC into next 8 stitches. \*2DC, 1 DC into next 8 stitches.\* Repeat from \*to \* around. (60) Rounds 9-10 (child) 9-12 (teen/small adult) These rows will NOT have a increase. I did a total of 6 white rows for my hat. You can add or subtract to meet your measurements. Theses rows will be: Chain 2, 1DC into same space as joining, 1DC into each stitch around. (60) Round 13: For teen / small adult. Change to blue yarn, Chain 2, DC into same space as joining. 1 DC into next 18 stitches. Change to white, 1DC into next stitch. Change to blue, 1DC into next 6 stitches. Change to white, 1 DC into next 16stitches. Change to blue, 1 DC into next 3 stitches. Change to white, 1DC into next stitch. Change to blue, 1 DC into next 3 stitches. Change to white, 1 DC into next stitch. Change to blue, 1 DC into next 3 stitches. Change to white, 1 DC into next stitches. Change to blue (last color change) and 1 DC into next 6 stitches. Join to 1st DC not chain 2 Round 14: Chain 2, 1 DC into same space as joining and into next 18 stitches. Change to white yarn, 1 DC into next stitch. Change yarn color to blue, 1 DC into next 6 stitches. Change yarn color to white, 1 DC into next 6 stitches. Change yarn color to blue and 1 DC into next 4 stitches. Change yarn color to white, 1 DC into next 5 stitches. Change yarn color to blue, 1 DC into next 3 stitches. Change yarn color to white, 1 DC into next stitch. Change yarn color to blue, 1 DC into next 3 stitches. Change yarn color to white, 1 DC into next stitch. Change yarn color to blue, 1 DC into next 3 stitches. Change yarn color to white, 1 DC into next stitch. Change yarn color to blue, 1 DC into next 6 stitches. Join to 1st DC not chain 2 Round 15: Chain 2, 1 DC into same space as joining and into next 18 stitches Change color to white, 1 DC into next stitch. Change color to blue, 1 Dc into next 6 stitches. Change color to white, 1 DC into next 6 stitches. Change color to blue, 1 DC into next 4 stitches. Change color to white, 1 DC into next 5 stitches. Change color to blue, 1 DC into next 3 stitches. Change color to white, 1 DC into next stitch. Change color to blue, 1 DC into next 3 stitches. Change color to white, 1 DC into next stitch. Change color to blue, 1 DC into next 3 stitches. Change color to white, 1 DC into next stitch. Change color to blue, 1 DC into next 6 stitches. Join to 1st DC not chain 2. Round 16: Only using white: Chain 1, 1 single crochet into same space as joining. 1 Single crochet into each stitch around. Join with slip stitch to 1st sc. Fasten off.(60)
EARFLAPS:
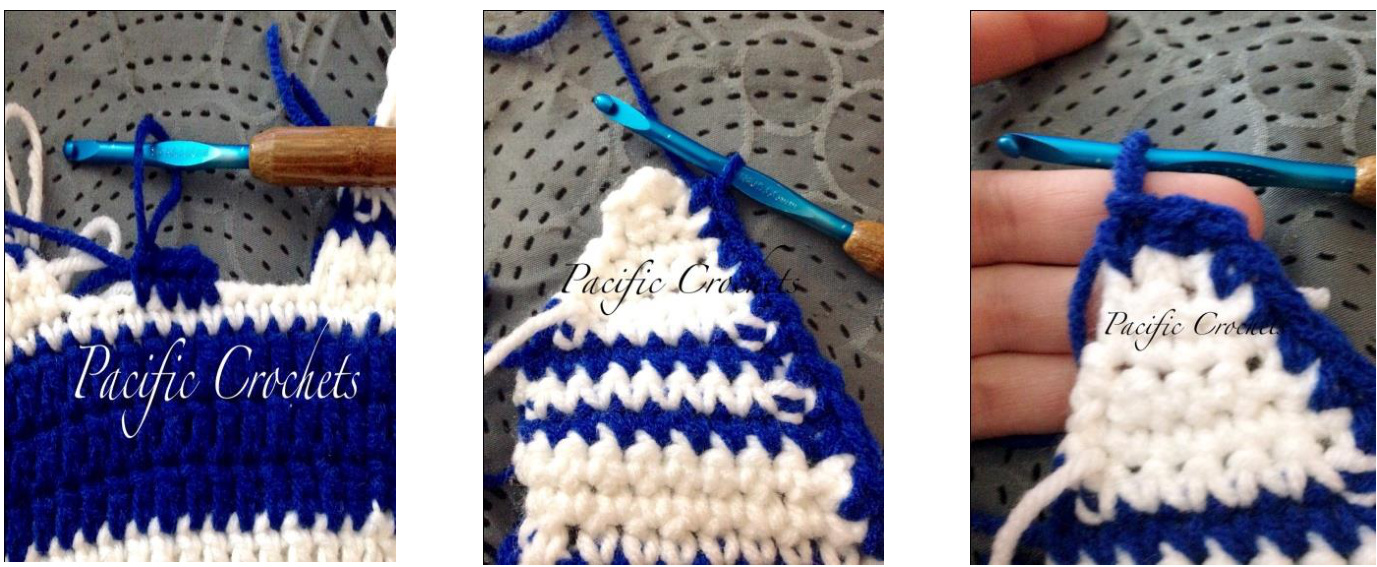
Now it's time to make earflaps! You will want to lay the hat out flat with the front facing you like pictured below.
With front face of your hat facing you, look on the corners of your hat showed in picture above. This is where you are going to want to start your earflaps. Starting with white yarn, attach to corner of hat with a single crochet. 1 SC into the next 12 stitches around back of the hat. You should end up crocheting over where you fastened off. Row 2: Chain 1, turn, SC2TOG, SC into next 8 stitches, SC2TOG. Row 3: Chain one, 1 single crochet into next 10 stitches. Row 4: Change yarn color to blue, Chain one, SC2TOG, 1 SC into next 6 stitches, SC2TOG. Row 5: Change yarn color to white, Chain one, SC into next 8 stitches. Row 6: Change yarn color to blue, Chain one, SC2TOG, SC into next 4 stitches. SC2TOG. Row 7: Change yarn color to white, Chain 1, SC into next 6 stitches. Row 8: Continue with white yarn, Chain 1, SC2TOG, SC into next 2 stitches, SC2TOG. Row 9: Chain 1, SC into next 4 stitches. Row 10: SC2TOG, SC2TOG. Row 11: SC2TOG, Fasten off.
SECOND EARFLAP:
Counting across back of hat, attach white yarn into the 8th-10th stitch. 1 SC into next 12 stitches. Row 2: Chain 1, turn, SC2TOG, SC into next 8 stitches, SC2TOG. Row 3: Chain 1, turn, SC into next 10 stitches. Row 4: Change yarn color to blue, Chain one, SC2TOG, 1 SC into next 6 stitches, SC2TOG. Row 5: Change yarn color to white, Chain one, SC into next 8 stitches. Row 6: Change yarn color to blue, Chain one, SC2TOG, SC into next 4 stitches. SC2TOG. Row 7: Change yarn color to white, Chain 1, SC into next 6 stitches. Row 8: Continue with white yarn, Chain 1, SC2TOG, SC into next 2 stitches, SC2TOG. Row 9: Chain 1, SC into next 4 stitches. Row 10: SC2TOG, SC2TOG. Row 11: SC2TOG, Fasten off. Attach blue yarn in the back of hat in the middle stitch between both ear flaps and single crochet all the way around hat. Adding two stitches in the points of earflaps as pictured below. Continue around hat w.ith 1 single crochet into each stitch around and join to first single crochet with a slip stitch
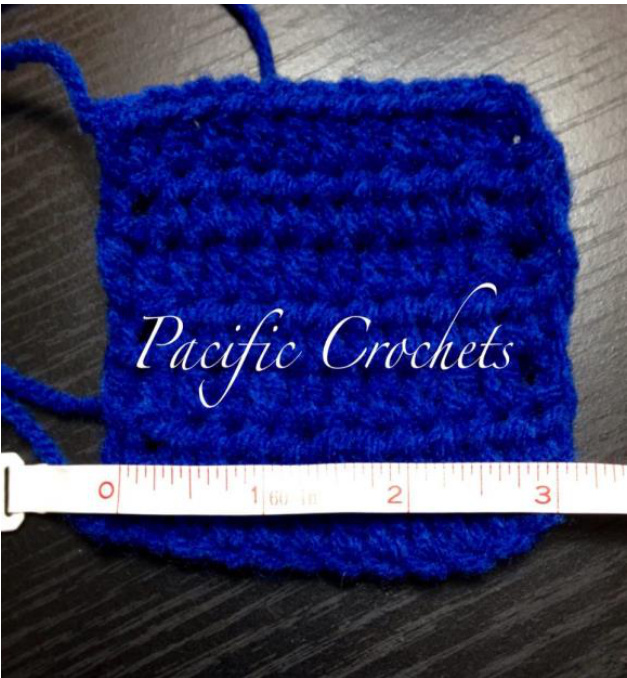
At this point your hat is done! Let's weave in those ends and get started on the embellishments! LARGE BLUE PATCH: using size G 4.0mm crochet hook. Starting with blue yarn, Chain 13, in third chain from hook, 1 Half Double crochet. 1 HDC into each chain down the hook. You should have 12 HDC when finished. Row 1: Chain 2, turn. 1 HDC into each stitch across. (12) Row 2: Chain 2, turn. 1 HDC into each stitch across. (12) Row 3: Chain 2, turn. 1 HDC into each stitch across. (12) Row 4: Chain 2, turn. 1 HDC into each stitch across. (12) Row 5: Chain 2, turn. 1 HDC into each stitch across. (12) Row 6: Chain 2, turn. 1 HDC into each stitch across. (12) Row 7: Chain 2, turn. 1 HDC into each stitch across. (12) At this point you should have a perfect square, measuring 3x3. Fasten off, leaving a extra long tail for sewing.
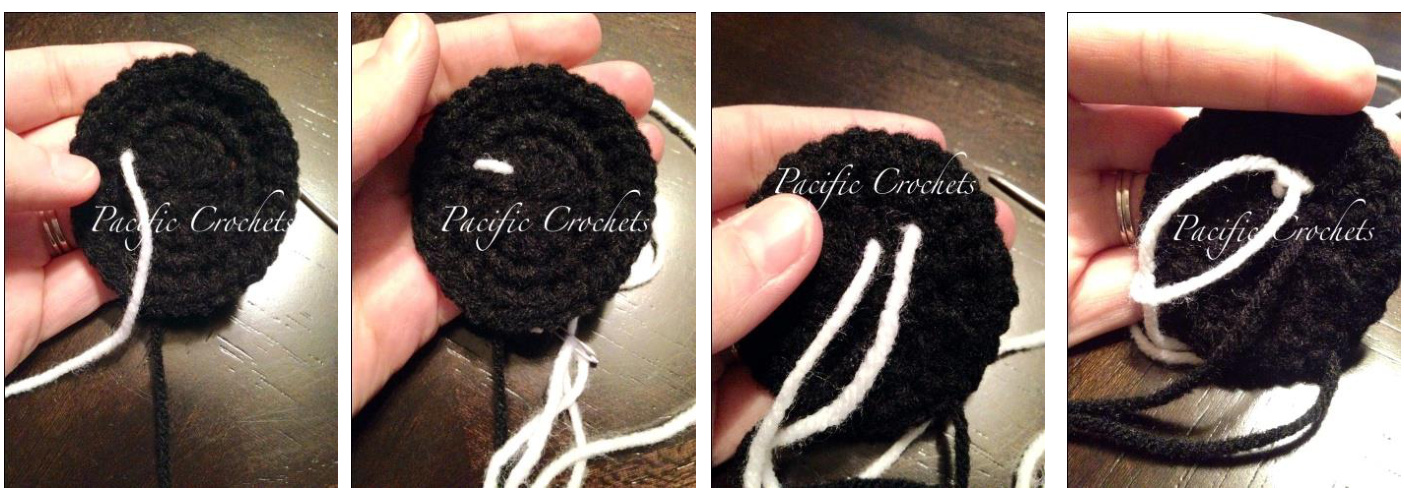
This is what your blue patch should look like. BLACK LENS: using size G 4.0mm crochet hook. Starting with black yarn, create a magic circle. Chain 2, (does not count) 12 DC into center of circle, pull yarn tight to close hole. Join to first DC. Row 2: Chain one, 2 SC into each stitch around. Row 3: Chain one, \*2sc into next stitch, 1 sc into next stitch around\* Fasten off, leaving long tail for sewing. WHITE PART OF LENS: Taking a long piece of white yarn, I threaded my needle and starting through the back and came up through the top. I then went back down into the circle and tied off. Pictures below hopefully will make this part clearer. I cut my yarn close to the knot made, and making sure it's tucked in while sewing.
SMALL GREY & BLUE PATCH: Starting with light grey and size F / 3.75mm crochet hook Chain 6, DC into third chain from hook and in each of the next chains. Row 2: Chain 2 (does not count), turn. 1 DC into next 4 stitches. (4) Row 3: Change to blue yarn, Chain one, turn. Slip stitch across the next 4 stitches. Row 4: Change to light grey yarn, Chain 2, turn. 1 DC into next 4 stitches of the back loops of grey stitches pictured below.
These are the back loops.
Row 5: Chain 1, turn. 1 SC into next 4 stitches. Now we will be going around the grey square we have made.. Row 6: Change to blue yarn, chain 1, turn. 2 SC into each corner stitch. 1 Sc around. Repeat this around square and join to first SC. Fasten off leaving a long tail for sewing.
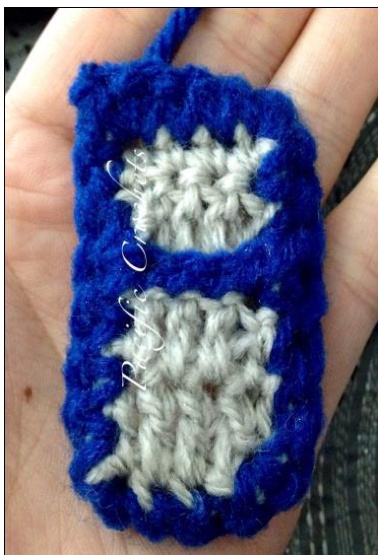
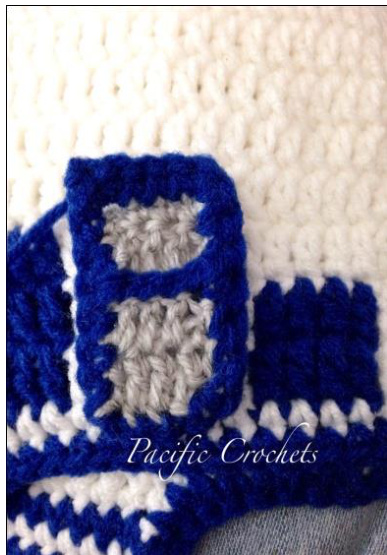
This is what you should have. RED LENS: Starting with red yarn and H hook. Create a magic circle, and chain 1. 12 SC into circle. Pull yarn tight to close up hole. Join in first SC. Fasten off and leave long tail for sewing. SECOND LENS: Starting with black yarn and size G 4.0mm crochet hook, Create a magic circle, Chain 1, 12 SC into circle. Join to first SC. Change to white yarn, Chain 1, \*2 Sc into each stitch around\* Change to light grey yarn, Chain 1, \*1 SC into each stitch around\* Join to first sc and fasten off. Leaving a long tail for sewing. WOOAH! Now that was a lot of color changing but look at the beautiful R2D2 hat you have made!! Well, okay, almost. Now it's time to sew all those patches to the hat. I did a very basic whip stitch to attach all my pieces. Follow along on my picture to see where to place them. Blue patch: Front of hat. Black lens: On top of blue patch. Grey and blue patch: Goes between the two blue squares on the left side of hat. Red lens: On top of blue square made into hat. Second lens: This attaches onto the first blue square made in hat and onto the corner of blue patch.
Okay, I promise we are almost done! Just one last thing..
BRAIDS!
The length of your braids all depends on how long you want them. I normally just cut each piece as I see fit, probably 55-60" Now, you will need 8 strands of each color. 8blue 8 white 8 light grey. After you have cut all your strands you need to divide them up. 4 blue for each side 4 white for each side 4 light grey for each side. Now you will fold them in half and finding a hole around the point of the earflaps, attach the strands like pictures below. Then you will just braid them! I sort my colors but that is totally up to you!
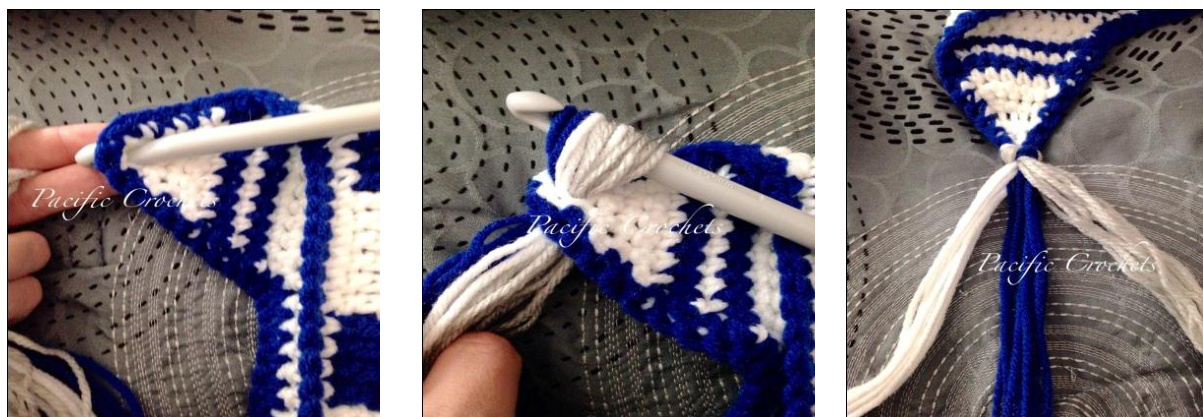
Now Braid away and tie your ends annndddd.... YOU ARE DONE! I hope that you have enjoyed this pattern and made lots of little R2D2 hats! This patterm was designed and written by: Jorden Morrison of PacificCrochets. Pattern may not be sold, copied or distributed in any way without owner's permission. Photographs belong to Jorden Morrison of PacificCrochets. If you need any help with this pattern you may email me at PacificCrochets@hotmail.com or www.facebook.com/pacificcrochets. or www.etsy.com/shop/pacificcrochets. Thanks so much and enjoy!


