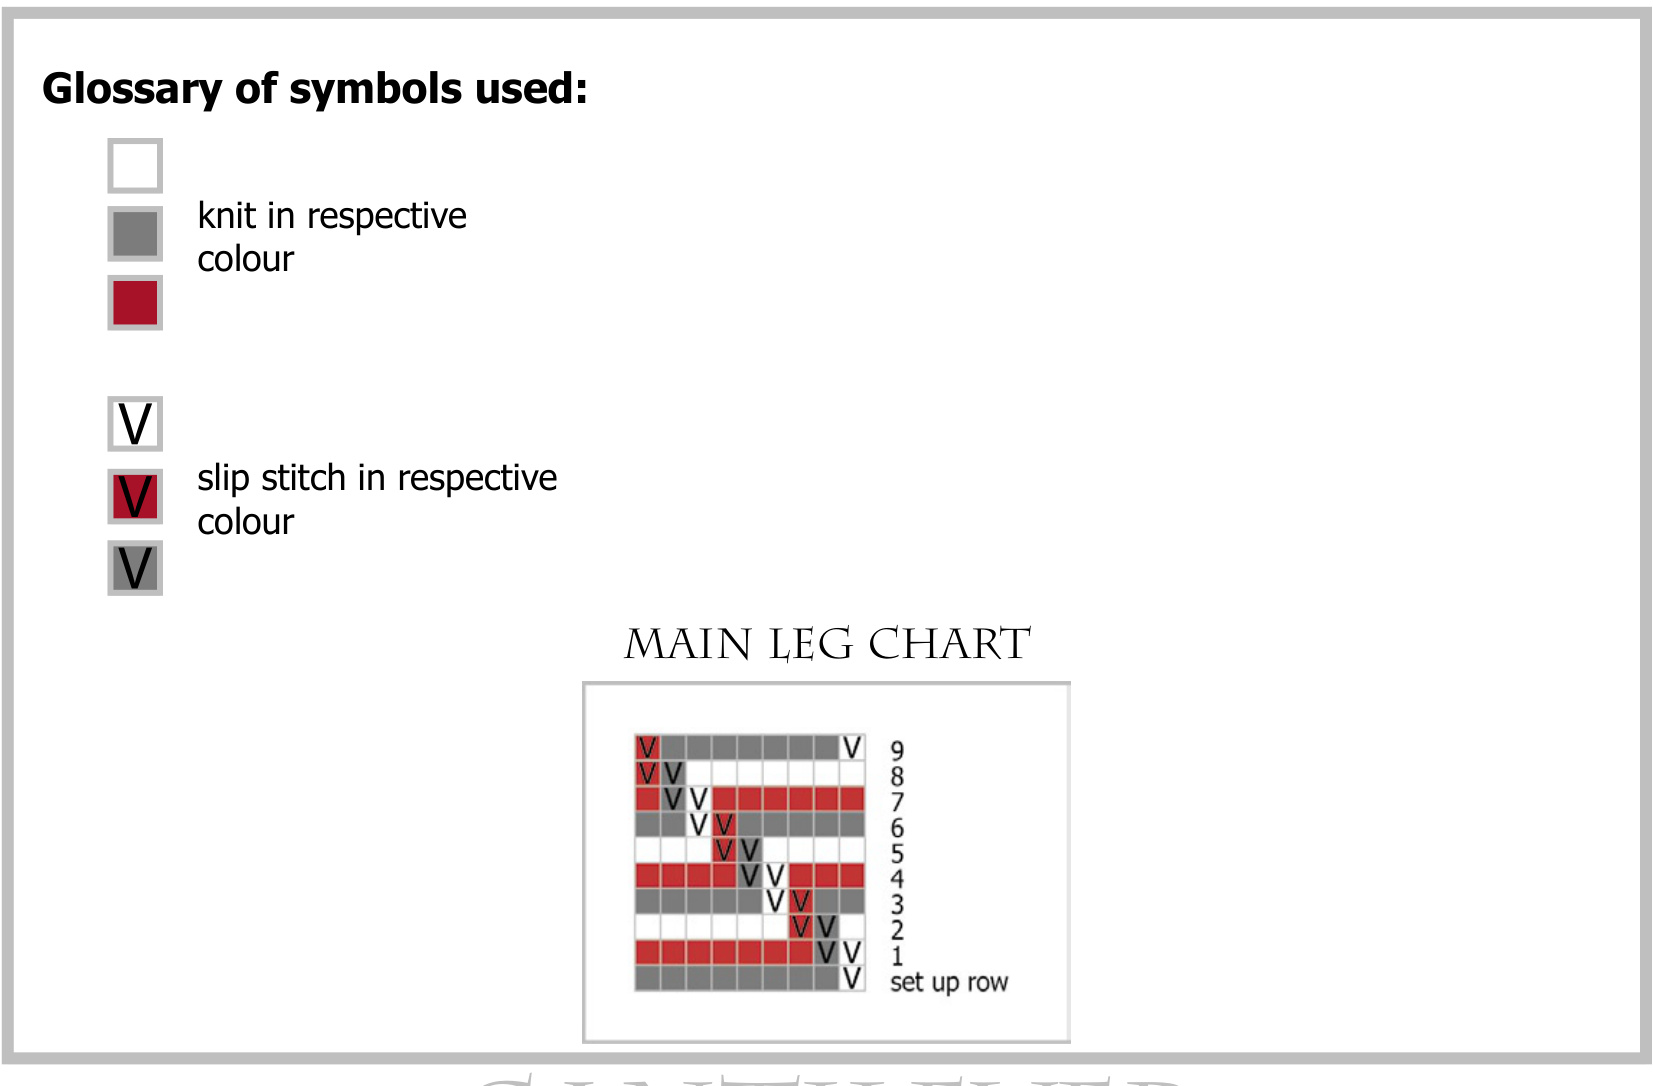
CANTILEVER
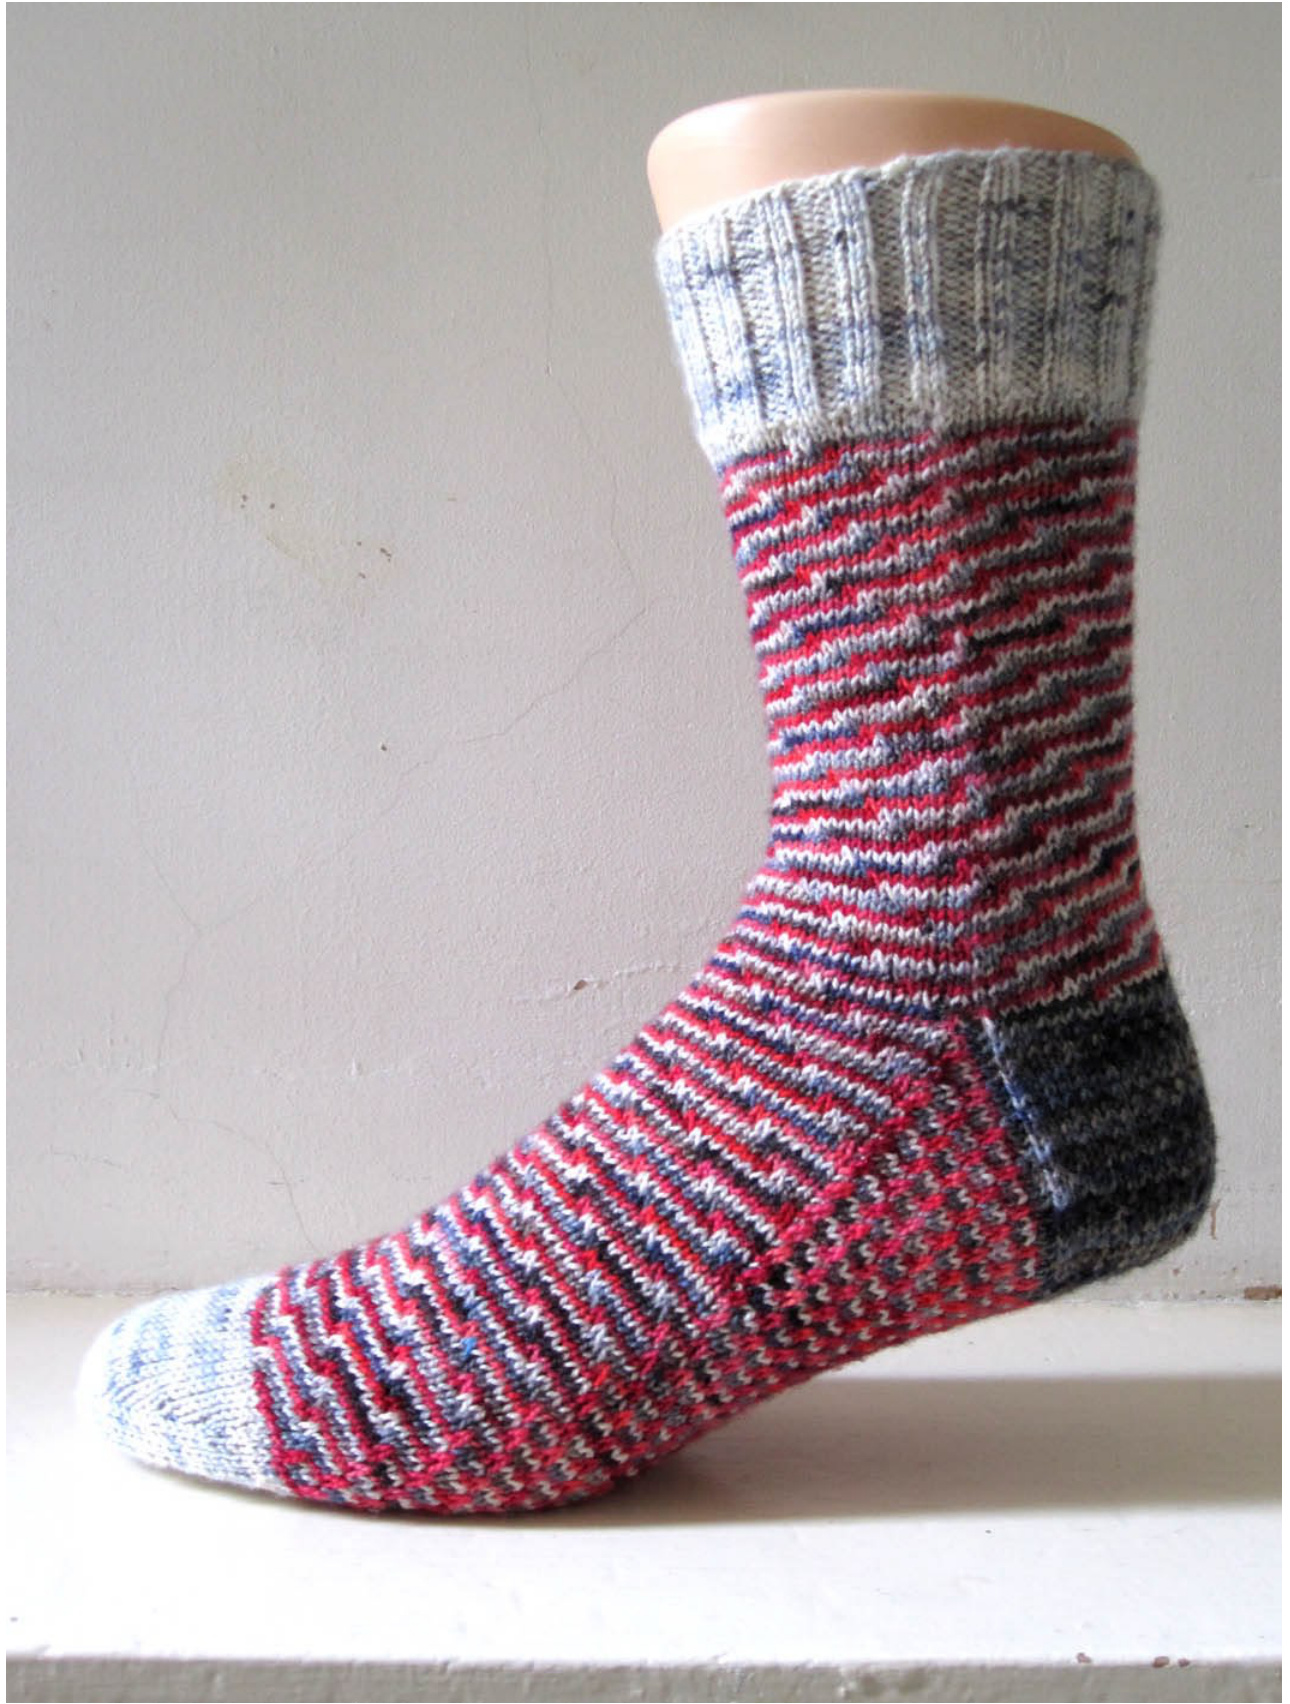
COPYRIGHT ? GENERAL HOGBUFFER 2015 This design started, like so many others, when I doodled with some coloured pens on a piece of graph paper. It falls into the Mosaic Knitting category due to the fact that each round, certain stitches in one colour are slipped while another colour is worked, but other than classic Mosaic it uses three colours and only one round per colour. The resulting look is one of continuously slanting lines and essentially very simple, but like most simple things it is very effective.
Size:
The possibilities are, if not endless, but very big. I have worked this with a pattern repeat of 9 sts, so you could work this over 54, 63, 72, 81 etc etc sts. However, I have also given you alternative charts for an 8 sts and a 10 sts repeat, so if you cannot make the 9 st repeat work, one of these should do the trick. Please see the notes on gauge below for these alternatives.
Material:
You will need three colours with reasonable contrast; a high contrast will result in a very graphic look, while a low contrast will yield a very subtle effect. In my sample, the dark neutral and the light neutral had some parts with almost identical tones, which made the design fade out slightly in areas where these tones met. If you want to avoid this, make sure you are using solid colours with strong contrasts, although personally, I quite like the more subtle patterning you get from a variegated yarn. Depending on which colours you chose for cuff, heel and toe you may need more from one colour or another, but overall, if you have 40g per colour you should be able to cover all eventualities.
Gauge:
On my sample, I got 36 sts over 4 inches / 10 cms, as the slipped sts not only draw the fabric in more compared to stocking stitch, they also reduce the stretchiness of the fabric a bit. So while I would normally work a plain sock over 64 sts, I used 72 sts for my sample (size M). Please be aware that the gauge may be different should you opt for one of the alternative repeats outlined above. The 8 st repeat will have 2 sts out of 8 slipped, while the 10 st repeat will have 2 sts out of 10 slipped, so the 8 st will have a tighter gauge and a lesser stretchiness than the 10 st repeat. I hate to say this, but I would go as far as saying that in that case, swatching will be essential.
Needle size:
Whatever needle size produces a fabric that you are comfortable with; I have used two 2.5 circulars throughout. I have written the instructions for circular needles and/or magic loop; if you prefer to work with DPN's please note that "needle 1" and "needle 2" may mean different things for you, other than that there should be no issues.
Further requirements:
Tapestry needle Stitch markers (although you could do it without if you prefer to)
Cuff:
Decide on the colour you would like your cuff to be in and cast on your required number of sts, see above for size options. If your number is not a multiple of 4 cast on the nearest higher multiple of 4 and decrease back to your chosen number after the cuff. Arrange half the number of sts on each needle, close to a round, taking care not to twist your sts. (I have actually worked my cuff on 80 sts and then worked a decrease round to get to 72 sts. Consider this option if your calves are significantly bigger than your ankles.) Work K2 P2 rib for at least 12 rounds; I have worked 24 rows on my sample socks.
Leg:
K 1 round. If you need to adjust your st number for reasons mentioned above use this round to decrease evenly to the number needed. Start working the main pattern chart; the first round will be in the colour you are presently working with, rounds two and three will introduce your remaining colours. Throughout the whole design, you will continue in this same sequence of three colours, one round per colour. The slipped sts in the chart are shown in the colour that they will appear in your work, NOT the colour that your are working the round with. For my 72 st sample, the chart repeats 8 times around the leg. Decide which colour you would like to work the heel in, and work the leg to your preferred length, ending with a round just before your chosen heel colour. Break off the two colours not used for the heel.
Heel:
The heel will be worked in one colour over the sts on needle 1 only, i.e. half your chosen number of sts. If your total number is odd work the heel over an even number and leave the odd number for the instep.( i.e. for 81 sts work the heel over 40 and leave 41 for the instep.) Row 1: work according to the chart to the end of needle 1, turn Row 2: sl1 purlwise, P to end, turn Row 3: [sl1 purlwise, K1] to end, turn Row 4: sl1 purlwise, P to end, turn Row 5: sl2 purlwise, [K1, sl1 purlwise] to last 2 sts, K2, turn Repeating rows 2 to 5, work the heelflap as long as desired, I have worked a total of 42 rows (including the first row), but feel free to adjust that number if you have a very flat or a very high instep, just make sure you end after a Ws row, ready to work on the Rs. Turn the heel as follows: The first two rows will depend on whether the number of sts used for the flap is a multiple of 4 or not.
For multiples of 4:
Row1: sl1 purlwise, K half the number of sts used for the flap, SSK, K1, turn (even number of sts unworked) Row2: sl1, P3, P2tog, P1, turn (again, same even number of sts unworked)
For even numbers that are not multiples of 4:
Row1: sl1 purlwise, K half the number of sts used for the flap, K1, SSK, K1, turn (even number of stsunworked) Row2: sl1, P5, P2tog, P1, turn (again, same even number of sts unworked) For all numbers: Row3: sl1, K to 1 st before the gap, SSK, K1, turn Row4: sl1, P to 1 st before the gap, P2tog, P1, turn Repeat the last 2 rows until you have used up all the sts on your needles, ending with a Row 4 and an even number of sts on your needle. Just to give you an example: I worked my sock over 72 sts, that means I used 36 sts for the heel (a multiple of 4, so I used the first set of instructions) and I ended after the heel turn with 20 sts On the needle. K half of these sts onto one needle - this is the centre back of your sock and the new beginning of your rounds.
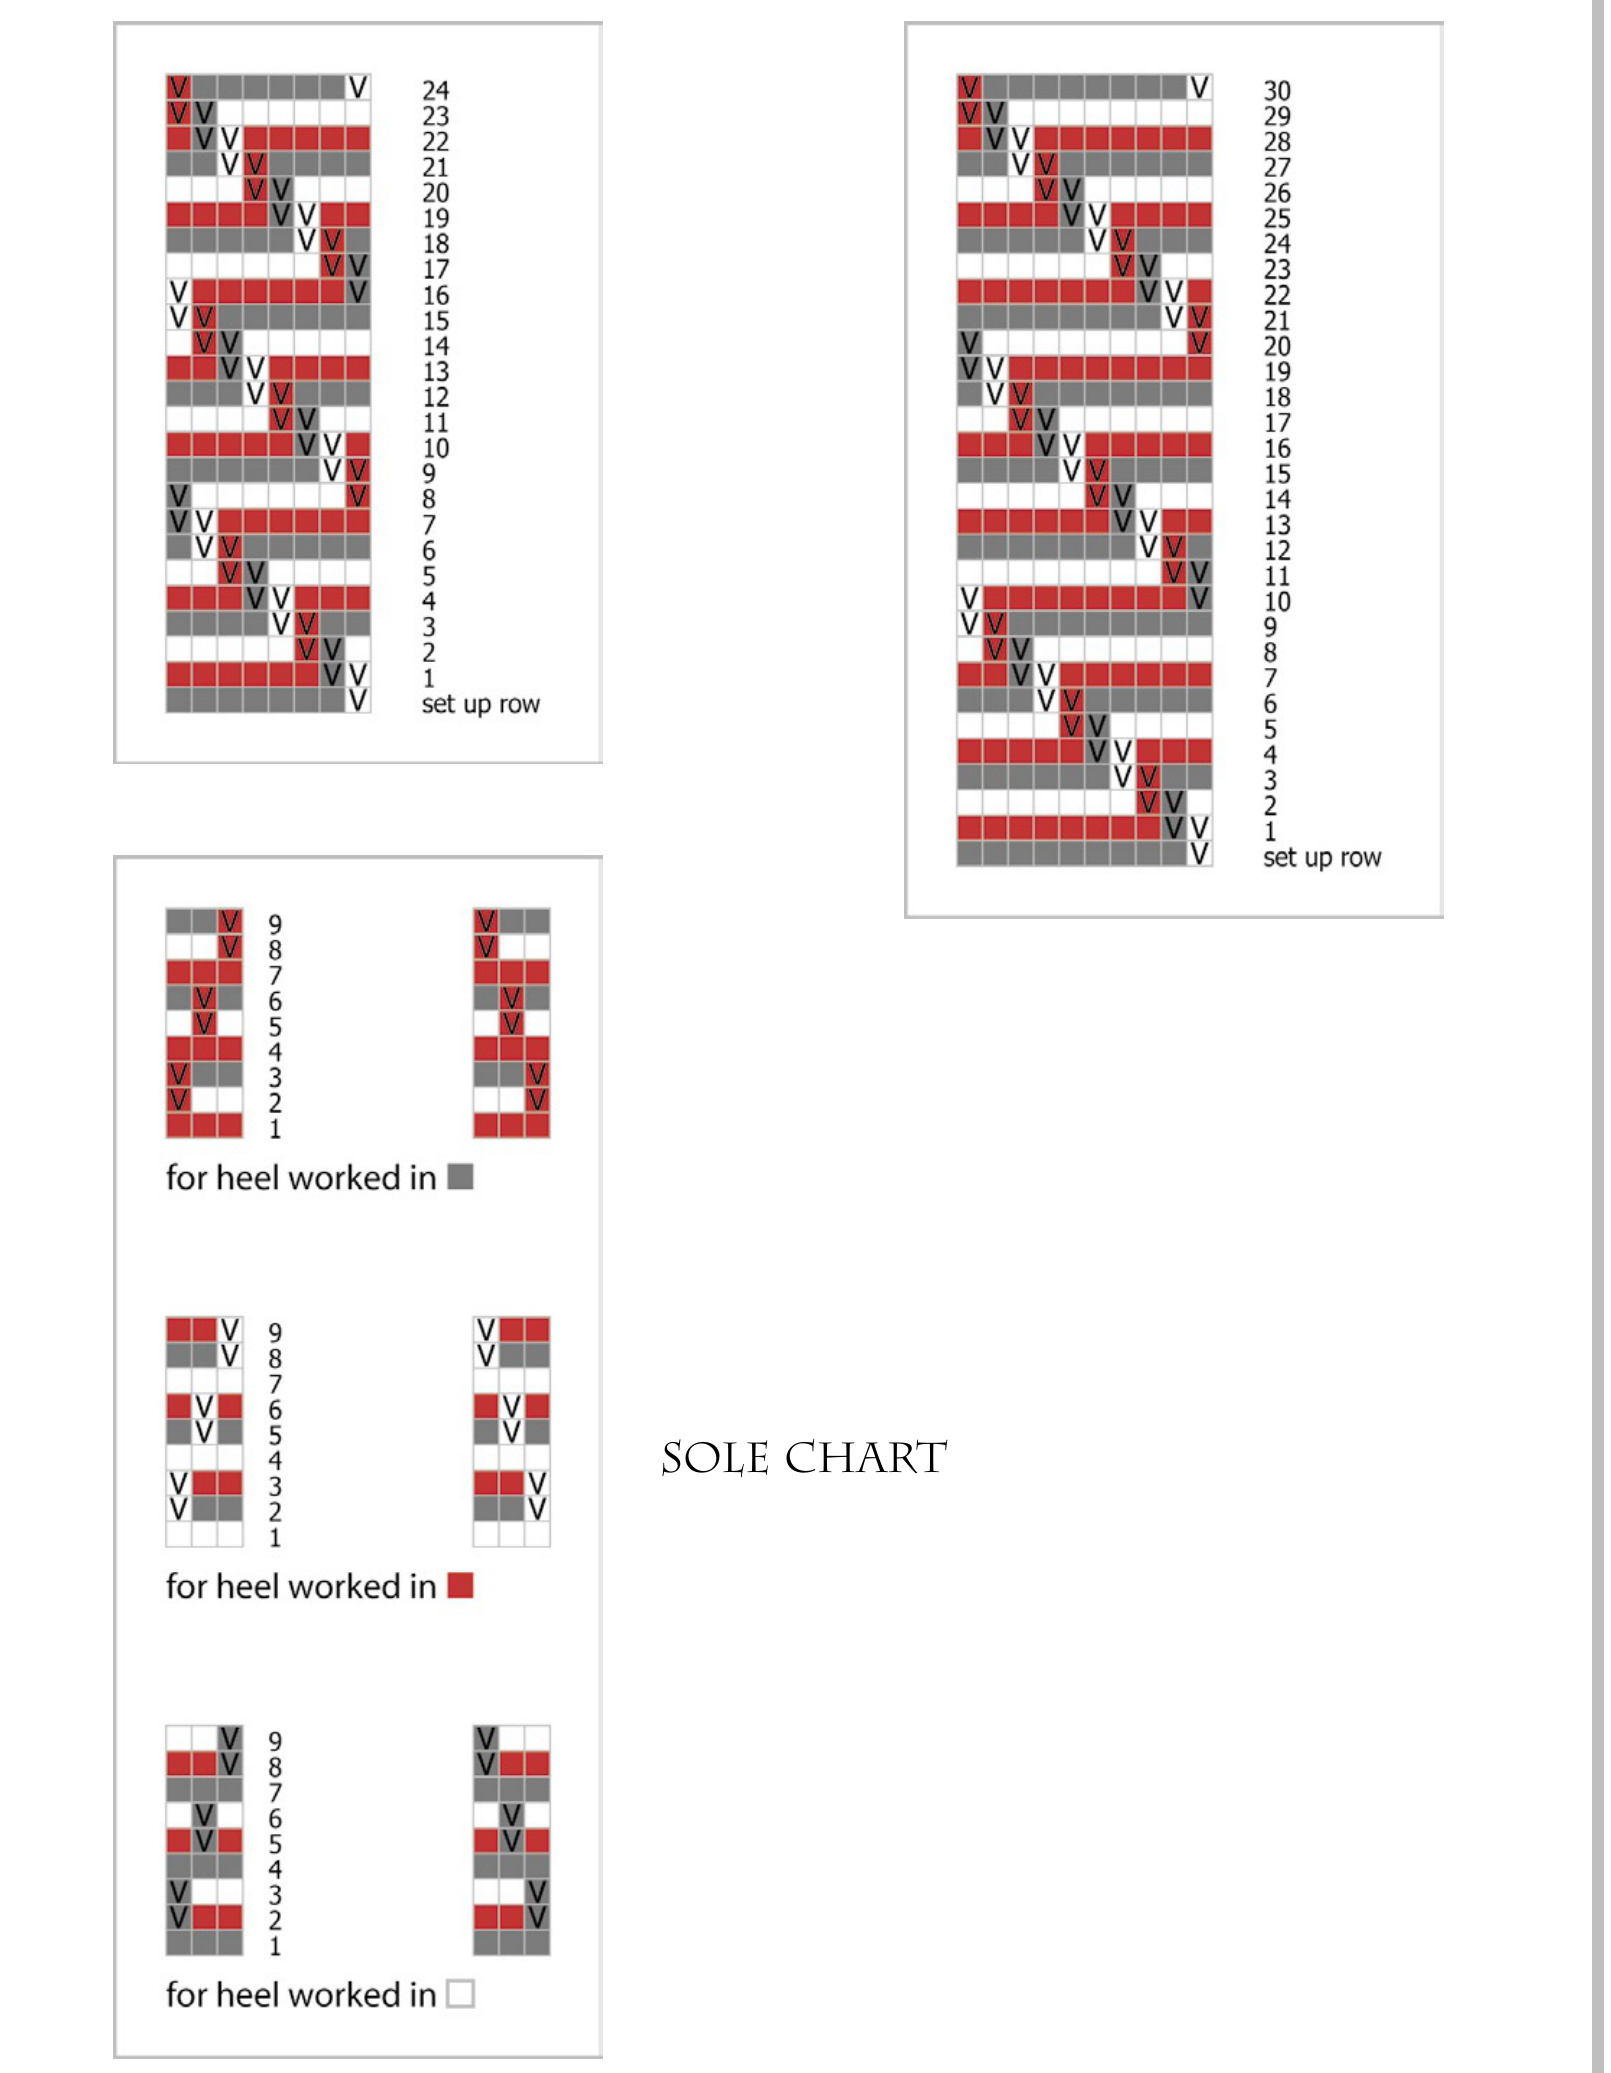
Gusset:
With needle 1, K the other half of the sts left after the heel turn. Pick up and K 1 st in each of the slipped stitches all the way down the heel flap to the instep. You should pick up half the number of sts that you have knitted rows in your flap, i.e. 21 sts for a 42 row flap. M1 st in the gap between the flap and the instep sts, Place first marker, work across half of the instep according to the next row of the main chart. With needle 2, work across the other half of the instep sts according to the main chart, place second marker, M1 in the gap between the instep and the flap. Pick up and K one st in each of the slipped sts up the second side of the heel flap, taking care to pick up the same number as on the other side. K the first half of the heel sts to centre back. The whole of the heel and this first round were all in one colour, from the next row you will revert to the 3 colour sequence as used on the leg portion. Because the order of colours will depend on the choice of colour for the heel I have provided the sole repeat in three versions, use the one that is correct for your sock. Round1: work sole chart pattern to 2 sts before marker, SSK, sl marker, work instep according to main chart, sl marker, K2tog, work sole pattern to end (you can mirror the sole portion from needle 1 if you prefer, see charts provided). Round 2 + 3: work sole chart pattern to marker, SsK, sl marker, work instep according to main chart, sl marker, work sole pattern to end as before. Repeat these three rounds until you have decreased your total stitch count to your original number (you can adjust your foot by doing fewer or more decreases if you know that you need more or fewer sts for your foot than for your leg).
Foot
Continue without decreasing, working the sole pattern over the sole sts and the main pattern over the instep until you have just over 2 inches / 5cm LEsS than your total desired foot length. End with the colour that will come just before your chosen toe colour in the sequence. Alternatively, you could continue the three colour sequence all through the toe shaping.
Toe:
K 1 round in your chosen colour, break off colours not used (if working a plain toe). K 1 round, decreasing 8 sts evenly OR ANY NUMBER THAT WILL RESULT IN A MULTIPLE OF 4 STS !!! For example, if you are using 81 sts, decrease 9 to bring you to 72. To place your markers for the toe decreases (if you prefer to use them), work first round as fol lows: K (a quarter of your total sts minus 3), K2tog, K1, place marker, K1, SSK, K to end of needle. Repeat on Needle2 Round2: K Round3: K Round4: K Round5: [K to 3 sts before marker, K2 tog, K1, sl marker, K1, SSK, K to end] on each needle Round6: K Round7: K Round8: as Round 5 Round9: K Round10: K Round11: as Round5 Round12: K Round13: as Round5 Round14: K Round15: as Round5 Round16: K Round17: as Round5 Keep working Round 5 until you have a total of 16 sts. With a DPN, K 4 sts from needle1. Move the remaining 4 sts from needle1 and the first 4 sts from needle2 onto a second DPN. Move the last 4 sts from needle2 onto the first DPN. Cut yarn, leaving about 10 inches / 25 cms and graft the toe closed. Turn sock inside out and darn in all loose threads.
Further suggestions:
If you would prefer to substitute a short row heel, you will not have to work the gusset decreases, so you could either work the sole and instep patterns as set out, or you could work the whole of the foot in the main pattern. Both the cuff and the toe could be worked in the three colour sequence if preferred. If you are using up leftovers, you could work cuff, heel and toe in a fourth colour. If you are very sensitive on your soles you may not like the idea of slipped sts in this part. You could work the soles in just plain stripes, but be aware that the resulting sock will be misshapen, since the top of the foot will be shorter than the sole.
Glossary:
St, sts stitch, stitches K knit P purl SI slip M1 Make one new sts by lifting the strand between two sts and knitting it tbl tbl through the back loop K2tog knit 2 stitches together SSK slip, slip, knit. Slip 2 stitches separately as if to knit, insert left needle into these two stitches from the right and knit onto right needle. P2tog purl 2 stitches together WS, RS Wrong Side, Right Side