Isabella - Crocodile Stich Baby Mittens
Size 0-3months
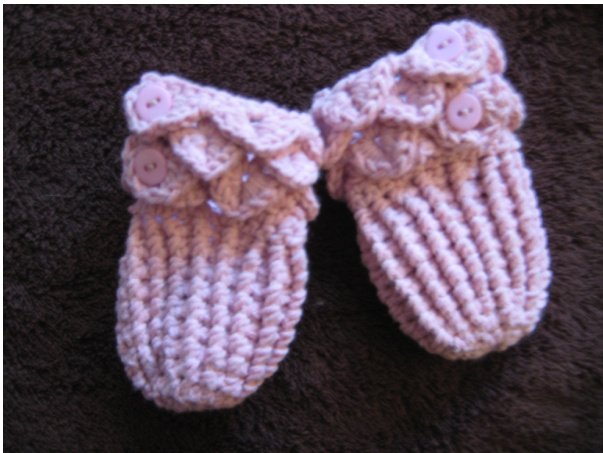
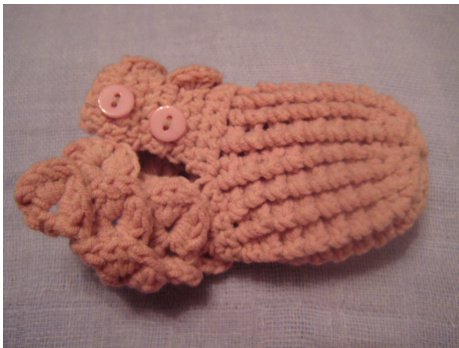
A very cute little pair of ribbed mittens with an adjustable crocodile stitch cuff. Should easily fit 0-3 month old babies (still fits my 3month old son) and because of the adjustable cuff can be used as scratch mitts or as winter hand warmers over the cuff of a coat. The pair shown have been worked using 1 skein of Sirdar Calico DK in shade 727 - Miami. The calico thread is beautifully soft without out being too fluffy so should not irritate your little one. They also look very cute worked in the Sirdar Smiley Stripes DK although any DK yarn could be used. You will need 4 little buttons (approx. 1cm diameter) for fastening the cuff. These are stitched to the flat section of each cuff and the V-stitch form the button holes. To do the cuff up tighter just button though the next V-stitch along.
Abbreviations
Ch - Chain Dc -Double Crochet Htr - Half treble crochet Bphtr - Back post half treble crochet (see below) Fphtr -- Front post half treble crochet (see below) V-stitch - Half treble crochet, ch1, half treble crochet in the SAME stitch.
Back Post Half Treble Crochet (BPHTR)
Work a htr around the post of the htr in the row immediately below. Yarn around hook, insert hook from back to front, around the post and back out behind the work. Draw loop through (3 loops on hook). Yarn round hook draw through 3 loops on hook to complete..
Front Post Half Treble Crochet (FPHTR)
As bphtr but insert hook from front to back around post and back out the front of the work.
Crocodile stitch
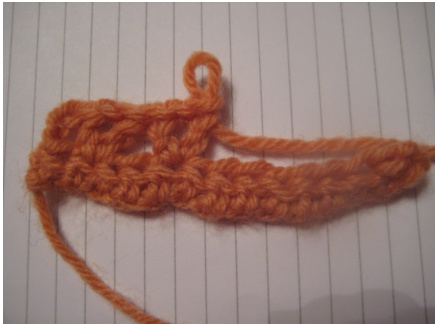
A row of V-stitches form the basis for the pattern. Image shown uses treble crochet rather than half treble purely for clarity. Stitches work first down the first htr of the v-stitch.
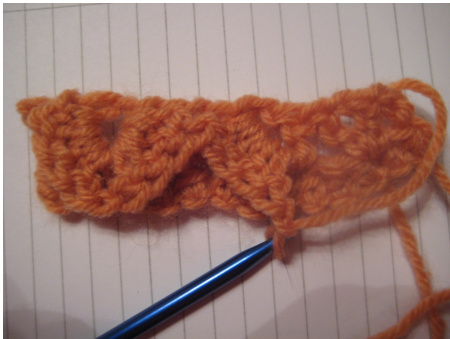
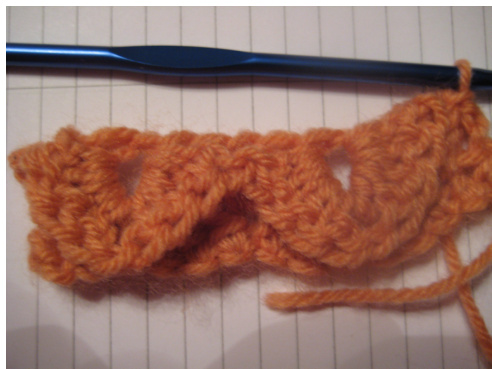
Then ch1 and work htr back up the second htr of the v-stitch to complete the scale.
Mitten Main Body Make 2
Ring Ch5 and join with a slip stitch R1 - Ch2, 11 htr in round, slip stitch join (12stitches) R2 - Ch2, 1htr in same space, \*2htr in next htr\* repeat from \*to\* to end. Slip join. (24stitches) R3 -Ch2 (as bphtr), fphtr in next htr, 2htr in next htr, \*bphtr, fphtr, 2htr in next htr, repeat from \* to end. Slip join (32stitches) R4 to 9 - Ch2 (as bphtr), fphtr, \*bphtr, fphtr repeat from \* to end. Slip join (32 stitches) R10 - DECREASE - Ch2 (as bphtr) fphtr, \*skip next bphtr, fphtr\* twice, bphtr, fphtr, bphtr, fphtr, bphtr, fphtr (skip next bphtr, fphtr) twice. Bphtr, fphtr ^skip next bphtr, fphtr^ twice, bphtr, fphtr, bphtr, fphtr, bphtr, fphtr [skip next bphtr, fphtr] twice. Slip join and fasten off. (24stitches)
CUFFS
LEFT CUFF
R1 - Ch6 and then with wrong side facing, Dc in 6th stitch from where cuff main body was fastened off. Dc in each stitch around mitten body. Do not join (30stitches) R2 - Turn. Ch1, Dc in each stitch. (30stitches) R3 - Ch2, V-stitch in next stitch, (skip next 2dc, V-stitch in next) repeat to last 5 stitches. Htr in last 5 stitches. (9 V-stitich in total) R4 - Ch1, slip stitch in 5htr. Work 4htr down first htr of V-stitch, Ch1, work 4htr up second htr of V-stitch. Skip next V-stitch. Repeat to last stitch. Htr in last. R5 - Ch2, V-stitch in 1ch space of V-stitch in row below, repeat to last 5 stitches. On V-stitch where no scale has been worked work around both the threads from Rows 3 and 4. Htr in last 5 stitches. R6 - Ch1, Slip stitch in next 6 stitches and slip stitch in 1ch space of first V-Stitch. Work 4htr down 1st htr on next V-stitch, ch1, work 4htr up 2nd htr of V-stitch, skip next V-stitch, repeat to last stitch, slip stitch in last stitch. R7-8 - As rows 3 and 4 R9 - Ch1, dc in next 2 stitches, dc in 1ch space of V-stitch, repeat to end and fasten Off.
RIGHT CUFF
R1 - With wrong side facing, count back 6 stitches from where the mitten body was fastened off. Rejoin and Ch1. Dc in every stitch, do NOT join at the end. Ch 6. (30stitches) R2 - Turn and work dc in every stitch (30stitches) R3 - Ch2 (as htr), htr in next 4 stitches, V-stitch in next stitch, skip 2dc, V-stitch in next. Repeat to last stitch, htr in last. R4 -Ch1, 4htr down 1st htr of 1st V-stitch, ch1, 4htr up 2nd htr of V-stitch, skip next V-stitch. Repeat to last 5htr, slip stitch in each htr. R5 - Ch2, htr in next 4 stitches. V-stitch in 1ch space of V-stitch of previous row. Repeat to last stitch, htr in last. R6 - Ch1, slip stitch in 1ch space of first V-stitch, 4htr down 1st htr of 2nd V-stitch, ch1, 4htr up 2nd htr of V-stitch. repeat to last V-stitch. Slip stitch in 1ch space of Vstitch and last htr. R7-8 - as row 3&4 R9 - Ch1, dc in next stitch, dc in 1ch space, dc in next 2 stitches, repeat to last 5 stitches. Dc in last 5 stitches and fasten off. FINISHING Sew in all ends and sew 2 buttons on each 5htr band of cuffs level with the top and bottom scales, which will form the button holes.


