Crocodile Clutch
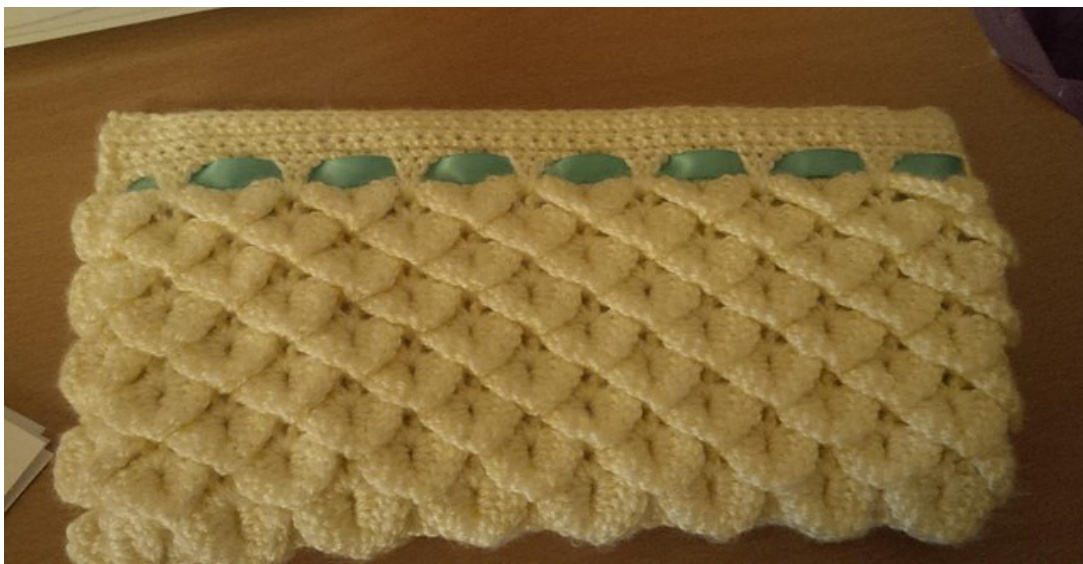
For this pattern I used the yarn Bernat Softee Baby in Antique White. One ball of yarn will make this size clutch. And the hook size is 4.omm. Also this pattern can be made to make a bigger or smaller purse or clutch just adjust the number of rows you have and the number of scales. ne important note I have to say, with this stitch always work in groups of 6 when casting on otherwise you will end up with uneven rows and an odd looking project. This clutch is crocheted in one long strip then folded and sewed closed with the yarn and a yarn needle. It is the easier way I found to make this. So for this you will need: 1 ball of Bernat Softee Baby in Antique White A 4.0mm crochet hook A yarn needle fabric lining of your choice A zipper Thread as close to the yarn color as you can get A sewing needle Abbreviations used: ch = chain DC = Double Crochet sl st = slip stitch st = stitch sk = skip = Repeat whatever steps fall between \* and \*
The Pattern:
Ch 15 sets of 6 (90 ch)
Row 1 : Sk 1st ch from hook, DC in 2nd ch from hook, \*ch 2, sk 2 ch, 2 DC in next ch, ch 2, sk 2 ch, DC in next ch\* repeat from \* to \* to end of row. Row 2 : Turn and ch 3, 4 DC around post DC, (without turning work over turn your work 90 degrees to make it easier to work around the next post) ch 1. 5 DC around the next post , ch l, skip the next set. (scales are set on every second set of posts, so there will be an empty one then a set with the scales.) 5DC down first post, ch 1, 5 DC up second post, ch 1\* repeat from \* to \* until the end. On the last scale when done sl st in the middle of the scale. Turn work. Row 3 : Ch 3, DC in centre of first scale, ch 2, 2DC between posts from the last row, ch 2 \* 2DC in centre space, ch2\* \* repeat from \* to \* to last st which was the beginning ch of the previous row, work 2 DC in that beg chain. Row 4: Ch 1, turn,leave the first set of post empty on this row and move to the second set. \* 5 DC around first post, ch 1, 5 DC around next post, ch 1, \* \*repeat from \* to \* to end of the row, sl st into the centre of the last set of posts. Repeat Rows 3 & 4 until you have 9 rows of "scales". Then repeat row 3 once more. Now SC for 5 rows, this gives you a good border on the top to sew with. Then bind Off. Now that you have this done fold the piece in half to it takes the clutch shape. Using extra yarn and the yarn needle, sew the open side and bottom closed and bind off. To make the lining I used a beautiful fabric I found and cut 2 pieces to fit inside the clutch giving an extra inch on the height because of sewing in the zipper. My fabric had a pattern on one side so I wanted that for the inside of the liner so you would see the pattern when you open the purse, so for that you want to sew If your fabric has no pattern then it doesn't matter which side is facing in. I found that if you sew your zipper on the fabric first then sew the fabric closed it gave much less hassle. Then to sew the lining inside the clutch you put the lining in the clutch and with a needle and thread sew it to the yarn. As you are really sewing on the wrong side leaves a nice clean outside of the clutch and no yuck yarn and thread bumps. To finish off if you want you can take a ribbon and weave it in and out of the gaps Now your clutch is done.


