
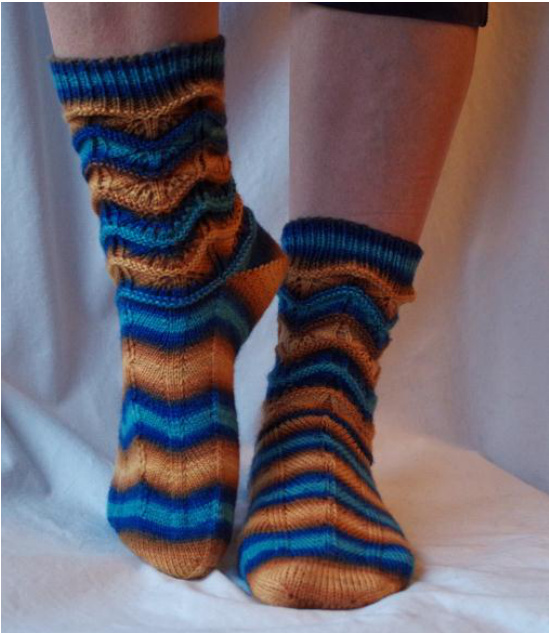
I designed this pattern for self-striping yarn challenge here on Ravelry SKA.The waves made by the pattern reminded me of dunes in the desert. I was going to call it Dunes but there were so many patterns by that name that I decide to name Barkhane instead. Pattern is written for Magic Loop or 2 circular (you can use 5 dpn by placing an equal amount of stitches on 4 needles; using needles 1 and 2 as the front or instep needles and using needles 3 and 4 as back/sole needles).
Sizes:
Yarn:
Needles:
Notions:
cabling needle (optional if you can cable without one)
Gauge:
Darning needle to Kitchener toe in stockinette 8.5/9.5 stitches and 11/12 rows per inch with US2/US1 needle in stockinette
Measurements:
Socks shown are the medium size and are 6 inches from cast on edge to start of short row heel, 9.5 inches from start of heel turn to end of toe. The lengths of the cuff, the leg and foot section are all easily adjustable. You decide the length of the cuff, leg and foot length. Choose the appropriate stitch count/needle size needed for your leg and foot circumference. Note that number of stitches/round varies because of the pattern. For example the medium size 72 sts varies from 66 to 72 stitches. That is why for the leg, a bigger needle is recommended
Written abbreviations:
| LH:lefthand K: knit | RH/RS: right hand, right side SSK: slip the next 2 sts knitwise one at a time to the |
| K2TOG:knit twostitches together P: purl | right hand needle,insert the left hand needle through the front legs and knit those 2 sts together |
| SLP: slip stitch as if to purl | St:stitch 1 (es) |
| Rnd: round(s) | WS: wrong side |
INSTRUCTIONS:
Cuff
With the larger sized needle, using twisted German cast-on (or your favorite loose caston); cast on 64/72/80 sts, then being careful not to twist sts; join to work in rnds. Divide sts to have an equal number of sts per needle; placing 32/36/40 sts on the front/instep needle, and 32/36/40 on the back/sole needle. Work in K1P1 ribbing for 16 rows (or desired cuff length). First stitch of front needle is the first stitch of all charts (page 4).
Leg
Leg Chart is worked twice column wise per rnd (once per needle). Work 6 repeats (row wise) of Leg Chart (page 4). If needed, work more (or less chart repeats) until desired leg length. Then work row 1 and 2 once. Switch to the smaller sized needle for the last round. From now on the rest of the sock will be knit with the smaller sized needle.
Heel
Short row heel is worked on back needle only (32/36/40 sts) with the smaller sized needle. I use Misocrafty's shortrow heel. (If you've never done a short row heel now is a good time to put a lifeline). You can find Misocrafty's shortrow heel tutorial at this link: http://web.archive.0rg/web/20061006003625/http://www.misocrafty.squarespace.com/jo urnal/2006/9/21/short-row-heel-tutorial.html
How to W&T (wrap and turn):
On the Knit Side: Knit the required stitches, bring yarn to front, slip st from LH to RH needle purlwise, and bring yarn to back, slip st back to LH needle. Turn work, you are ready for the purl side. On the Purl Side: Purl the required stitches, bring the yarn to the back, slip st from LH to RH needle purlwise, take yarn to the front, slip st back to LH needle. Turn work you are ready for the knit side.
How to work wrapped sts (wws):
On the Knit Side: Knit up to the wrapped st (single or double), before knitting the wrapped st, PU wrap(s) with RH needle tip (or do like I do, take the darning needle). Lift the wrap(s) and place the wrap on RH needle. Knit the next stitch and with LH needle slip (pass over) the wrap(s) over this newly knit stitch On the Purl Side: Purl up to the wrapped stitch but before purling the wrapped st, turn your work so that the knit side is facing you. With RH needle (or darning needle) lift the wrap(s) lift over and place on RH needle. Turn your work once more so that the purl side is facing you. Purl the wrapped st and with LH needle slip (pass over) wrap(s) over this newly purled stitch. Note: If like me, you are using the darning needle to pick up and place the wrap on the RH needle, lift the wrap from bottom to top of wrap and place on the RH needle and if you are using your RH needle to pick up wrap lift the wrap from top to bottom of wrap. Misocrafty suggest two ways of picking up the stitches in the socks shown the wraps were picked up from top and the sock shown in the tutorial picks them up from the bottom. Both ways look good just be consistent.
Beg short row shaping:
Row 1(WS): P31/35/39, W&T. Row 2(RS): K30/34/38, W&T. Row 3(WS): P to stitch before first wrapped st (in this case 29/33/37 sts), W&T. Row 4(RS): K to stitch before first wrapped st (in this case 28/32/36 sts), W&T. Repeat rows 3 and 4, working 1 less st before each W&T, until you have 8/10/12 "live" (unwrapped) stitches in the center of the needle and 12/13/14 wrapped stitches on each side (ending with a row 4, RS row). Note: How many stitches you leave unworked in the middle depends on how wide you want your sock heel to be. If you want it a bit wider, do a couple fewer short rows.
Reverse short row shaping:
Row 1 : P until you reach the first wrapped st, wws ( this once you will only have one wrap to lift), W&T Row 2 : K until you reach the first wrapped st, wws (this once you will only have one wrap to lift) , W&T Row 3 : P until you reach the next wrapped st, wws (from now on you will have 2 wrap: to lift),W&T Row 4 : Knit until you reach the next wrapped st, wws, W&T Repeat rows 3 and 4; until all 32/36/40 stitches are live again ending with a right side row ready to work the instep needle.
Foot
With smaller sized needle, work Instep chart pattern (page 4) on instep and stockinette on sole needle until you reach approximately 2 inches from end of foot. End after completing row 3 of Instep chart.
Toe
Rnd 1: Needle 1: K1, SSK, knit to last 3 STS, K2TOG, K1 Needle 2: K1, SSK, knit to last 3 STS, K2TOG, K1 Rnd 2 on Needle 1 and 2: K all stitches Repeat these 2 rnds until there are 18 /20/22 sts on each needle and then keep working Rnd 1 (decreasing every row) until there are 8/10/12 sts left on each needle. Graft toes with Kitchener st and weave in the ends. Notes: Use the numbers at the bottom of each chart as guide for size. I suggest using a black marker to hide those extra columns if you are knitting the small/medium size. It helps to watch Cat Bordhi's LLinc and LRinc videos on Youtube in order to understand the increases on the instep. 1 find them at this link: http://www.youtube.com/watch?v=SYOYMJBGx1


