Sonnet
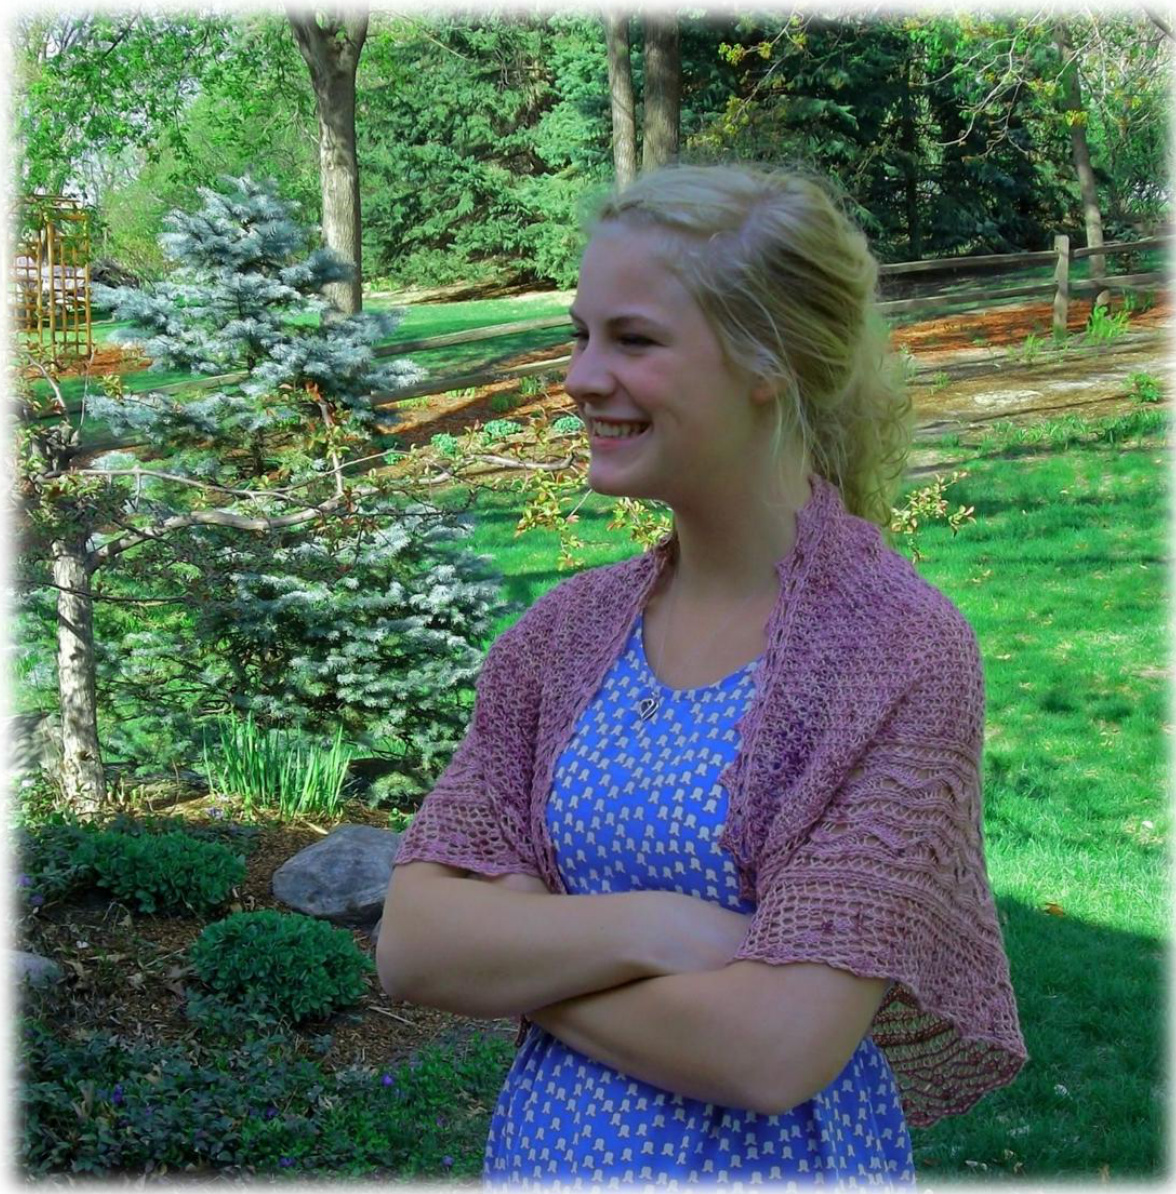
Designed by Michele Alberg
Find me on Ravelry as primenumbergirl or by email at alberg.michele9@gmail.com June 2012
Technical Information
Size
50 in (1.3m) wide x 28 in (0.7m) deep after blocking Approximately 36 in (0.9m) by 22 in (0.55m) before blocking
Materials:
600 yds (550 m) of Sun Valley Fibers MCN Lace (800yd or 730 m/150g skein) Colorway-Adornment 80% merino wool, 10% cashmere, 10% nylon
Needles:
One 32" circular needles US 4 (3.50mm)
Tools:
1 stitch marker & Blunt tapestry needle, 2 stitch markers
Gauge
My gauge was 24st/4 in (10 cm) on main body pattern after wet blocking. Do not over block the main body pattern. The pattern should be open but the fabric structure should still remain stretchy. The Wide Border will be quite heavily blocked.
Special Notes:
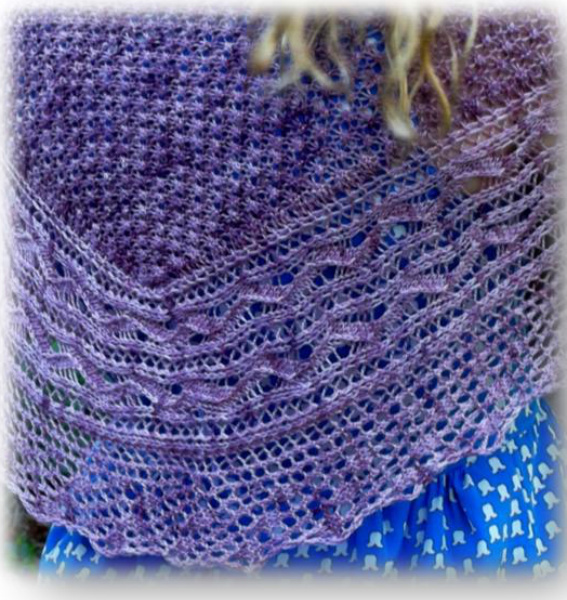
The main body of this shawl is knit with a modified trinity stitch pattern. Trinity stitch is unusual in that the wrong side of the pattern is worn to the outside of the shawl. Once the main body is worked it is flipped over so that the wrong side is facing outward when the stitches for the border are picked up.
Method of Construction:
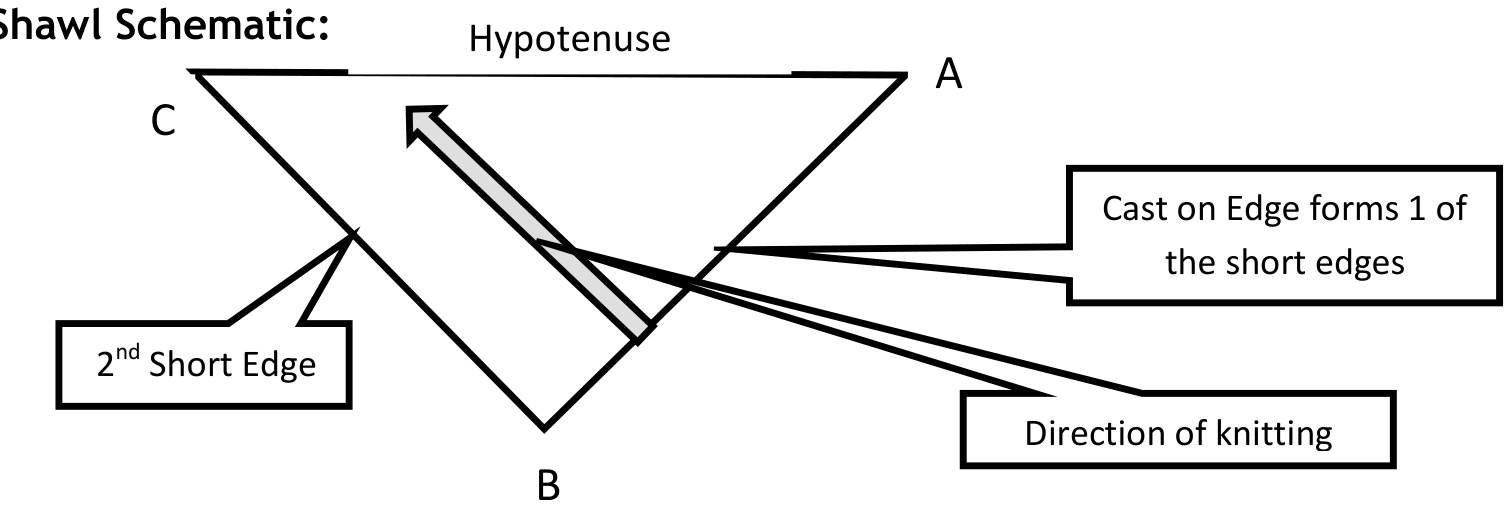
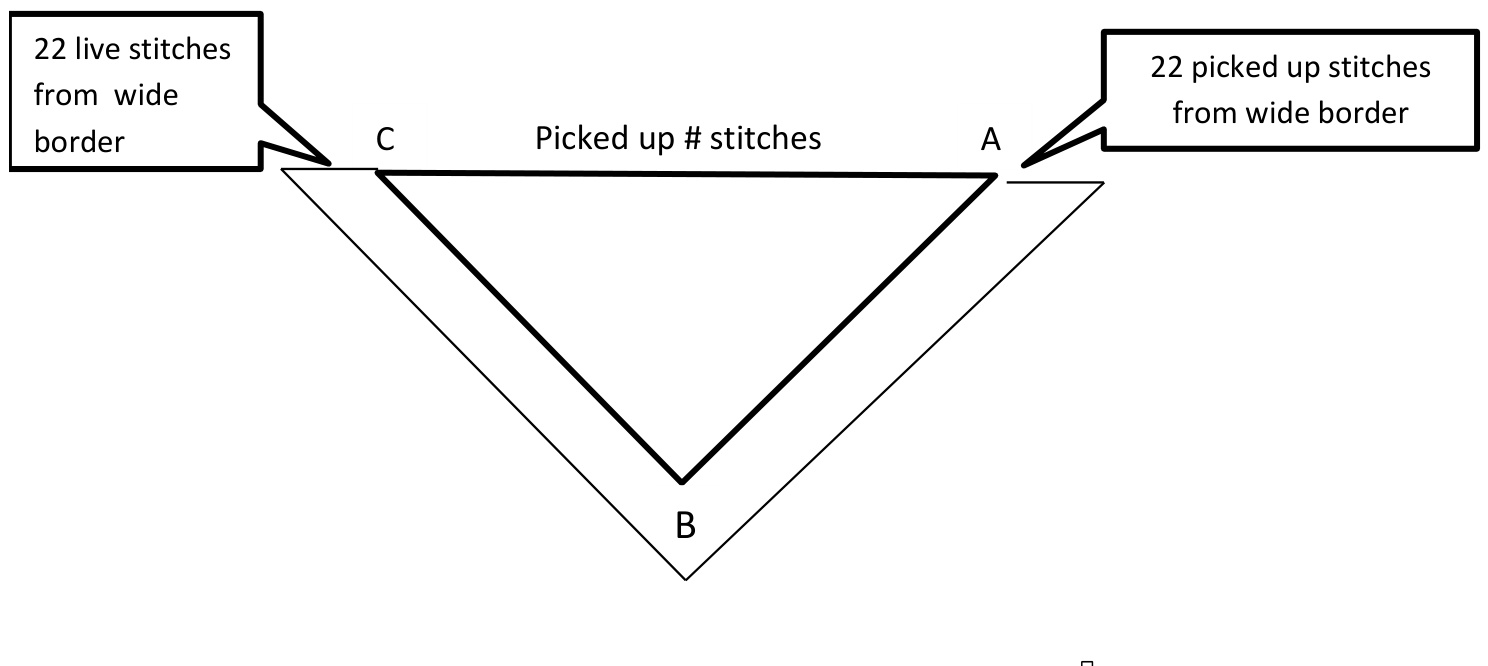
This shawl will be constructed without any cutting of the yarn between the main body of the shawl and the knitted on borders. This method of construction is common for Shetland shawls and other Victorian era shawls and will leave you with only the two ends to weave in. First you will cast on the stitches between points A and B on the Shawl Schematic and knit the modified trinity stitch pattern, decreasing on the hypotenuse edge (between points A and C). When the main body of the shawl is completed you will have 1 remaining stitch at Point C. Once you have completed the main body, you will pick up stitches between Points C and B and then between Points B and A, and finally cast on additional stitches for the Wide Border (Chart A). As you knit the Wide Border you will attach it to the main body of the shawl by binding the edge to the stitches you picked up along the edge ABC. Once the Wide Border is completed all of the picked up stitches will have been consumed and you will bind off the remaining live stitches (leaving 1 live stitch). You will then pick up stitches along the edge of the Wide Border to point C and continue picking up stitches from C to A and then continue to pick up stitches along the opposite Wide Border edge (at point A). Next you will knit a Narrow Border (Chart B) along the hypotenuse of the shawl in a similar manner as you did for the Wide Border. Once the Narrow Border is complete you will bind off the Narrow Border stitches and block the shawl.
Size Adjustment Notes:
This shawl is quite easy to change in size. Either of these methods can be used depending on your yarn choices: If you wish to knit with a yarn that is heavier than lace-weight, using larger needles and heavier weight yarn will allow you to follow the directions as written and create a larger shawl. One of test knitters used a dk weight yarn on Us8 needles and knit a shawl that was, after blocking 68" x 36" (1.9m x 0.9m), and consumed about 750m of yarn. However, if you wish to use a lace-weight yarn you will find that casting on more stitches to create a larger triangle is the easiest way to increase the shawl. The number of cast-on stitches should be a multiple of 4 + 2 additional stitches. When you pick up stitches along the edges from Points C to B to A, you will pick up half the number of cast on stitches on each side. For example, for my shawl, 3.2 cast-on stitches created an additional 1 inch (2.54 cm) of width. If I wanted to make my shawl 10 inches wider I would cast on 32 additional stitches (158+32=190 st). I would then pick up 94 stitches between Points C and B and another 95 stitches between points B and A. Picking up for the narrow border is straightforward. Follow the directions for the narrow border but pick up more stitches betweenPoints C and A. Decreasing the shawls size can be done in a similar manner. Using smaller gauge needles will result in a shawl that is smaller, or casting on fewer stitches can also be done. Just make sure that the number of cast on stitches is a multiple of 4 +2 additional stitches.
Sonnet Pattern:
Main Body in Modified Trinity Stitch Cast-on 158 stitches using knitted cast on. Work the four set up rows and then repeat Rows 1-4 until you have decreased down to 10 stitches. Work the last 10 stitches using Rows 5-9 Main Body Set Up (work set up rows once) Set Up Row 1: Knit all stitches Set Up Row 2: Sl 1 wyif, purl to last 2 stitches, k2 Set Up Row 3: k2, \*(k1, yo, k1) in 1 stitch, p3tog\*, repeat stitches between \*'s Set Up Row 4: Purl to last 2 stitches, k2 Main Body (repeat Rows 1-4 until you have reduced final stitch count to 10) Row 1: k2, \*p3tog, (k1, yo, k1) in 1 stitch\*, repeat stitches between \*'s until last 4 stitches, p4tog Row 2: Purl to last 2 stitches, k2 Row 3: k2, \*(k1, yo, k1) in 1 stitch, p3tog\*, repeat stitches between \*'s until last 5 stitches, (k1,yo,k1) in 1 stitch, p4tog Row 4: Purl to last 2 stitches, k2
Main Body Completion (work rows 5-9 once)
Row 5: k2, p3tog, (k1, yo, k1) in 1 stitch, p4tog Row 6: Purl to last 2 stitches, k2 Row 7: k3, p4tog Row 8:p2 ,k2 Row 9: p4tog. There will be one stitch left on needles after this row.
Wide Border
After you have worked the main body of the shawl, turn the shawl so that the wrong or "nubby" side of the trinity stitch is facing you. This will be the side that will be worn outward. Begin the Wide Border by picking up and knitting the stitches along the two shorter edges of the shawl between Points C and A as shown in Schematic A below. Pick up and knit 77 stitches along the edge between Point C and B (78 stitches on the needle including the stitch left on the needle after Row 9). Place a marker and pick up and knit and additional 78 stitches along the edge between Point B and A. The only purpose of this marker is to facilitate counting stitches between Points B and A.
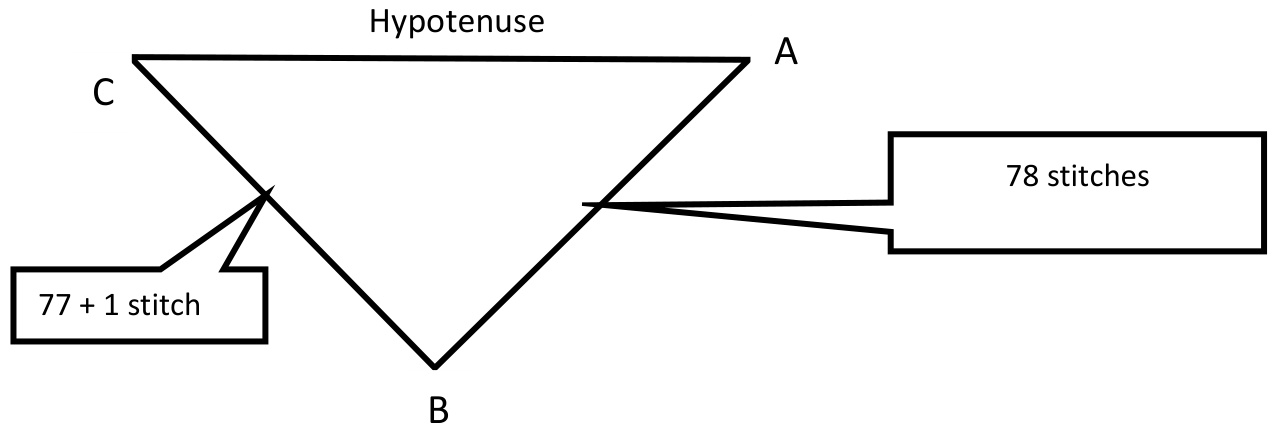
Schematic A: Location and Stitch Count for Wide Border Using the knitted cast on, cast on 44 stitches (these are the stitches that will form the Wide Border of the shawl. Row 1: Set up Row: Purl 43 of the cast-on stitches placing a stitch marker (SM) between the 19th and 2o't purled stitch (the purpose of the SM is to help keep track of the wide border pattern where it moves from the garter stitch based pattern and the stockinette based pattern). After purling 43 stitches you will have 1 remaining cast-on stitch on the left needle. Purl this last cast-on stitch together with the next stitch (last picked up stitch at Point A). You have now consumed one picked up stitch and have begun the process of attaching the knitted Wide Border to the shawl. Continue to work rows 2-13 of the Wide Border using Chart A or the written instructions below the chart until you have used up all of the picked up stitches and you are back to Point C. Each EVEN side row (right side, outward facing) is begun by slipping the first stitch with the yarn in the back. Each ODD side row is ended by purling the last stitch together with the next picked up stitch along the shawl edge. When you reach the marker that was placed at Point B, remove the marker and continue knitting the Wide Border until you have used up all the picked up stitches along the shawl edge, ending an odd row of Chart A (inside edge of the Wide Border). Turn the work and loosely bind off the live stitches of the Wide Border leaving 1 stitch remaining on your needle.
Narrow Border:
Next work the Narrow Border along the hypotenuse of the shawl (Points C to A) as shown in Schematic B below. Turn the shawl and with the wrong (nubby) side of the trinity stitch still facing upwards, pick up 22 stitches along the edge of the Wide Border to Point C. Continue picking up stitches between each of the trinity bumps (every 4 rows) from Points C to A. This longer spacing between picked up stitches will help ensure that the shawl will not overstretch along the bias of the shawl. Once you reach Point A, pick up an additional 22 stitches along the edge of the opposite Wide Border. The number of stitches that you picked up between Points C and A is not particularly important (in my shawl it was about 79 stitches). If you changed the size of the shawl by casting on more or less stitches for the main triangle (see Size Adjustment Notes) the number of stitches will be more or less depending on the number of cast on stitches. Using the knitted cast on, cast on an additional 5 stitches. Schematic B: Location and Stitch Count for Narrow Border Setup Row: Purl 4 of the cast-on stitches. You will have 1 remaining cast-on stitch on the left needle. Knit this stitch together with the next stitch (last picked up stitch at Point A). You have now consumed one picked up stitch and have begun the process of attaching the knitted Narrow Border to the shawl in the same manner as the Wide Border was completed.
Continue knitting rows 1-8 of the Narrow Border using Chart B or the written instructions below the chart until you have used up all of the picked up stitches. Each ODD side row is begun by slipping the first stitch with the yarn in the back. Each EVEN side row is ended by knitting the last stitch together with the next picked up stitch along the shawl edge. As in the wide border, the EVEN side row will be the public (or outward facing) side of the shawl. End the shawl when the last picked up stitch has been bound off. Cast off the remaining Narrow Border stitches loosely. Block the shawl to final size per Blocking instructions.
BLOCKING:
Blocking wires simplify the blocking procedure but T pins can be used as well. Begin by soaking the shawl for %2 hr in tepid water. Squeeze as much water as possible from the shawl. If using Block wires: Begin by running block wires along the hypotenuse of the shawl. Next run blocking wires down both of the sides towards point B. However, because the bottom of the shawl is curved rather than pointed, the blocking wires should only be attached about 80-85% of the way down each of the sides, leaving the bottom, curved section, free. are not using blocking wires omit the blocking wire step and proceed Continue blocking the shawl as follows: 1. Lay the shawl out on a flat surface and locate the bottom tip of the shawl (point B). Secure that to the blocking surface with a T pin. 2. Locate the edge at the outer edge from Point B. Secure that to the blocking surface with a T pin. 3. Move to the top edge of the shawl that is directly above Point B (half way between Points A and CO and stretch the shawl to the desired depth of the shawl (about 28-30 inches). Secure this position to the blocking surface with T pins. 4. Stretch the hypotenuse to the desired width (about 50 inches) and pin into place. 5. Position the sides to match each other, ensuring that the Wide Borders are the same width on both sides. Do not pin in place yet. 6. Stretch the curved edge of the shawl bottom so that the Wide Border curves evenly around the tip of the shawl. Pin these into place. 7. Go back to the Wide Border along the sides and pin these into place. y thoroughly and weave the two ends of the yarn into the shawl edge
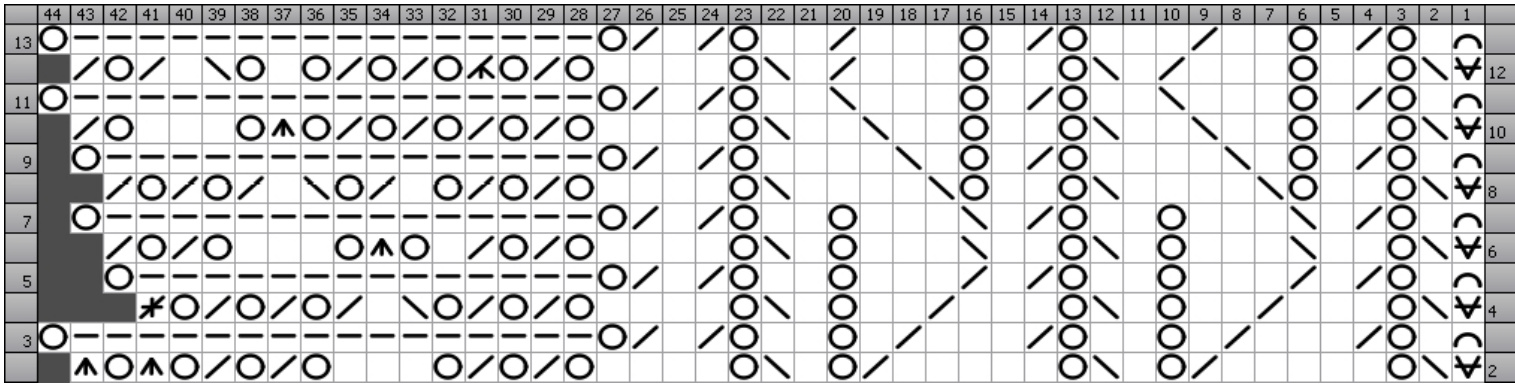
Chart A: Wide Border
Terminology: Key to stitches on Charts A and B and written instructions
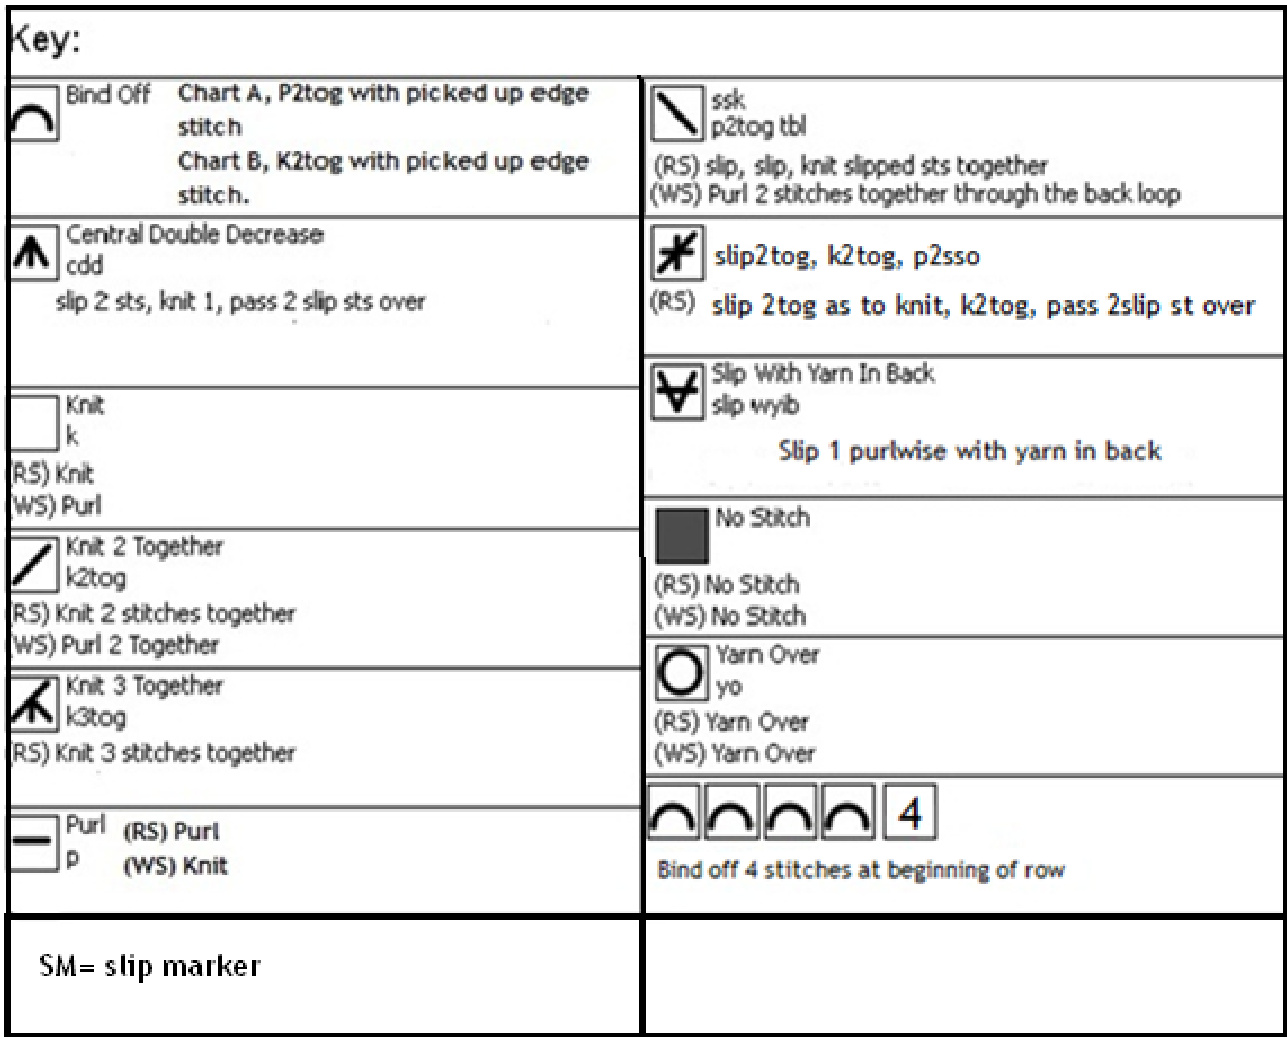
Chart A: Written Instructions
Row 2: slip 1 wyib, ssk, yo, k5, k2tog, yo, k1, ssk, yo, k5, k2tog, yo, k1, ssk, yo, k2, SM, k2, yo, k2tog, yo, k2tog, yo, k3, yo, k2tog, yo, k2tog, yo, cdd, yo, cdd Row 3: yo, k16, yo, p2tog, SM, p1, p2tog, yo, p2, yo, p1, p2tog, p3, p2tog, yo, p2, yo, p1, p2tog, p3,p2tog, yo, p1, p2tog with picked up stitch on edge Row 4: slip 1 wyib, ssk, yo, k3, k2tog, k2, yo, k1, ssk, yo, k3, k2tog, k2, yo, k1, ssk, yo, k2, SM, k2, yo, k2tog, yo, k2tog, yo, ssk, k1, k2tog, yo, k2tog, yo, k2tog, yo, sl2 k2tog p2sso Row 5: yo, k14, yo, p2tog, SM, p1, p2tog, yo, p2, yo, p3, p2tog, p1, p2tog, yo, p2, yo, p3, p2tog, p1, p2tog, yo, p1, p2tog with picked up stitch on edge Row 6: slip 1 wyib, ssk, yo, k2, ssk, k3, yo, k1, ssk, yo, k2, ssk, k3, yo, k1, ssk, yo, k2, SM, k2, yo, k2tog, yo, k2tog, k1, yo, cdd, yo, k3, yo, k2tog, yo, k2tog Row 7: yo, k15, yo, p2tog, SM, p1, p2tog, yo, p2, yo, p3, p2togtbl, p1, p2tog, yo, p2, yo, p3, p2togtbl, p1, p2tog, yo, p1, p2tog with picked up stitch on edge Row 8: slip 1 wyib, ssk, yo, k2, yo, ssk, k4, ssk, yo, k2, yo, ssk, k4, ssk, yo, k2, SM, k2, yo, k2tog, yo, k2tog, yo, k1, k2tog, yo, ssk, k1, k2tog, yo, k2tog, yo, k2tog Row9: yo, k15, yo, p2tog, SM, p1, p2tog, yo, p4, p2togtbl, p1, yo, p1, p2tog, yo, p4, p2togtbl, p1, yo, p1, p2tog, yo, p1, p2tog with picked up stitch on edge Row 10: slip 1 wyib, ssk, yo, k2, yo, k2, ssk, k2, ssk, yo, k2, yo, k2, ssk, k2, ssk, yo, k2, SM, k2, yo, k2tog, yo, k2tog, yo, k2tog, yo, k2tog, yo, cdd, yo, k3, yo, k2tog Row 11: yo, k16, yo, p2tog, SM, p1, p2tog, yo, p2, p2togtbl, p3, yo, p1, p2tog, yo, p2, p2togtbl, p3, yo, p1, p2tog, yo, p1, p2tog with picked up stitch on edge Row 12: slip 1 wyib, ssk, yo, k2, yo, k3, k2tog, k1, ssk, yo, k2, yo, k3, k2tog, k1, ssk, yo, k2, SM, k2, yo, k2tog, yo, k3tog, yo, k2tog, yo, k2tog, yo, k1, yo, ssk, k1, k2tog, yo, k2tog Row 13: yo, k16, yo, p2tog, SM, p1, p2tog, yo, p2, p2tog, p3, yo, p1, p2tog, yo, p2, p2tog, p3, yo, p1, p2tog, yo, p1, p2tog with picked up stitch on edge
CHART B: Narrow Edge
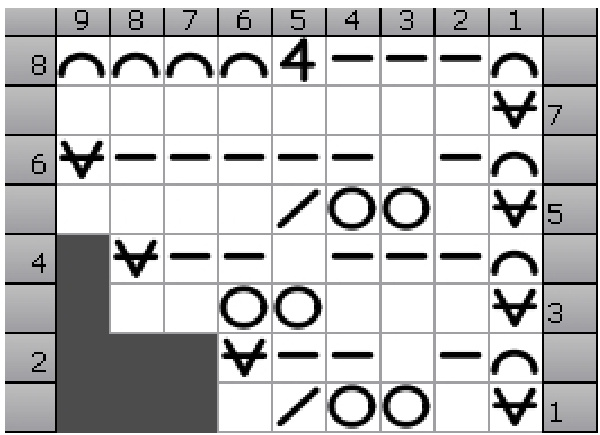
Row 1: slip 1 wyib, k1, yo2, k2tog, k1 Row 2: slip 1 wyib, k2, p1, k1, k2tog with picked up stitch on edge Row 3: slip 1 wyib, k3, yo2, k2 Row 4: slip 1 wyib, k2, p1, k3, k2tog with picked up stitch on edge Row 5: slip 1 wyib, k1, yo2, k2tog, k4 Row 6: slip 1 wyib, k5, p1, k1, k2tog with picked up stitch on edge Row 7: slip 1 wyib, k8 Row 8: bind off 4 stitches, k3, k2tog with picked up stitch on edge
Acknowledgements:
There is an incredible group of dedicated and talented knitters on Ravelry in the Group: Free Pattern Testers. I want to take time to personally thank each of the knitters that worked the bugs and poorly worded phases out of this design and helped to bring you this pattern. Thanks very much to: KnittingfanK87, lazylibran, mozartatk, Rusallka, svet-lanka, and TiggerRD. Any remaining errors or lack of clarity is on my shoulders. Should you have any questions please do not hesitate to contact me.


