PUCKER
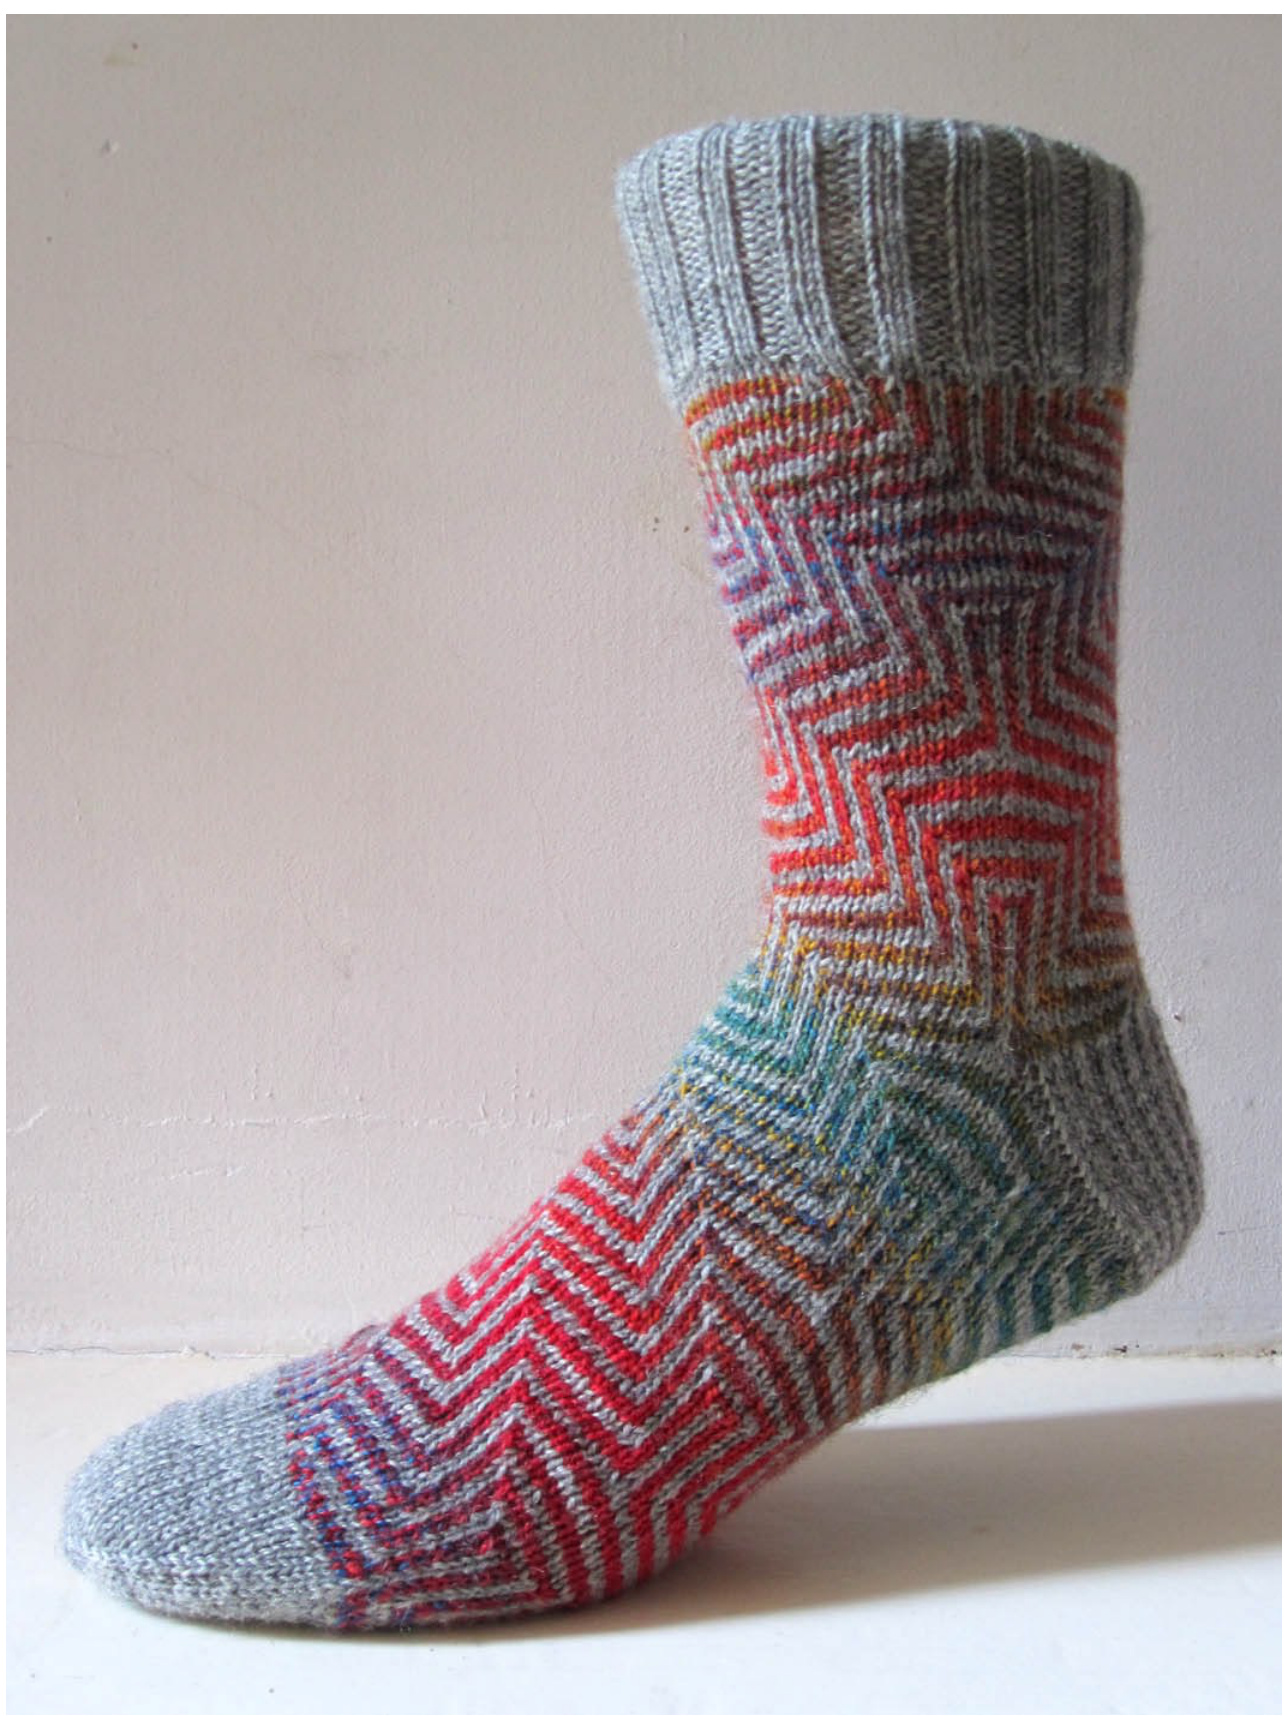
COPYRIGHT ? GENERAL HOGBUFFER 2012 Although this sock has a texture that is very close to stocking stitch when worn, the unblocked item shows a fair amount of puckering, similar to the effect achieved on seersucker fabric. This is due to the construction, as stitches that look like they are in the same round are actually knitted and slipped independently and alternately, thus creating a drag and areas of surplus fabric. When under tension, i.e. when worn, the tight and the loose parts will cancel each out, however, and the sock will appear reasonably even. Just trust me on that one. Please make sure you have read the whole of the instructions before starting to make sure you have understood what you will be doing, and to make you aware of all the options.
Size:
Due to the nature of the repeat in the pattern, this design is easiest sized up and down in increments of 8 sts. I have provided 3 sizes, for a 64, 72 and 80 st sock. Since mosaic fabric has a much reduced ability to stretch, however, you should move up one size from what you would choose for a plain sock. I wear a plain 64 st sock, and I have worked my example sock with 72 sts. Feel free to message me on Ravelry if you need help with choosing the right size for you. Size small (S) will be knit with 64 sts around, but fit like a plain 56 sts sock. Numbers will be in red. Size medium (M) will be knit with 72 sts around, but fit like a plain 64 sts sock. Numbers will be in black. Size large (L) will be knit with 80 sts around, but fit like a plain 72 sts sock. Numbers will be in blue. If only one number is given it will apply to all sizes.
Material:
Sock wool in 4 ply / fingering weight in two coordinating colours. I have used about 70 gr of the main colour (MC) and just over 30 gr of the contrast colour (CC), although that depends on what colour you use for the cuff, heel and toes. If you have 50 gr each, you could miror the socks. I have used a plain Regia 4 ply for the MC and a crazy Zauberball as a CC, but two solid colours will work equally well. The higher the contrast, the clearer the pattern, and the easier it willbe to distinguish the sts while knitting.
Needle size:
2.5 mm or size needed to get the right dimensions. You will need 2 circulars, which I will call needle 1 and needle 2. These are equally easy to work on DPN's, though, in that case your first and second needle will equal needle1, and your third and fourth will equal needle 2.
Further requirements:
- Tapestry needle - Stitch markers (although you could do it without if they irritate you) - 2 DPN's will be helpful even if you work on circs, but they are not absolutely essential.
Cuff:
Using your favourite cast-on method and MC, cast on 64/72/80 sts and close to a round, taking care not to twist the cast-on. Work K2, P2 rib for as many rounds as you would like your cuff to be, I did 24 rounds for my sample. K 2 rounds in MC. (On my sample socks, I actually worked the cuff for the larger size and decreased down to 72 sts in the first plain K round. If you have larger calves and/or don't like tight cuffs, this may be an option toconsider.)
Leg:
Join your CC and start working the leg following the appropriate chart for your size. The pattern requires you to work two rounds in MC followed by two rounds of CC and so on. Work the chart once on needle 1 and once on needle 2, for as long as you would like your leg to be. Since the fabric changes under tension, you may want to try the leg on to determine your exact length. Make sure to end after a second round in CC, i.e. ready to use the colour that you want the heel to be. (If you would like the heel to be in the CC, stop after a second round of MC, of course.). Make a note of where you are on the chart. Cut the colour not in use, leaving a tail for sewing in.
Heel:
Row1: With your heel colour, K the next 15/17/19 sts onto a DPN. Turn. Row2: sl1, P the 14/16/18 sts on your needle and a further 16/18/20 sts from needle 2. Work the heel flap over these 31/35/39 sts as follows: Row3:[sl1, K1] to last st, K1. turn Row4: sl1, P to end. turn Work the heel flap for as long as you need it to be, this depends on the height of your instep. I did a total of 40 rows for a size M, but feel free to adapt this to your individual needs. Make a note of how many rows you did, however. Having completed a Ws row, turn the heel as follows: Row1: work in the established pattern for 16/18/20 sts, SSK, K1, turn (leaving 12/14/16 sts un worked) Row2: sl1, P2, P2tog, P1, turn (again leaving 12/14/16 sts unworked) Row3: sl1, K to 1 st before gap, SSK, K1, turn Row4: sl1, P to 1 st before gap, P2tog, P1, turn Repeat rows 3 and 4 until you have used up all the sts either side. You should be ready to work a K row, with 17/19/21 sts on your needle.
Gusset:
Using needle2, K9/10/11. This is the centre back. Using neelde1, K8/9/10. Pick up and knit 1 st in each slipped stitch down the side of the heel flap. You will pick up half the number of rows you knitted; for my 40 rows I picked up 20 sts. M1 in the gap before your instep sts. Work across the instep sts according to the next row in the pattern chart for your size. The instep section will start in the centre of the chart, NOT on the right side. M1 in the gap before the heel flap, pick up and knit 1 st in each slipped st up the other side of the heel flap. Make sure you have picked up the same number of sts as before. K the 9/10/11 sts to the centreback. Now comes the teeniest, tiniest amount of maths to make sure the gusset works the way it was meant to. (sorry...). Count all your sts, making sure you have the same amount on needle1 and needle2. Take the total of your sts and subtract the number of sts you worked your leg part with, i.e. 64/72/80. The number you are getting is the number of sts that you will need to decrease while working the gusset. In my sample socks, I had a total of 98 sts (49 per needle), and since I was working the size M with 72 sts, I had to decrease 26 sts. Work the next round, placing your markers as follows: K half the number of sts of your gusset (in my case 13 sts), place marker, K to instep, work instep according to chart, K until you have 1 st more than half your gusset sts (in my case 14 sts), place marker, K to end. The last st on your needle2 is the centre back st, and this is the last st that will be left over after your gusset decreases, when it will become the very left most st on the chart. Re-join your CC and work the next row as follows: K to 2 sts before marker, K2tog, sl marker. Starting at the right end of the chart, work the appropriate full row of the chart across the remaining sts on needle1. Work the same row again over the sts on needle2 with exception of the last st on the left. Sl marker, ssk, K to end. This has established your pattern and your gusset; keep working the foot by working the chart as before, knitting all the gusset sts and decreasing 2 sts as before in every 3rd round. This is because mosaic knitting has a much tighter row gauge, so decreasing every 2nd round would result in too short a gusset. Your very last decrease round will decrease the last remaining 3 gusset sts into one, this is done as follows: Start the round by slipping the first st onto needle2. Remove marker, work the rest of the round as established until marker, remove 2nd marker. Sl2 sts together as if to K, K1, pull slipped stitches over. You should have arrived at the same number of sts that you worked the leg with. From now on, work the last st on needle2 according to the chart.
Foot:
Work the foot part in pattern until you have 2 inches / 5 cm less than your desired foot length. Again, you may want to try the sock on to get a true idea of it's size. End after working the second of the two rounds in CC. Cut CC, leaving a tail to sew in later.
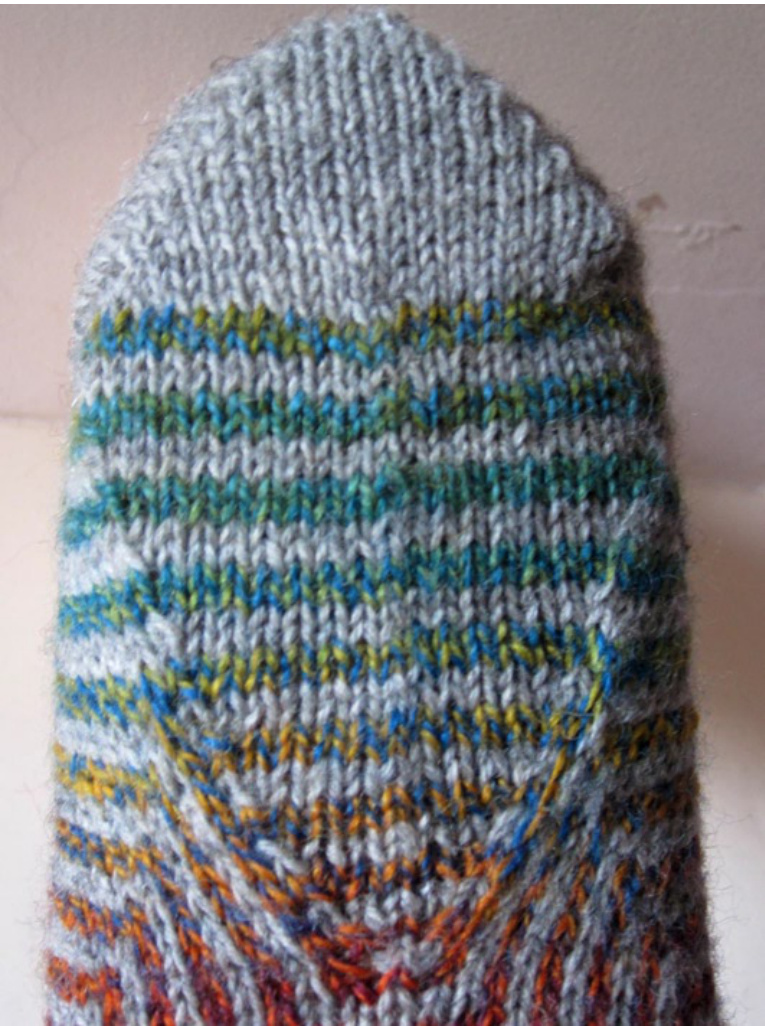
Toe:
With MC, K one round. In the next round, we will decrease the 8 sts to bring us to the number a plain stocking stitch sock would have. K3/3/4, [K2tog, K6/7/8] twice, [SSK, K6/7/8] twice, [K2tog, K6/7/8] twice, SSK, K6/7/8, SSK, K3/4/4. To make sure the pattern is perfectly centred, and to place your markers for the toe decreases, work first round as follows: K11/13/15, K2tog, K1, place marker, K to end of needle1. On needle2, K13/15/17, place marker, K1, K2 tog, K to end. Round2: K Round3: K Round4: K Round5: [K to 3 sts before marker, K2 tog, K1, sl marker, K1, SSK, K to end] on each needle Round6: K Round7: K Round8: as Round 5 Round9: K Round10: K Round11: as Round5 Round12: K Round13: as Round5 Round14: K Round15: as Round5 Round16: K Round17: as Round5 Keep working Round 5 until you have a total of 18 sts, 9 on each needle. With a DPN, K4 sts from needle1. Move the remaining 9 sts from needle1 and the first 4 sts from needle2 onto a second DPN. Move the last 5 sts from needle2 onto the first DPN. Cut yarn, leaving about 10 inches / 25 cms and graft the toe closed. Turn sock inside out and darn in all loose threads. sock the same way, but feel free to reverse the colours if you feel so incline
Further options:
Due to the chart repeat, this sock is not easily adapted if you need a different amount of sts for leg and foot. Short of completely re-drafting the pattern, I would suggest you work either a plain foot, or you work the pattern on the instep only with a striped sole and gusset. Contact me if you are strugglingwith this. As I said before, it's up to your personal choice which colour you use for the cuff, heel and toe. You could easily introduce a third colour for these... In principle, the instructions would work for any mosaic pattern, feel free to experiment, but make sure you pick a pattern that will repeat within the required number of sts. Of course, you can easily substitute other types of heels and toes if you prefer. For a short row heel, omit all the gusset instructions and just continue working the chart in the round straight after the heel.
Glossary:
St, sts stitch, stitches Kknit Ppurl SI slip K2tog knit 2 stitches together SSK slip, slip, knit. Slip 2 stitches separately as if to knit, insert left needle into these two stitches from the right and knit onto right needle. P2tog purl 2 stitches together Pattern for personal use only, Copyright @ General Hogbuffer 2012
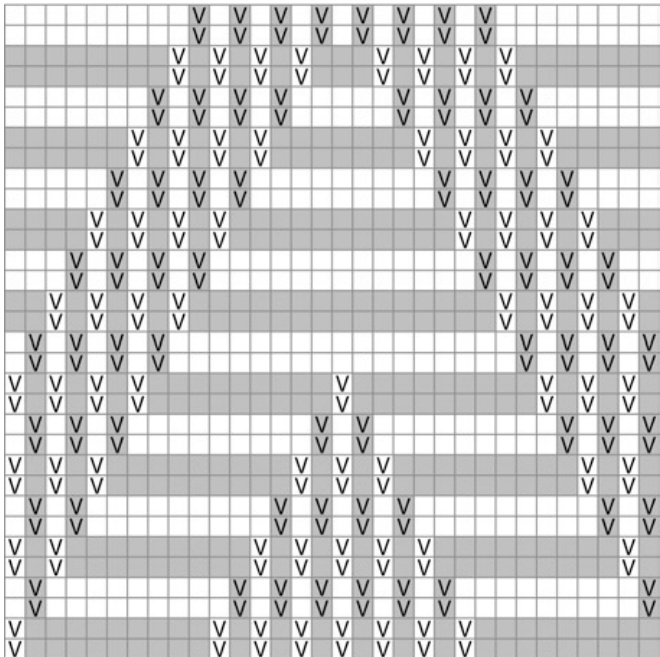
PATTERN CHART MEDIUM
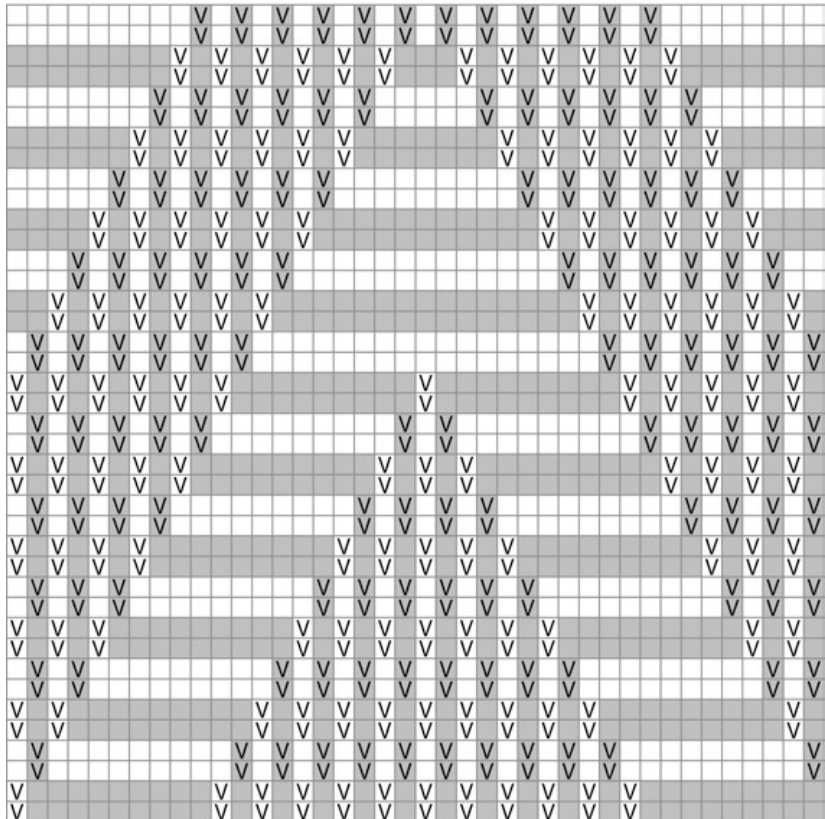
knit the stitch in the colour shown slip the stitch the stitch in the colour shown as if to purl, with yarn in the back


