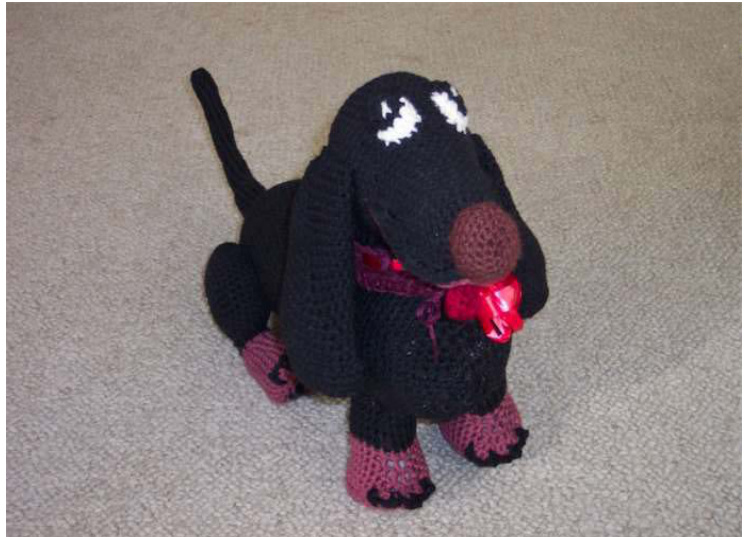
For Dad, his love for pets and animals and especially for dogs; bringing home ourfirst Dachshund Heidi, but mostly for his memories of Missy Pupper Upper. I know he loved and misses her dearly. Crocheted Stuffed Canine Animal Scott Hooper, Designer

Materials: Worsted weight yarn in following colors: 13 oz. black; 5 oz. rust; Small amounts each: Red; Dark Brown; and White. Polyester fiberfill; $\pmb{24^{\circ}}$ ribbon $\pmb{\mathcal{1}}/\pmb{\mathcal{4}}^{\pmb{\mathscr{s}}}$ in width or $\pmb{1}/\pmb{2^{\circ}}$ folded in half lengthwise.. Sizes E, F, and G hooks or sizes needed to obtain gauge. Finished Size: Approximately 21" long without tail. Gauges: E hook used for working in tight stitches and spaces only. F hook, 9 sc = $\pmb{2^{\circ}}$ ;9 sc rows $\mathbf{\delta}=\mathbf{2^{\circ}}$ ;G hook, 4 sc $=$ 1"; 4 sc rows $\mathbf{\Delta}=\mathbf{\nabla}\cdot\mathbf{\nabla}^{*}$ Stitches Used: Ch; sl st; sc; hdc. And dc. Pattern Abbreviations: ch.. ...chain dc... .double crochet hdc... .half-double crochet hk... ..hook Ip(s).. .loop(s) rep... ..repeat rem... ...remain(ing) rnd(s).. ...round(s) sc.... .single crochet sl st.. .slip stitch sp(s).. ...space(s) st(s)... .stitche(s) tog... ..together yo.... .yarn over sl st next 2 sts tog - (insert hk next st, yo, pullthrough st) 2 times, continue pulling through sc next 2 sts tog - ( insert hk in next st, yo, pullthrough st) 2 times, yo, pull through all 3 Ips on hk. hdc next 2 sts tog - (yo, insert hk in next st, yo, pull through st) 2 times, yo, pull through all 5 Ips onhk. dc next 2 sts tog -(yo, insert hk in next st, yo, pul through st, yo, pull through 2 Ips on hk) 2 times, yo, pull through all 3 Ips on hk. () - work enclosed instructions as many times as specified by the number immediately following all instructions enclosed in opening and closing parenthesis or contains explanatory remarks or indicates total number of specified stitches at end of round or row just worked. Work in continuous rnds throughout unless otherwise indicated. Rnd 1: Starting at front, with F hk and black, ch 2, 6 sc in second ch from hk. (6 sc.) Rnd 2: 2 sc in each st around. (12 sc.) Rnd 3: (2 sc in next st, sc in next st) around. (18 sc.) Rnd 4: (2 sc in next st, sc in next 2 sts) around. (24 sc.) Rnd 5: (2 sc in next st, sc in next 3 sts) around. (30 sc.) Rnd 6: (2 sc in next st, sc in next4 sts) around. (36 sc.) Rnds 7-18: Sc in each sts around. Stuff firmly, but do not overstuff. stuffed entirely, and after the crochet lips are properly sewn and made, the bottom jaw underneath the head will, by itself, protrude into the shape of the muzzle's lower smaller jaw. Add more stuffing as either preferred or necessary. Note: After rnd 18 has been worked, using pattern photographs as guide, fold, tuck, and push crocheted fabric up and into shape of muzzle and then sew both the sides and the starting ch of tube tog from rnd 1 through rnd 18.

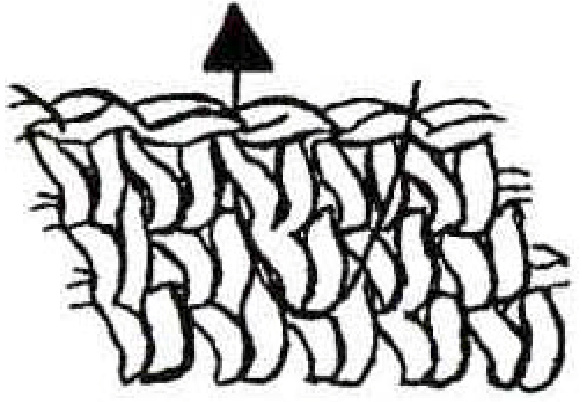
$\bullet\bullet$ marks and blue lines with $\pmb{\kappa}^{\pmb{\rho}}$ marks as shown in illustrations 1-3 below. Rnd 19: (2 sc in next st, sc in next 5 sts) around. (42 sc.) Rnds 20-23: Sc in each st around. Rnd 24: (2 sc in next st, sc in next 6 st) around. (48 sc.) Rnds 25-30: Sc in each st around. Begin to close the head by decreasing. Rnd 31: (Sc in next 6 sts, sc next 2 sts tog) around. (42 sc.) Rnd 32: (Sc in next 5 sts, sc next 2 sts tog) around. (36 sc.) Rnd 33: (Sc in next 4 sts, sc next 2 sts tog) around. (30 sc.) Rnd 34: (Sc in next 3 sts, sc next 2 sts tog) around. (24 sc.) Rnd 35: (Sc in next st, sc next 2 sts tog) around. (16 sc.) Rnd 36: (Sc next 2 sts tog) around. (8 sc.) Rnd 37: (SI st next 2 sts tog) around until opening closes, Join with sl st in any adjacent sl st just made. Fasten off black, leaving $\mathbf{24^{\circ}}$ yarn end for sewing and attaching later. For overlapping upper jaw lip edging, starting at point (llustrations 1 and 2), with a G hk, black, and working from inside through both fabric layers and outside over sewn portion of lips about 1/8" to 1/4" above edges of upper lips, join with sl st, ch 1, sc in same hole in which sl st just made, and then sc evenly against fabric grain from point A in direction of Point A's arows (llustrations 1 and 2) and over sewn portion of upper lips to opposite side of lips and mouth, and stopping at Point B (llustration 2). Sl st in next available hole after sewn portion of lip fabric evenly after last sc made at end of upper lip row. Fasten off black. Hide yarn end. Working from outside through inside of last sl st of black sc edging row just worked around upper lips in order to make the lips appear to be overlapping a lower jaw, join rust with sl st in last sl st at Point B (llustration 2), (sl st in each sc) around, sl st in sl st at point A. Fasten off rust. Hide yarn end. Red lines without $\mathbf{\omega}^{\bullet\bullet}\mathbf{x}^{\bullet\bullet}$ marks represent head's muzzle part before forming muzzle. Blue lines with $\bullet\bullet$ marks represent place where upper lips are to be sewn, first, and crocheted over, second. To form overlapping upper lip, fold, tuck, and push fabric up and into shape of muzzle in direction of three arrows while sewing muzzle formation against fabric grain.
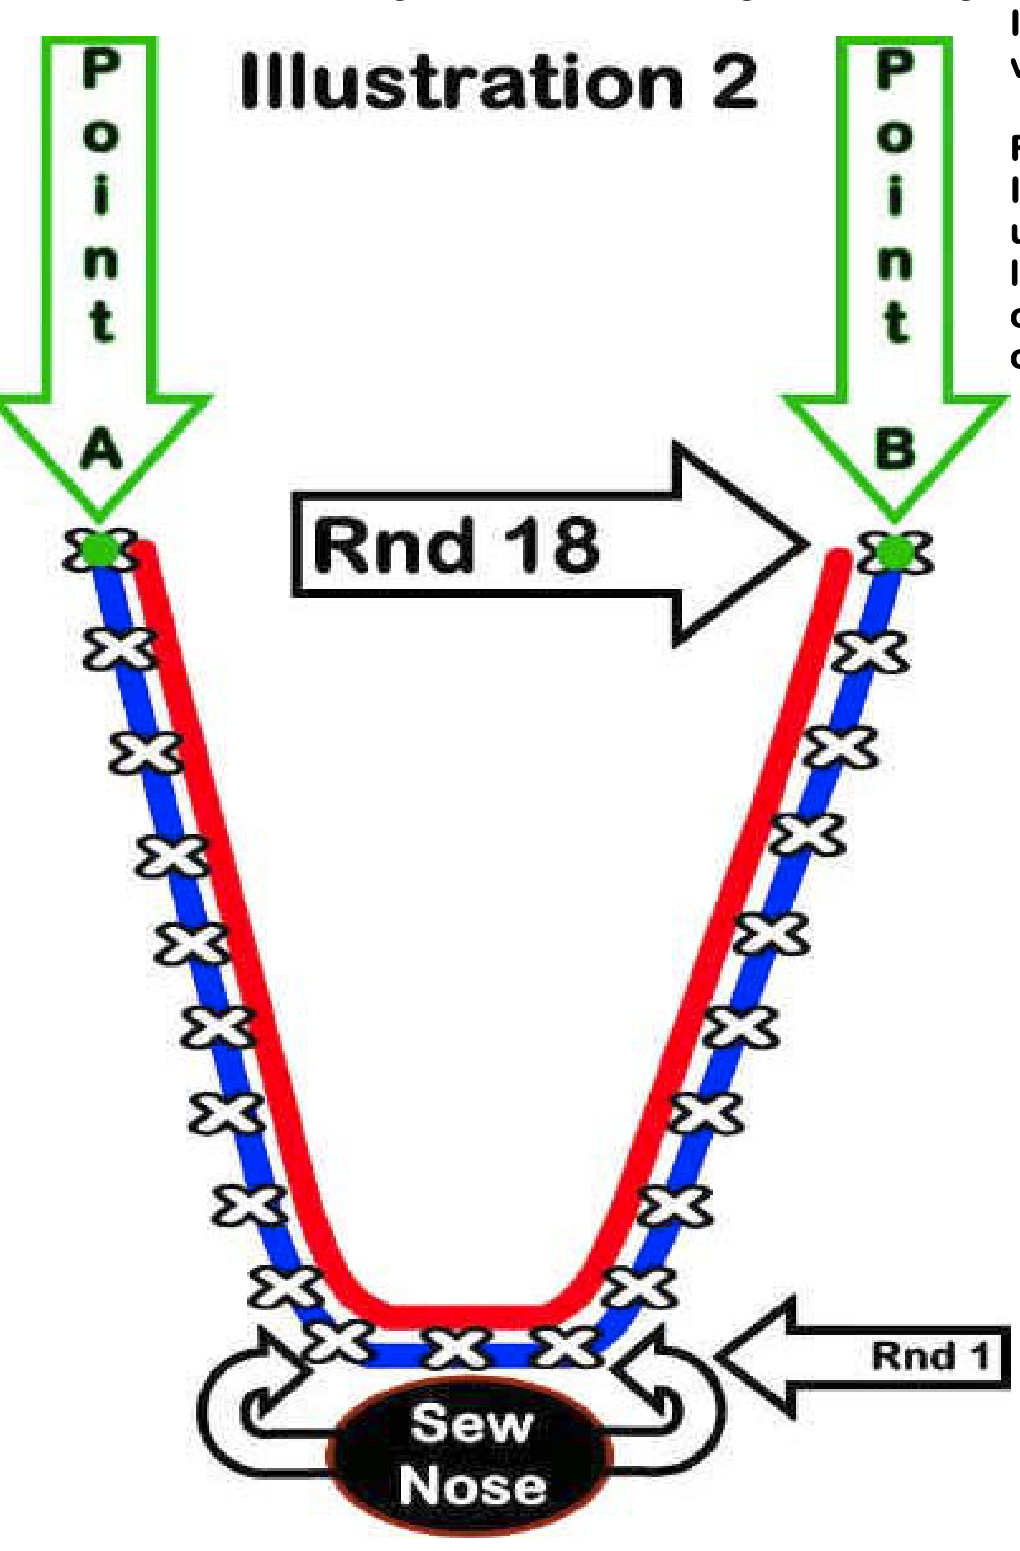
Illustration 2. Bottom and front muzzle views. Red line is the circular head shown in Illustration 2. It represents head before upper jaw and lips are made, and blue lines with $\bullet\bullet$ marks represent sewn lips of upper jaw. Sew upper lips so that the overlap bottom jaw.
llustration 6. Front Loop Only and Back Loop Only.
Front Loop Only [BLO} -insert hook into the front loop of your stitch. Back Loop Only [BLO] insert hook into the back loop of your stitch.
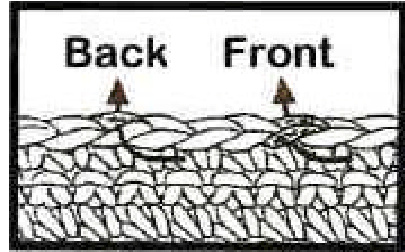
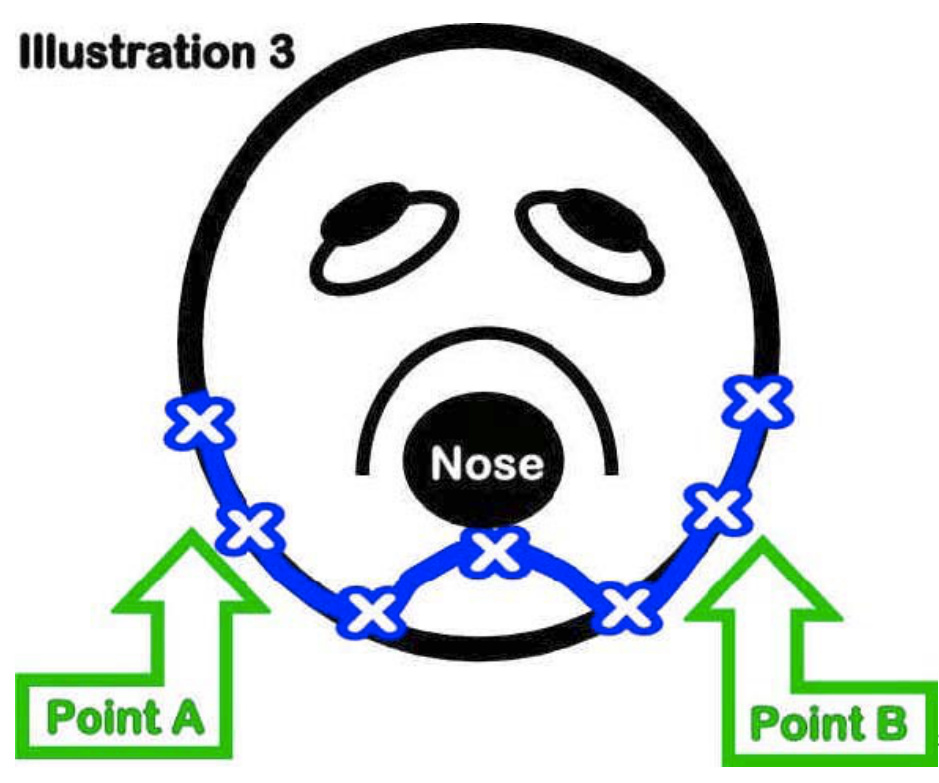
Illustration 3. Bottom and front views of muzzle. Black line is the circular head shown in Illustration 3. It represents head before upper jaw and lips are made, and blue lines with $\mathbf{\omega}^{\bullet\bullet}\mathbf{x}^{\bullet\bullet}$ marks represent sewn lips of upper jaw. Sew upper lips so that the overlap bottom jaw. EYE (Make 2) Rnd 1: With E hk and black, ch4, sl st in first ch to form ring, ch 1, 8 sc in ring.(8 sc.) Rnd 2: (2 sc in next st, sc in next st) around, join with sl st in first sc. Fasten off black. (12 sc.) Rnd 3: For bottom of eye, with E hk,join white with sc in first st, hdc in next st, 2 dc in each of next 2 sts, hdc in next st, sc in next st leaving rem sts unworked. Fasten off white. (8 sts.)
EYE SPARKLE [Optional] (Make 2)
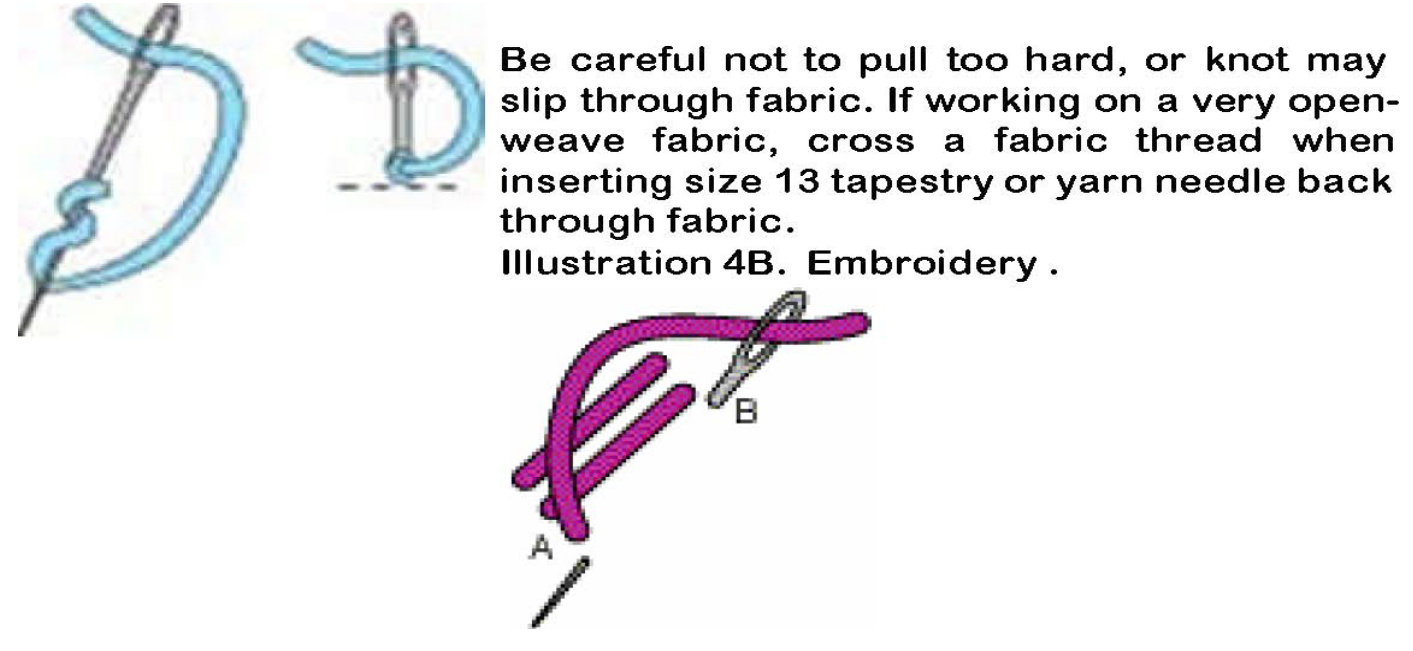
With white, using French Knot (llustration 4A and 4B), embroider sparkle in each eye. Bring size 13 tapestry or yarn needle from fabric back to front; keeping yarn taut, wrap twice around size 13 tapestry or yarn needle and insert size 13 tapestry or yarn needle back through fabric from front to back. Hold yarn taut until size 13 tapestry or yarn needle is completely through fabric, pull gently to tighten. Illustration 4A. French Knot.
EYE LASHES {Optional] (Make 2) With either rust or dark brown, using straight stitch (llustrations 5A and 5B), embroider three lines for lashes. Ilustrations 5A and 5B. Eyelash Embroidery.
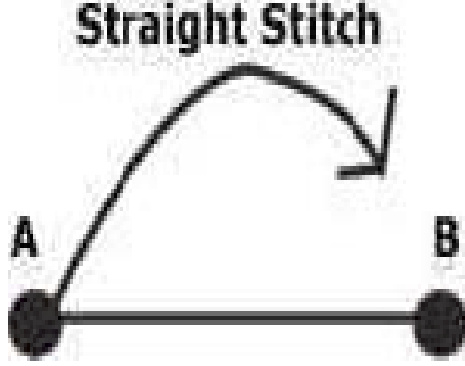
A Straight Stitch, the basis of many hand-embroidery stitches, is formed by bringing the needle up at A and down at B. The basis of many hand-embroidery stitches, the straight stitch is formed by bringing the needle up at A and down at B. Stitch can be of any length and be worked in any direction.
Rnd 1: With E hk and black, ch 2, 6 sc in second ch from hook. (6 sc.) Rnd 2: 2 sc in each st around. (12 sc.) Rnd 3: (2 sc in next st, sc in next st) around. (18 sc.) Rnd2 4-7: Sc in each st around. At end of last rnd, join with slst in first sc.(18 sc.) Fasten off black. Stuff.
TONGUE
With E hk and red, ch 3, sc in second ch from hk, 7 sc in last ch; working on opposite site of starting ch, join with sl st in first sc. Leaving ${\mathfrak{e}}^{\bullet\bullet}$ strand for later sewing, fasten off red (9 sc.) Referencing allilustrations and pattern photographs as placement guide, sew evenly all facial parts onto head using the BLO of the eyes, eyebrows, nose, and tongue.

BODY Rnds 1-6:
Starting at center back to area where tail will later be sewn, Rep rnds 1-6 of head. Rnd 7: (sc in next st, sc in next 5 sts) around. (42 sc.) Rnd 8-10: Sc in each st around. (42 sc.) Rnd 11: (2 sc in next st, sc in next 6 sts) around. (48 sc.) Rnds 12-42: Sc in each st around. (48 sc.) Rnd 43: For top of back opposite of chest, (2 sc in next st, sc in next 5 sts) 5 times, sc in each rem sts around.(53 sc.) Rnds 44-45: Sc in each st around. (53 sc.) Rnd 46: (2 sc in next st, sc in next 7 sts) 5 times, sc in each st around. (58 sc.) Stuffirmly while gently stretching body lengthwise. Continue stuffing as body is worked. Rnds 47-55: Sc in each st around. (58 sc.) Rnd 56: (Sc next 2 sts tog, sc in next4 sts) 9 times, sc next 2 sts tog, sc in each of rem sts.(48 sc.) Rnd 57: Sc in each st around. (48 sc.) Rnd 58: (Sc next 2 sts tog, sc in next 3 sts) 9 times, sc next 2 sts tog, sc in last rem sts. (38 sc.) Rnd 59: Sc in each st around. (38 sc.) Rnd 60: (Sc next 2 sts tog, sc in next 3 sts) 7 times, sc in last rem st. (30 sc.) Rnd 61: (Sc next 2 sts tog, sc in next 2 sts) 7 times, sc next 2 sts tog, sc in last rem st.(22 sc.) Rnd 62: (Sc next 2 sts tog, sc in next st) 7 times [NOTE: in last st where last sc is placed at the end of seventh multiple of this rnd only, sc that and last rem st tog]. (14 sc.) Rnd 63: (Sc next 2 sts tog) 7 times, joining with sl st in first sc of last rnd. (7 sc.) Rnd 64: (sl st next 2 sts tog) around until decreased sts : of opening closes. Join with final sl st in any adjacent sl : st just made. Fasten off black. NECK Rnd 1: With G hk and two strands of black, ch 26, sl st in first ch to form ring, ch 1, sc in each ch around. (26 sc.) Rnds 2-3: Sc in each st around. At end of last rnd, join with sl st in first sc of last rnd. Fasten off black.(26 sc.) Sew bottom of rnd 1 of neck centered over rnd 49 on top of body. Stuff. Sew bottom of rnds 22-31 of head over rnd 3 of neck. EAR (Make 2) Leaving an approximate $\mathbf{20^{\circ}}$ yarn tailfor later sewing ear tog and then onto head, with G hk and black, ch 16, sl st in first ch to form ring. (16 sc.) Rnd 2: Sc in each st around. (16 sc.) Rnd 3: (2 sc in first st, sc in each of rem sts) around. (17 sc.) Rnds 4-22: Rep rnd 3 nineteen more times. [Rnd 4 (18 sc.)], [Rnd 5 (19 sc.)],[Rnd 6 (20 sc.)], [Rnd 7 (21 sc.)], [Rnd 8 (22 sc.)], [Rnd 9 (23 sc.)], [Rnd 10 (24 sc.)], [Rnd 11 (25 sc.)],[Rnd 12 (26 sc.)],[Rnd 13 (27 sc.)], [Rnd 14 (28 sc.)], [Rnd 15 (29 sc.)],[Rnd 16 (30 sc.)],[Rnd 17 (31 sc.)], [Rnd 18(32 sc.)], [Rnd 19 (33 sc.)], [Rnd 20 (34 sc.)], (Rnd 21 (35 sc.)], [Rnd 22 (36 sc.)]. Rnd 23: Sc in next 4 sts, sc next 2 sts tog) around. (30 sc.)

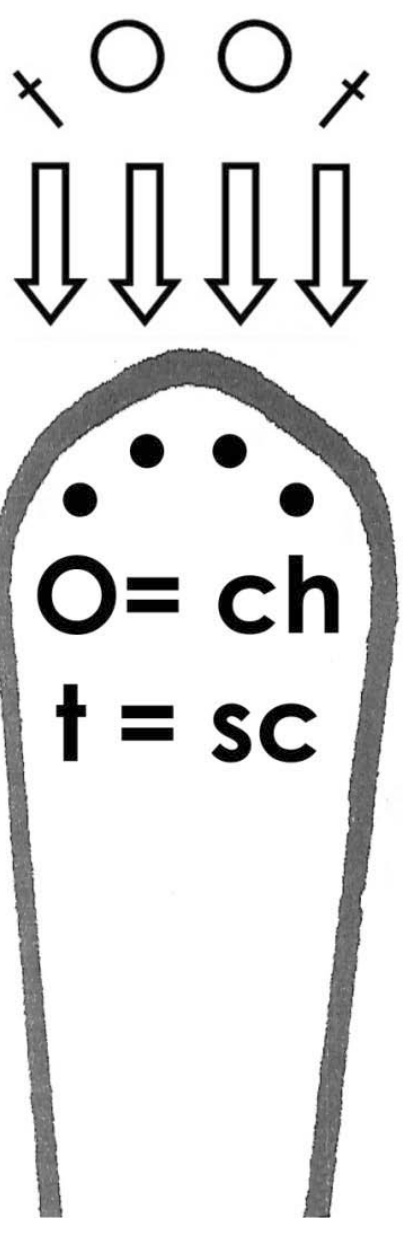
Rnd 24: (Sc in next 3 sts, sc next 2 sts tog) around. (24 sc.) Rnd 25: (Sc in next st, sc next 2 sts tog) around. (16 sc.) Rnd 26: (Sc next 2 sts tog) around. (8 sc.) Rnd 27: (SI st next 2 sts tog) around until decreased opening closes. Join with a final sl st in any adjacent sl st just made. Fasten off black. Sew top of one ear over rnds 27-31 and second ear over rnds 28-32 on sides of head approximately $\mathbf{4^{\circ}}$ apart. See photograph on page 1. FRONT LEG AND PAW (Make 2) Rnd 1: Starting at bottom of foot, with F hk and rust, ch 5, sc in second ch from hk, sc in next 2 chs, 6 hdc in last ch, working on opposite side of starting ch, sc in next 2 ch, 2 sc in last ch. (13 stsmade.) Rnd 2: 2 sc in next st, sc in next 2 sts, 2 hdc in each of the next 6 sts, sc in next 3 sts, 2 sc in next st.( 21 sts.) Rnd 3: ( 2 sc in next st, sc in next 3 sts) 2 times, 2 hdc in each of the next 3 sts, (sc in next 3 sts, 2 sc in next st) 2 times, sc in next 2 sts. (28 sts.) Rnd 4: 2 sc in next st, (sc in next 4 sts, 2 sc in next st) 2 times; for toe shaping, hdc in next 5 sts, 2 hdc in next st; (2 sc in next st, sc in next 4 sts) 2 times, sc in next st. ( 34 sts.) Rnd 5: Working in back loops only (illustration 6), sc in next 16 sts, 2 hdc in each of the next 4 sts, sc in next 14 sts.(38 sts.) Rnds 6-7: Working in both Ips (illustration 6), sc in each st around. (38 sts.) Rnd 8: Sc in next 15 sts, (sc next 2 sts tog) 6 times, sc in next 1 sts. (32 sc.) Rnd 9: ( Sc next 2 sts tog)2 times, sc in next 11 sts; for continued toe shaping, (sc next 2 sts tog) 3 times; sc in next 11 sts. (27 sc.) Rnd 10: Sc in next 11 sts, (sc next 2 sts tog) 3 times, sc in next 10 sts. (24 sc.) Rnd 11: Sc next 2 sts tog, sc in next 22 sts. Change to black at last yo of last sc of this rnd. (23 sc.) Rnds 12-15: Sc in each st around. (23 sc.) Rnd 16: For left leg extension: sc in next 2 sts, hdc in next st, (dc in next st, 2 dc in next st) 2 times, dc in next st, hdc in next st, sc in next st, sl st in next st leaving rem sts unworked. Fasten off black leaving approximate $\mathbf{12^{\circ}}$ tail for later sewing onto body. Rnd 16: For right leg extension: sl st in next st, ch 1, turn, skip first sl st just made, sc in next st, hdc in next st, (dc in next st, 2 dc in next st) 2 times, dc in next st, hdc in next st, sc in next st, sl st in next st leaving rem sts unworked. Fasten off black leaving approximate $\mathbf{12^{\circ}}$ yarn tail for later sewing onto body. HIND HIP (Make 2) Rnd 1: Ch 2, 6 sc in second chain from hk. (6 sc.) Rnd 2: 2 sc in second ch from hk. (12 sc.) Rnd 3: (2 sc in next st, sc in next st) around. (18 sc.) Rnd 4: (2 sc in next st, sc in next 2 sts) around. ( 24 sc.) Rnd 5: (2 sc in next st, sc in next 3 sts) around. (30 sc.) Rnd 6: (2 sc in next st, sc in next 4 sts) around. (36 sc.) Rnd 7: (2 sc in next st, sc in next 5 sts) around. (42 sc.) Rnd 10: (Sc in next 4 sts, sc next two sts tog) around. (36 sc.) Rnd 11: (Sc in next 3 sts, sc next two sts tog) around. (30 sc.) Rnd 12: (Sc in next 2 sts, sc next two sts tog) around. (24 sc.) (Stuff lightly and flatten.) Rnd 13: (Sc in next st, sc next two sts tog) around. (16 sc.) (Continue to stufflightly and flatten so that hip is no more than 3/4" to 1" thick in width.) Rnd 14: (Sc next 2 sts tog) around. (8 sc.) Rnd 15: (Sl st next 2 sts tog) around and sew shut after stuffing. Fasten off black. Flatten. HIND LEG AND PAW (Make 2). Rnd 1: Starting at point which knee begins, with F hk and black, ch 2, 6 sc in second ch from hk. (6 sc.) Rnd 2: 2 sc in each st around. (12 sc.) Rnds 3-10: Sc in each st around. Change colors from black to rust at last yo of last st of rnd 10. (12 sc.) Rnds 11-12: Sc in each st around. (12 sc.) Rnd 13: Sc in next 6 sts, (2 sc in next st, sc in next st) 3 times. (15 sc.) Rnd 14: Sc in next 6 sts, (2 sc in next st, sc in next 2 sts) 3 times. (18 sc.) Rnds 15-16: Sc in each st around. (18 sc.) Rnd 17: Sc in next 6 sts, (2 sc in next st, sc in next 3 sts) 3 times. (21 sc.) Rnds 18-19: Sc in each st around. (21 sc.) Rnd 20: Sc in next 6 sts, (2 sc in next 4 sts) 3 times. (24 sc.) Rnds 21-22: Sc in each st around. (24 sc.) Rnd 23: Sc in next 6 sts, for toe shaping: (sc in next st, sc next 2 sts tog) 6 times. (18 sc.) Rnd 24: Sc in next 6 sts, for continued toe shaping: (sc in next 2 sts, sc next 2 sts tog) 3 times. (15 sc.) Rnd 25: Sc in next 6 sts, for continued toe shaping: (sc in next st, sc next 2 sts tog) 3 times. (12 sc.) Rnd 26: (Sc in next st, sc next 2 sts tog) around. (8 sc.) Rnd 26: (Sc next 2 sts tog) around. (4 sc.) Fasten offrust, leaving an approximate $\mathbf{20^{\circ}}$ yarn end for later sewing onto underneath bottom side of hip. TOENAILS (for allfour paw toes) Pinching bottom and top of front of paw together, inserting F hk between sts of both fabric layers about $\mathbf{1}/\mathbf{8^{\circ}}$ to $\pmb{\uparrow}\pmb{\mu}\pmb{\eta}$ from edge and between toe shapings, with F hk and black, join with sc, ch 2, sc in in which sc just made was placed) 3 times across as shown in llustrations 7, 8, and 9. Fasten off black.
llustration 7—-Between Stitches Repeat on rem paws. Stuff all legs firmly. Sew left and right front legs over rnds 43-53 on bottom front of body about 1/8" to $\pmb{\mathcal{1}}/\pmb{\mathcal{4}}^{\pmb{\mathscr{s}}}$ apart. Illustration 8- Front Leg Paw Toenail Placement With last round of hip against side of body to hide decreased sts of hip closing, sew one hip and attached hind leg piece over rnds 9-16 and one over rnds 10-17 on opposite side of back of body. TAIL Rnd 1: With E hk and black, starting at top of tail, ch 2, 4 sc in second ch from hk. (4 sc.) Rnd 2: With F hk, 2 sc in each st around. (8 sc.) Rnds 3-30: Repeat rnd 2. Stuff as tail is worked. (8 sc.) Rnd 31: (2 sc in next st) 1 time, sc in each st around. (9 sc.) Rnds 35-45: Rep rnd 31 three more times as follows: [Rnd 32 (10 sc.],[ Rnd 33 (11 sc.)],[Rnd 34 (12 sc.)].

Illustration 9-Hind Legs and Paws.
Rnds 35-45: Sc in each st around. Sl st in first st. Fasten off black, leaving an approximate $\pmb{\bigcirc}^{\bullet}$ yarn tail for later centering and sewing over rnd 3 of back of body, positioning it directly over beginning ch 2 and rnd 1 of body.
COLLAR
Row 1: With G hk and rust, ch 41, dc in fifth ch from hk (first ch-5 counts as first dc plus ch-2 sp), (ch 1, skip next st, dc in next st) across. (19 ch-1 sps, 20 dc.) Rnd 2: Ch 1, [(3 sc in sc-1 sp), $\bf{\Psi}_{S C}$ in next st, sc in next ch-1 $\mathbf{s}\mathbf{p}^{\star}$ 19 times across], working in rnds on outer edge and on opposite side, rep between () 1 more time, rep between \*\* 1 more time, rep between () one more time, sl st in first sc, ch 1, turn. (82 sc made around.) Rnd 3: Skip first sl st just made, [sc in each of the next 36 sts, (sc in next st, 3 sc in next st)] 2 times, sl st in first sc. Fasten off rust. (82 sC.) Weave your color of choice of ribbon through collar evenly down and in through first ch-1 sp of collar, underneath first dc, (up and out through next ch-1 sp, over next dc, down and in through next ch-1 sp, underneath next dc) across. Wrap around neck and tie bow atop chin underneath muzzle. End.

I don't like admitting my age, but I have to be a good sport. I am 38. I began crocheting in 1994 when life circumstances caused me to look for something constructive to do that was portable and fun. I've been "hooked"
ever since. My main passion are for afghans made from all kinds of different yarns. Stuffed animals, especially puppies and dogs, are my second favorite. I am capable of the afghan stitch [a/k/a "Tunisian crochet", but haven't mastered it just yet. My goals are to master hairpin and broomstick. Scott Hooper passed away on 11/17/2005 gifting this to me to share his passion of Crochet and his Favorite Toy. His Memorial Blog is http://grannyguy.blogspot.com . Scott Hooper@ Licensed toCrafty Andy $\circledcirc$ with permission of his family@ You are not to sell this pattern or items made by this pattern unless is for charity. Comments or questions contact me Andy@CraftyAndy.net