Platypus coasters crochet pattern by Rosy Alice Crochet Designs @ Ravelry
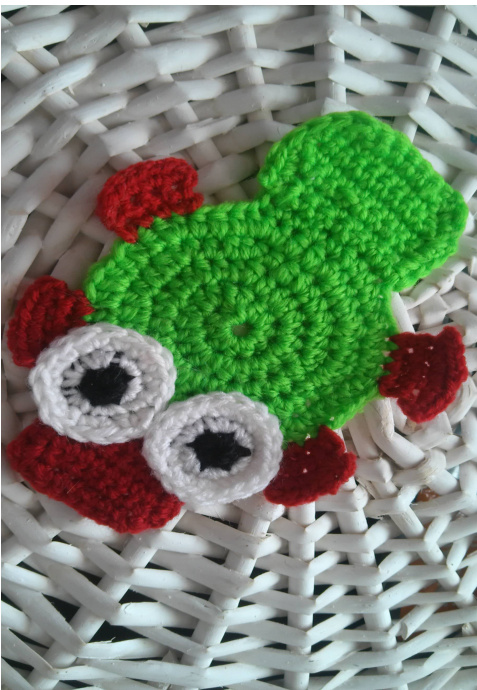
This pattern will show you how to make platypus coasters measuring 15 cm in length by 11 cm in width. If you use larger yarn and a larger hook, you can make them bigger. I'll be coming up with a much bigger platypus pattern soon so watch this space!
You will need:
4mm hook Yarn in colours of your choice Tapestry needle Optional - glue
Stitches:
Double crochet (US single crochet) DC2TOG - double crochet 2 together (US single crochet 2 together) Slip stitch Chain
Body
Start with a magic circle, or a chain 4 and join with a slip stitch. Round 1: 10 dc into the circle. (10) Round 2: 2 dc into each stitch from previous round. (20) Round 3: [1 dc. 2 dc into next.] Repeat all the way round. (30) Round 4: [1 dc. 1 dc. 2 dc into next.] Repeat all the way round. (40) Round 5: [1 dc. 1 dc. 1 dc. 2 dc into next.] Repeat all the way round (50) Do not fasten off or cut yarn.
Tail
Next we are going to make the tail. Continuing directly on from round 5 and your last 2 dc, crochet a dc into each of the next 4 stitches and a slip stitch into the 5th. Chain 1. Turn your work and now go back in the direction you have just come. Row 1: DC into each of the next 9 stitches. Chain 1. Turn. (9) Row 2: 2 dc into first stitch. 1 dc into next seven stitches. 2 dc into last stitch. Chain 1. Turn. (11) Row 3: 1 dc into each stitch all the way across. Chain 1. Turn. (11) Row 4: Dc2tog into first 2 stitches. 1 dc into into next seven stitches. DC2tog into last 2 stitches. (9) Row 5: 1 dc into each stitch all the way across. (9) Chain 1 and crochet down one side of tail. Break yarn. Join on the other side of the tail and crochet that side too.
Feet
Foot 1.
Row 1: Count 4 stitches along from where the tail meets the body. Dc into this 4" stitch, and each of the next 3. Chain 1. Turn. (4) Row 2: 1 dc into each stitch. Chain 1. Turn. (4) Row 3: 2 dc into each stitch. (8) Fasten off.
Foot 2.
Row 1: Count 5 stitches along from foot 1. Dc into this 5h stitch, and each of the next 3. Chain 1. Turn. (4) Row 2: 1 dc into each stitch. Chain 1. Turn. (4) Row 3: 2 dc into each stitch. (8) Fasten off. Foot 3 - repeat instructions for foot 1 on opposite side of body. Foot 4 -- repeat instructions for foot 2 on opposite side of body.
Head
You will now have a space for the head on the opposite side of the body to the tail. It should fit dead centre, with 3 stitches gap either side between it and the nearest set of feet. We are basically following the same instructions as for the tail. Row 1: DC into each of the next 9 stitches. Chain 1. Turn. (9) Row 2: 2 dc into first stitch. 1 dc into next seven stitches. 2 dc into last stitch. Chain 1. Turn. (11) Row 3: 1 dc into each stitch all the way across. Chain 1. Turn. (11) Row 4: Dc2tog into first 2 stitches. 1 dc into into next seven stitches. DC2tog into last 2 stitches. (9) Row 5: 1 dc into each stitch all the way across. (9) Chain 1 and crochet down 1 side of tail. Break yarn. Join on the other side of the tail and crochet that side too. Sew in all your ends.
Eyes
Make a magic circle or chain 4 and join with a slip stitch. Round 1: 5 dc into circle in black yarn. (5) Round 2: 2 dc into each stitch from previous round in white yarn. (10) You can sew the eyes to your platypus if you like but since I loathe fiddly bits like that, I glued 'em On!


