Hallucigenia Wonderful Crochet
Pattern copyright 201o by Lisa Golladay; please see Creative Commons statement below H. is crocheted in one piece starting at the “head." Single crochet (sc) rounds are joined with a slip stitch. You are welcome to work amigurumi-style in a spiral, but you may have to adjust where you put the legs to keep them lined up. If you want to add eyes, you're on your own deciding where to put them.
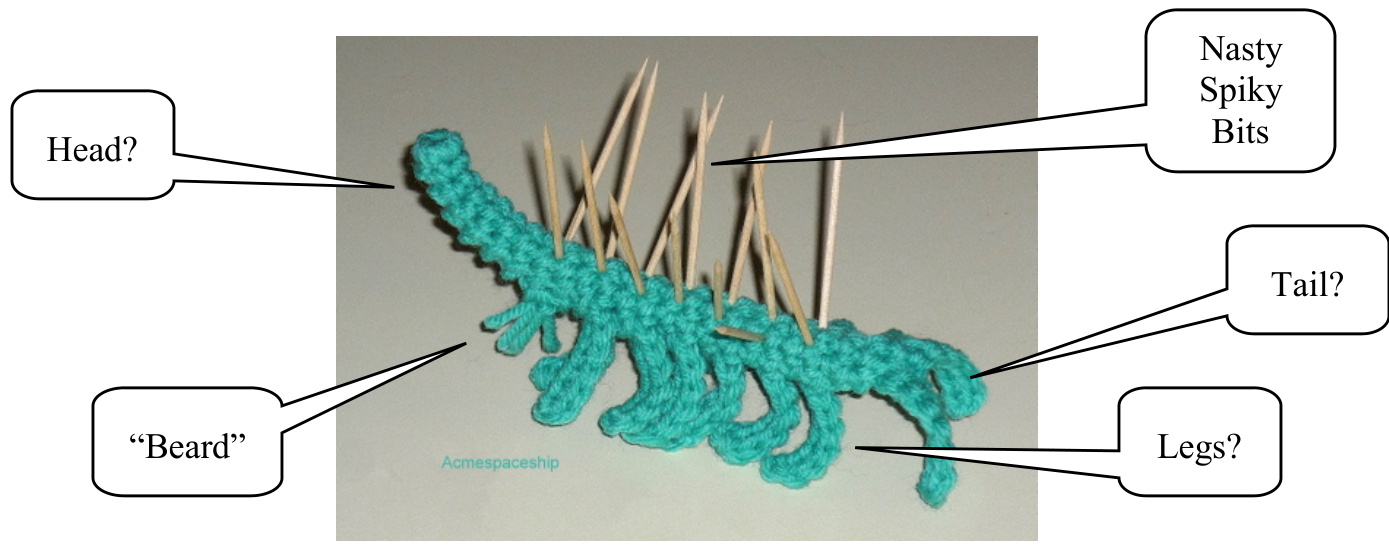
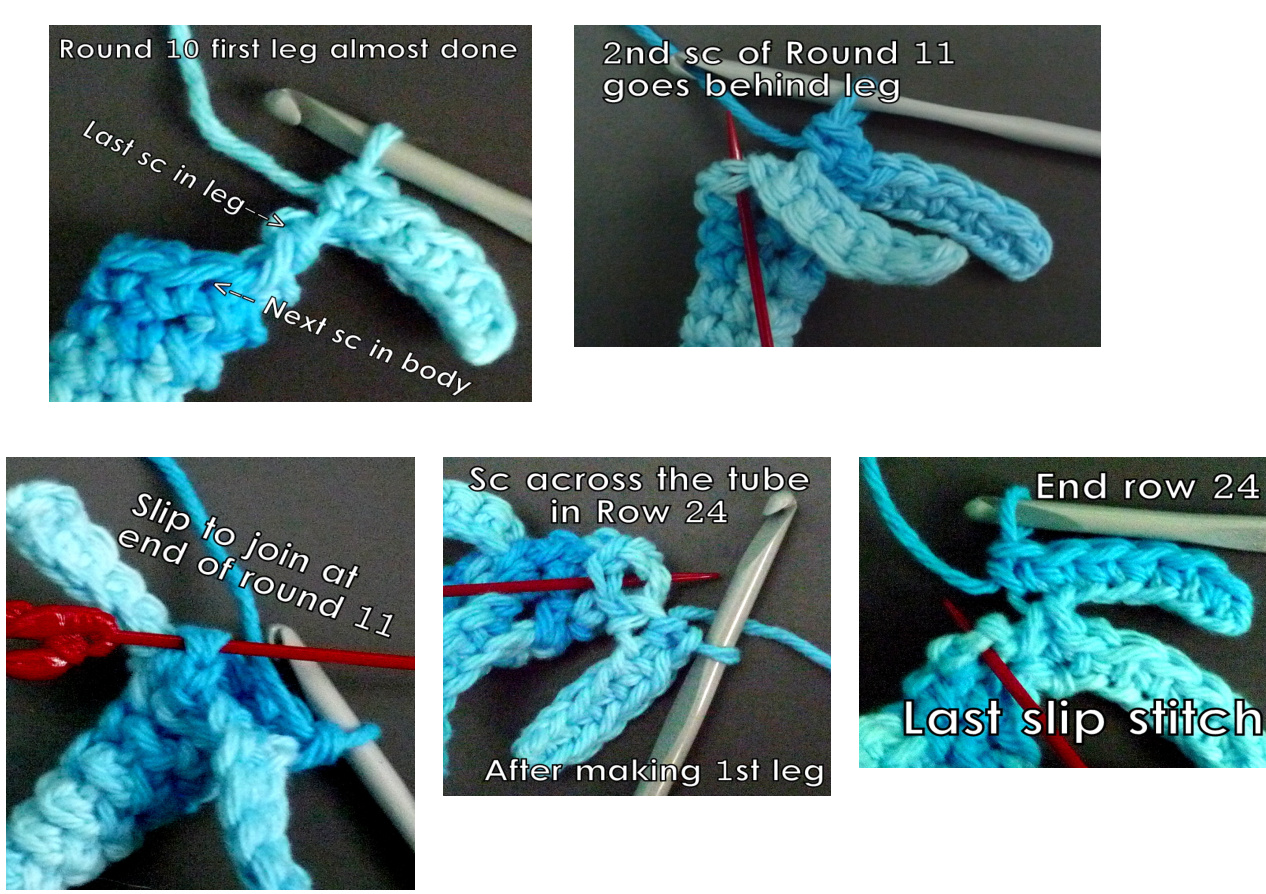
Here is an extinct critter from the Cambrian Era (5oo million years ago). Most people who know of Hallucigenia learned about it from Stephen Jay Gould's bestselling 1989 book Wonderful Life. This pattern is based on a more recent reconstruction done by Lars Ramskold. The result is an animal that is slightly less... well... hallucinatory than the one we met in Gould's book. But still mysterious. For purposes of this pattern, I will call the long tube the “head" and the forked thing at the other end the “tail." But really we have no idea. Materials: Acrylic worsted-weight yarn, size G hook, 14 toothpicks. If small children or pets might play with Hallucigenia, please don't use toothpicks. Try pipe cleaners, stiff ribbon, straw, raffia, or something else a little more forgiving. Dry spaghetti? Gauge: Work with fairly tight tension so the “legs" will stand. Invisible sc-decrease: Insert hook in the front loop of the next stitch, insert hook in the front loop of the following stitch, yarn over and pull through 2 loops on hook, yarn over and pull through 2 loops on hook. (If this is too confusing, just use a regular sc decrease) Note on joining rounds: I work the first sc of the round in the same space as the joining slip stitch. This keeps the join from spiraling around the piece on successiverows. Start: Chain 4 and join into a ring by working a slip stitch into the first chain. Chain 1. Round 1: Work 4 sc into the ring. Join with a slip stitch in the top of the first sc. Chain 1. (4 stitches made in this round) Round 2: Sc in each stitch around. Join. Chain 1. (4 stitches) Round 3: Sc in each of the next three stitches, 2sc in last. Join. Chain 1. (5 stitches) Rounds 4-7: Sc in each stitch around. Join. Chain 1. (5 stitches) Round 8: Sc in each of the next four stitches, 2sc in last. Join. Chain 1. (6 stitches) Round 9: Sc in each stitch around. Join. Chain 1. (6 stitches) Now it's time to make legs! You're working sc around the body as usual, then all of a sudden, instead of making the next sc where it would normally go, you chain 7 and work 6 sc back along the chain (work into the back loop of each chain). Then you go back to working sc around the body like nothing happened. It will all be explained. No reason to panic. Round 10: Sc in first stitch, (make a leg as follows: chain 7, sc in the 2nd chain from hook and in each of the remaining 5 chains for a total of 6 sc), sc in each of the next 5 stitches on the body, make another leg, join with a slip stitch in the first sc of the round. Chain 1. (6 stitches and 2 legs) Round 11: Sc in each stitch around (flip the legs forward so you can go around behind them). Join. Chain 1. (6 stitches) Repeat rounds 10 and 11 until you have 6 pairs of legs. Round 21 is a repeat of Round 11. Round 22: Sc in each of the next 2 stitches, make an invisible scdecrease across the next 2 stitches, sc in each of the next 2 stitches. Join. This time do not chain 1. (5 stitches) Round 23: Skip first stitch, sc in each of next 3 stitches, slip in last stitch. Don't bother to join. (This round narrows the “tail" and makes it bend downward) The last round is a row because you'll be working straight across the end of the body tube. The legs should point toward you as you work this row. Row 24: Make a leg, pinch the body tube closed and insert the hook through both the next stitch and a stitch directly across the body at the center of Hallucigenia's back (closing off the tube) and make an sc. Make the second leg. Slip stitch at the base of this leg and finish off. "Beard': Tie a couple of short lengths of yarn to the bottom “neck." Nobody knows what these are. Spines: Hallucigenia has 7 pairs of toothpick spines, one pair above each set of legs on the body, and the last pair above the “beard." Optionally, add little cubes of cheese as an hors d'oeuvre. Maybe these photos will be helpful when you're figuring out rounds 10 and 11 and the final row 24. The red toothpick shows where the hook goes next. Don't worry about it too much - as long as you're happy with the results it doesn't matter where you're placing the next stitch.