Purple People Eater
By: Amanda Melton
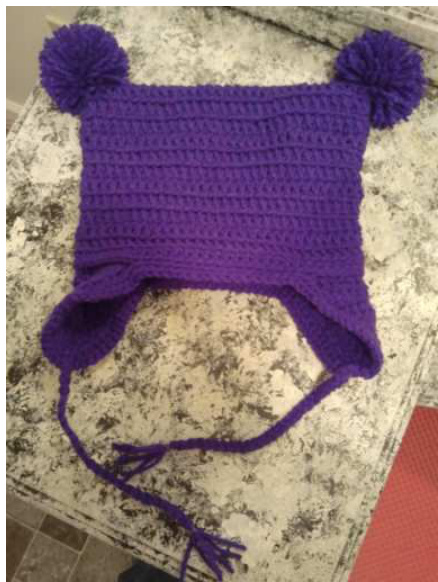
11-24-11 This hat was based on the general design of Valerie Whitten's Pretty in Pink hat available on her blog Vallieskids. There is an alternating pattern of horizontal ribbing, plus the addition of earflaps and braided ties. This was a gift for my cousin's daughter, and unfortunately lonly got one picture of it before I sent it to her. Stitches and Abbreviations Used Chain (ch) Stitch (st) Single Crochet (sc) Double Crochet (dc) Slip Stitch (ss) Back Loop (BL) Front Loop (FL) Decrease (dec) Earflap (EF)
Hook, Yarn, & Fit
H/8 - 5.00mm or I/9 - 5.50mm Red Heart Super Saver in Amethyst When I made the hat for my 15 month old, I used an H hook, which takes up some of the slack you get using an I hook for a larger hat (approximately 3T). However, this does not hold true for every yarn. Despite the fact that I always use RHSS medium worsted weight yarns, some of them are thicker/softer or thinne r/coarser. The thick or soft yarns make a floppy hat with an I hook and there is very little difference in width between an H and I hook. The thinner or coarser yarns make a tighter hat and an H hook and there is quite a bit of difference in width.
Instructions
| Hat | |
| Begin & Row 1 30dc | Ch 32, dc in BL of 3rd ch from hook and each ch across, turn and dc in FL of each st across (including beginning dc); ss to top of beginning dc |
| Row2&3 dc | Ch 2, dc in BL of same and each st around; ss to top of beginning |
| Row 4 | Ch 2, dc in each st around; ss to top of beginning dc |
| Row5&6 dc | Ch 2, dc in BL of same and each st around; ss to top of beginning |
| Row 7 | Ch 2, dc in each st around; ss to top of beginning dc |
| Row 8& 9 | Ch 2, dc in BL of same and each st around; ss to top of beginning |
| Row 10 | dc Ch 2, dc in each st around; ss to top of beginning dc |
| Row 11 | Ch 2, dc in BL of same and each st around; ss to top of beginning |
| dc Earflaps | |
| Notes: Some of the EF will be worked in BOTTOM LOOPS. You will find the bottom loop on the inside of the hat. Placing your st in the bottom loop will make a knit or braided look on the front of the hat. This will allow you later to crochet over top of the EF in Row 12 & 13. side of the hat in Row 11. Count to the 7th st before and the 6th st after the st marker on your left; count to the 6th st before and the 7th st after fthe st marker on your right. You should have 14 st marked on each side of the hat. | |
| LOOPSsoRow 12canbeworked over topof theminback loops Begin & R1: Ch2, dcin same st and next 13 st; Left Side R2: Ch 2, turn, dc in 3rd ch from hook and next 13 dc EF R3: Ch 2, turn, dc in 3rd chfrom hook and next 13 dc 14/14/14 R4: Ch 2, turn, dec in first 2 dc, dc in next 4, dec in next 2, dc 11 in next 4, dec in last 2 7/7 R5: Ch 2, turn, dec in first 2, dc, dec in next 2, dc, dec in next 3 2, dc, dec in last 2 1 R6: Ch 2, turn, dc in 3rd st from hook and next 6 dc R7: Ch 2, turn, dec in first 3, dc, dec in last 3 R8: Ch 2, turn, dec in all Ch1,sSdownsideofEF,scinBOTTOM LOOPStoRightSideEF | |
| Right Side R1: Ch2,dcin same st and next 13 st EF 14/14/14 11 7/7 in next 4, dec in last 2 3 1 2, dc, dec in last 2 R8: Ch 2, turn, dec in all Ch1,ss down side ofEF,scinBOTTOM LOOPSaround toLeft | R2: Ch 2, turn, dc in 3rd ch from hook and next 13 dc R3: Ch 2, turn, dc in 3rd ch from hook and next 13 dc R4: Ch 2, turn, dec in first 2 dc, dc in next 4, dec in next 2, dc R5: Ch 2, turn, dec in first 2, dc, dec in next 2,dc, dec in next R6: Ch 2, turn, dc in 3rd st from hook and next 6 dc R7: Ch 2, turn, dec in first 3, dc, dec in last 3 |
| Side EF, ssin base offirst EF dc Hat | |
| Row 12 Row 13 | Ch 1, sc in BL of same and BL of each dc of Row 11, ss to top of beginning sc Ch 1, sc in same st and each st around, sc through existing sc |
| Row 14 | between EE (do not sc through existing sc if you want the option of turning EF to the inside of the hat); ss to top of beginning sc Ch 1, sc in same st; sc 2xin each row of EF, 1xin each end dc of |
| Row 15 | EF, sc in BL of Row 13 between EF; repeat for other side (do not sc around EF if you want the option of turning EF to the inside of the hat); ss to top of beginning sc; fasten off ONLYCOMPLETETHIS ROWIF YOUDIDNOT SC THROUGH |
| IN ROW 14. Ch 1, sc in BL of same st and BL of each st around; ss to top of beginning sc | |
| Braids Cut 6 strands of yarn 36" long | |
| Holding 3 strands of yarn together, fold in half to form a loop Insert loop from back to front of R8 of EF Insert ends of yarn through loop and pull to tig hten Divide each group of yarn into thirds (2 strands of yarn in each third) Braid tightly to the ends, leaving a 1 %2" tail Wrap a rubber hair band several times around the tail at the base of the braid to keep it from unraveling | |
Other Uses
JIiuy oilaioi tuiai! yuui lloi iou Iat uloloiui io. iu uu ulo. OMeasure your hat's height and width. Cut a piece of fabric (broadcloth, fleece, calico, muslin) that is twice the height plus 2 1/4" and the same width. OTurn the fabric so the right sides are together (the side with the design or writing on the selvedge edges) and pin down the 2 sides. DONOTPIN THE OPENINGOPPOSITE THEFOLDEDEDGE! OUsing a basic stitch, sew 5/8" from the pinned edges being sure to secure the thread by sewing backward a few stitches at each end. OTo create a flat bottom, hold the "bag" with the seams you just sewed together. Lay one seam on a flat surface with the other seam on top of it. Mark 1" up the side seam. Press the bottom of the seam down into a V. Stitch perpendicular across the seam at the 1" mark. Repeat for the other side. (see illustrations below) 0Press the tip of the V upward and tack it to the seam 1" above the perpendicular stitch. OTurn down the top opening 5/8" and stitch around. DO NOT TURN THE“BAG" RIGHTSIDE OUT!OInsert your lining into the purse, press the bottom flat, and hand sew the top of the lining to the top of the purse.


