Easter Egg Surprise by AlpiKnit Designs
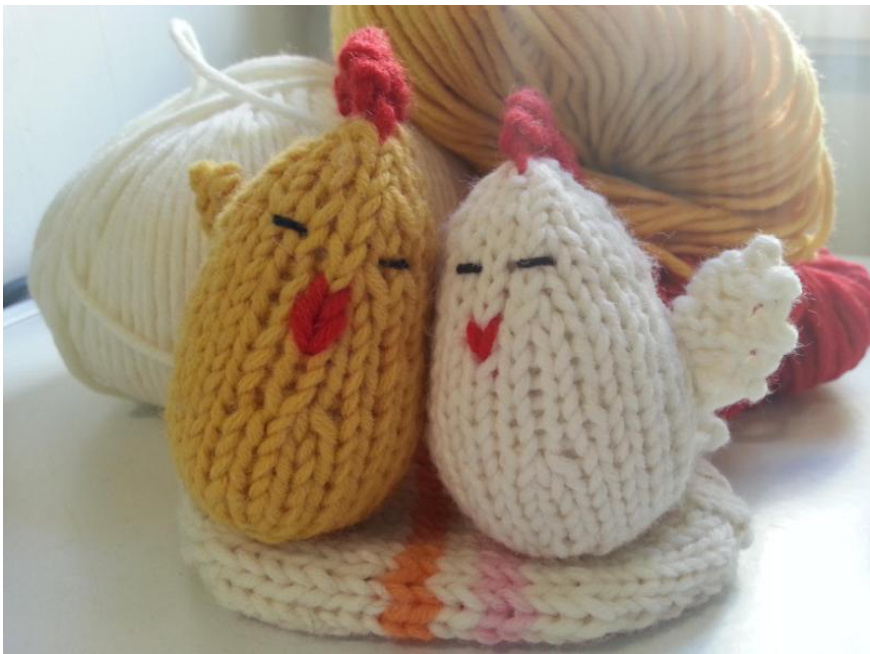
Easter Egg Surprise consists of two pieces: an egg-shaped case and one fibre filled tiny chicken, which is to be put inside case. Egg and chicken are each knit in the round. Chicken comb, tail and wings are knit back and forth separately and attached to body later on. Beak is made by way of duplicate stitch and eyes are embroidered with black floss.
Gauge
6 sts and 8 rows to measure 2.5x2.5 cm [1x1"] over stocking stitch using size 3.5 mm [US 4] needles Note: In order to tighten gauge and avoid slackening once piece is stuffed with fibrefill, worsted weight yarn is worked on smaller than usual needles.
Materials & Notions
A set of 4 size 3.5 mm [US 4] double pointed needles OR a set of circular needles of the same size to knit pattern using Magic Loop method A small amount of worsted weight yarn in Main Colour (for body and egg case) A small amount of worsted weight yarn in two colours of choice for stripes on egg case A bit of worsted weight red yarn for chicken comb and beak A small amount of fibrefill to stuff chicken body OA cut length of black embroidery floss for eyes A tapestry needle
Abbreviations
kknit ppurl k2tog knit two stitches together ssk slip slip knit k1 f&b knit one stitch front and back st(s) stitch(es) rnd(s) round(s) dpns double pointed needles co cast on rep. repeat MC main colour CC1 contrast colour 1 Cc2contrast colour 2 ws wrong side of work
Finished Measurements
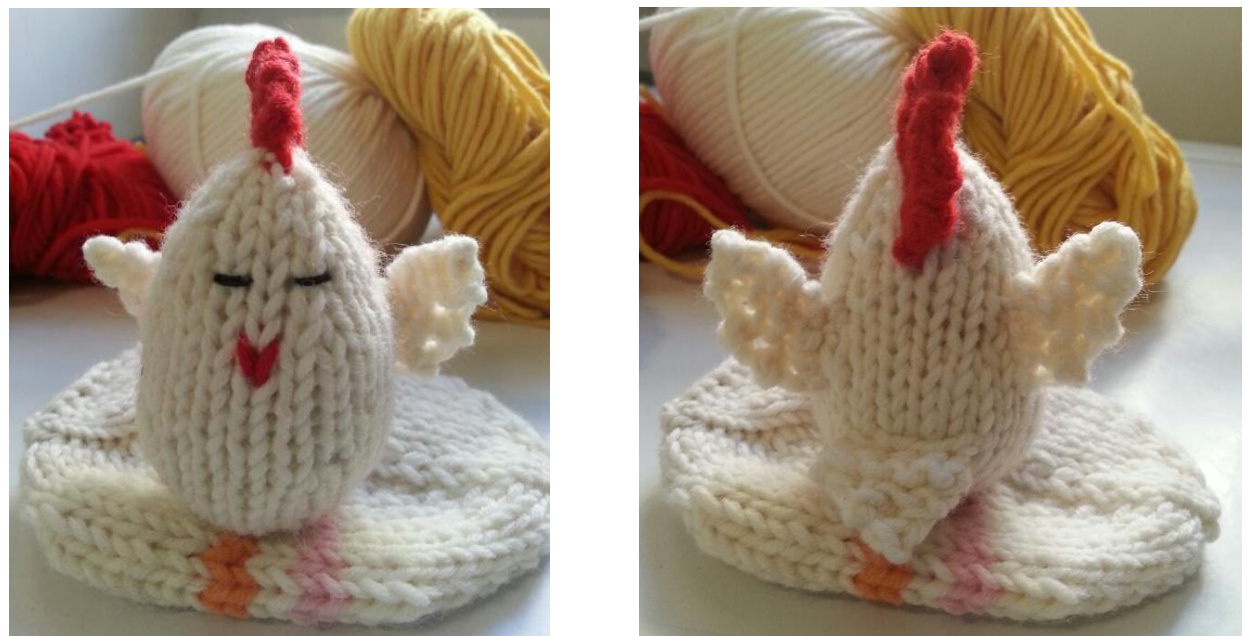
Chicken is approximately 8 cm [3.2"] high (including comb) and 6.5 cm [2.5"] wide if measured from wing to wing. Egg is approximately 11.5 cm [4.5"] high and 7.5 cm [3"] wide.
CHICKEN
Body
Using MC yarn CO 4 sts on 3.5 mm [US 4] size dpns. Divide sts evenly on needles for working in the round and place marker on first st. Note: pattern can instead be knit using a set of circular needles and the Magic Loop technique, which is how I did it. rnd 1: k every st f&b [you'll now have a total of 8 sts on needles] rnd 2: k1, k1f&b, rep. until end of rnd [12 sts] rnd 3: k2, k1 f&b, rep. until end of rnd [16 sts] rnd 4: k3, k1 f&b, rep. until end of rnd [20 sts] rnd 5: k4, k1 f&b, rep. until end of rnd [24 sts] Knit the next 5 rnds rnd 11: k4, k2tog, rep. until end of rnd [20 sts] Knit the next 5 rnds rnd 17: k3, k2tog, rep. until end of rnd [16 sts] Knit the next 2 rnds ffing piece with fibre NOW and continue to stuff it as you decrease towards the en rnd 20: k2, k2tog, rep. until end of rnd [12 sts] Knit the next 2 rnds rnd 23: k1, k2tog, rep until end of rnd [8 sts] Cut off yarn and thread it through live st, pulling tight. Weave in all lose ends and pull them into body.
Wings (make two)
Using MC yarn CO 5 sts. Wings are worked back and forth in garter st. row 1: k row 2: ssk, k until end of row [4 sts] rep. rows 1 and 2 two more times. row7:k2tog Cut yarn and thread it through last remaining st. Pull tight and weave end into fabric. Do not weave in CO tail: you'll be using it to sew wing to body.
Tail
Using yellow yarn CO 6 sts. Tail is worked back and forth in garter st. row 1 and 3: k row 2: ssk, k2, k2tog [4 sts] row 4: ssk, k2tog 2 [2 sts] row 5:k2tog Cut yarn and thread it through last remaining st. Pull tight and weave end into fabric. Do not weave in CO tail: you'll be using it to sew chicken tail to body.
Comb
Using red yarn CO 10 sts. Comb is worked back and forth in garter st. row 1: knit row 2: ssk twice, k until end of row row 3: ssk, k until end of row row 4: bind off 2 sts at the beginning of row, knit until end of row row 5: bind off 1 st at the beginning of row, knit until end of row row 6: bind off 2 sts at the beginning of row, k1 row 7: ssk Cut yarn and thread it through last remaining st. Pull tight and weave end into fabric. Do not weave in CO tail: you'll be using it to sew comb to body.
Finishing
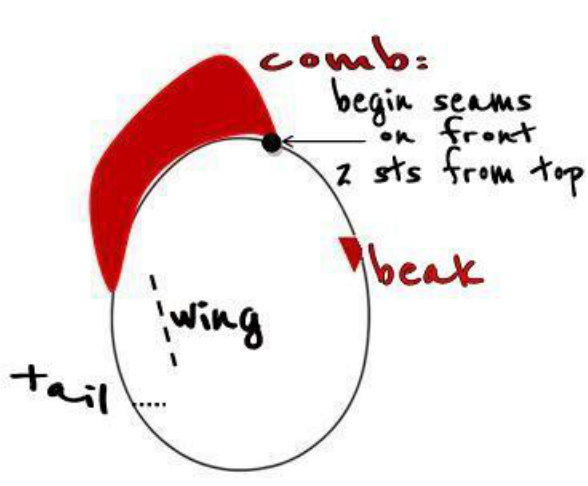
Use CO tails to sew pieces to body and work in mattress stitch. Decide which side of 'chicken' would be the front side. Start sewing the comb. Beginning in the middle of front 2 sts from top, work your way up, then down on back side. Using comb as reference point to calculate centre, mattress stitch tail horizontally at the centre of back, approximately 6 sts from CO (where body increases had stopped). Still working on back side, sew each wing onto chicken sides, so that it would form a slightly diagonally line. Turn to the front side. With a cut length of red yarn add a duplicate stitch for beak in the middle of front, approximately 7 sts below comb. With a cut of black embroidery floss make 2 horizontal small sts for each eye. Pull all loose ends into chicken and trim.
EGG-SHAPED CASE
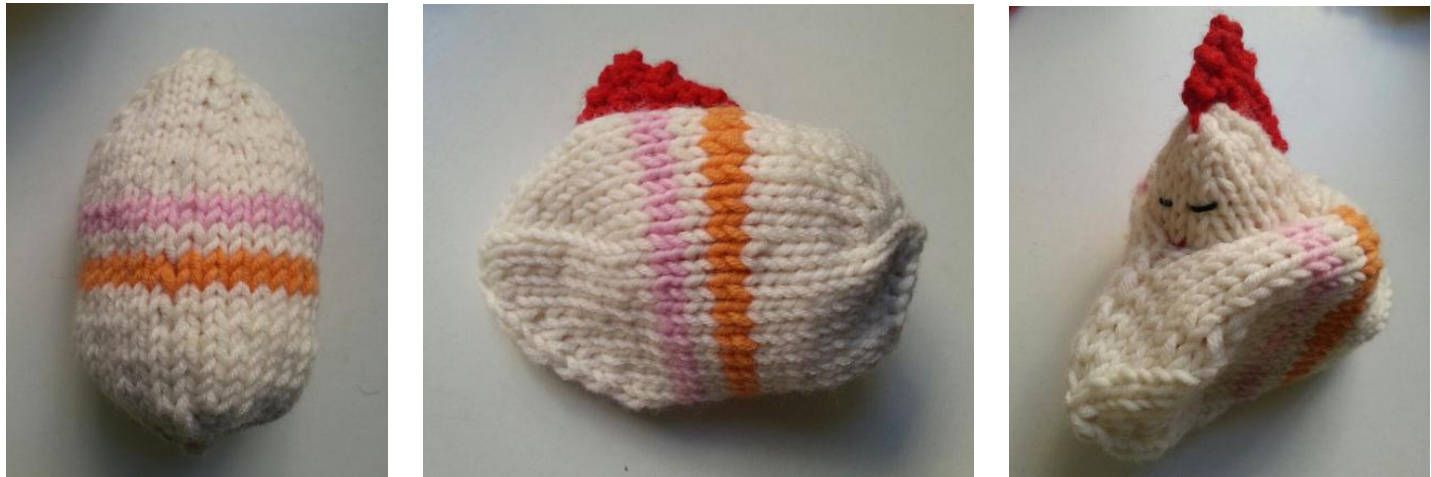
Using MC yarn CO 4 sts on 3.5 mm [US 4] size dpns. Divide sts evenly on needles for working in the round and place marker on first st. Egg too could be knit using a set of circular needles and Magic Loop method. rnd 1: k every st f&b [8 sts] rnd 2: k1, k1 f&b, rep. until end of rnd [12 sts] rnd 3: k2, k1 f&b, rep. until end of rnd [16 sts] rnd 4: k3, k1 f&b, rep. until end of rnd [20 sts] rnd 5: k4, k1 f&b, rep. until end of rnd [24 sts] rnd 6: k5, k1 f&b, rep. until end of rnd [28 sts] rnd 7: k6, k1 f&b, rep until end of rnd [32 sts] Knit the next 5 rnds. In order to create an opening on egg side, you'll now work 12 rows back and forth. (Nevertheless, leave sts on 4 needles to keep strain off). row 1 (WS): purl row 2: knit Switch to CC1 and rep. rows 1 and 2 once Switch to MC and rep. rows 1 and 2 once Switch to CC2 and rep. rows 1 and 2 once Switch to MC and rep. rows 1 and 2 twice Join to work in the round again and place marker at the beginning of rnd. rnd 1 and all odd rnds: knit rnd 2: k6, k2tog, rep. until end of rnd [28 sts] rnd 4: k5, k2tog, rep. until end of rnd [24 sts] rnd 6: k4, k2tog, rep. until end of rnd [20 sts] rnd 8: k3, k2tog, rep. until end of rnd [16 sts] rnd 10: k2, k2tog, rep. until end of rnd [12 sts] rnd 11: k1, k2tog, rep. until end of rnd [8 sts] Cut yarn and thread end through live sts, pulling tight. Weave all loose ends into fabric. Squeeze Chicken into case (bottom first) and voila, here you have your Easter Egg with Surprise!
AMONG OTHER THINGS...
Choking Hazard - Easter Egg Surprise is not meant for little children. Final pieces are very small and they shouldn't be given to children under the age of 3 or older if there's a risk that they might swallow them.
Notes on copyright
Among the many things that I do for a living I design knitting patterns. I sell some of them to dyers who operate in my local area and put others online, either for sale in my online shop or as free patterns on my blog and Ravelry account - the final destination mostly depending on the amount of time that I spend creating and writing them. This particular project is free and I mean it: it is ok to make as many Easter Egg Surprise as you like both for personal or commercial use.
Contacts
If you have any questions or comments about this project please let me know at alpiknit@ gmail.com or leave them on my blog at http://alpiknit.wordpress.com. I'd be very glad to hear from you. I'malsoon:

http://pinterest.com/alpiknit
avelry username is AlpiKnit (but you must have an account to see my profile, sorr


