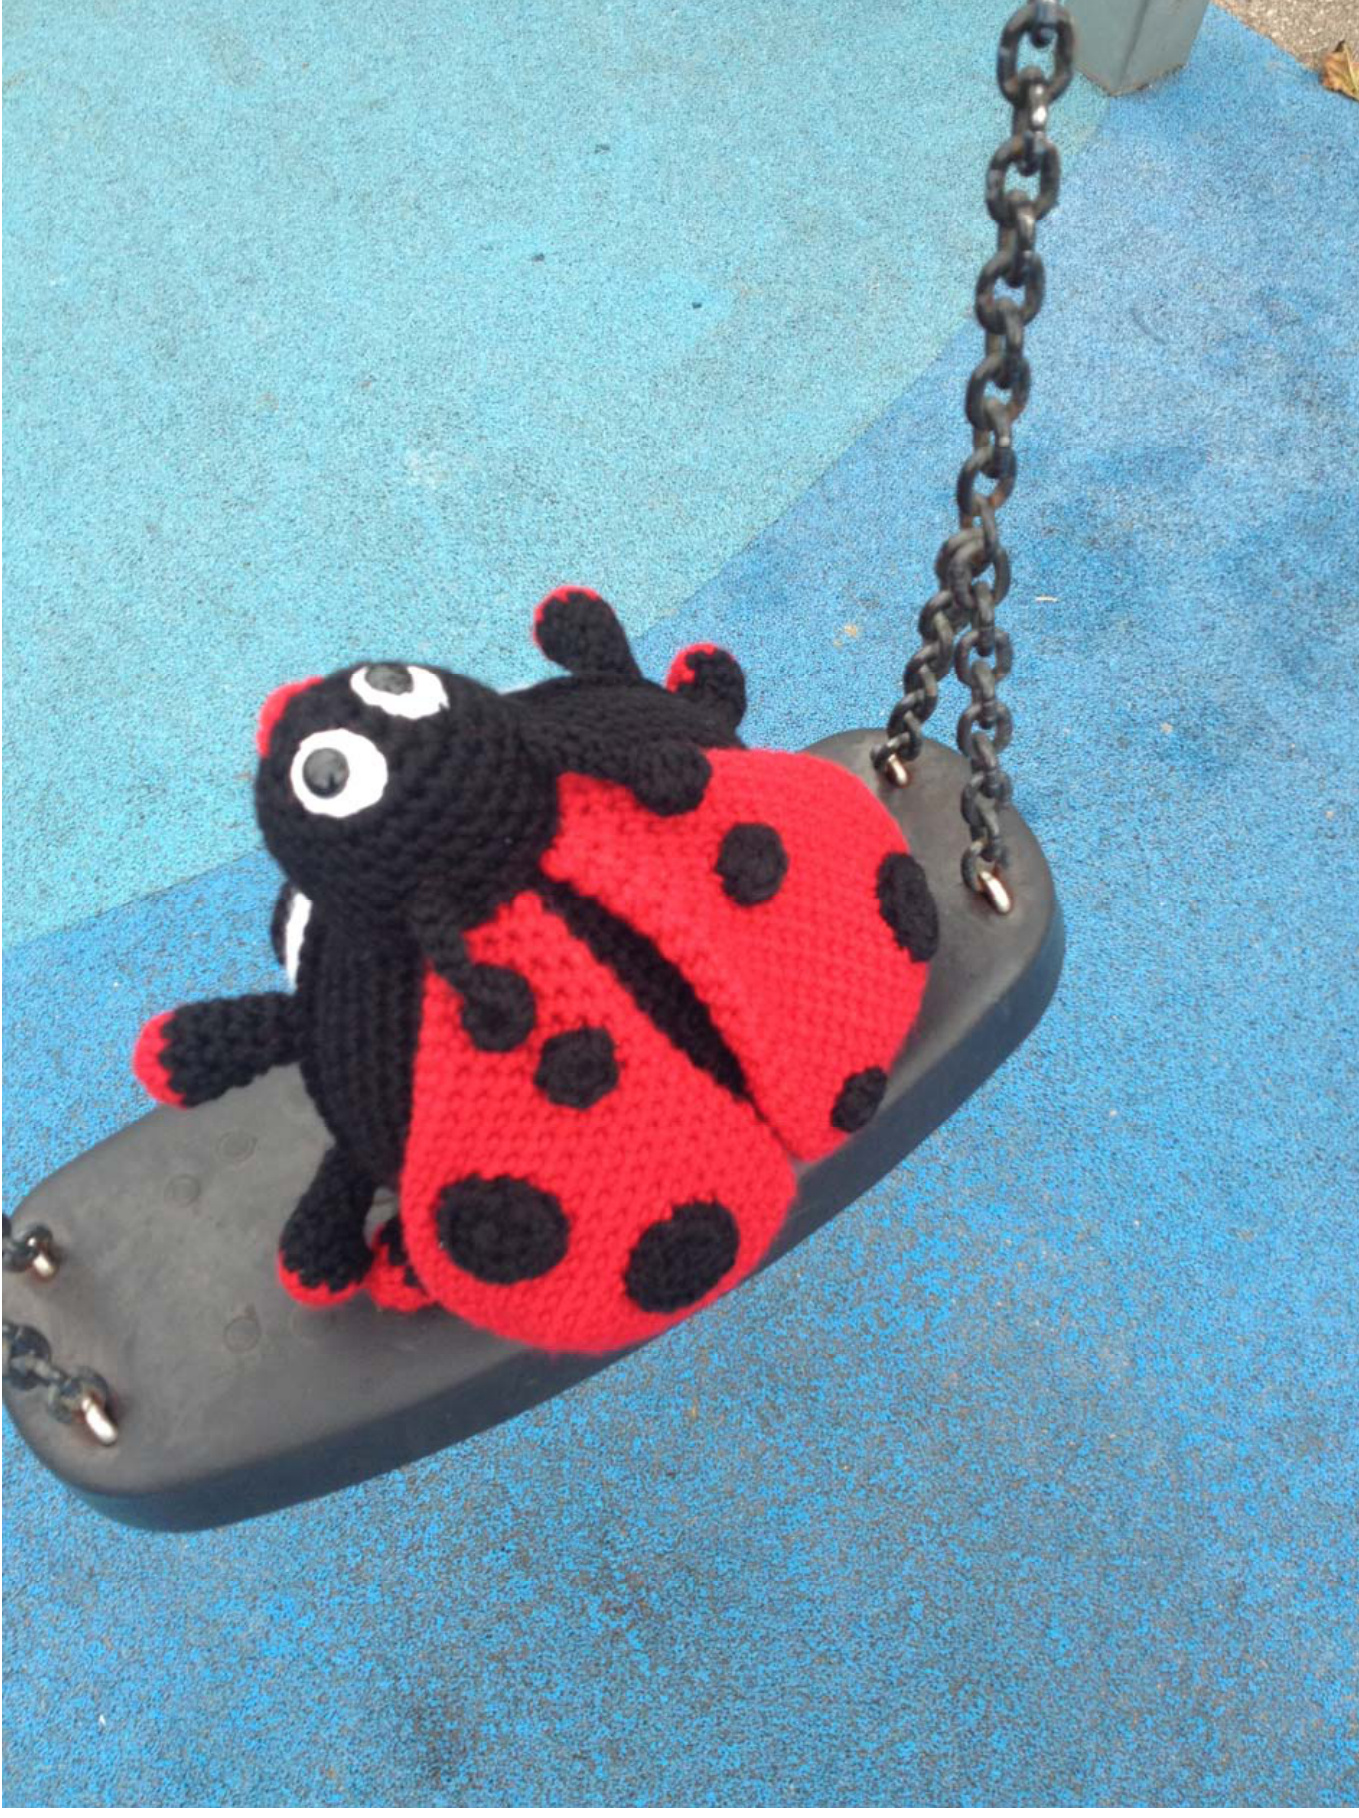
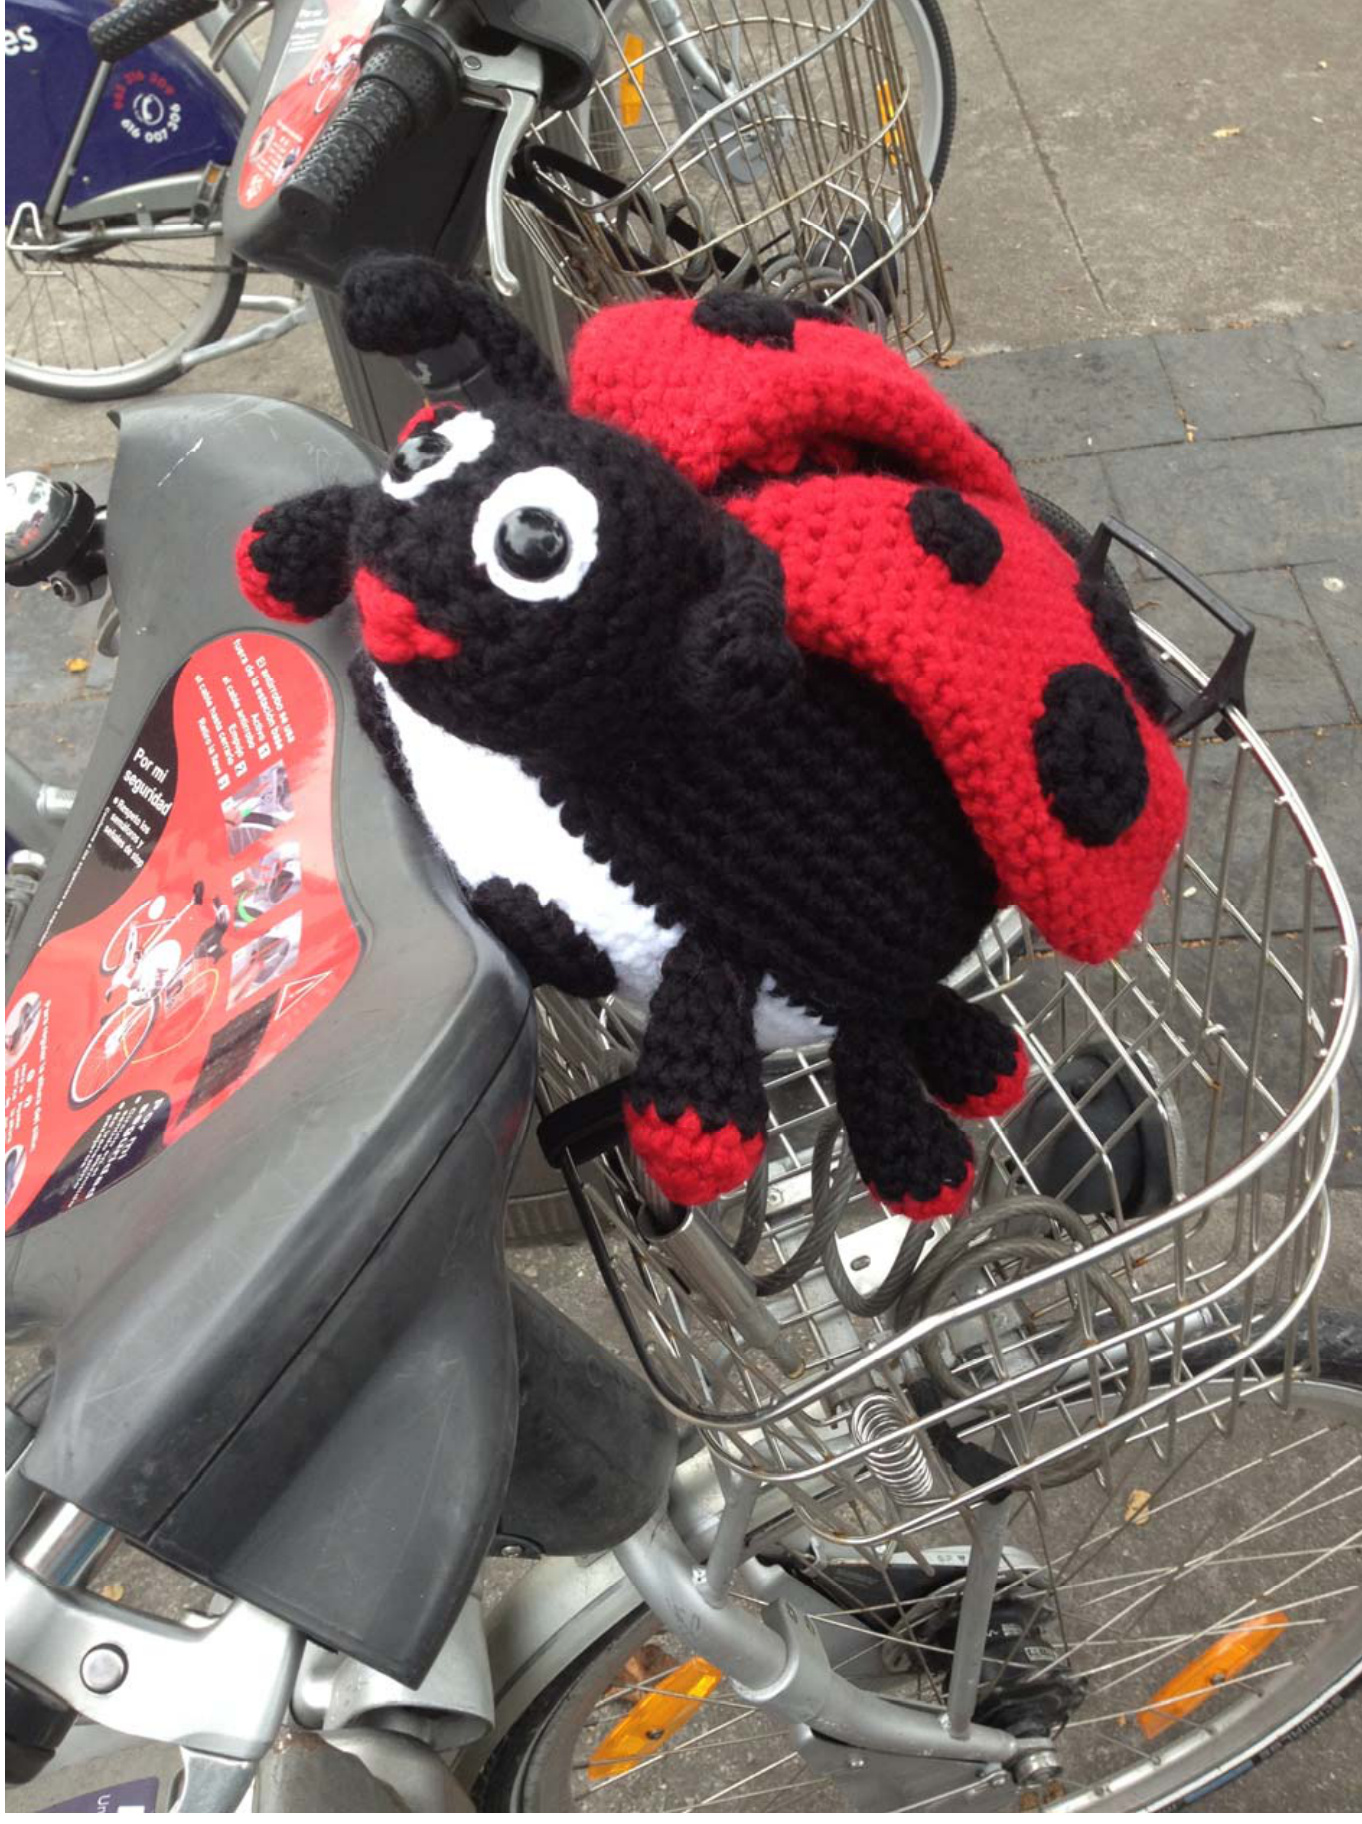
Dotty the Ladybug
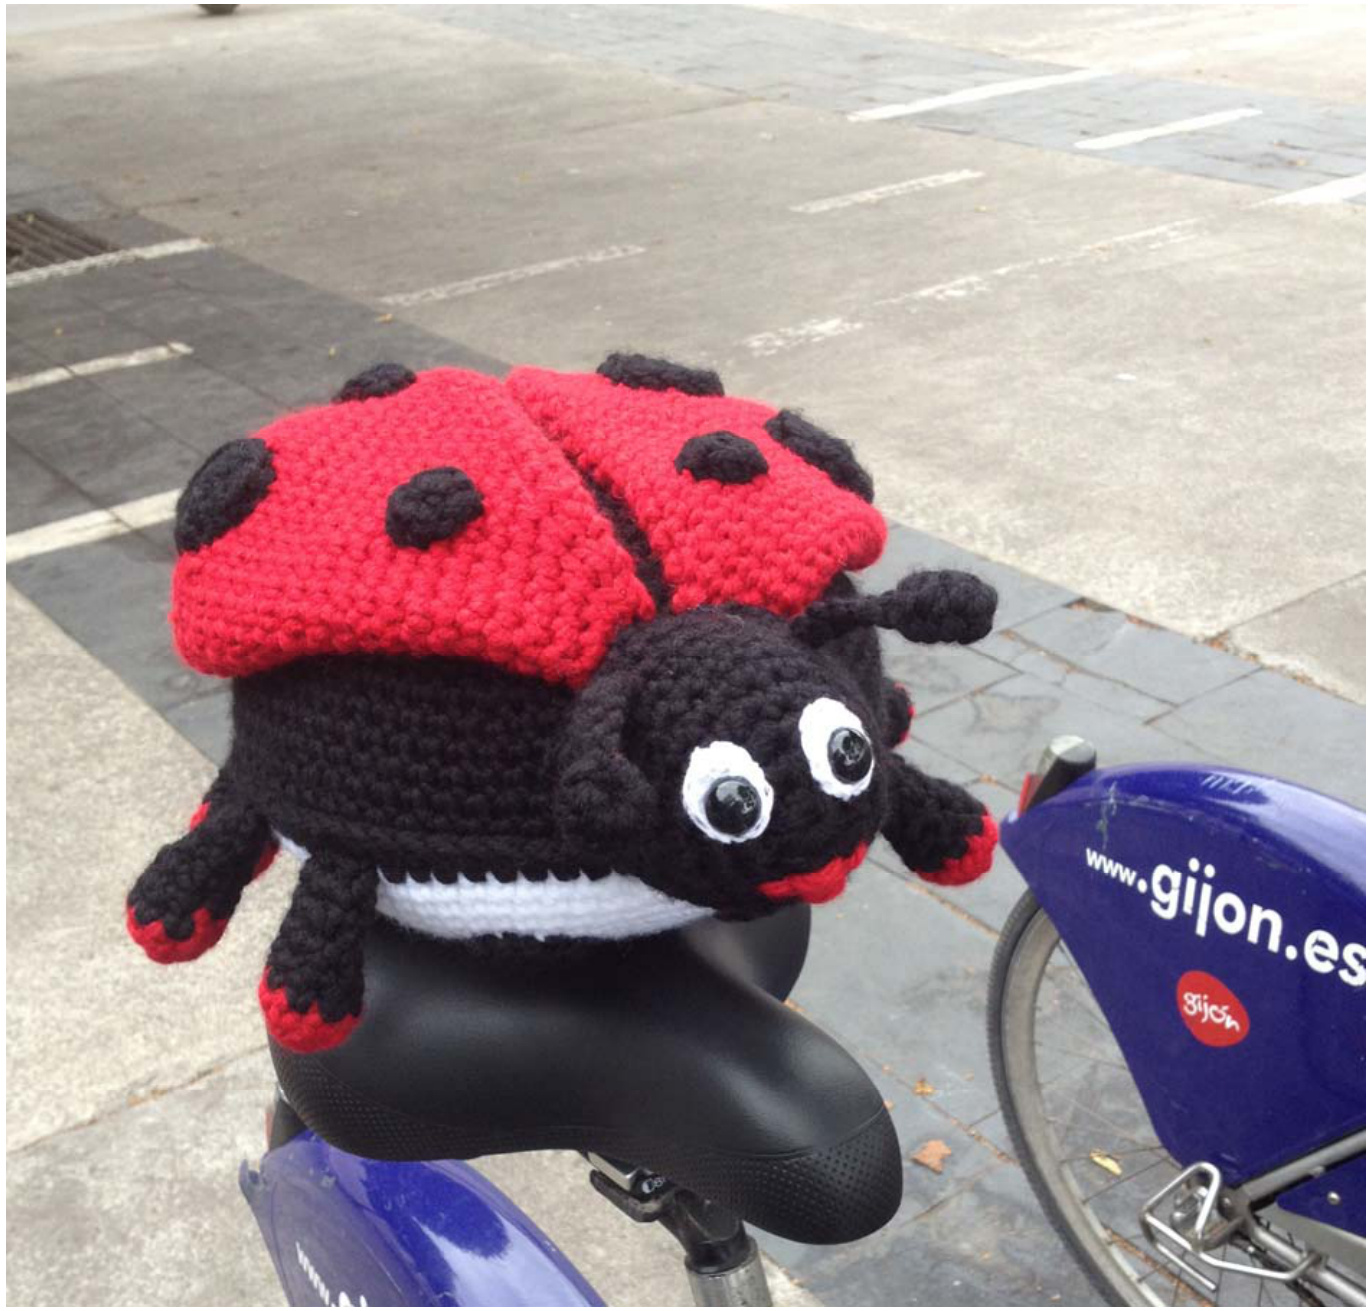
By Teresa Alvarez (July 2013) About copyright: It's really something great when people like what I have designed. You can sell the final item or whatever you like, but it would be nice to reference where you found the pattern! If there is anything you do not understand or there are any mistakes, please, send me a message! As you can see in the way I write, English is not my first language. So, you could come across some mistakes and grammatical inconsistencies@. Sorry and my apologies! This file describes how to crochet Dotty the ladybug, this is the second ladybird I've designed. When my eldest son was born, a workmate gave him a small ladybug in red, white and black. Inspired by it, I decided to crochet this cute Dotty thing and add some touches to catch baby's attention. I know ladybirds do not have dots under the shell or on the belly, but I want children and toddlers to have fun, so let's look for the hidden dots!
ABOUT YARN:
I have used Katia CANADA, 100% Acrylic. 100gr = 75 meters Colors: black (2 skeins), red (2 skeins), white (1 skein).
ABOUTGAUGE:
It is not important, as far as you are consistent with your tension.
ABOUTHOOK:
3.75 mm hook (only for the eyes, I've used a thinner yarn) 6 mmhook. Remember that when making amigurumis, stitches should be tight.
YOU WILL NEED:
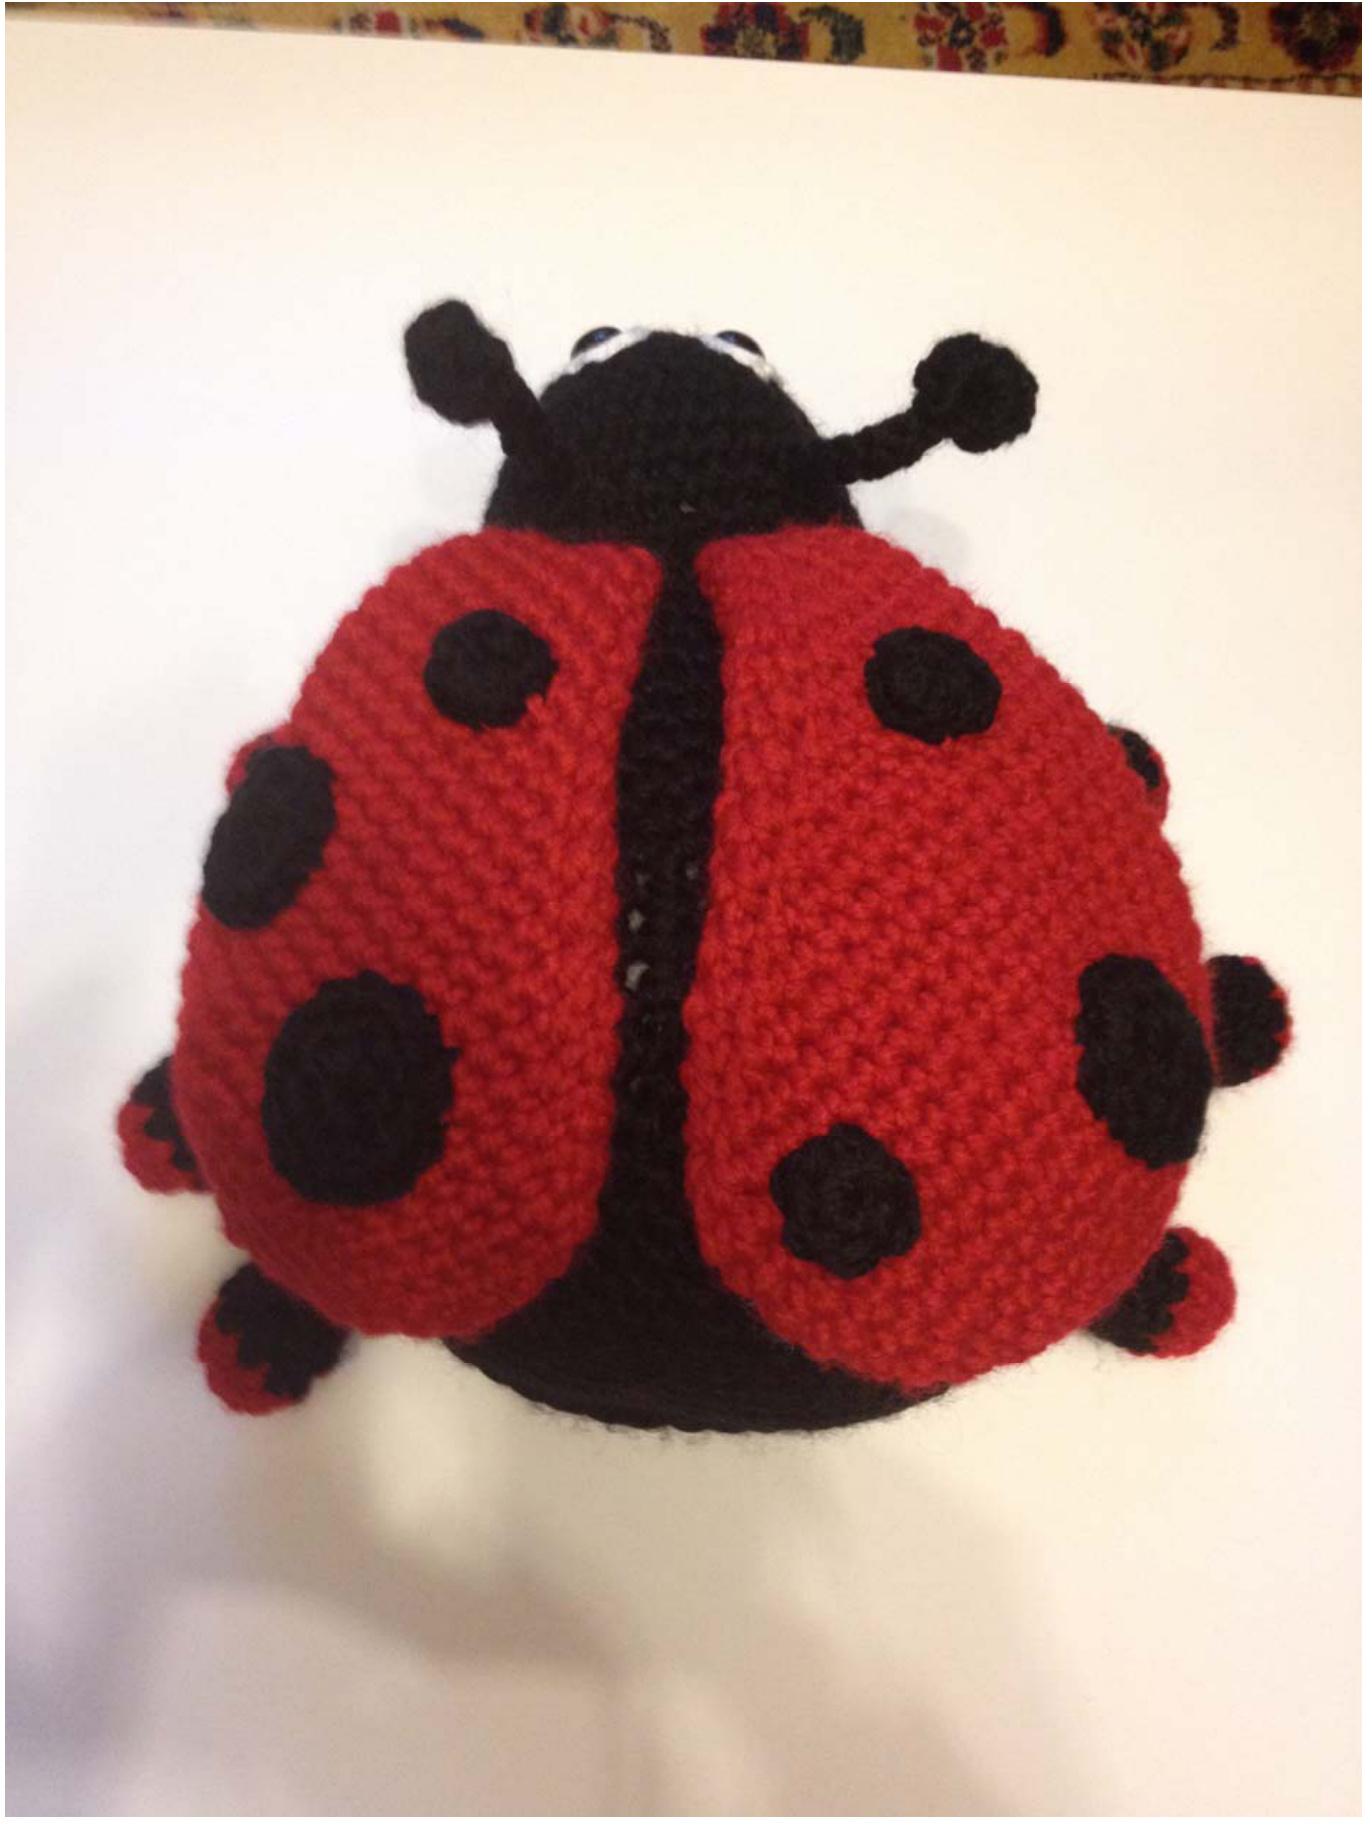
·Yarn for the ladybird. Eyes, three ways: 0Two safety eyes and some white yarn thinner than Canada yarn. oWhite and black yarn (thinner than Canada yarn). o Felt in white and black. ·Stuffing. Tapestry needle. Optional: if the ladybug is not going to be play with by a small child, pipecleaners can be used to give strength to the antennae.
ABOUTCROCHETTERMS:
I've followed the US terminology. Stitch: st Chain: ch Slip stitch: Sl st Single crochet: sc Sc2tog: decreasing two sc (i.e., 2 st become 1) Bobble: yarn over, insert hook in next stitch, [yarn over and draw up a loop, yarn over and draw it through the first 2 loops on your hook] repeat 6 times, yarn over and draw hook through all the remaining loops. NOTE: I've made all the decreases as invisible decreases
PATTERN:
All the pattern is worked in spirals, so do not join at the end/beginning of a row.
Dots
The only 'compulsory dots' are those placed onto the shell, all the others are a game, a way to keep children amused! There are three different sizes:
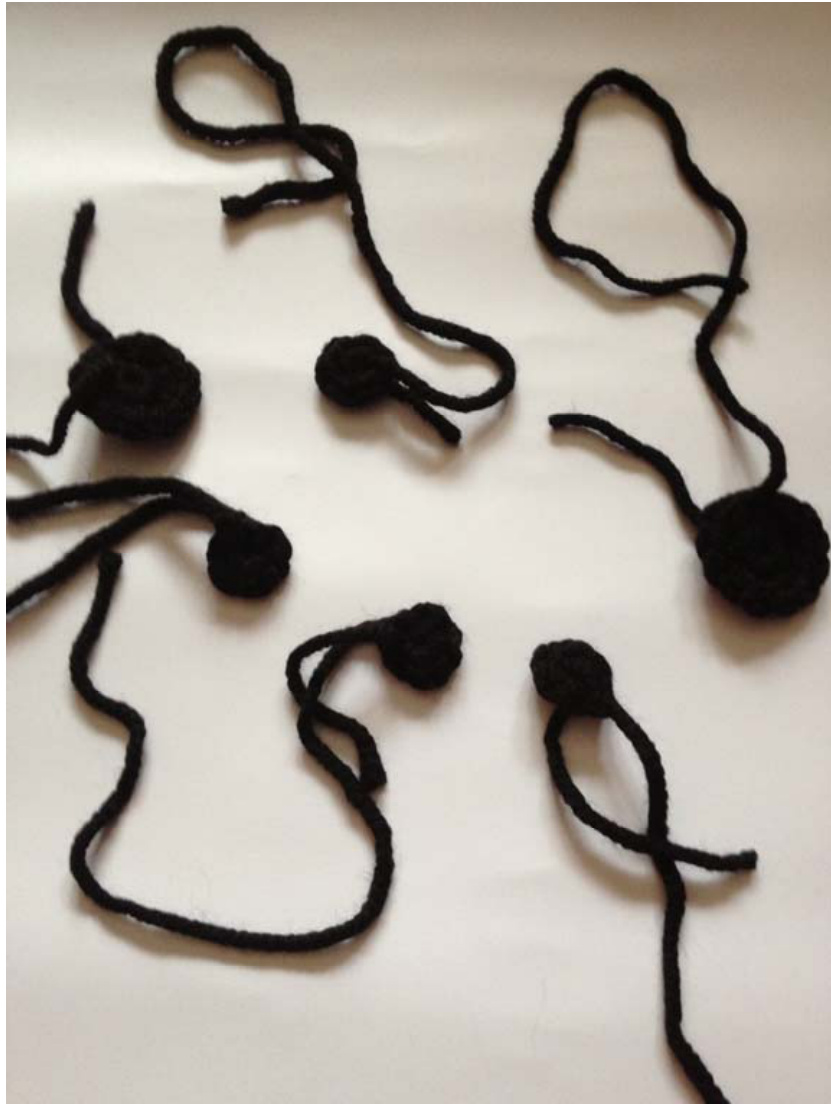
Small dot:
magic ring, 6 sc (alternatively, 2 ch and 6 sc in 2nd ch from hook). Fasten off. Large dot: Round 1: magic ring, 6 sc (alternatively, 2 ch and 6 sc in 2nd ch from hook). Round 2: 2sc in next 6 st, sl st in next st (12 sts) Fasten off. Leave long end to sew.
Extra-large dot:
Round 1: magic ring, 6 sc (alternatively, 2 ch and 6 sc in 2nd ch from hook). Round 2: 2sc in next 6 st, sl st in next st (12 sts) Round 2: 2sc in next 6 st, sl st in next 2st (18 sts) Fasten off. Leave long end to sew.
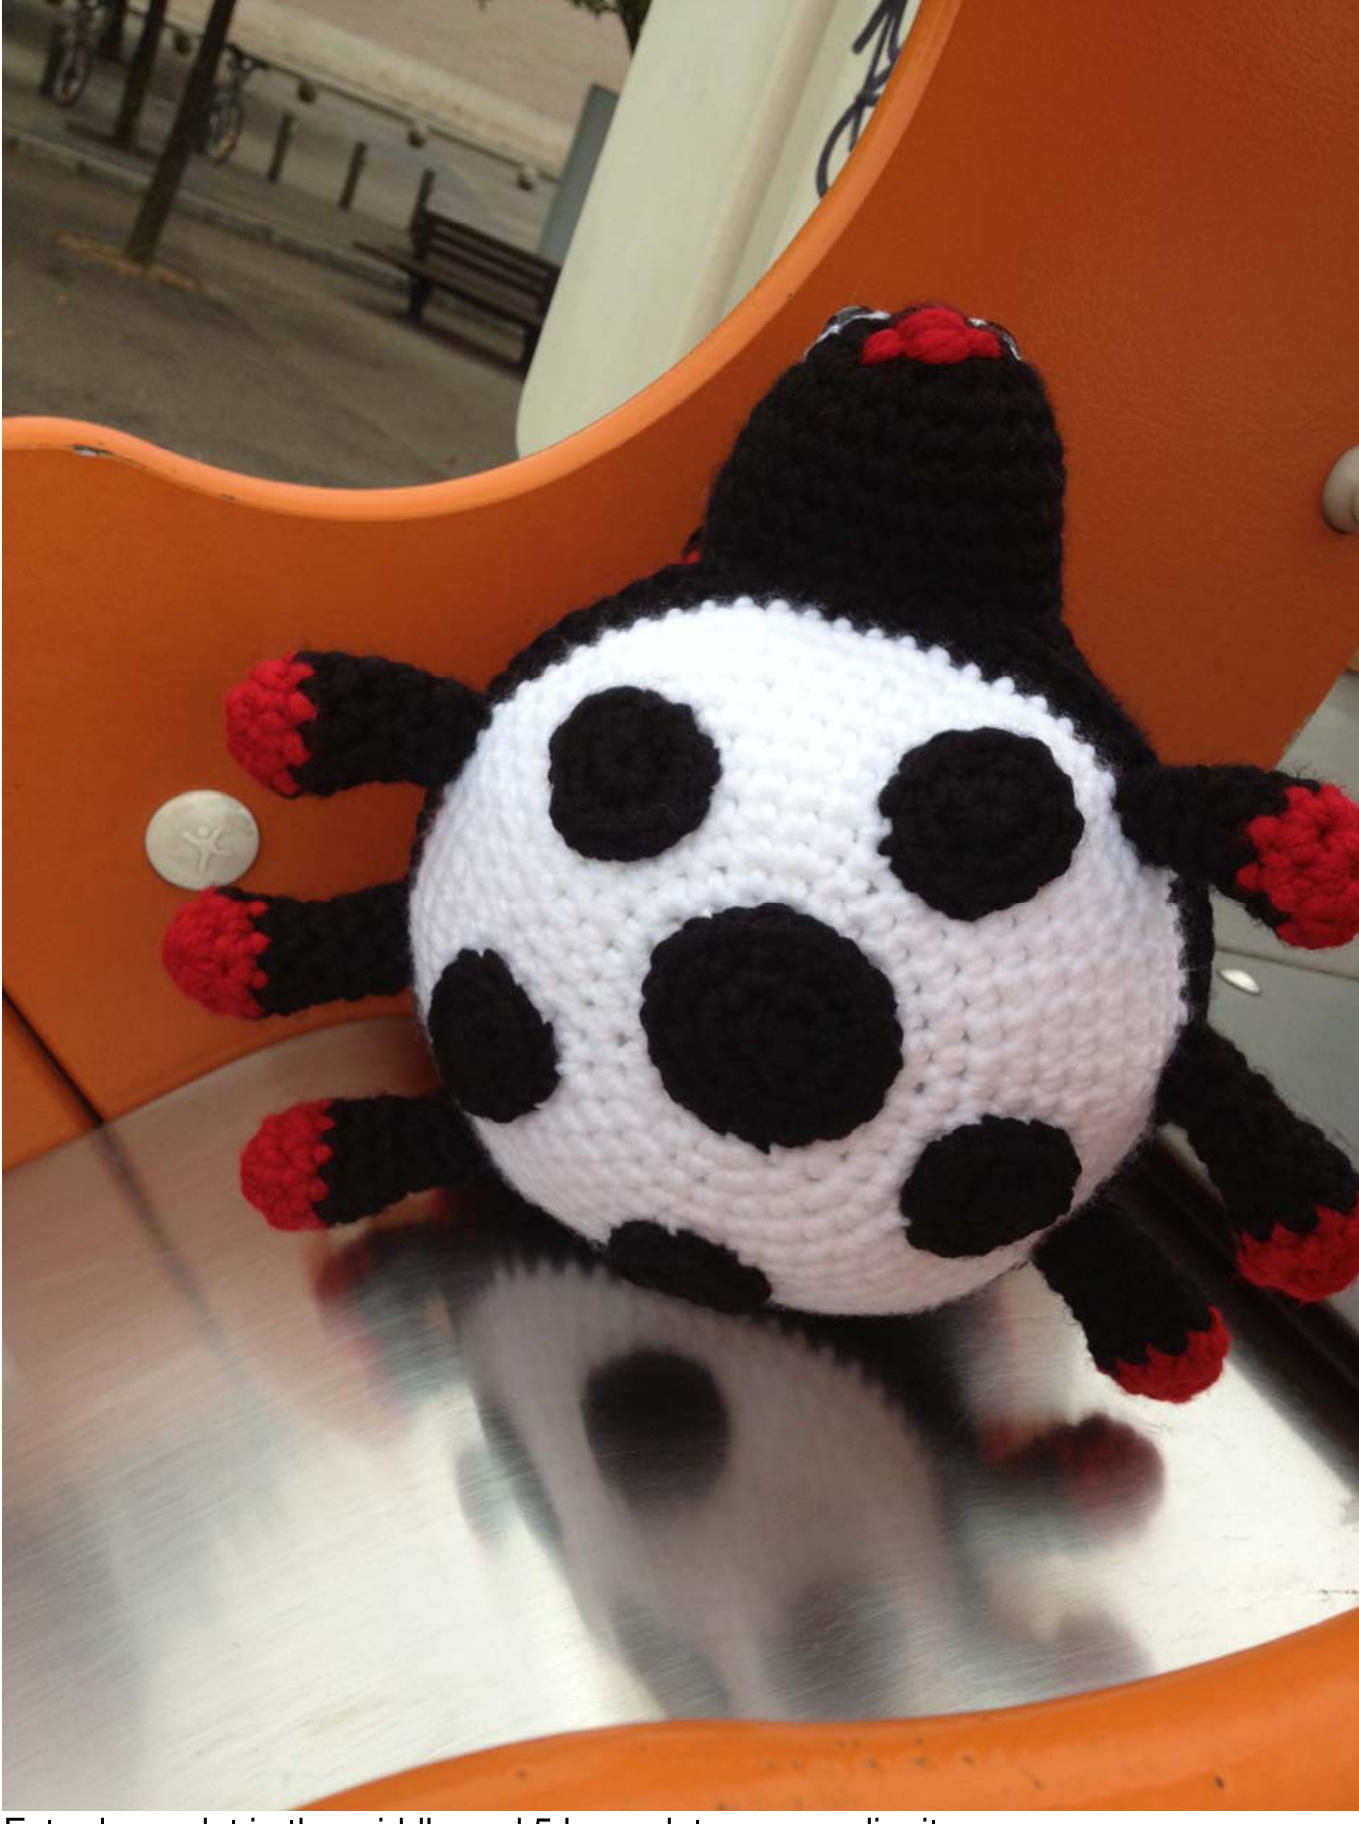
Shell dots:
Using black: 3 small dots and 3 large dots. Shell dots (hidden side): Using black: 2 small dots and 1 large dots. (Place as many as you like, I run out of yarn ...) Belly dots: Using black: 5 large dots and 1 extra-large dot. Body dots (hidden under the shell) Using red: 3 small dots and 4 large dots.
Antennae (make 2)
Using black. Ch 8, bobble in 2nd ch from hk, sl st in remaining sts. Fasten off
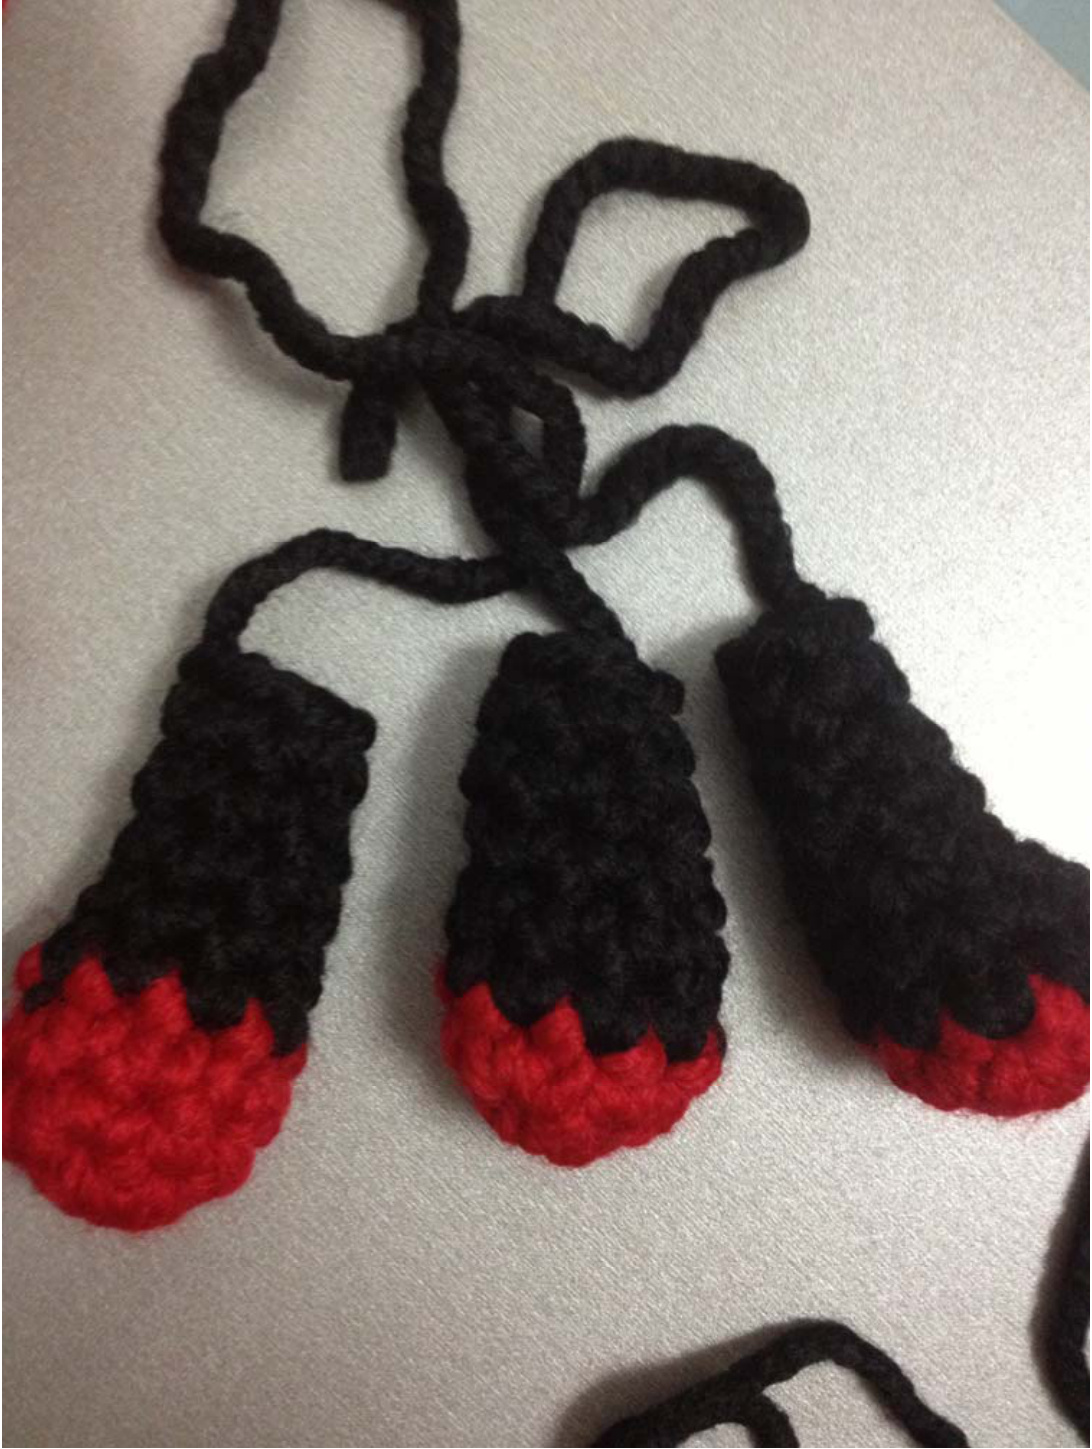
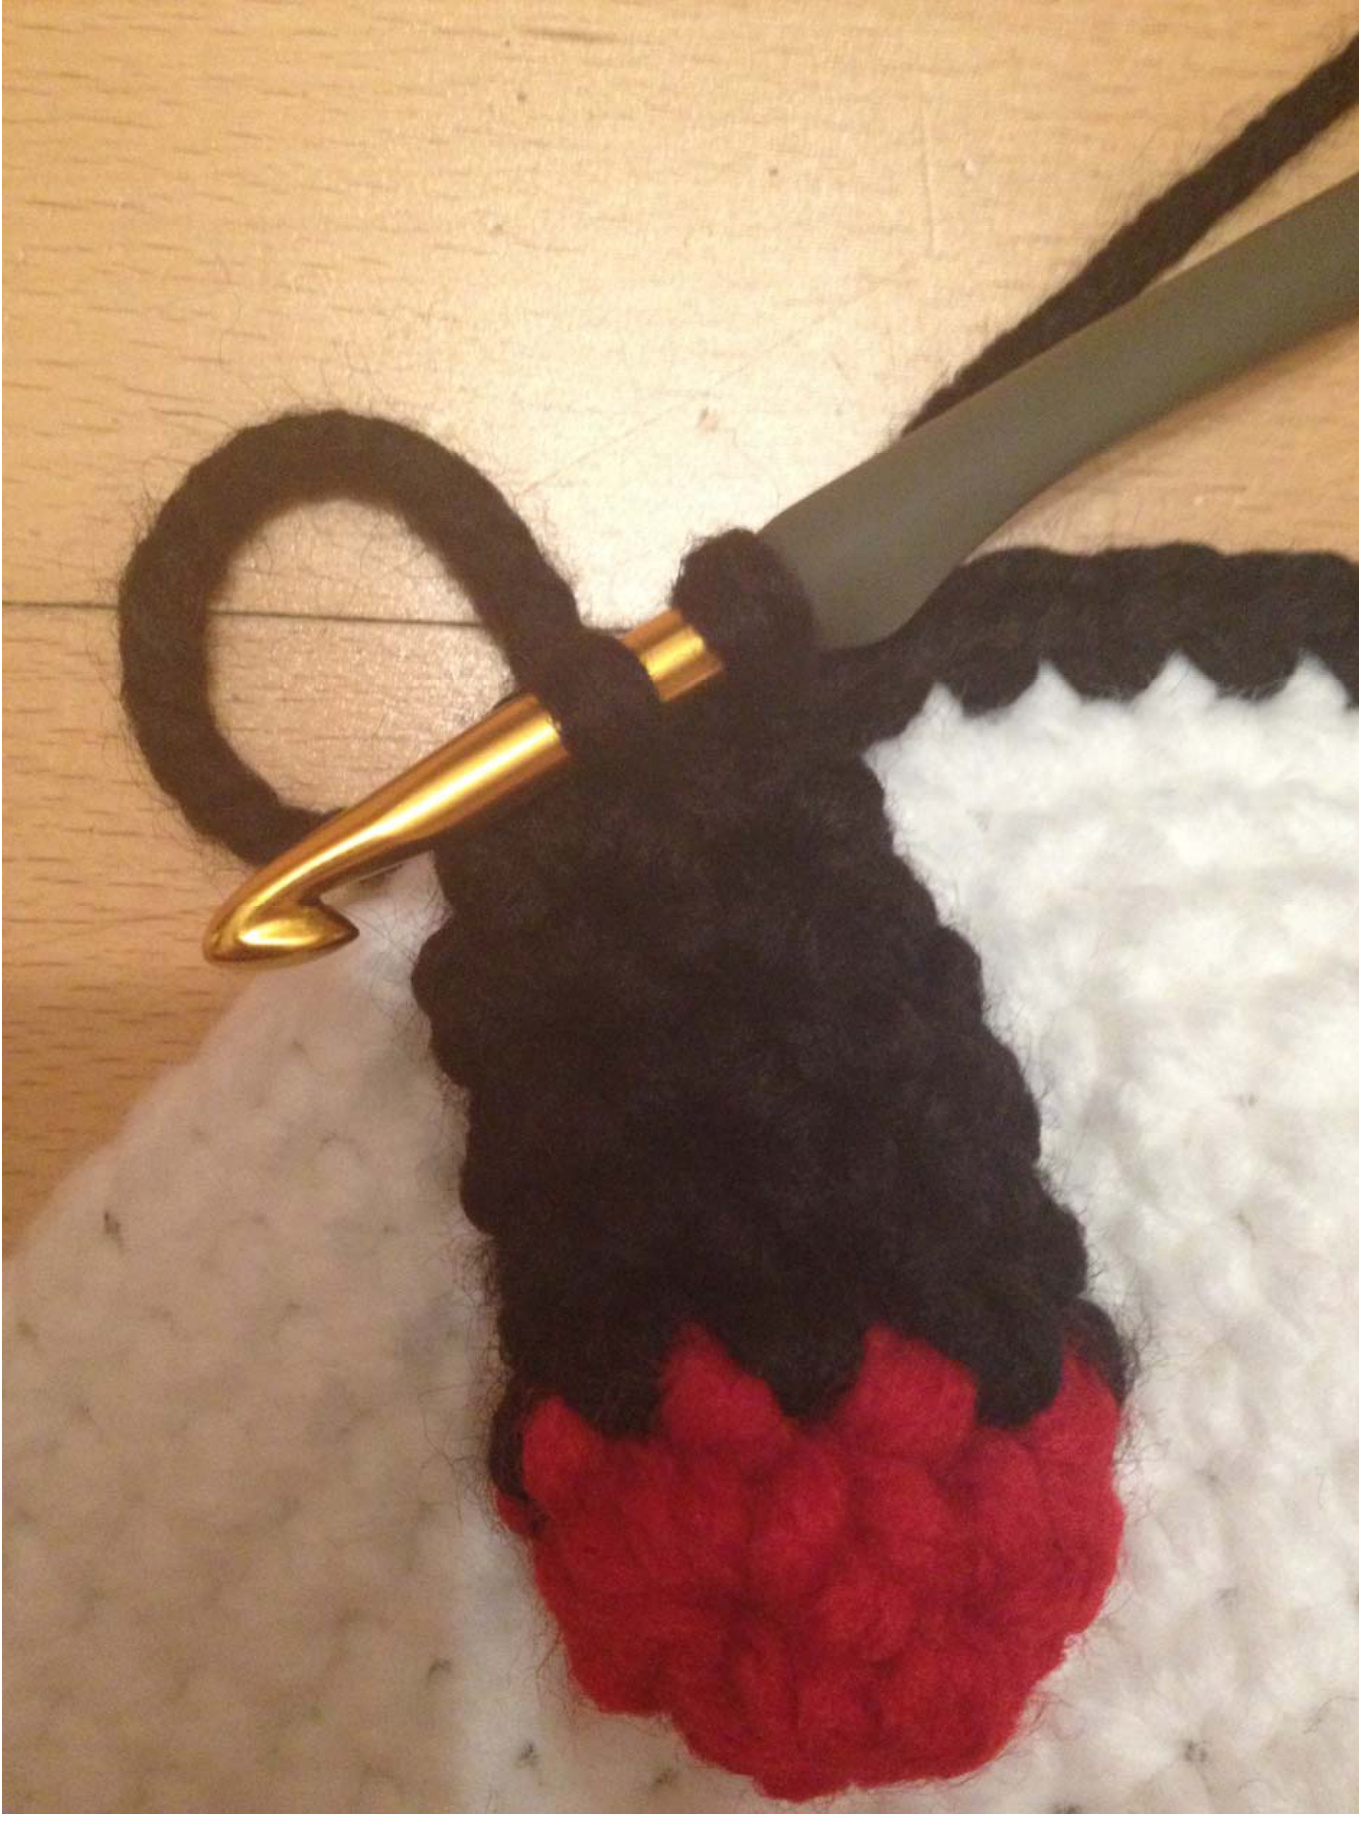
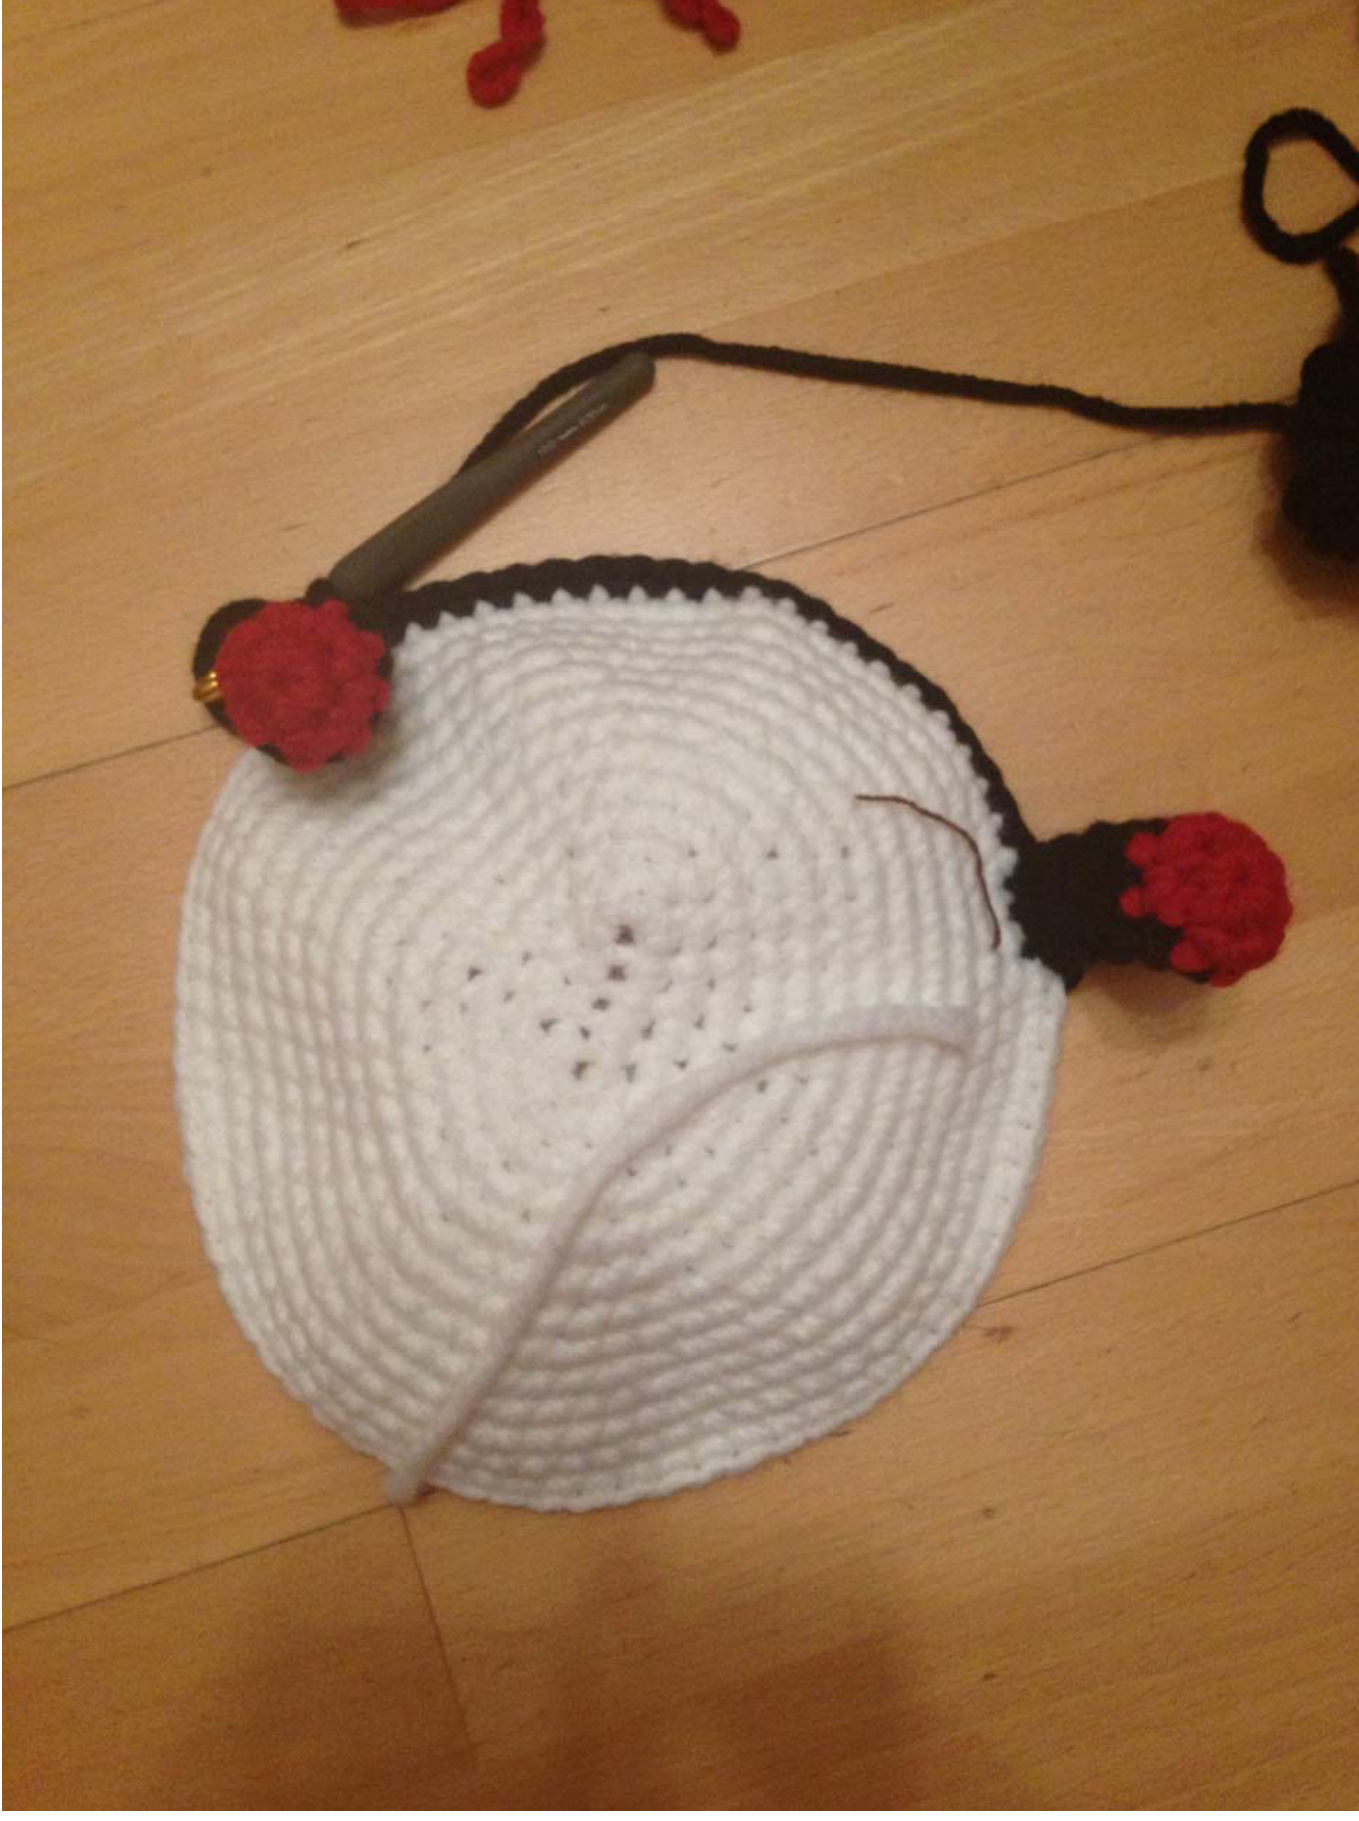
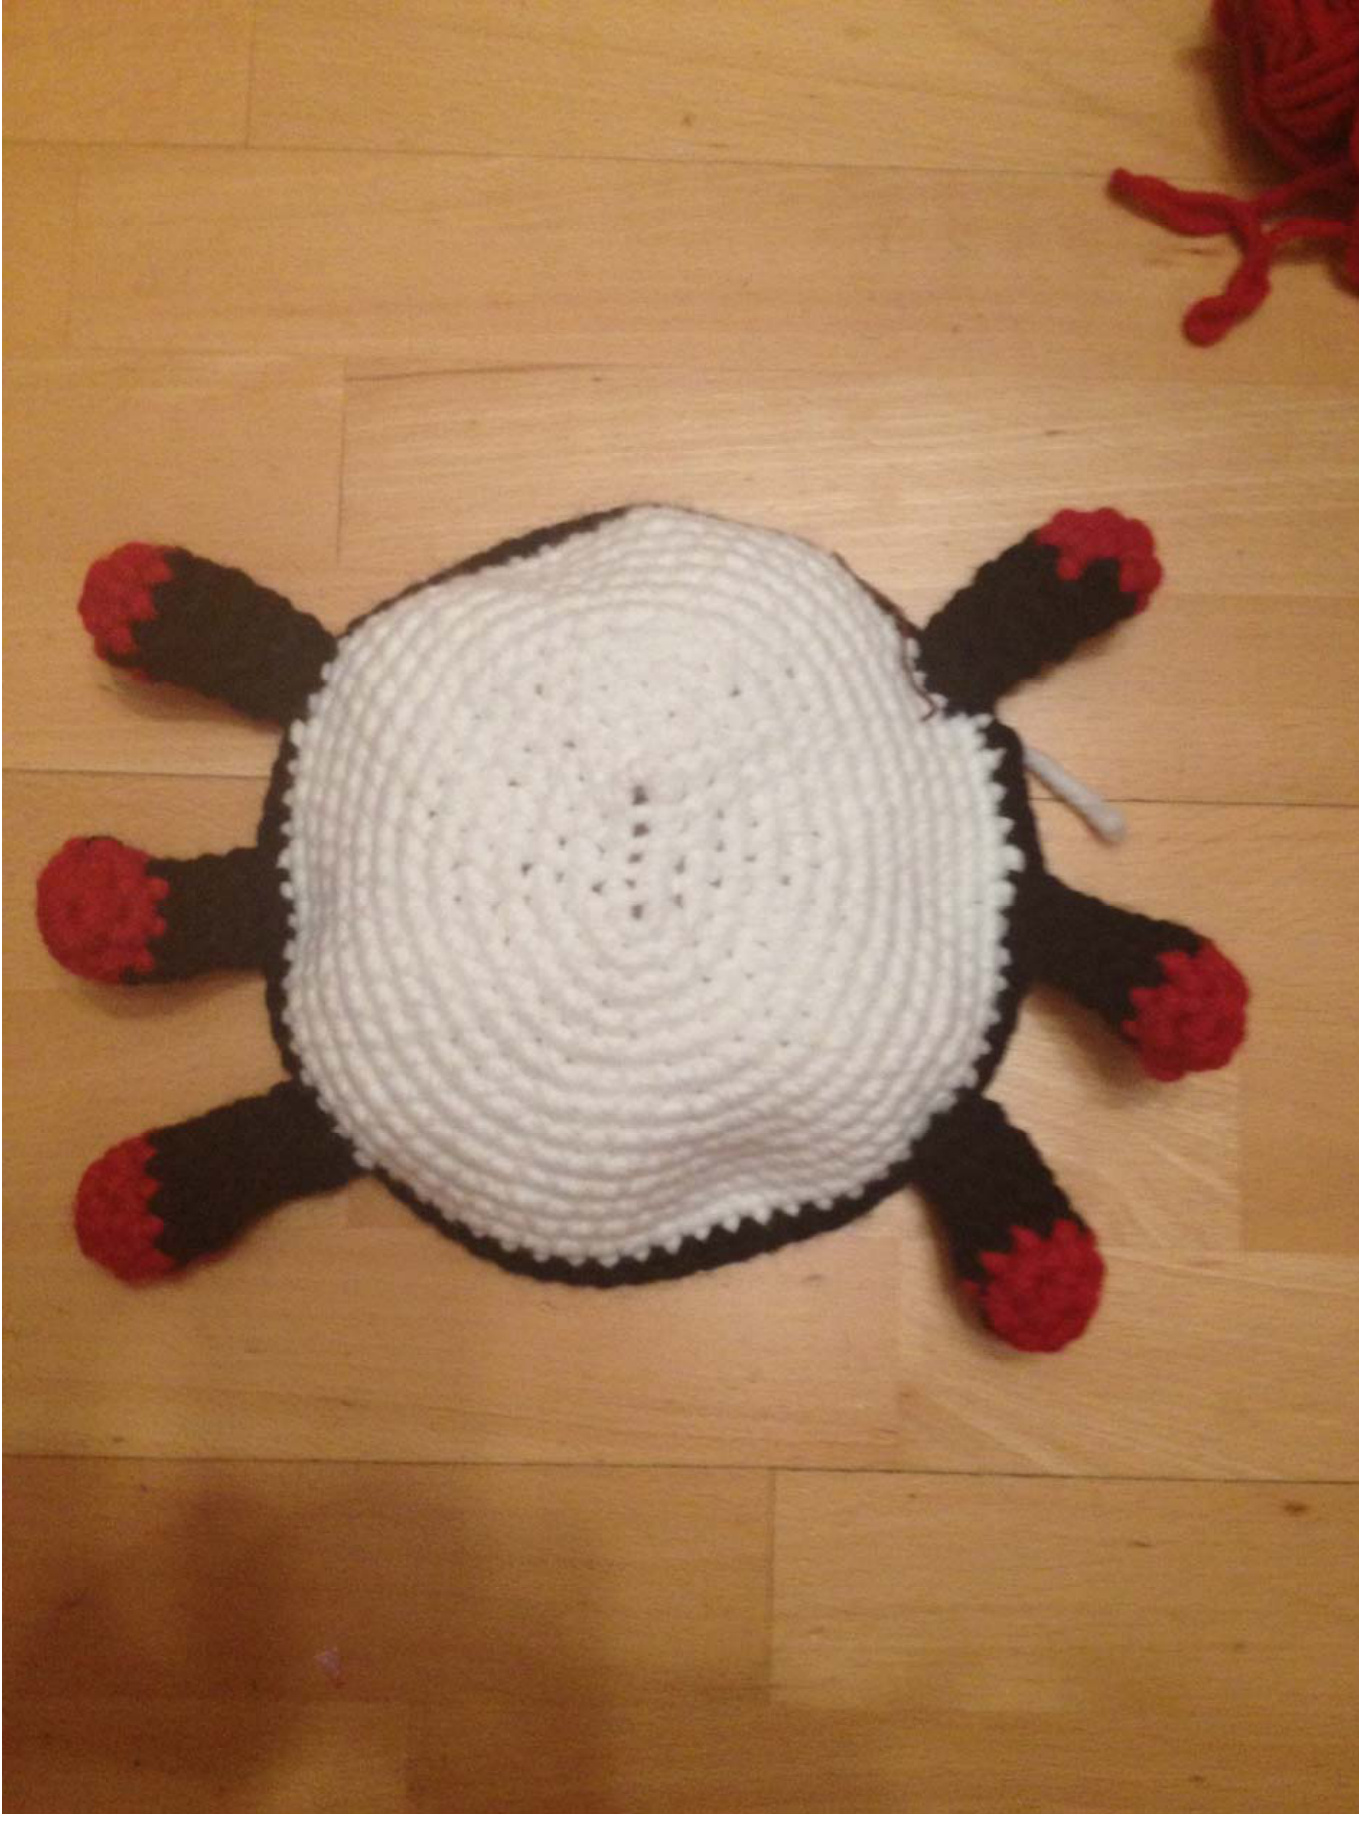
Legs ( make 6)
Round 1: magic ring, 6 sc (alternatively, 2 ch and 6 sc in 2nd ch from hook). Round 2: [2sc in next st, sc in next st] repeat 3 times, (9 sts) Round 3: change to blak, sc in each st across (9st) Round 4: sc2tog, sc in next 7 st (8st) Round 5: sc in next 3 st, sc2tog, sc in next st (6st) Round 6: sc in each st across (6 st) Fasten off. I haven't stuffed the legs, the ends is the only stuffing @.
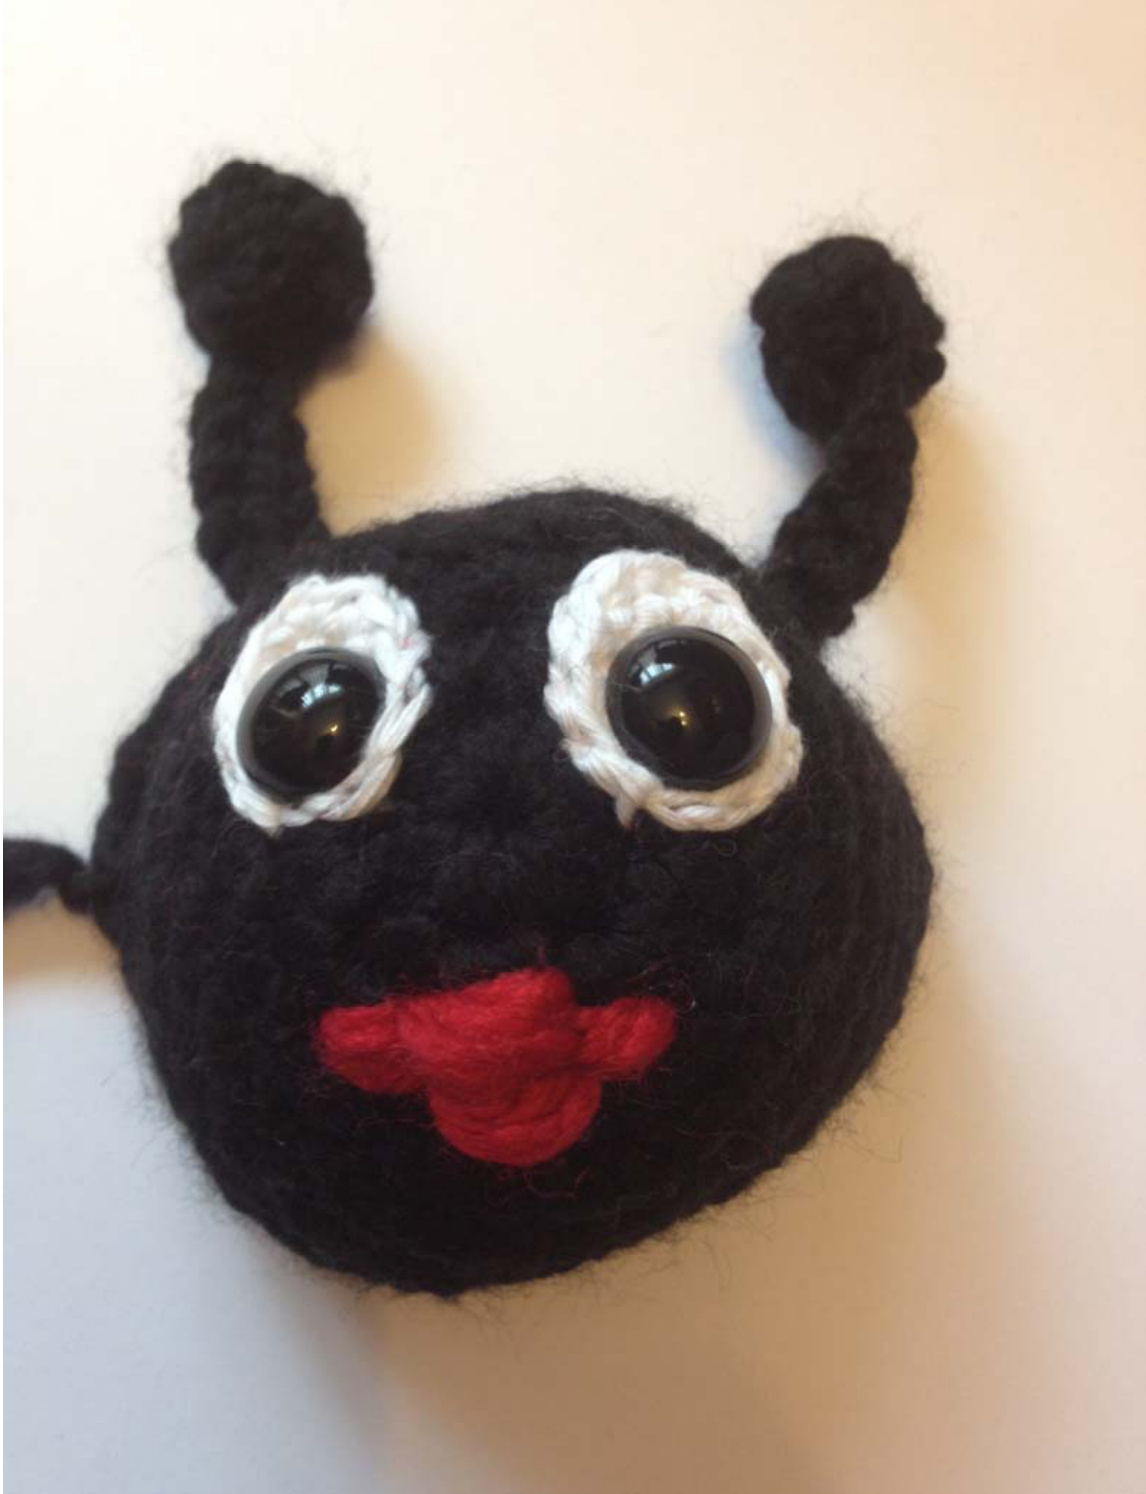
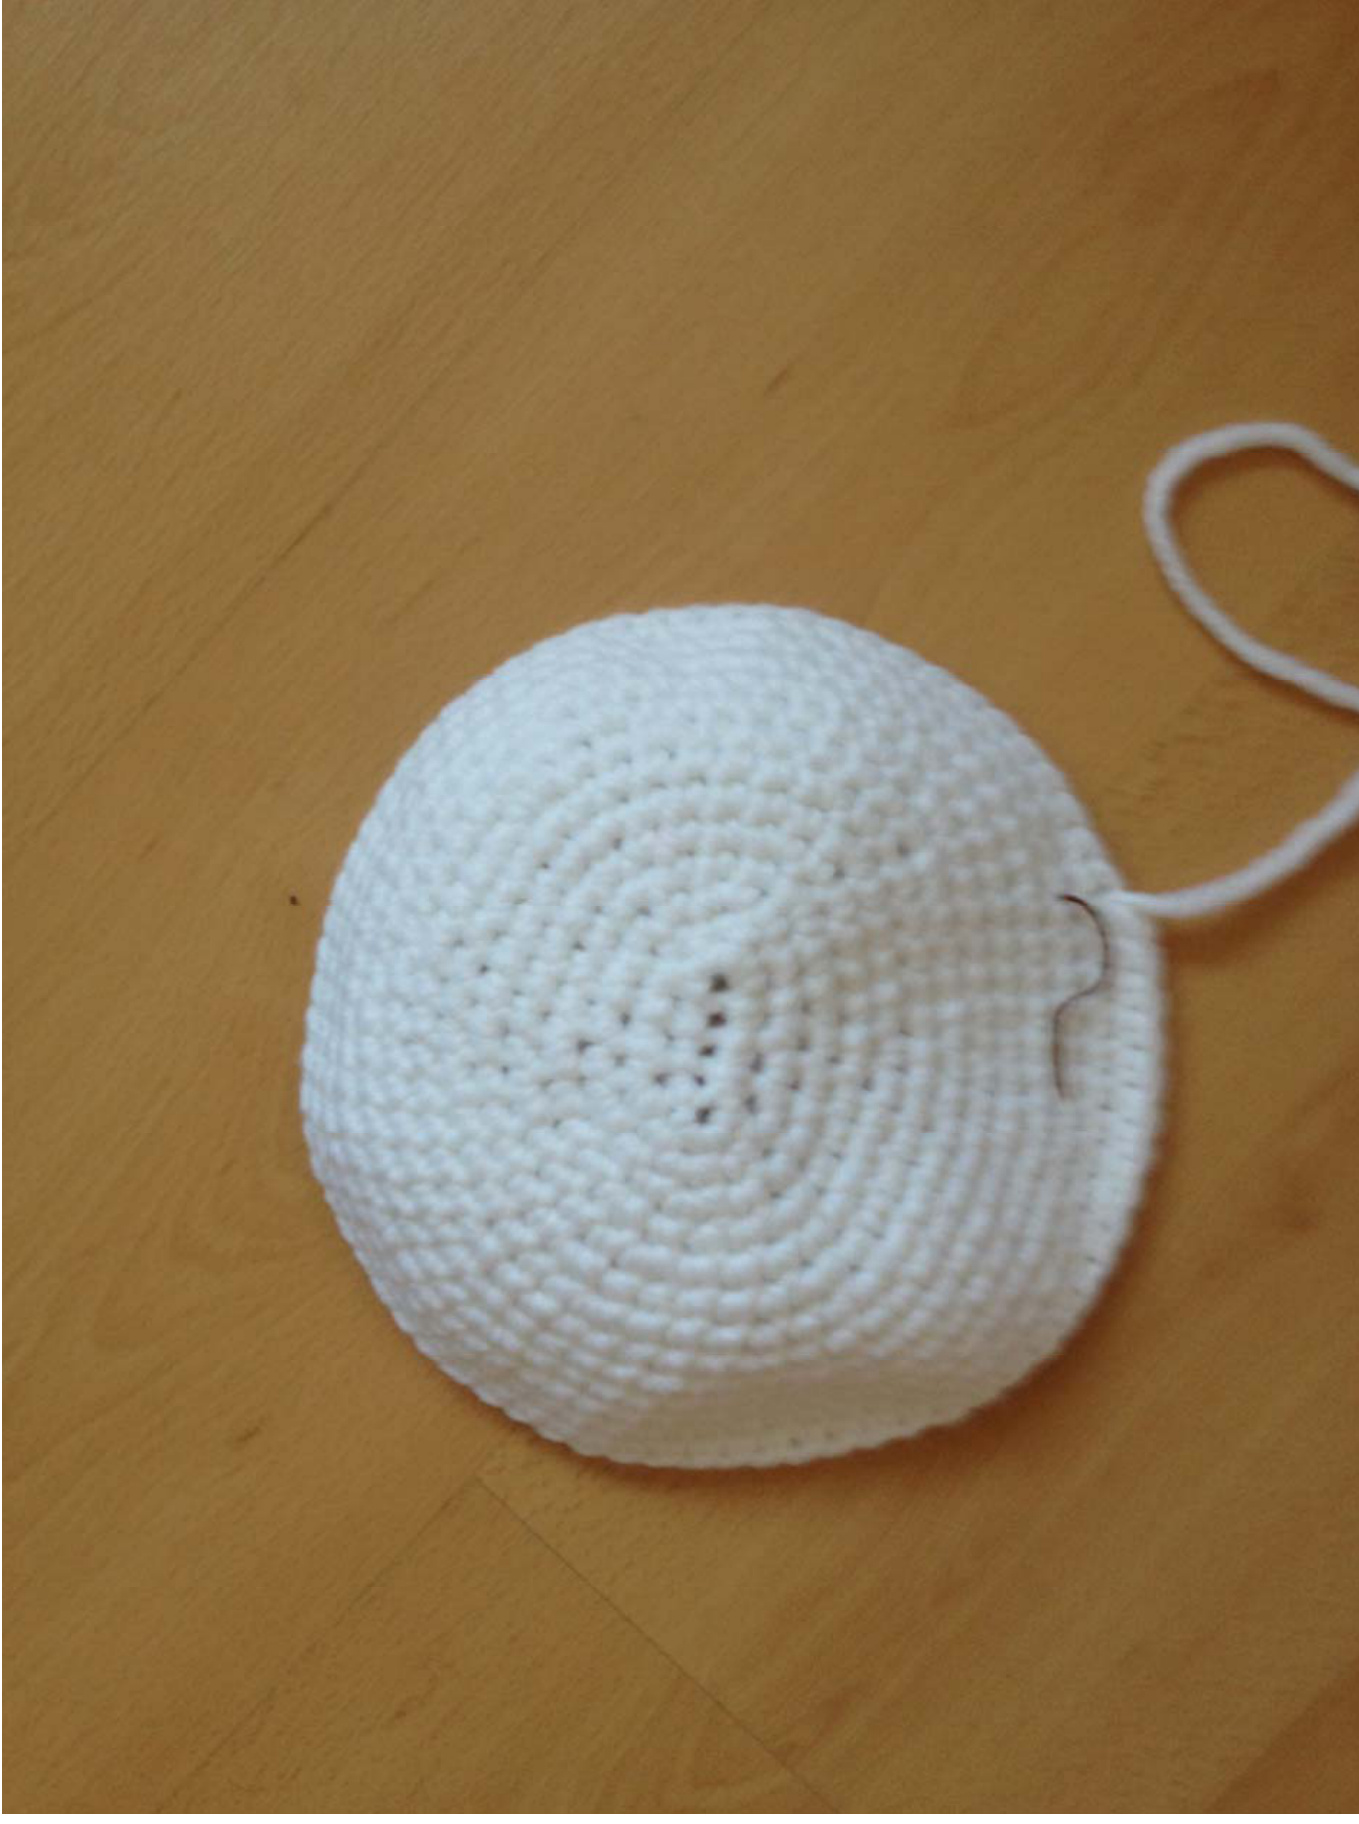
Eyes (make 2)
Using white and a thinner yarn. Round 1: ch 4, 2sc in 2nd ch from hook, sc in next st, 3sc in last st, sc in unused loop of next stitch (we are going round the base chain), sc in first st. (8sts) Round 2: [2sc in next st, sc in next 3st] repeat 2 times (10sts) Fasten off and use end to sew to head. The eyes have an oval shape.
Head
Using black. Round 1: magic ring, 6 sc (alternatively, 2 ch and 6 sc in 2nd ch from hook). Round 2: 2sc in next 6 st. (12st) Round 3: [2sc in next st, 1sc in next st] repeat 6 times (18 sts) Round 4: [2sc in next st, 1sc in next 2st] repeat 6 times (24 sts) Round 5: sc in each st across (24 sts) Round 6: [2sc in next st, sc in next 11st], repeat 2 times (26 sts) Round 7-9: sc in each st across (26 sts) Fasten off, leave long end to sew head to body. Embroider mouth using red and place eyes and antennae:
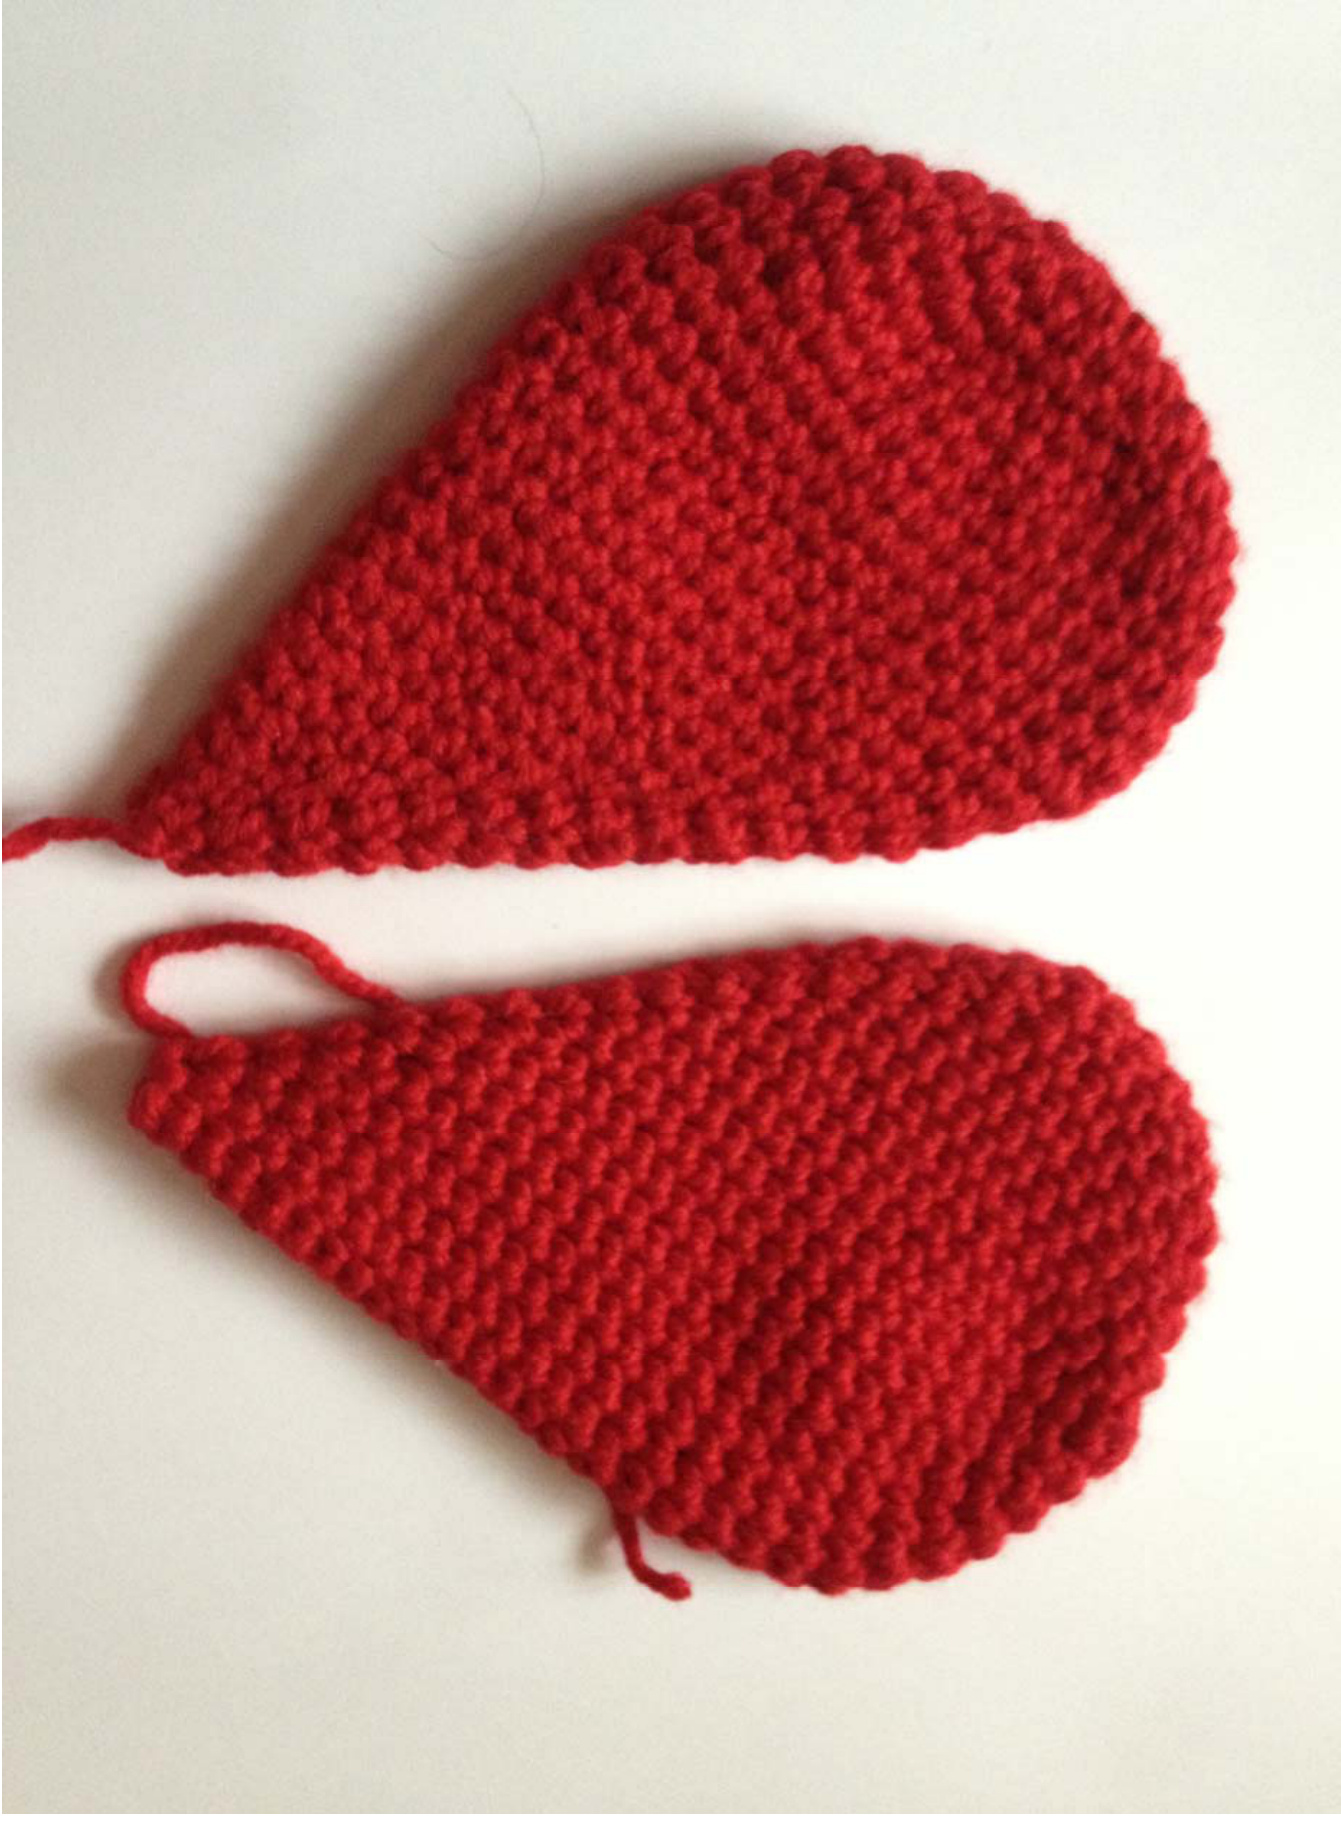
Wings (make 2) Using red. Round 1: magic ring, 6 sc (alternatively, 2 ch and 6 sc in 2nd ch from hook). Round 2: 2sc in next 6 st. (12st) Round 3: [2sc in next st, 1sc in next st] repeat 6 times (18 sts) Round 4: [2sc in next st, 1sc in next 2st] repeat 6 times (24 sts) Round 5: [2sc in next st, 1sc in next 3st] repeat 6 times (30 sts) Round 6: [2sc in next st, 1sc in next 4st] repeat 6 times (36 sts) Round 7-11: sc in each st across (36sts) Round 12: sc in next 34 st, sc2tog (35sts) Round 13: sc2tog, sc in next 33st, sc2tog (33sts) Round 14: sc2tog, sc in next 31 st, sc2tog (31sts) Round 28: sc2tog, sc in next 3st, sc2tog (5sts) Fasten off The wings are not stuffed; they are flattened and sewn to body.
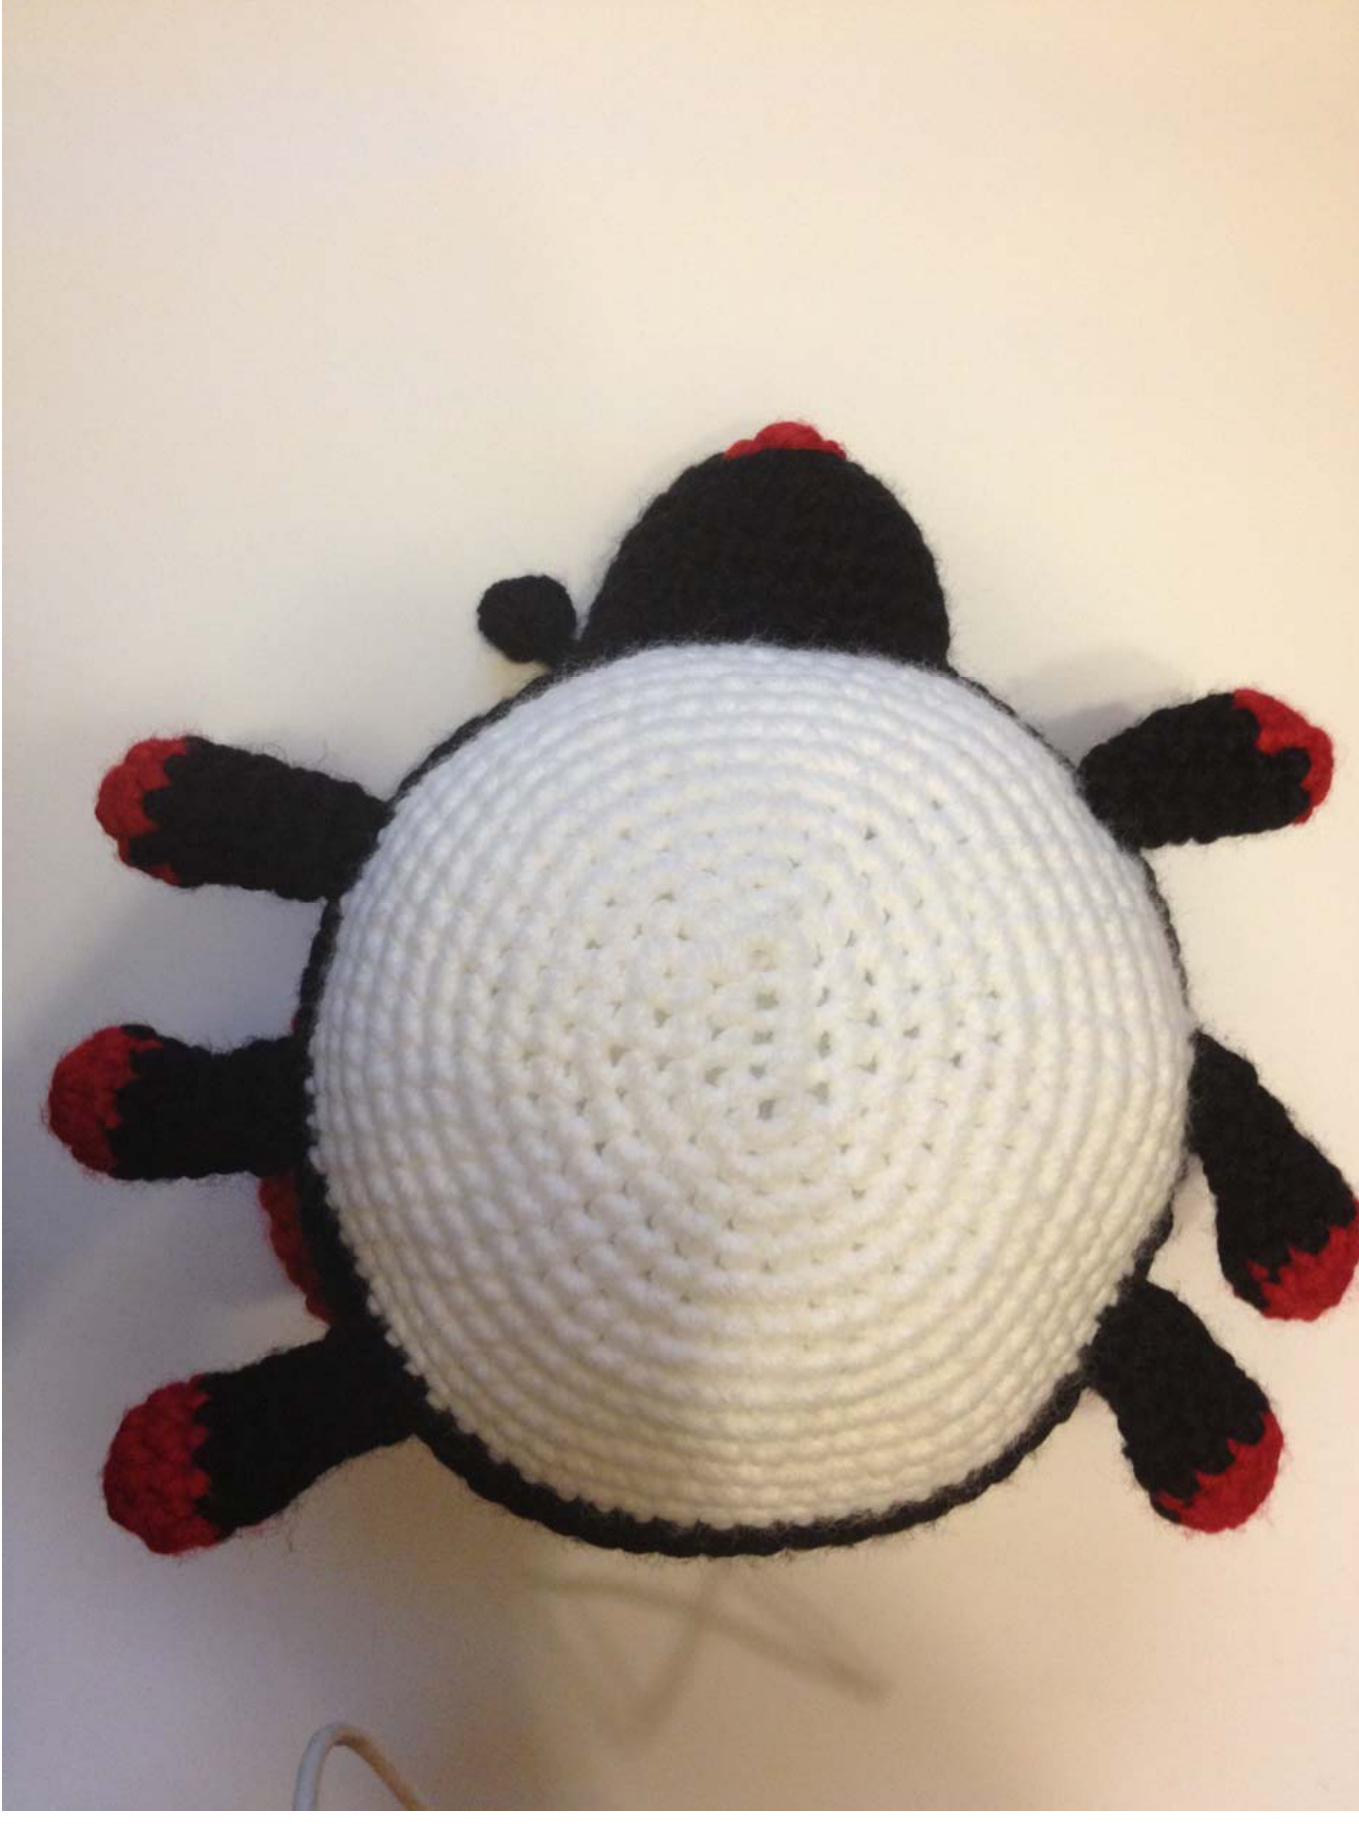
Body (lower part)
Using white (l've gone for white because I wanted a toy using red/black/white, for a classic look, work in black. (about increases: to keep the round shape as roundish as possible, I like to place the increases randomly) Note: The body is slightly oval, so the first row is worked as an oval (base chain and working sc around it) and all the other rows the usual round way. Round 1: ch 6, 2sc in 2nd ch from hk, sc in next 3st, 3sc in next st, (now working on the unused loops of the base chain), sc in next 3 st, sc in last st. (12 sts) Round 2: [2sc in next st, 1sc in next st] repeat 6 times (18 sts) Round 3: [1sc in next st., 2sc in next st, 1sc in next st] repeat 6 times (24 sts) Round 4: [2sc in next st, 1sc in next 3st] repeat 6 times (30 sts) Round 5: [1sc in next 2st., 2sc in next st, 1sc in next 3st] repeat 6 times (36 sts) Round 6: [2sc in next st, sc in next 5st] repeat 6 times (42 sts) Round 7: [sc in next 3st., 2sc in next st, 1sc in next 3st] repeat 6 times (48 sts) Round 8: [2sc in next st, sc in next 7st] repeat 6 times (54 sts) Round 9: [sc in next 4st., 2sc in next st, 1sc in next 4st] repeat 6 times (60 sts) Round 10: [2sc in next st, sc in next 9st] repeat 6 times (66 sts) Round 11: [sc in next 4st., 2sc in next st, 1sc in next 6st] repeat 6 times (72 sts) Round 12-13: sc in each st across. (72 sts) Round 14: chanae to black. I like to attach legs with the crochet hook instead of sewing them, but you can go the way you prefer: crocheting or sewing! [working through both thicknesses: leg and body sc in next 3st], sc in next 20 st, [working through both thicknesses: leg and body sc in next 3st, sc in next 4st] repeat 2 times, [working through both thicknesses: leg and body sc in next 3st], sc in next 18 st, working through both thicknesses: leg and body sc in next 3st, sc in next 4st] repeat 2 times (72 st and 6 legs attached) astenoff (see photos for help)
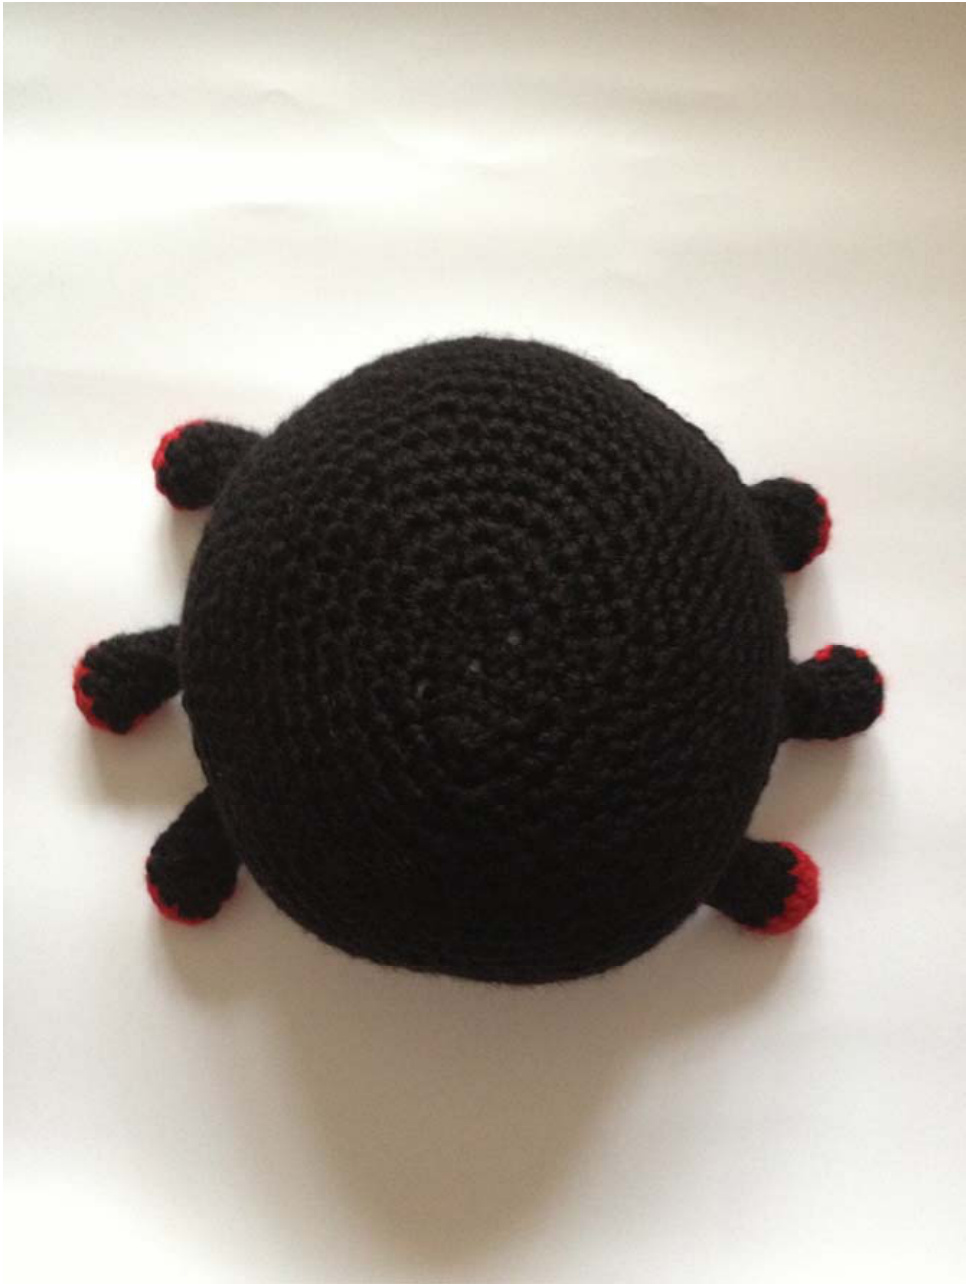
Body (upper part) Using black
(about increases: to keep the round shape as roundish as possible, I like to place the increases randomly) Note: The body is slightly oval, so the first row is worked as an oval (base chain and working sc around it) and all the other rows the usual round way. Round 1: ch 6, 2sc in 2nd ch from hk, sc in next 3st, 3sc in next st, (now working on the unused loops of the base chain), sc in next 3 st, sc in last st. (12 sts) Round 2: [2sc in next st, 1sc in next st] repeat 6 times (18 sts) Round 3: [1sc in next st., 2sc in next st, 1sc in next st] repeat 6 times (24 sts) Round 4: [2sc in next st, 1sc in next 3st] repeat 6 times (30 sts) Round 5: [1sc in next 2st., 2sc in next st, 1sc in next 3st] repeat 6 times (36 sts) Round 6: [2sc in next st, sc in next 5st] repeat 6 times (42 sts) Round 7: [sc in next 3st., 2sc in next st, 1sc in next 3st repeat 6 times (48 sts) Round 8: [2sc in next st, sc in next 7st] repeat 6 times (54 sts) Round 9: [sc in next 4st., 2sc in next st, 1sc in next 4st] repeat 6 times (60 sts) Round 10: [2sc in next st, sc in next 9st] repeat 6 times (66 sts) Round 11: [sc in next 4st., 2sc in next st, 1sc in next 6st] repeat 6 times (72 sts) Round 12-16: sc in each st across. (72 sts) Do not fasten off (we will be joining upper and lower parts)
Finishing touches
First: joining upper and lower body parts. Take care in aligning the two parts correctly. Black part (upper side) will be facing us, sc in each st across. Remember to stuff body as firm as you can.
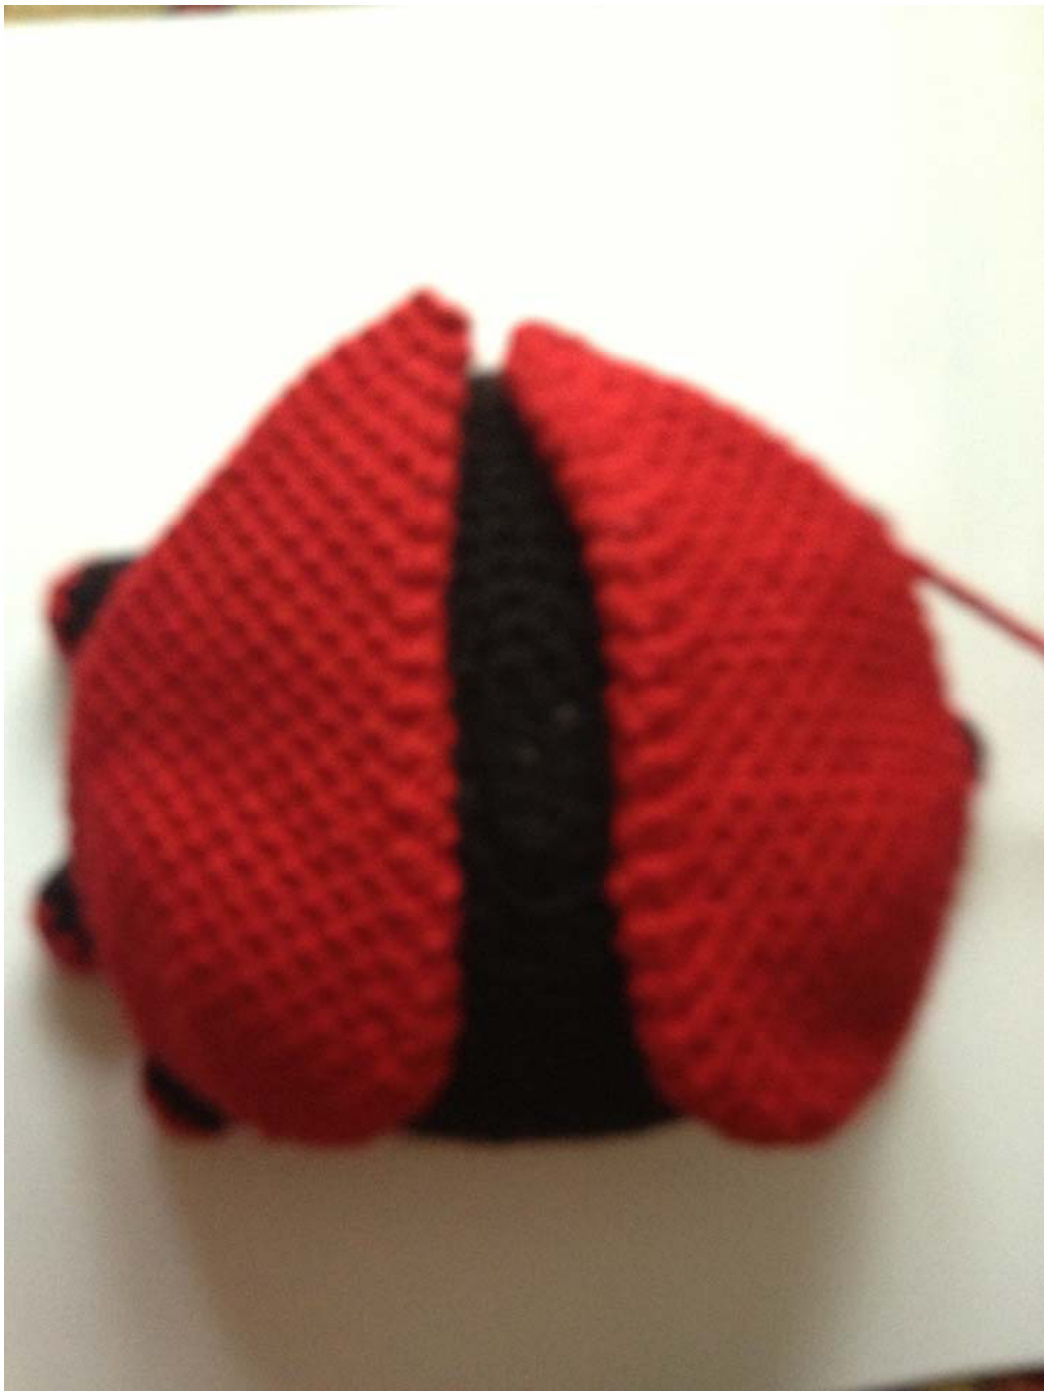
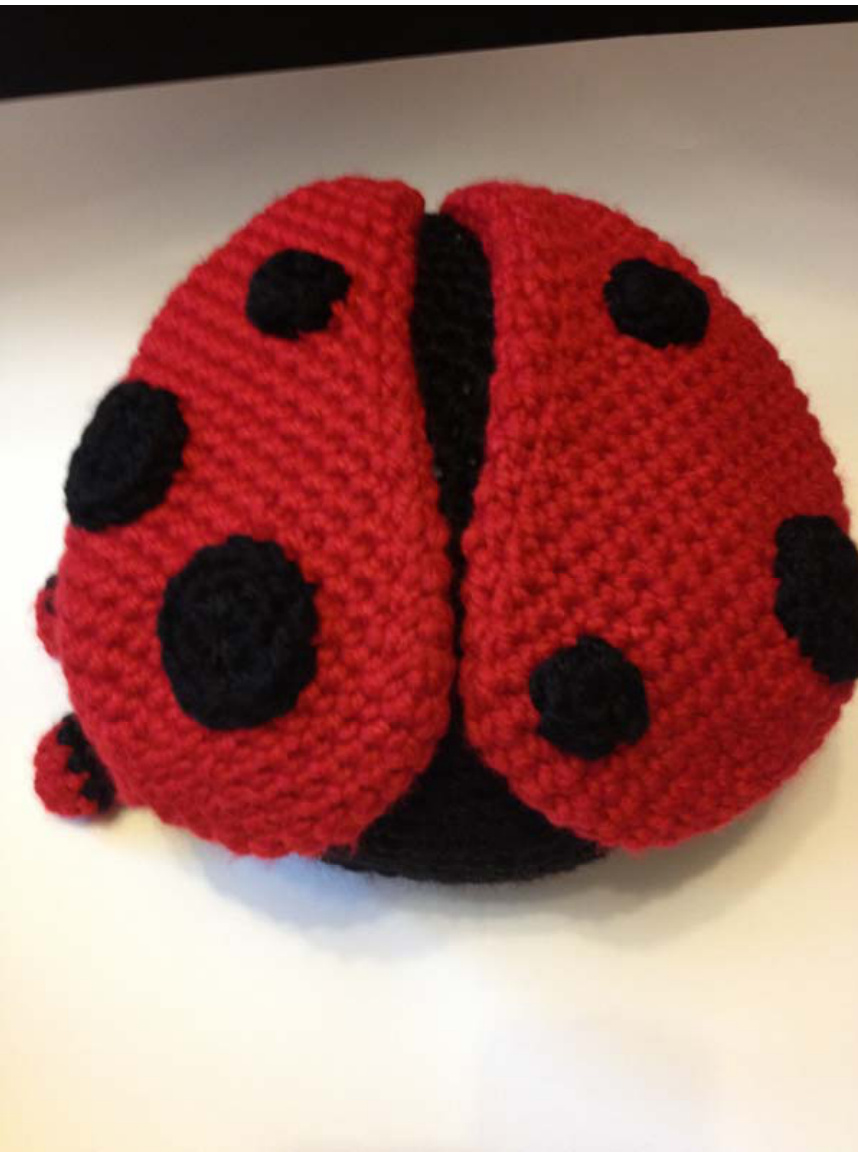
Second: place wings (well, it's the shell, but this time they work as wings!) onto upper part of body and sew them:
Dots can be sewn:
Third: sew head to body, place head hiding the narrowest side of the wings. Stuff. See photos:
Finally, the 'extra-dots' are sewn: Under the wings, onto the body (upper and lower part)
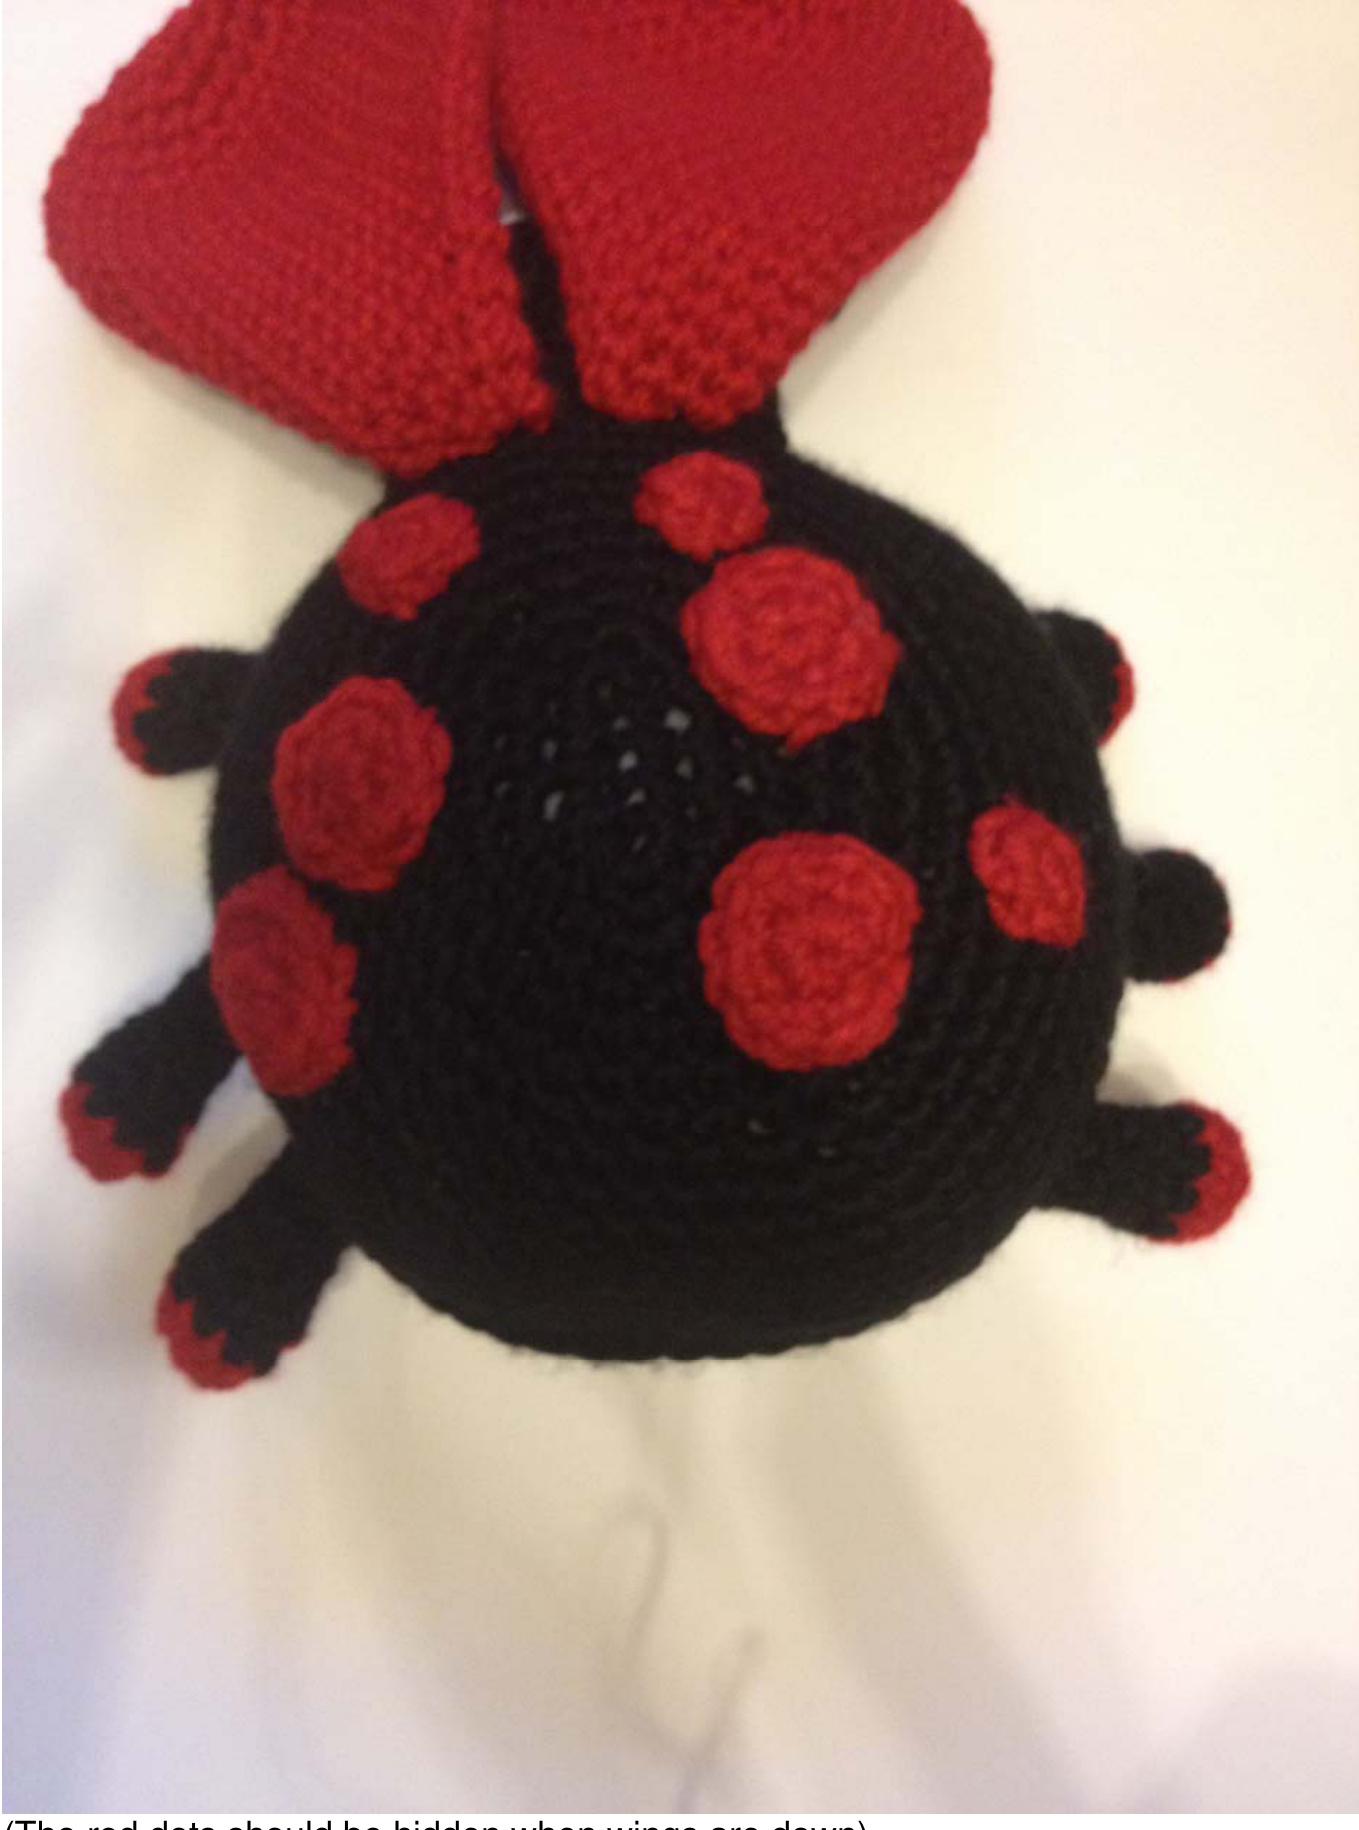
(The red dots should be hidden when wings are down)
Extra-large dot in the middle and 5 large dots surroundingit.
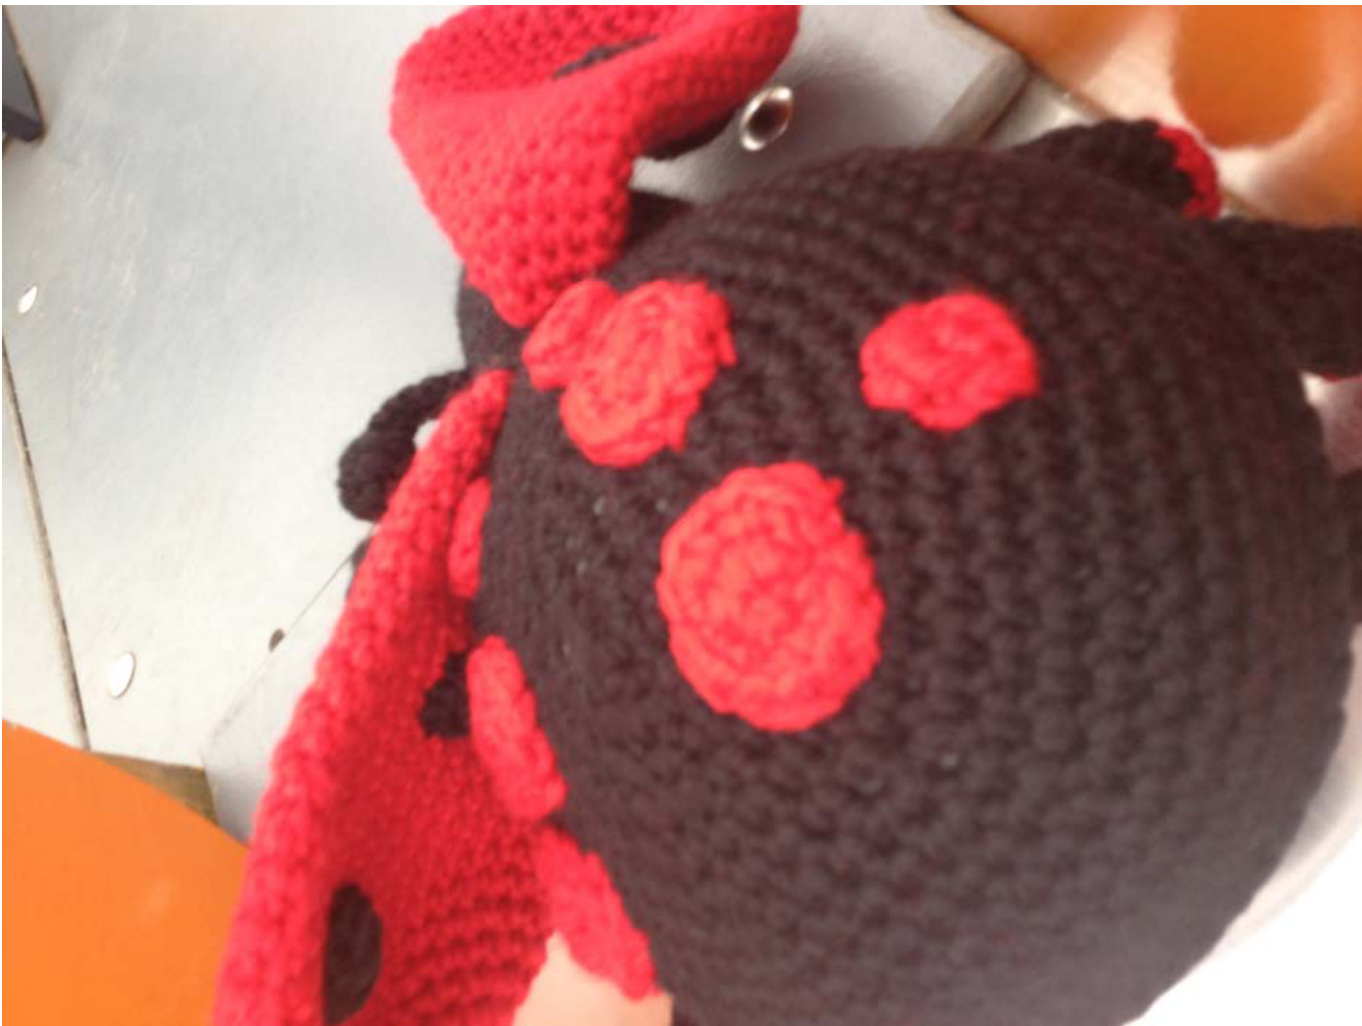
Two black dots in the side of one of the wings touching the body and one large dot in the other.