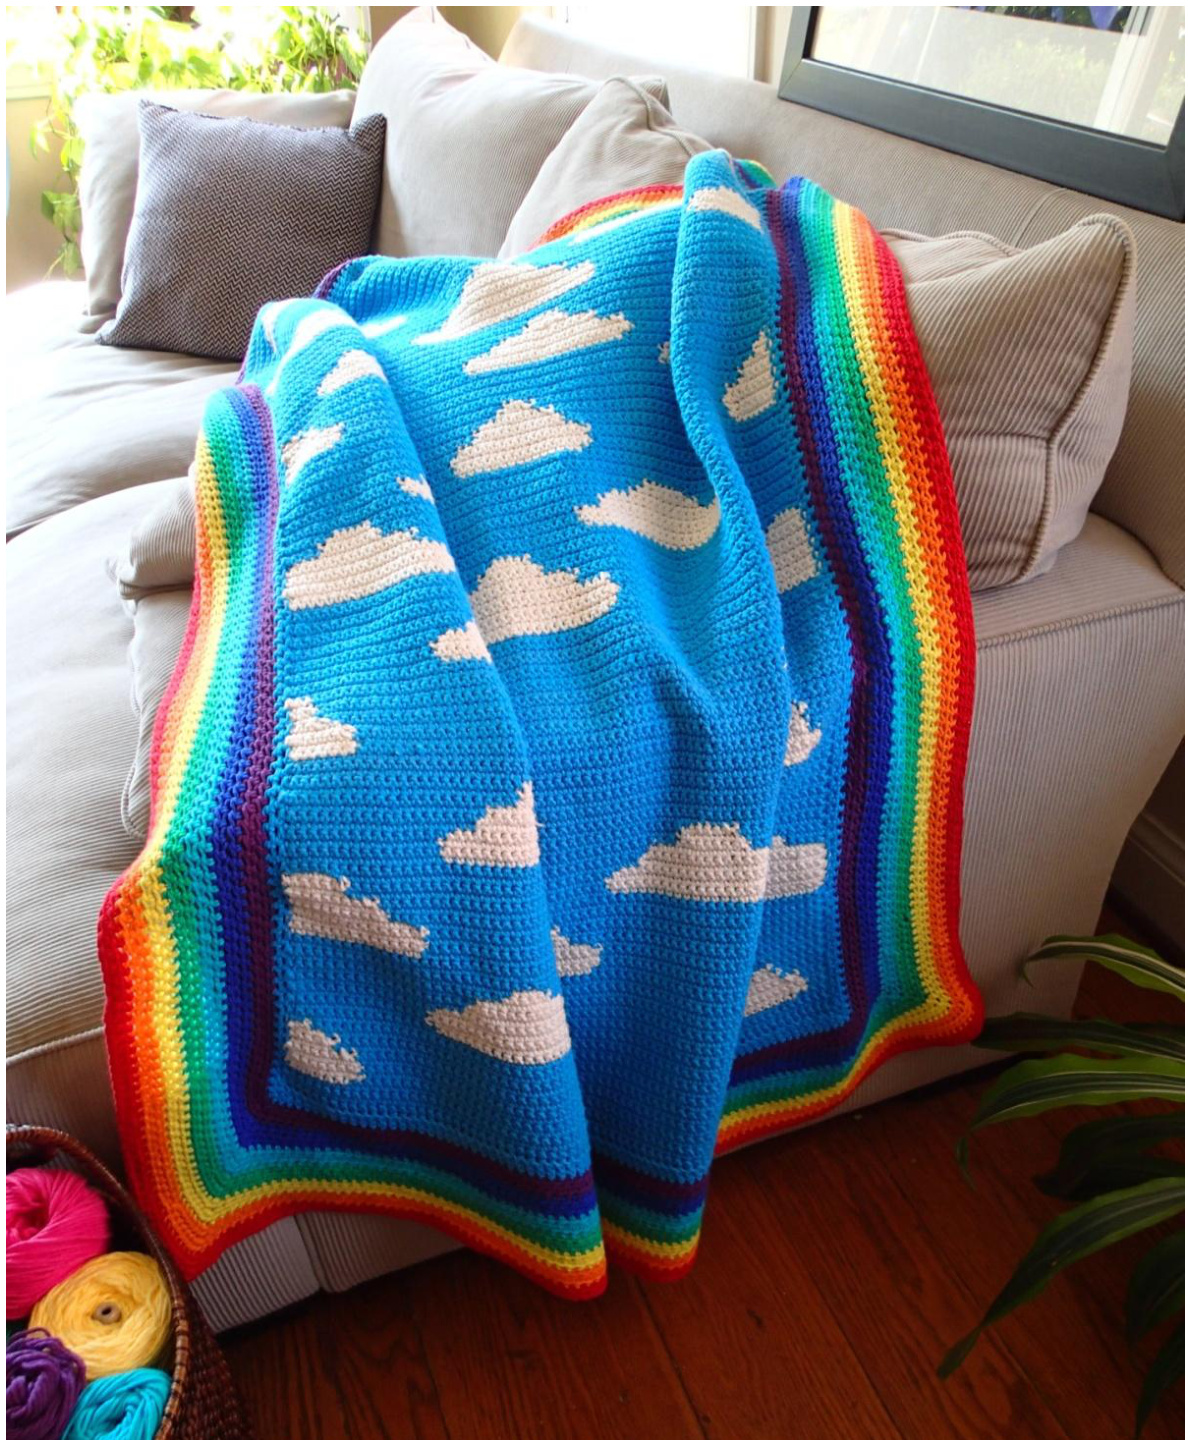
THE BEAUTIFUL DAY BLANKET CROCHET PATTERN
BY SUSAN KENNEDY OF PRETTYPEACEFUL
YARN RECOMMENDATIONS:
Any medium, worsted weight yarn will work for this project. The blanket pictured was made with Lily Sugar'n' Cream cotton and a 5 mm hook.
| Recommended color of Lily Sugar 'n' Cream Cotton | Color | yards | meters | |
| Ecru | ivory | 374 | 342 | |
| HotBlue | sky blue | 1921 | 1756 | |
| Red | red | 111 | 101.5 | |
| Hot Orange | orange | 108 | 99 | |
| Sunshine | yellow | 105 | 96 | |
| ModGreen | grassgreen | 102 | 93.5 | |
| ModBlue | turquoise | 100 | 92 | |
| Blueberry | royal blue | 98 | 06 | |
| BlackCurrant | violet | 95 | 87 |
Finished blanket size: 42 x 52 inches (107 x 132 cm) with the recommended border and yarn. If you want to make a larger blanket, use bulkier yarn and a larger hook, repeat the pattern chart more times, or add extra rows to the border of the blanket. If you want to make a smaller blanket, use dk or lighter yarn and a smaller hook or repeat the pattern chart fewer times than recommended.
THE BEAUTIFUL DAY BLANKET CROCHET PATTERN
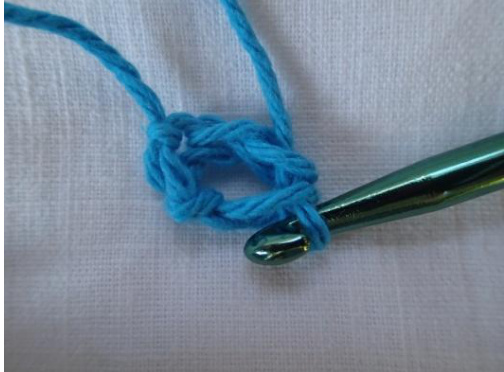
Yarn weight: worsted weight, cotton recommended Hook size: US H hook (5 mm) Gauge: 7 sc stitches = 2 inches (5 cm). 8 rows in sc = 2 inches (5 cm) Terms: ch: chain. Yarn over and pull through loop on hook. sl st: slip stitch. Insert hook into stitch, yarn over, pull through stitch and loop on hook. sc: single crochet. Insert hook into stitch, yarn over, pull through stitch, yarn over, and pull through both loops on hook. hdc: half double crochet. Yarn over, insert hook into stitch, yarn over, pull through stitch and all three loops on hook. foundation single crochet: a method for beginning a row without having to make a separate row of chains first. See last pages of pattern for instructions.
Row 1:
Option A: With sky blue yarn, foundation single crochet 112 stitches. Turn. Option B: With sky blue, chain 113 stitches. sc in 2nd loop from hook and all chains across. Turn.
Rows 2-4:
Chain 1. sc in each stitch across. Turn.
Rows 5-170:
Begin following chart below. Chain 1. sc in each stitch across, changing colors from sky blue to ivory and back as directed in the chart. See tutorial section below for instructions and photos on how to change colors.
Rows 171-173:
With sky blue, chain 1. Sc in each stitch across. Turn.
PATTERN CHART
You will repeat the chart four times across to complete one row of the blanket. For example, after you complete the 28th stitch of the row, you will start the chart again at stitch 1. You will repeat the chart height-wise five times to complete all rows of the blanket. For example, after you complete the 33rd row of the chart, you will start the chart again at row 1 in your next row. If you prefer a more random, realistic look to your clouds, skip a few clouds and add a few freeform clouds wherever you like.
| 28272625242322212019181716151413121110987654321 | ||||||||||||||||||||||||||||
| 33 | 33 | |||||||||||||||||||||||||||
| 32 | 32 | |||||||||||||||||||||||||||
| 31 | 31 | |||||||||||||||||||||||||||
| 30 | 30 | |||||||||||||||||||||||||||
| 29 | 29 | |||||||||||||||||||||||||||
| 28 | 28 | |||||||||||||||||||||||||||
| 27 | 27 | |||||||||||||||||||||||||||
| 26 | 26 | |||||||||||||||||||||||||||
| 25 24 | 25 | |||||||||||||||||||||||||||
| 23 | 24 | |||||||||||||||||||||||||||
| 22 | 23 | |||||||||||||||||||||||||||
| 21 | 22 21 | |||||||||||||||||||||||||||
| 20 | 20 | |||||||||||||||||||||||||||
| 19 18 | 19 | |||||||||||||||||||||||||||
| 17 | 18 17 16 15 14 13 12 11 10 9 8765 4 32 1 | |||||||||||||||||||||||||||
| 16 15 14 13 12 11 10 9 8 65432 1 |
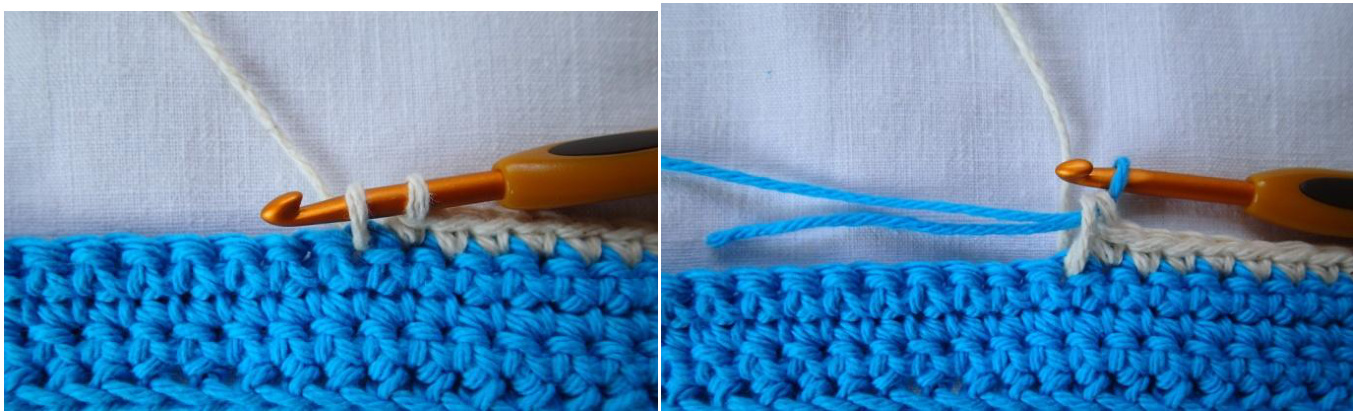
BORDER:
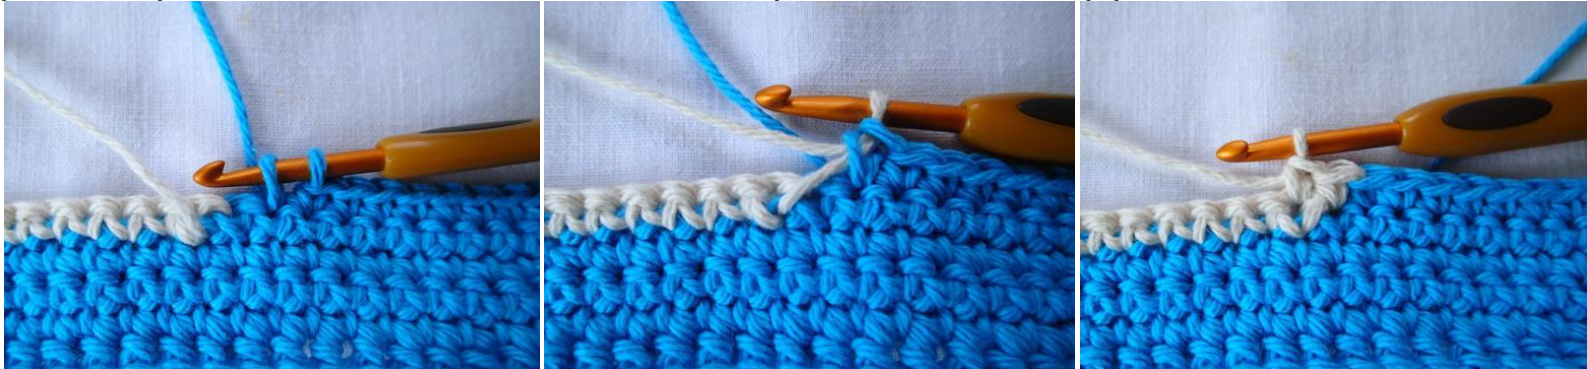
The border consists of sixteen rounds of hdc, 2 rounds of each color. Flip the blanket over after each round to avoid distorting the corners. You will crochet one border round with the "right side" facing you and the next border round with the "wrong side" facing you. (Really, the blanket is reversible and looks the same from both sides). Round 1: Attach sky blue yarn with a slip stitch to top right edge of one of the short ends of the blanket, 2 or 3 stitches from the corner. Ch 2. hdc into each stitch, placing 3 hdc into the last stitch of the row to form the corner. hdc in end of each row to end of blanket. 3 hdc in end of last row to form the corner. hdc in each stitch across the row. 3 hdc in last stitch to form corner. hdc in end of each row to end of blanket. 3 hdc in last stitch to form corner. hdc in each stitch to the beginning ch 2. Attach with slip stitch to first hdc of the round. Flip blanket over.
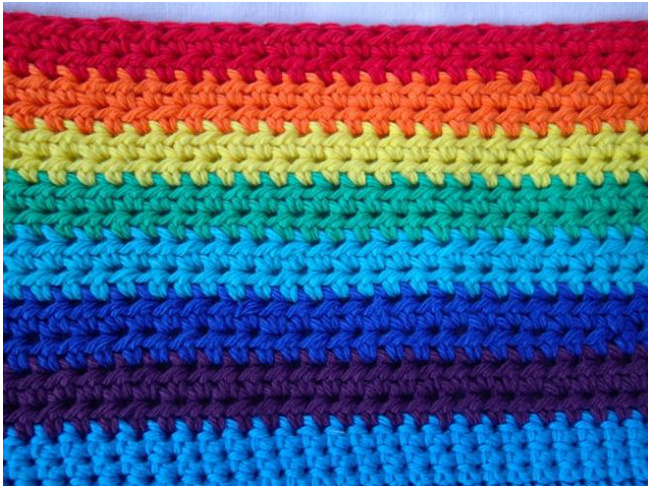
Round 2: With sky blue, ch 2. hdc in each stitch around, placing 3 hdc in each corner stitch. Fasten off yarn and weave in end. Flip blanket over. Round 3: Attach violet yarn. Repeat Round 2. Flip blanket over. Round 4: Repeat Round 2 with violet yarn. Fasten off violet yarn. Weave in end. Flip blanket over. Round 5: Attach royal blue yarn. Repeat Round 2 but do not fasten off. Flip blanket over. Round 6: Repeat Round 2 with royal blue yarn. Fasten off and weave in end. Flip blanket over. Round 7: Attach turquoise yarn. Repeat Round 2 but do not fasten off. Flip blanket over. Round 8: Repeat Round 2 with turquoise yarn. Fasten off yarn. Weave in end. Flip blanket over. Round 9: Attach green yarn. Repeat Round 2 but do not fasten off. Flip blanket over. Round 10: Repeat Round 2 with green yarn. Fasten off yarn, weave in end, and flip blanket over. Round 11: Attach yellow yarn. Repeat Round 2 but do not fasten off. Flip blanket over. Round 12: Repeat Round 2 with yellow yarn. Fasten off yarn, weave in end, and flip blanket over. Round 13: Attach orange yarn. Repeat Round 2 but do not fasten off. Flip blanket over. Round 14: Repeat Round 2 with orange yarn. Fasten off yarn, weave in end, and flip blanket over Round 15: Attach red yarn. Repeat Round 2 but do not fasten off. Flip blanket over. Round 16: Repeat Round 2 with red yarn. Fasten off yarn and weave in all ends.
PATTERN TUTORIALS: FOUNDATION SINGLE CROCHET INSTRUCTIONS
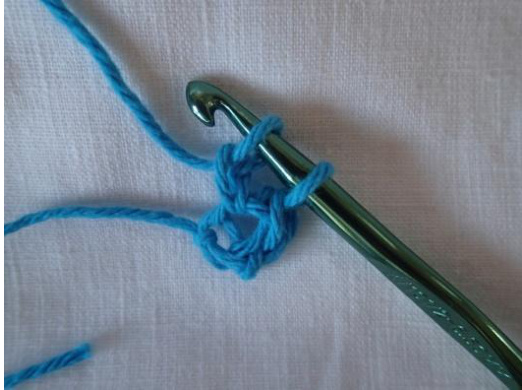
1. Attach yarn to hook with a slip knot. Chain 2. This will count as your first foundation single crochetstitch.

2. Insert hook into second chain from hook. Yarn over and draw up a loop.
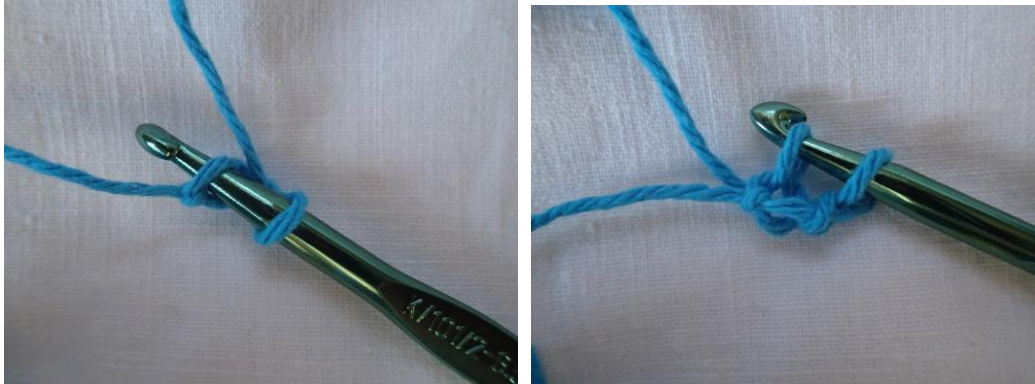
3. Chain 1.
4. Yarn over and pull through both loops on the hook. You just made a foundation single crochet Stitch!
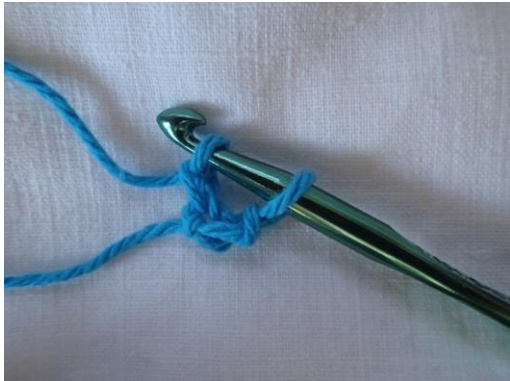
5. Insert hook into the chain you created in step 2. Yarn over and draw up a loop.

6. Chain 1.
7. Yarn over and pull through both loops on the hook.
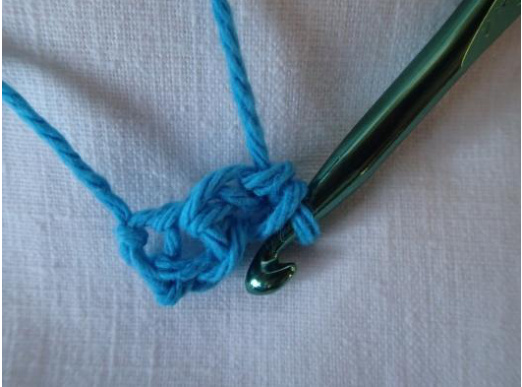
8. Repeat steps 5, 6, and 7 inserting your hook into the last chain you created to begin each new foundation single crochet stitch. To begin your next row, turn your work and crochet into bottom of the row you just created.
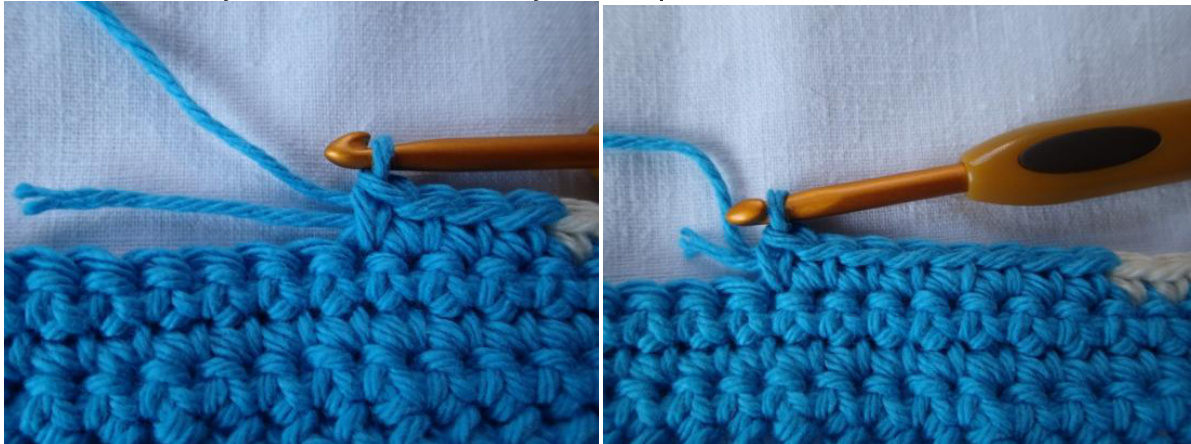
CHANGING COLORS (INTARSIA CROCHET):
Before you begin working in the chart pattern, wind your yarn into several small balls to make changing colors easier. Start with 4 small balls of ivory yarn and 5 balls of sky blue yarn. To change colors in the blanket, you will yarn over with the new color one stitch before the first sc with the new color. 1. In the stitch before the color change, complete the single crochet stitch as usual but do not perform the last yarn over yet.
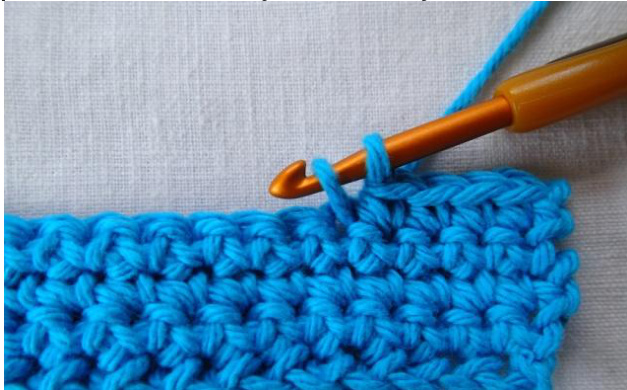
2. Yarn over with the new color (ivory) and pull through both loops on the hook.
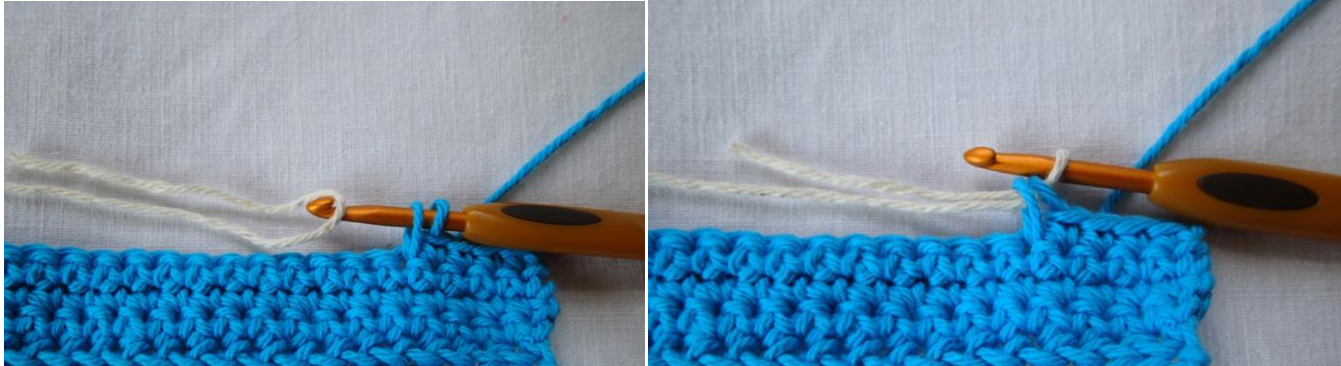
3. Insert hook into next stitch and pull both yarn ends tight. Complete a single crochet stitch as usual with ivory yarn. Do not cut the sky blue yarn. Drop it and continue to crochet with ivory yarn.
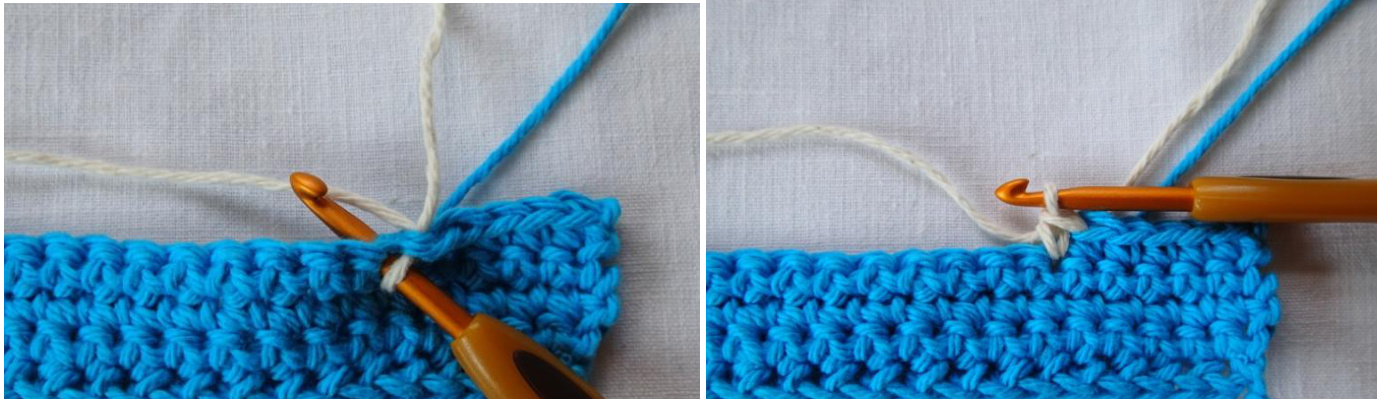
4. When you are ready to change back to sky blue yarn, attach a new ball of sky blue yarn in the same way as shown above. Do not cut the ivory yarn. Drop it and continue to crochet with sky blue yarn.
5. In the next row, you will pick up the ivory yarn again and drop the sky blue yarn. Do not cut either yarn until you are finished with that cloud. Then you can cut the ivory yarn and weave in the end.
HOW TO HANDLE THE YARN ENDS:
There are three ways to handle the yarn ends: 1. Crochet over the yarn ends by holding the end on top of the previous row as you crochet. This is the fastest way, but it can be tricky to keep neat and secure.
2. Weave the ends back into the blanket with a yarn needle. Weave in the tails of each row as you goalong! 3. Combine both techniques. For example, weave in the tail at the end of each cloud with a needle and crochet over the beginning tail at the start of each cloud. This is my favorite method for securing the yarn tightly and quickly. May your blanket brighten your space and bring a harmonious vibration!


