Pearls Before Swine Character Set- Part 1 Pig, Rat, Croc

Skill Level:Easy Hook size: size 3 or 3.75 hook (or the recommended size for your yarn) Yarn type/weight suggestion: I used Järbo Garn Mini Akryl (Sport / 5 ply) and Svart Faret Candy in various colors Size: Rat will be about 3" tall including ears, Pig and Croc are about 3.5" tall Supplies: stuffing yarn needle black yarn (or embroidery floss) -Pig: pink yarn -Rat: gray yarn, black yarn -Croc: dark and light green yarns, white yarn row marker
Terms:
ch chain stitch SC single crochet inc increase, do 2 sc in the same stitch dec invisible decrease: put the hook through the front loop of the next 2 stitches, YO, pull loop through the front loops, (2 loops on hook), YO, pull through all loops hdc half double crochet slst slip stitch 3-in-1 do 3 sc into the same stitch MC "magic circle," need help? Try http:/ /www.youtube.com/watch?v=WLuSVykvoUg [# xxx]\* repeat these stitches around this row (#) the count of stitches in that row FO finish off
Terms of Use/Copyright information:
"Pearls Before Swine”" rights belong to the author, Stephan Pastis. This pattern is available to fans to create and share, but not for selling or other commercial purposes. You may freely distribute this pattern, but please give credit back to the author, Jessica Nayes.
How to read the pattern:
Each character has several pieces. Unless indicated, you only need to do one of each piece. The hook size I used is listed by the character name, but do for what works with your yarn. Stuff the appropriate pieces and sew them together like the pictures.
Pig -size 3.75 hook
BODY In pink yarn -We are starting at the base. MC with 6 sc R1 6 inc (12) R2 [1 inc, 1 sc]\* (18) R3 [1 inc, 2 sc]\* (24) R4 [1 inc, 3 sc]\* (30) -Now we start to go upwards. R5 (this row only, in back loop) 30 sc (30) R6 30 sc (30) R7 [3 sc, 1 dec]\* (24) R8 24 sc (24) R9 [2 sc, 1 dec]\* (18) R10-13 18 sc (18) R14 1 sc,1 dec] (12) R15-16 12 sC (12) FO -Leave a tail long enough to sew the body to the head.
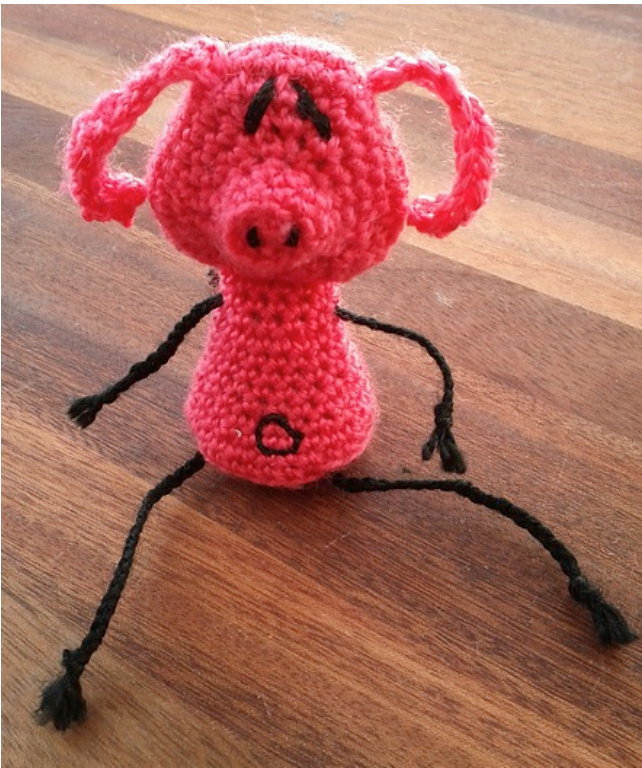
HEAD In pink yarn -The head is started from the back. MC with 6 sc R1 6 inc (12) R2 [2 inc, 2 sc]\* (18) R3 [3 inc, 3 sc]\* (27) R4 [4 inc, 5 sc]\* (39) R5-7 39 sc (39) R8 [4 dec, 5 sc]\* (27) -This could be a good time to start stuffing the head. R9 [3 dec, 3 sc]\* (18) R10 [2 dec, 2 sc]\* (12) -Now we are starting the snout. R11 (this row in front loop only:) 12 sc (12) R12 12 sc (12) R13 6 dec (6) FO EARS (Make 2) In pink yarn
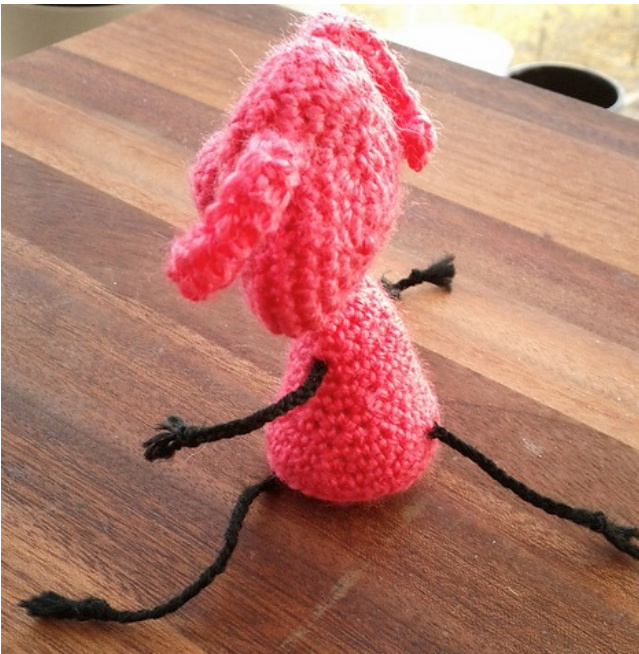
Ch 13 R1 start in 3rd chain from hook with 1 hdc, 5 hdc, 4 sc, 1 slst to F0- leave enough yarn to sew the ears to the head. ARMS/LEGS In black yarn I suggest doing this part after the head and body pieces have been stuffed and sewn together so the sizing can be figured out nicely. 1- Braid 3 strands of black yarn together, for a braid knotted at either end. Size it to the scale of your character, it needs to be arm length on either side of the body, plus enough to go through the upper portion of the body. 2- Take the crochet hook and push it into a gap on one side of the body where the arm should go, work it around stuffing if needed, then come out the other side from another good arm hole. 3- Put the braided arm piece in the hook and pull it gently through the body. The arms can be evened out by pulling on one or the other, as needed. 1- Repeat steps 1-3 for the legs. (May be slightly longer than “arm length" in step 2) TAIL In black yarn This is similar to how you did the arms/legs, just use less long of a length of yarn. Instead of braiding the tail and then putting it through the body, try and tie the start of the braid through a loop where you want the tail to be. Then braid until the desired length. EYES/NOSE/BELLY BUTTON In black yarn or embroidery floss Embroider on eyes, nose, and belly button, before of after stuffing.
Rat -size 3 hook
BODY In grey yarn -We are starting at the base. MC with 6 sc R1 6 inc (12) R2 [1 inc, 1 sc]\* (18) R3 [1 inc, 2 sc]\* (24) R4 [1 inc, 3 sc]\* (30) -Now we start to go upwards. R5 (this row only, in back loop) 30 sc (30) R6 30 sc (30) R7 [3 sc, 1 dec]\* (24) R8 24 sc (24) R9 [2 sc, 1 dec]\* (18) R10-12 18 sc (18) R13 [1 sc, 1 dec] (12) R14 12 sc (12) FO -Leave a tail long enough to sew the body to the head. HEAD In grey yarn -Starting at the tip of the nose. MC with 3 sc R1 3 inc (6) R2 [1 inc, 1 sc]\* (9) R3-5 9 sc (9) R6 [1 inc, 2 sc]\* (12) R7 12 sc (12) R8 [1 inc, 3 sc]\* (15) R9 15 sc (15) R10 [1 inc, 4 sc] (18) R11 [1 inc, 5 sc] (21) R12 [1 inc, 6 sc] (24) R13 [1 inc, 3 sc] (30) R14-15 30 sC (30) -This could be a good time to start stuffing the head. R16 [1 dec, 4 sc]\* (24) R17 [1 dec, 3 sc]\*(18) R18 [1 dec, 2 sc]\*(12) R19 [1 dec, 1 sc]\* (6) FO NOSE In black yarn MC with 4 sc R1 4 inc (8) R2 [1 inc, 1 sc]\* (12) R3 [1 inc, 2 sc]\* (16) R4 [1 dec, 2 sc]\* (12) R5 [1 dec, 1 sc]\* (9) FO -I think I may have added a little bit of stuffing to the nose, but do what looks right when sewing it to the stuffed head.
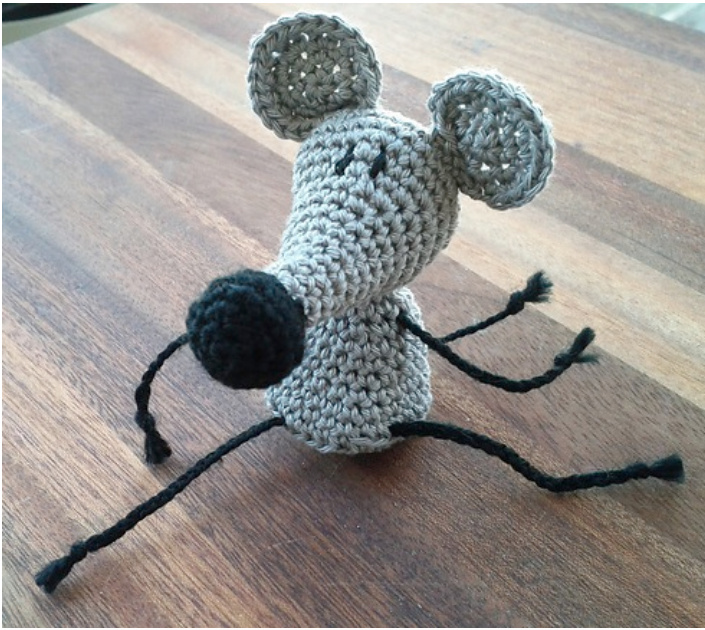
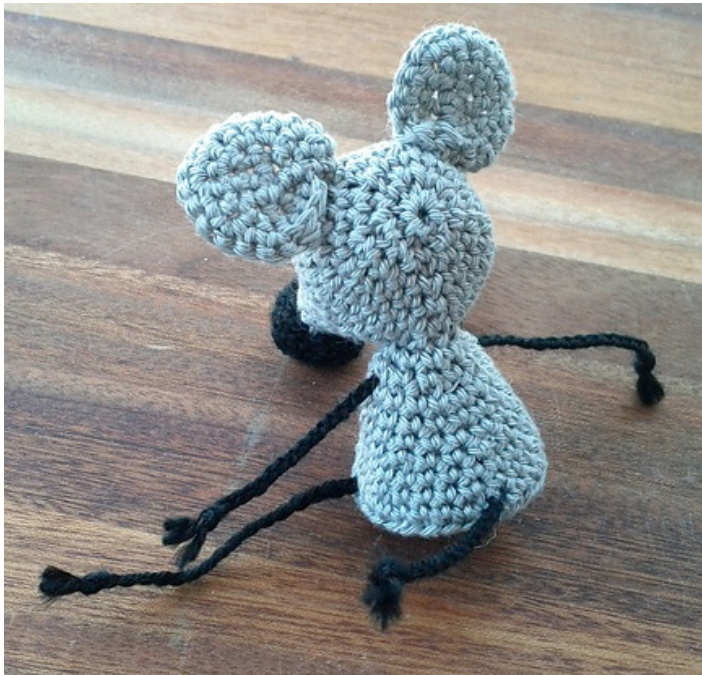
EARS (Make 2) In grey yarn MC with 5 sc R1 5 inc (10) R2 6 inc, 4 slst (16) R3 [1 inc, 1 sc]\*6, 4 slst (22) R4 1 slst to FO ARMS/LEGS In black yarn I suggest doing this part after the head and body pieces have been stuffed and sewn together so the sizing can be figured out nicely. 1- Braid 3 strands of black yarn together, for a braid knotted at either end. Size it to the scale of your character, it needs to be arm length on either side of the body, plus enough to go through the upper portion of the body. 2- Take the crochet hook and push it into a gap on one side of the body where the arm should go, work it around stuffing if needed, then come out the other side from another good arm hole. 3- Put the braided arm piece in the hook and pull it gently through the body. The arms can be evened out by pulling on one or the other, as needed. 4- Repeat steps 1-3 for the legs. (May be slightly longer than “arm length" in step 2). TAIL In black yarn This is similar to how you did the arms/legs, just use less long of a length of yarn. Instead of braiding the tail and then putting it through the body, try and tie the start of the braid through a loop where you want the tail to be. Then braid until the desired length. EYES In black yarn or embroidery floss Embroider eyes onto the head, before of after stuffing.
Croc -size 3.75 hook
BODY In dark green yarn -We are starting at the base. MC with 6 sc R1 6 inc (12) R2 [1 inc, 1 sc]\* (18) R3 [1 inc, 2 sc]\* (24) R4 [1 inc, 3 sc]\* (30) -Now we start to go upwards. R5 (this row only, in back loop) 30 sc (30) R6 30 sc (30) R7 [3 sc, 1 dec]\* (24) R8 24 sc (24) R9 [2 sc, 1 dec]\* (18) R10-13 18 sc (18) R14 [1 sc,1 dec] (12) R15-16 12 sc (12) FO -Leave a tail long enough to sew the body to the head. HEAD In dark green yarn -The head is started from the back. MC with 6 sc R1 6 inc (12) R2 [2 inc, 2 sc]\* (18) R3 [3 inc, 3 sc]\* (27) -This row makes the “ears" R4 4 inc, 3 sc, \*\*3-in-1, 1 sc, turn, start in last sc of the 3-in-1, 3 inc, 1 sc, turn, start in last sc of 3rd inc, 6 sc, start back in regular row\*\*, 2 sc, repeat from \*\* to \*\*, 4 sc, 4 inc, 5 sc (\~42) R5-7 42 sC (42) R8 4 dec, 2 sc, 9 dec, 2 sc, 4 dec (25) -This could be a good time to start stuffing the head. R9 12 dec, 1 sc (13) R10 dec until there are 8 stitches (8) R11-18 8 sc (8) R19 4 sc, 3-in-1, 3-in-1, 1 sc (11) R20 2 dec, 1 sc, 1 dec, 1 sc, 1 dec (6) FO -Stitch on two nostrils to the end of the nose, using black yarn or embroidery f EYES (Make 2) Small bits of white and black yarn MC with 5 sc (white yarn) R1 5 inc (10) FO, leave tail to sew on to the head -Toget small black pupils: 1- With a small piece of black yarn, sew from the back to the front, slightly through some of the yarn on the side of the center hole.
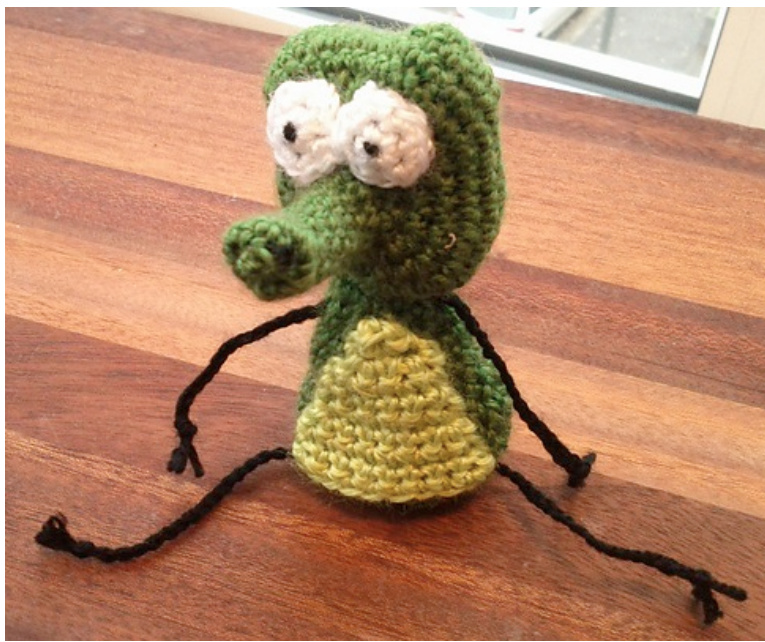
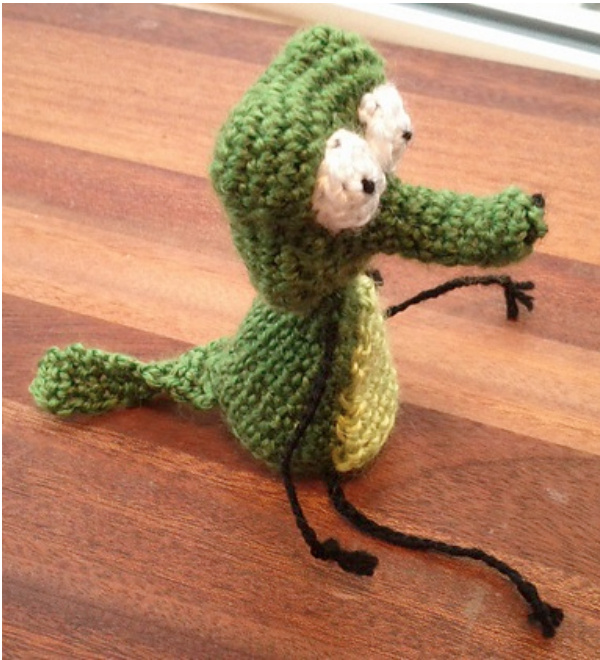
2- Tie a knot in the black yarn. 3- Thread the yarn back through slightly off from the center of the eye, on the other side of the center from step one. I- Knot both ends of the thread on the back side of the eye. Leave the tail for now. -When you sew the eyes on to the head, you can tuck in extra yarn tails behind them to help them “bug out" a little extra. BELLY In light green yarn -The beginning yarn tail can be short, tuck in in under the belly piece when you sew it on. Ch 2 R1 1 sc (1) R2 ch 1, turn, 1 inc (2) R3 ch 1, turn, 2 inc (4) R4 ch 1, turn, 1 inc, 2 sc, 1 inc (6) R5-6 ch 1, turn, 6 sc (6) R7 ch 1, turn, 1 inc, 4 sc, 1 inc (8) R8 ch 1, turn, 8 sc (8) R9 ch 1, turn, 1 inc, 6 sc, 1 inc (10) FO ARMS/LEGS In black yarn
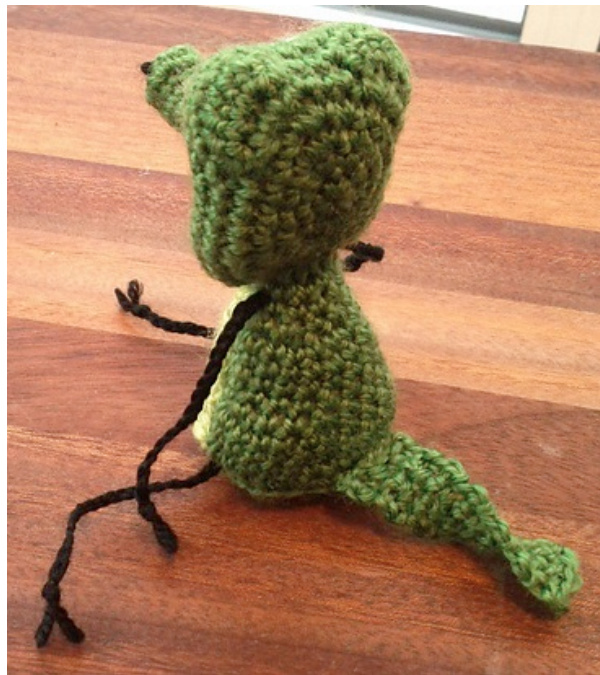
I suggest doing this part after the head and body pieces have been stuffed and sewn together so the sizing can be figured out nicely. 1- Braid 3 strands of black yarn together, for a braid knotted at either end. Size it to the scale of your character, it needs to be arm length on either side of the body, plus enough to go through the upper portion of the body. 2- Take the crochet hook and push it into a gap on one side of the body where the arm should go, work it around stuffing if needed, then come out the other side from another good arm hole. 3- Put the braided arm piece in the hook and pull it gently through the body. The arms can be evened out by pulling on one or the other, as needed. 1- Repeat steps 1-3 for the legs. (May be slightly longer than “arm length" in step 2) TAIL In dark green yarn -Leave a longer tail at the beginning if you are like me and need the first couple rows to be looser than the end rowswillbe. Ch4 R1 start in 2nd loop from hook, 3 sc (3) R2+ ch 1, turn, 3 sc (3) -l made my tail the same length as the body. It's rather tedious to count rows, just compare it's length to the body. FO


