Fisherman's Rib Neck Warmers
by HomeMadeOriginals\* Pocatello, Idaho
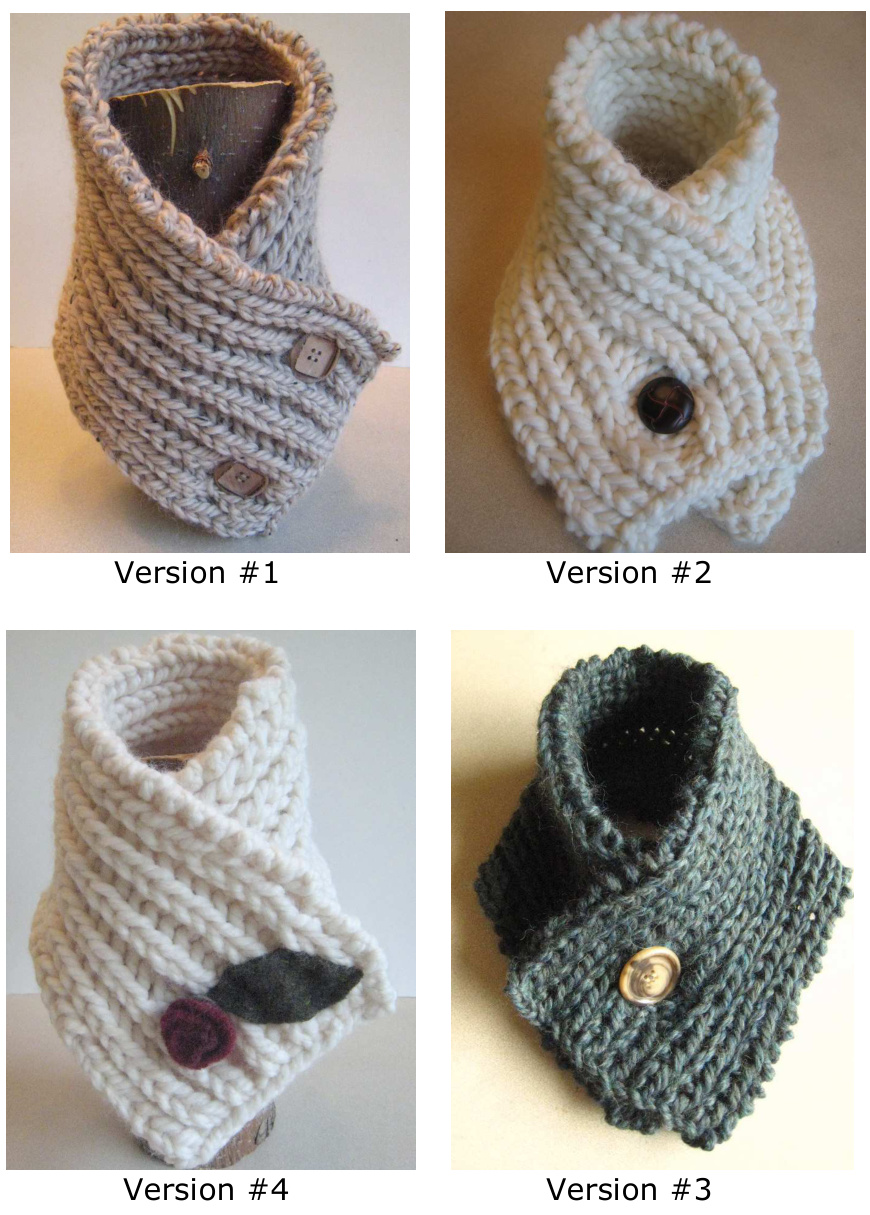
Instructions are included for knitting all four versions. What they have in common is a distinctive, thick rib. The True Fisherman's Rib is a voluminous reversible rib, stretchier and less stable than the Half Fisherman's Rib. Instructions are also included for using recycled wool sweaters to make the flower and leaf embellishment. All versions use size 10.5 needles and yarn such as Plymouth Encore Mega, Plymouth Baby Alpaca Grande or other bulky yarn (3 to 3.5 stitches per inch) or worsted weight yarn, doubled. You will need approximately 80-100 yards (twice that if using two strands of yarn). Pictured at top, left: True Fisherman’s Rib with two buttons; top right: True Fisherman's Rib with one button; bottom, left: True Fisherman's Rib with optional flower/leaf in felted wool; bottom, right: Half Fisherman's Rib. Abbreviations: $\mathrm{K}{=}]$ Knit $\scriptstyle\mathrm{P=}\mathrm{Purl}$ $\mathrm{Klb}{=}$ Knit the next stitch in the row below (see instructions and photos below) RS $\r=$ Right side WS $\leftrightharpoons$ Wrong side YO $\risingdotseq$ Yarn over
Version #1 True Fisherman's Rib with two buttonholes:
Cast on 18 stitches Depending on width desired and type of yarn, you may cast on fewer stitches, but you should adjust the pattern accordingly. You must cast on an even number of stitches, e.g. 14 or 16.) Row 1: Purl one row Row 2 (Pattern): $\sp{*}\mathrm{P}1$ , $\mathrm{Klb^{*}}$ , repeat from \* until last two stitches, P2 Repeat Row 2 until approximately $20^{\circ}$ in length. Buttonhole row: $\sp{*}\mathrm{P}1$ , K1b\*, repeat from \* one time, YO, K2 tog, \*P1, K1b\*, repeat from \* two times, YO, K2 tog, P1, K1b, P2 Row after buttonhole: $\sp{*}\mathrm{P}1$ , K1b\*, repeat from \* one time, P1, K1, \*P1, K1b\* repeat from \* two times, P1, K1, P1, K1b, P2. Continue in pattern (Row 2) until you have knitted about $2^{\circ}$ past the buttonhole. Bind off in pattern. Weave in ends. Fold neck warmer right side out so ends align as shown in accompanying picture, and sew on buttons.
Version #2 True Fisherman's Rib with one buttonhole:
Cast on 18 stitches Depending on width desired and type of yarn, you may cast on fewer stitches, but you should adjust the pattern accordingly. You must cast on an even number of stitches, e.g. 14 or 16). Row 1: Purl one row Row 2 (Pattern): $\sp{*}\mathrm{P}1$ , $\mathrm{Klb^{*}}$ , repeat from \* until last two stitches, P2 Repeat Row 2 until approximately $20^{\circ}$ in length. Buttonhole row: On right side: $\sp{*}\mathrm{P}1$ , $\mathrm{Klb^{*}}$ repeat from \* three more times, P1, bind off 2 stitches, K1b, $\sp{*}\mathrm{P}1$ , $\mathrm{Klb^{*}}$ repeat from \* one more time, P2 Row after buttonhole: $\sp{*}\mathrm{P}1$ , K1b\*, repeat from \* two more times, P1, K1, cast on 2 stitches, $\sp{*}\mathrm{P}1$ , $\mathrm{Klb^{*}}$ , repeat two more times, P2 Next row: $\sp{*}\mathrm{P}1$ , $\mathrm{Klb^{*}}$ , repeat from \* three more times, P1, K1, $\ast_{\mathrm{P1}}$ , K1b\*, repeat from \* two more times, P2. Continue in pattern (Row 2) until you have knitted about $2^{\circ}$ past the buttonhole. Bind off in pattern. Weave in ends. Fold Neck warmer right side out so ends align as shown in accompanying picture, and sew on button.
Version #3 Half Fisherman's Rib with one buttonhole:
Cast on 18 stitches. Half Fisherman's rib will knit up narrower than the Full Fisherman's Rib. (Depending on width desired and type of yarn, you may cast on fewer or more stitches, but you should adjust the pattern accordingly. You must cast on an even number of stitches, e.g. 14 or 16). Row 1: Purl one row (WS) Row 2: $\ast_{\mathrm{P1}}$ , $\mathrm{K}1^{*}$ , repeat from \* until last two stitches, P2 Place marker at beginning of Row 3 to keep track of the right side of the work. (RS) Row 3: $\sp{*}\mathrm{P}1$ , $\mathrm{Klb^{*}}$ , repeat from \* until last two stitches, P2 Repeat rows 2 and 3 for the pattern. Knit in pattern until approximately $20^{\circ}$ in length. Buttonhole row, on right side: $\ast_{\mathrm{P}1}$ , $\mathrm{Klb^{*}}$ repeat from \* three more times, P1, bind off 2 stitches in pattern, K1, $\sp{*}\mathrm{P}1$ , $\mathrm{Klb^{*}}$ repeat from \* one time, P2 Next row: $*_{\mathrm{p}1,\,\mathrm{K}1^{*}}$ , repeat three more times, cast on 2 stitches, $\ast_{\mathrm{P}1}$ , $\mathrm{K}1^{*}$ repeat from \* two more times, P2 Nextrow: $\sp{*}\mathrm{P}1$ , K1b\* repeat from \* three times, P1, K1, \*P1 K1b\*, repeat from \* two more times, P2 Continue in pattern (repeating Row 3 and Row 2) until you have knitted about $2"$ past the buttonhole. Bind off in pattern. Weave in ends. Fold Neck Warmer right side out so ends align as shown in accompanying picture and sew on button.
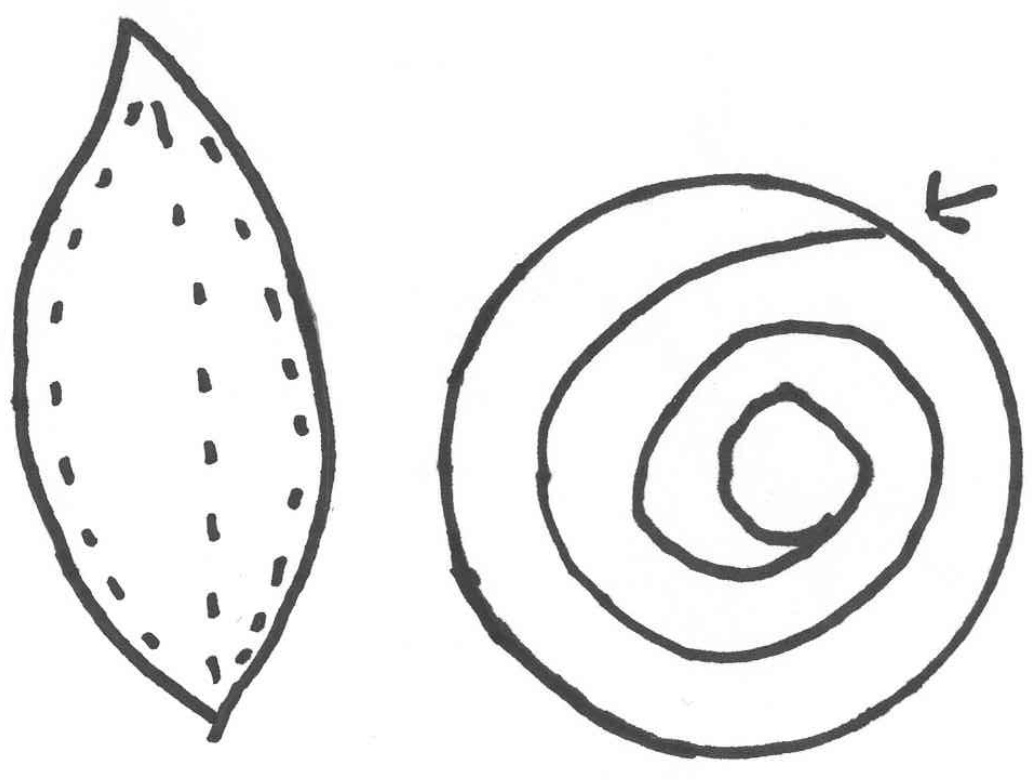
Version #4 with Leaf and Flower Embellishment:
Knit either one button version (Version $\#2$ or #3) Using the pattern provided, cut one flower and one leaf from scraps of felted wool. (See instructions below on felting wool sweaters.) Using yarn or embroidery floss, top stitch the leaf onto the neck warmer as shown. For flower, cut circle in a spiral as indicated starting at arrow. Roll up tightly from the outside end (arrow) until you reach the middle portion. Use a hot glue gun and glue the middle circle to the bottom of the rolled up flower. Sew button to neck warmer (choose a flat button, just large enough for the flower to cover). Glue flower to button, making sure it is securely attached.
Instructions for K1b:
Step 1, insert right needle in the stitch below Step 2, wrap yarn around needle and pull through the loop

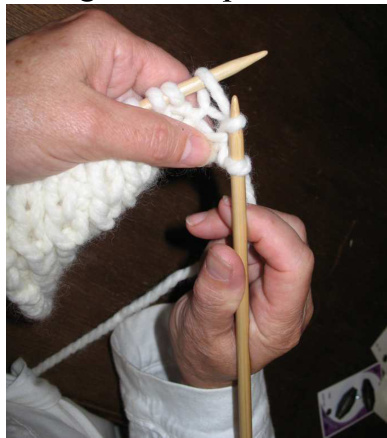
Step 3: lift stitch off of left needle
Instructions for Felting Wool Sweaters:
Perhaps you have an old wool sweater that you fulled or \*felted" by mistake or you may be able to find some already felted sweaters at a thrift store. If not, here is how you produce them: $100\%$ wool (not washable wool) sweaters are best. Place each sweater in a pillowcase or washing bag Important step to protect your washer). Add a pair of jeans and or some tennis balls to provide increased agitation. Fill the washer with the smallest amount of hot water that will cover what you are washing. Add a very small amount of detergent (approximately 1/8 cup) Run washing cycle for 5 minutes and check progress of felting. If the sweaters are not sufficiently felted (you can no longer see individual knitted stitches) continue to wash and check at 5 minute increments. You may need to run the wash cycle more than one time. Felting times really vary depending on the sweater and your machine. You may be more successful with this process with a top loading washing machine. When the sweaters are suffciently “done', run the rinse cycle and spin dry long enough to remove most of the water. Remove sweaters and hang or lay flat to dry.
$\circledcirc$ HomeMadeOriginals 2009, All Rights Reserved Frances Lunney, Pocatello, Idaho


