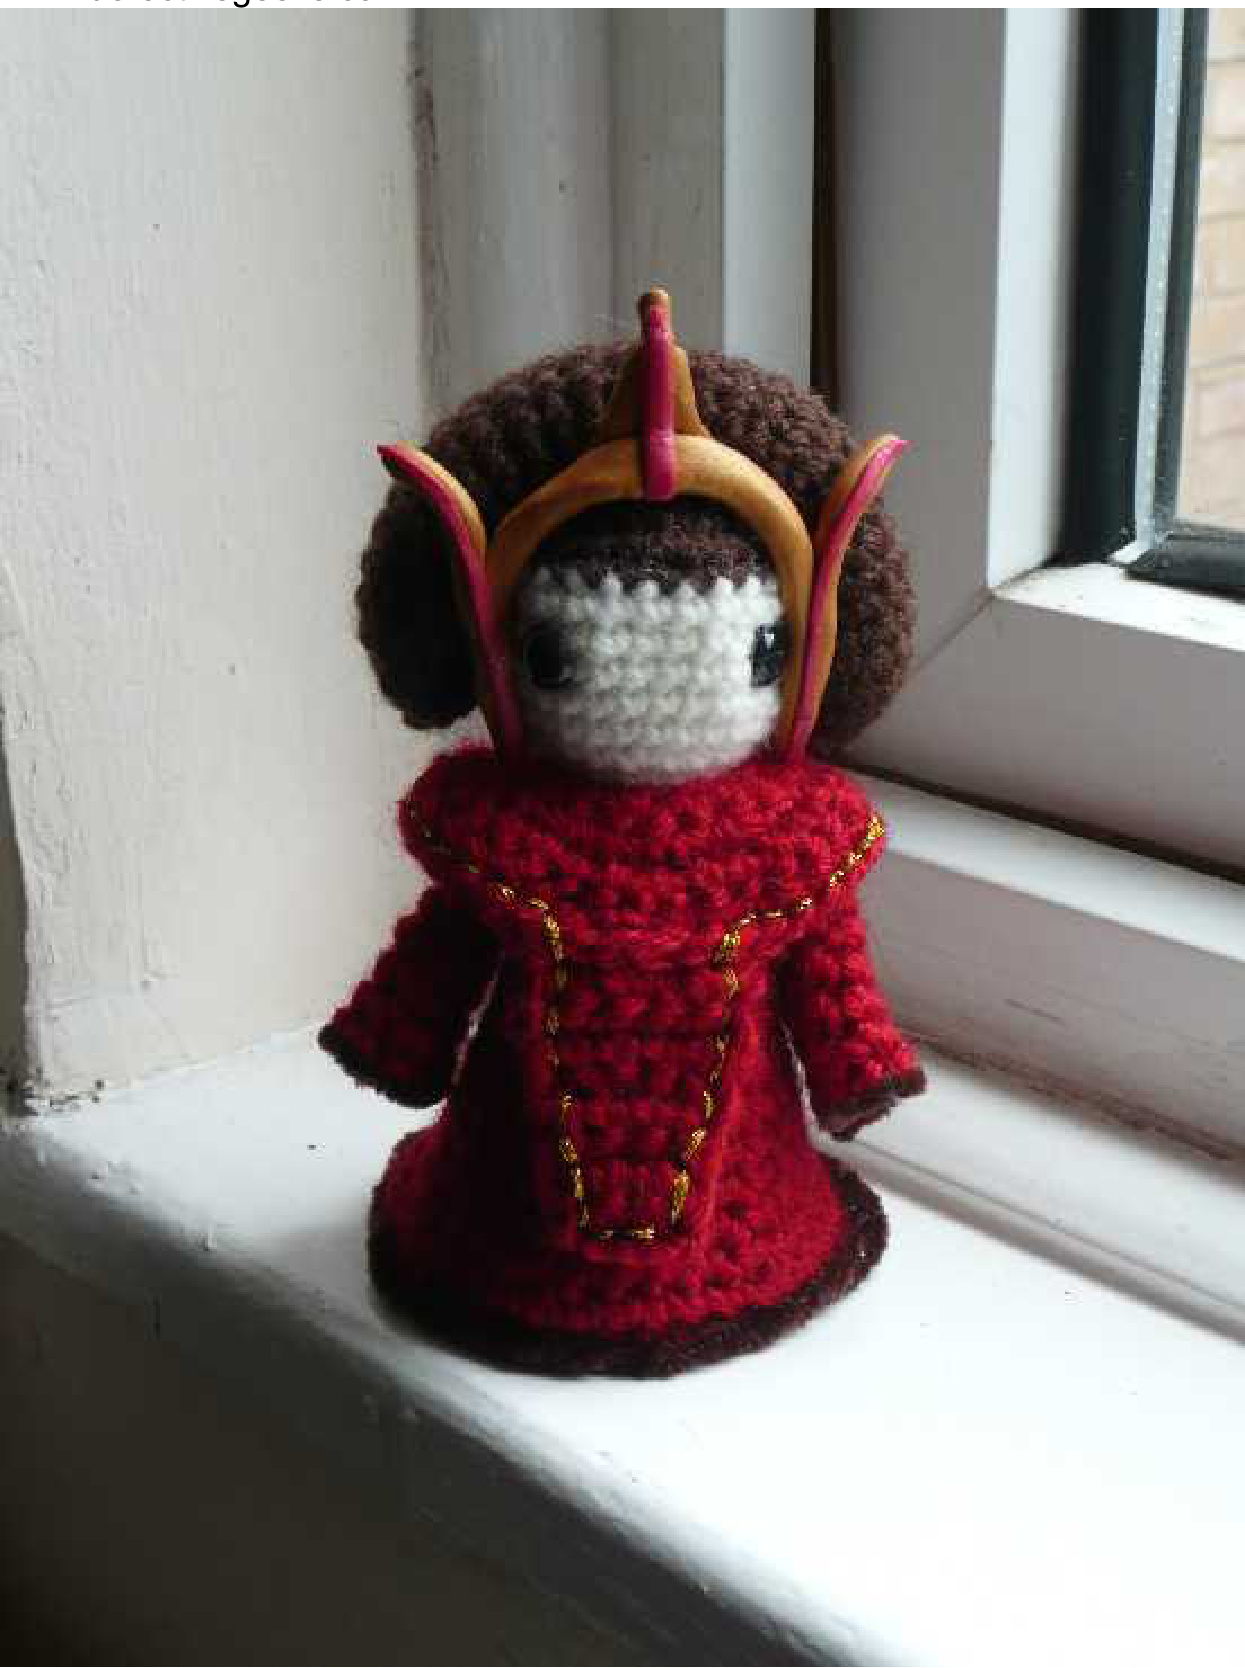
Queen Amidala Invasion Dress Pattern
By: Pilbeam www.defectivegeeks.com
www.defectivegeeks.com
Supplies
4.0 mm hook Brown yarn [suggested Sirdar Country Style DK SH530] Red yarn [suggested Stylecraft Life Chunky Colorway 2306] Off-white yarn (skin tone) [Sirdar Country Style DK SH411] Fimo Effect clay: ruby red, metallic gold Gold metallic embroidery thread Sewing thread to match the dress and the pipe cleaners 9.mm Safety Eyes Brown pipe cleaners Stuffing Small piece of cardboard for dress base I used a 4.0 mm hook throughout. The fur trim on the dress bottom and the sleeves was done by sewing brown pipe cleaners to the crochet. The crown was done with Fimo Effect clay: ruby red and metallic gold. The crown was made last so that I could make sure it fit the head.
Terminology and links
(American crochet terminology) Magic loop technique - http://www.planetjune.com/blog/tutorials/magic-ring. right-handed/ Slip stitch - http://www.planetjune.com/blog/amigurumi-help/crochet-basicsright-handed/#slst Sc - Single Crochet Inc - Increase (2 sc in one sc stitch) Dec - Invisible decrease http://www.youtube.com/watch?v=tZ575 ZkivWk video or written tutorial http://www.planetjune.com/blog/amigurumi help/invisible-decrease/ Row vs. round - A row in crochet is single crochet straight across, chain, and turn. In a circle, you slip stitch into the first single crochet you made for that row to finish the row, then chain 1, and then do the next row without turning. The slip stitch does not count towards the stitch count. A round is a spiral, created by continuing on to the next instructions. Back loop only -Do a normal single crochet in the back loop of the V. http://www.stitchdiva.com/custom.aspx?id=128
Dress Base
The base is done in circular rows. Each time you finish going around the circle, slip stitch into your first stitch and then chain 1 to give you enough height to do the next row. The total number of stitches are noted in square brackets [] at the end of each line of instructions. Magic Ring 6 [6] Inc around [12] (1 sc, inc) around, slip stitch, chain 1 [18] (1 sc, 1sc, inc) around, slip stitch, chain 1 [24] (1 sc, 1 sc, 1 sc, inc) around, slip stitch, chain 1 [30]
www.defectivegeeks.com
(1 sc, 1 sc, 1 sc, 1 sc, inc) around, slip stitch, chain 1 [36] sC x36 back loop only [36] This step flips you onto the top of the disc that you have just made. Now start doing the main body of the dress in spirals. You don't need to slip stitch and chain at the end of each round. I used invisible decreases, but you can use normal ones, if you prefer. (1 sc, 1 sc, 1 sc, 1 sc, dec) around [30] (1 sc, 1 sc, 1 sc, dec) around [24] sc x24 around [24] sC x24 around [24] sc x24 around [24] sc x24 around [24] sc x24 around [24] Cut out a circular piece of cardboard the size of the base (approximately 2.5 inches across, but cut it to fit the size of your base. It may vary depending on the weight of the yarn you are using). Put the cardboard into the dress at the bottom. The stuffing will keep it in place and the base will remain nice and flat. (1 sc, 1sc, dec) around [18] sc x18 around [18] sc x18 around [18] sc x18 around [18] (1 sc, dec) around [12] Stuff the dress now.
Head
Use the off-white yarn for the face and brown yarn for the hair. Sc around, slip stitch, chain 1 [12] skin yarn (1 sc, inc) around, slip stitch, chain 1 [18] skin yarn (1 sc, 1 sc, inc) around, slip stitch, chain 1 [24] skin yarn We now do half the circle in brown and the other half in skin. Sc x11 in brown, sc 13 in skin, slip stitch, chain 1 [24] Sc x11 in brown, sc 13 in skin, slip stitch, chain 1 [24] Sc x11 in brown, sc 13 in skin, slip stitch, chain 1 [24] Sc x11 in brown, sc 13 in skin, slip stitch, chain 1 [24] Sc x11 in brown, sc 13 in skin, slip stitch, chain 1 [24] Sc x11 in brown, sc 13 in skin, slip stitch, chain 1 [24] Switch to using only brown, sc x24 around, slip stitch, chain 1 [24] Good idea to put eyes in now and stuff it a little. (1 sc, 1sc, dec) around, slip stitch, chain 1 [18] (1 sc, dec) around, slip stitch, chain 1 [12] dec around [6] Stuff the head to fullness because it will be difficult to do any stuffing after you do the next row. dec around [3] Close off. Queen Amidala Invasion Dress
www.defectivegeeks.com
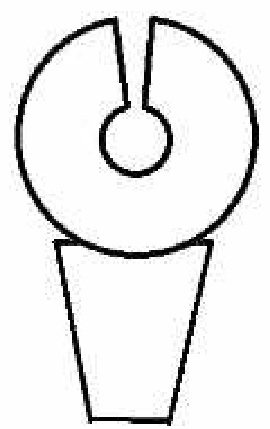
Collar
This diagram shows the shape of the finished collar:
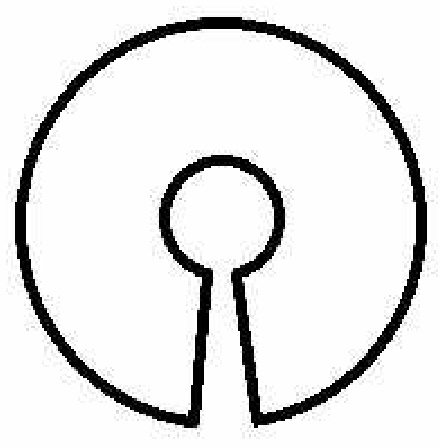
Do the collar in straight rows (doing the slip stitch and chain 1 again), but with the increases placed so that it becomes circular. Chain 13 Sc x12, chain 1 [12] (1 sc, inc) across, chain 1, turn [18] (1 sc, 1 sc, inc) across, chain 1, turn [24] (1 sc, 1 sc, 1 sc, inc) across, chain 1, turn [30] (1 sc, 1 sc, 1 sc, 1 sc, inc) across, chain 1, turn [36] Before you place the collar on the neck, I recommend making the chest piece, because you need to sew the chest piece to the collar.
www.defectivegeeks.com
Chest Piece
Leave a long piece of yarn hanging off the chain. You are going to use this yarn to sew the chest piece to the collar. This diagram shows the shape the finished chest piece:
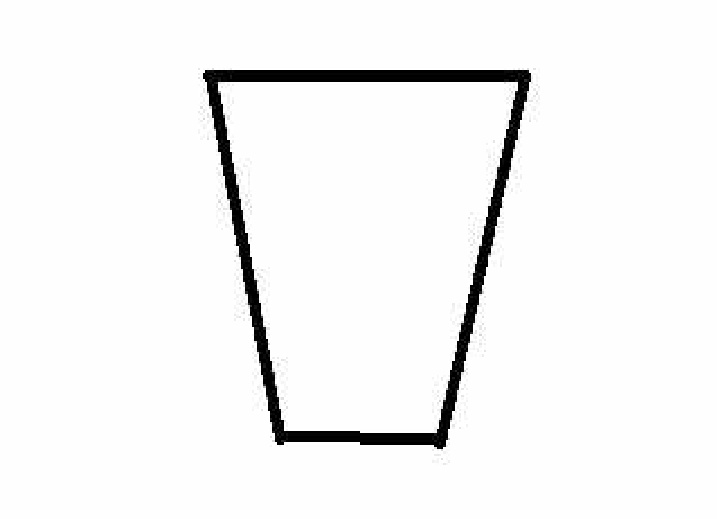
Chain 6 Sc x5 across, chain 1, turn [5] Sc x5 across, chain 1, turn [5] Sc x5 across, chain 1, turn [5] Dec, sc, dec across, chain 1, turn [3] Sc x3 across, chain 1, turn [3] Sc x3 across, chain 1, turn [3] Sc x3 across, chain 1, turn [3] Sew the chest piece to the front of the collar. Then put the collar around the doll's neck and use the length of yarn from the chest piece to sew back of collar together.
Use the gold embroidery thread around the edge of the neck and collar.
www.defectivegeeks.com
Sleeves
The sleeves were done in a spiral, but they can be done in rows. It's up to you! All increases are done at the start of a round, which creates a bit of a lopsided shape to give the look of draped sleeves. Magic loop [6] Sc x6 Inc sc x6 [7] Inc sc x7 [8] Inc, inc, sc x8 [10] Inc, inc, inc, sc 10 [13] Sc x13 [13] Sc x13 [13] Sc x13 [13] Make a second sleeve. Sew the sleeves onto body. You can sew on the pipe cleaners now. I just wrapped them into the shape, cut them to the needed length, and then sewed them on with brown thread.
Hair Roll
The hair roll is also done in a spiral, so there's no need for slip stitch and chain 1. Magic loop 3 [3] Inc x3 [6] Inc x6 [12] Sc x12 for next 22 rounds Stuff the hair roll at this point. Dec x6 [6] (Stuff a little more at each row until tie-off.) Dec x3 [3] Close off, and then sew the hair roll onto the head.
www.defectivegeeks.com
Crown
Fimo Effect clay
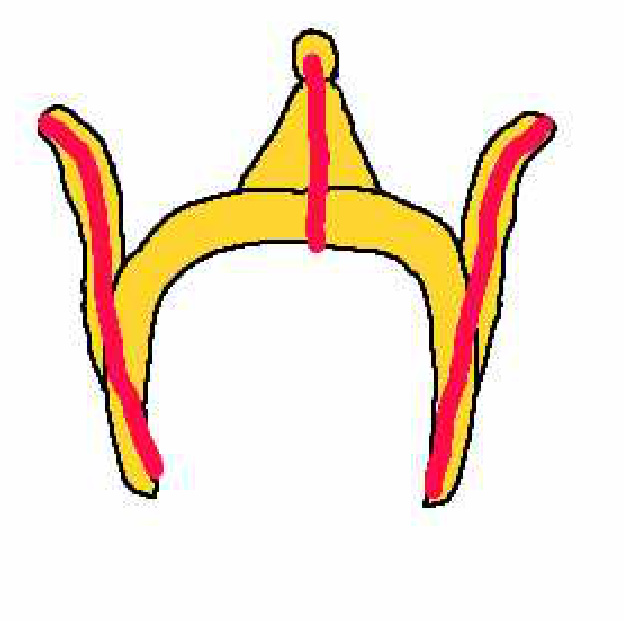
rolled the gold clay into a cylinder for the bit that wraps around the head. I shaped the triangular top and gently meshed it with the main cylinder. I made two more gold rolls and meshed them into the main cylinder. Then I made three narrow red cylinders and overlaid them onto the centre and sides. I pushed a toothpick through the triangular top so that I could sew it to the hair roll when finished.
Follow manufacturer's directions for baking the clay. Let the invasion begin! Queen Amidala Invasion Dress


