ROY THE FLAMINGO

by Justyna Kacprzak
ROY THE FLAMINGO
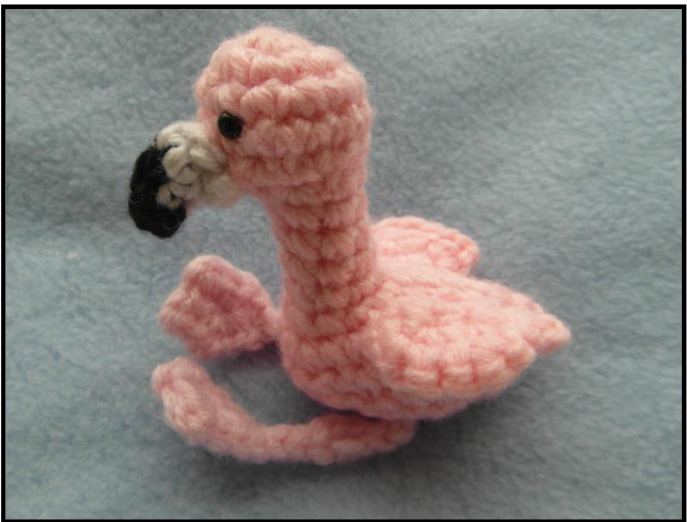
Meet Roy, the friendly flamingo! He's made with worsted weight yarn and F (3.75mm) hook and measures 5"' (with legs). If you want him to be even tinier, you can use DK, sport or even fingering yarn and he'll be so small you can use him as a key-ring and take him everywhere with you! Hope you'll enjoy the pattern! At the very end of the file you'll find printable version of the pattern. You can go there by clicking here. You're very much welcome to share your finished objects made from the patterns on my Facebook page or Ravelry group.
Materials:
- yarn: 100% acrylic, worsted weight pink light pink or tan (for legs) black white - hook: 3.75mm (F) - 6mm safety eyes - yarn needle - scissors - stuffing - stitch marker (optional)
List of abbreviations used:
ch - chain sc - single crochet hdc - half double crochet sl st - slip stitch inc - increase (2 stitches in 1) dec - decrease (2 stitches worked together) 3in1 -3sc in 1 stitch sk - skip FO -- fasten off. x5/x3 - repeat 5 times/3 times (n) - number of stitches in a round
How to read the pattern:
Let's take row 3 from the wing part. It says: 2sl st, 1sc, inc, 2sc, 1sl st (8) It means you make 2 sl st in the first sc, then 1sc in the next sc, 2sc in the next sc, 1sc in each of the next 2sc, and finally 1 sl st in the last st. You should have a total of 8sts in that row. Please, check out the abbreviations box, too.
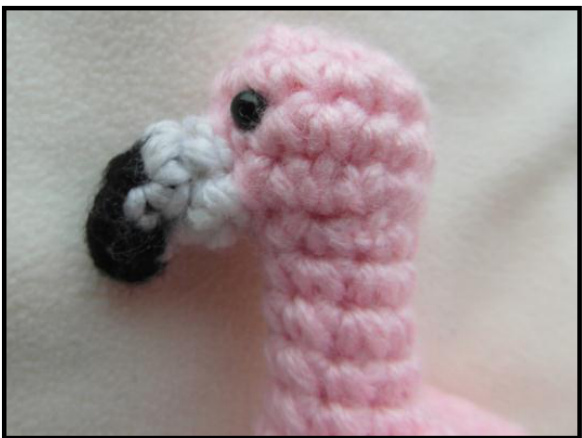
Beak:
withblack ch2 1. 4sc in the 2nd ch from the hook (4) 2. inc, join white: 3sc (5) 3. black: inc, 1sc, white: 1sc, inc, 1sc (7) 4. white: 1sc in each sc (7) FO, leaving the long piece of thread for sewing the beak to the body.
Head and body:
with pink
1. 6sc in the 2nd ch from the hook (6) 2. inc x6 (12) 3. (1sc, inc) x3, 6sc (15) 4. 1sc in each sc (15) you may want to mark the 3rd and 7th sc from this row to know where to attachthesafety eyes 5. (1sc, dec) x3, 6sc (12) You may want to attach the safety eyes now, if you're using them. I put mine between the 2"d and 3rd and 7th and 8"h st in row 4. It is important to put them on this side of the head, as the body is worked together with the head and neck, and we prefer the flamingo not to look in a strange direction... Oh, and you can stuff the head now, too. Continue stuffing the neck as you go. 6. (1sc, dec) x4 (8) 7. - 10. 1sc in each sc (8) 11. ch5, inc in the 2nd ch from the hook, 1sc in the next ch, 2hdc, working in the scs from the neck part again: 3sc, inc x2, 3sc, working on the other side of the ch: 2hdc, 1sc, 3in1 (21) 12. inc, 7sc, inc, 2sc, inc, 7sc, inc, 3in1 (27) 13. 1sc, inc, 20sc, inc, 1sc, sk 3 and make sure that they won't hide inside the body, but stick out (it will be the tail) (26) 14. inc, (4sc, dec) x4, inc (24) 15. dec x2, 4sc, dec x4, 4sc, dec x2 (16) 16. dec x8 (8) FO. Sew the opening closed.
Wing (make 2):
1. inc in the 2"d ch from the hook, 1sc, inc, ch1, turn (5) 2. sk1, 1sl st, inc x3, ch1, turn (7) 3. 2sl st, 1sc, inc, 2sc, 1sl st (8) FO, leaving the long piece of thread for sewing. Sew the wings to the body. Pattern by Justyna Kacprzak - www.handmade-by-just-in.blogspot.com All rights reserved
Leg (make 2):
with light pink or tan
ch3
1sc in the 2"d ch from the hook, [2sc, ch2, (1sc, ch2)x2, 2sc] in the next ch, 1sc on the other side of the 2"d ch (where you made the first sc), ch8, 1sl st in the 2nd ch from the hook, 2sl st, inc, 3sl st, join to the first sc. FO, leaving the long piece of thread for sewing. Sew the legs to the body. And you're done!
Note!
His legs are dangly and wonky. If you're not happy with such a result and would prefer them to behave, you can try “killing the acrylic" technique to give them more defined shape.
Pattern by Justyna Kacprzak www.handmade-by-just-in.blogspot.com
If you have any questions, comments or problems with the pattern, feel free to contact me at kacprzak justyna @ wp.pl I'd love to get some feedback and help you out, if I can! Please respect the copyright on this pattern and do not sell a finished product made from it without first obtaining permission from the designer. You are also not allowed to resell this pattern to anyone or publish it without the designer's permission.
Beak:
withblack ch2 1. 4sc in the 2nd ch from the hook (4) 2.inc, join white: 3sc (5) 3. black: inc, 1sc, white: 1sc, inc, 1sc (7) 4. white: 1sc in each sc (7) FO, leaving the long piece of thread for sewing the beak to the body.
Body:
withpink ch2 1. 6sc in the 2nd ch from the hook (6) 2.inc x6 (12) 3. (1sc, inc) x3, 6sc (15) 4. 1sc in each sc (15) you may want to mark the 3rd and 7th sc from this row to know where to attach the safety eyes 5. (1sc, dec) x3, 6sc (12) You may want to attach the safety eyes now, if you're using them. I put mine between the 2"d and 3rd and 7t"h and 8"h st in row 4. It is important to put them on this side of the head, as the body is worked together with the head and neck, and we prefer the flamingo not to look in a strange direction... Oh, and you can stuff the head now, too. Continue stuffing the neck as you go. 6. (1sc, dec) x4 (8) 7. - 10. 1sc in each sc (8) 11. ch5, inc in the 2"d ch from the hook, 1sc in the next ch, 2hdc, working in the scs from the neck part again: 3sc, inc x2, 3sc, working on the other side of the ch: 2hdc, 1sc, 3in1 (21) At this point it may start to look like a dinosaur or a slug of some kind. If you can't stand it, you can sew the beak now. It should start to resemble the flamingo much more after that. If you're fine with the look you can leave sewing the beak till the very end. 12.inc, 7sc, inc, 2sc, inc, 7sc, inc, 3in1 (27) 13. 1sc, inc, 20sc, inc, 1sc, sk 3 and make sure that they won't hide inside the body, but stick out (it will be the tail) (26) 14. inc, (4sc, dec) x4, inc (24) 15. dec x2, 4sc, dec x4, 4sc, dec x2 (16) 16. dec x8 (8) FO. Sew the opening closed.
Wing (make 2):
with pink ch4 1. inc in the 2"d ch from the hook, 1sc, inc, ch1, turn (5) 2. sk1, 1sl st, inc x3, ch1, turn (7) 3. 2sl st, 1sc, inc, 2sc, 1sl st (8) FO, leaving the long piece of thread for sewing. Sew the wings to the body.
Leg (make 2):
with light pink or tan ch3 1sc in the 2nd ch from the hook, [2sc, ch2, (1sc, ch2)x2, 2sc] in the next ch, 1sc on the other side of the 2nd ch (where you made the first sc), ch8, 1sl st in the 2"d ch from the hook, 2sl st, inc, 3sl st, join to the first sc. FO, leaving the long piece of thread for sewing. Sew the legs to the body.


