CROCODILE STITCH BAG By Shanti Ordonez, 2011
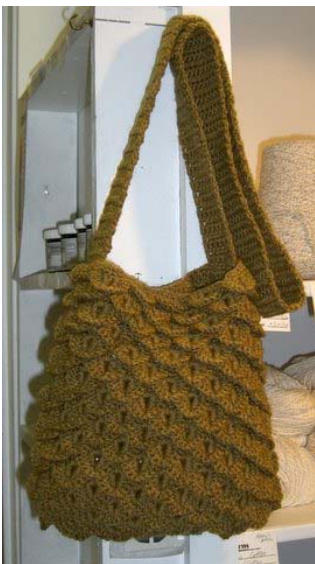
This is a crochet bag that uses the crocodile stitch for the front and the shell stitch for the back. The crocodile stitch results in a very fun and highly textured fabric, dense enough to give the piece a good structure without being super heavy. \*\* The Crocodile stitch used in this bag is based on the one explained by Jenny at yarn-muse.blogspot.com where she has written instructions and videos on how to work the first 3 rows withthisstitch. Finished Measurements: 10x10" (25x25 cm), with a 43” strap (109 cm). Yarn: This bag was made with 2 balls of Cascade 220 Superwash (color 870), however you can make it with around 430yds of any worsted yarn. Hook: 5mm (US H) hook. Gauge: Is not critical for this bag Lining: Optional, Line your bag with a pretty fabric and a magnetic snap! Abbreviations: The pattern is written in US terminology. ch -- chain sC -- single crochet hdc -- half double crochet dc -- double crochet sl st -- slip stitch To work the scale pattern: work 5 dc around the post of the first dc of the set (from top to bottom of the dc post), ch 1, work 5 dc around the post of the second dc inserting your hook from left to right (from bottom to top of the dc post)
To make the front:
Make a slip knot. Chain 37. Row 2: ch 3, turn, dc in base of ch3, \*ch 2, skip 2 ch, 2 dc in next sc\*, until the end of the row. Row 3: ch 1, turn, work scale pattern around the first set of 2 dc's, \*skip one set of 2 dc's and work scale pattern in the next set of dc's (the one following the one you just skiped)\*; repeat from \* until the end of the row, working just 4 dc in the 2"d part of the last scale. -- 7 scales. Row 4: ch 3, turn, sl st around the post of first dc (from row 2) to complete the last scale pattern from row 3. Ch 3, dc in center sp of scale, \*ch 2, 2 dc in sp between the scale you're in and the next one, ch 2, 2 dc into center of next scale\*; repeat from \* until the end of the row. When you work between 2 scales, you can put your hook into the space between the 2 dc's and all the way through the scales so you “catch' them with the dc's you're making, giving more structure to the fabric. Row 5: turn, sl st in 2"d dc, \*work scale pattern on next set of de's, skip one set of dc\*; repeat from \* until the end of the row, sl st on last dc to secure the end of the scale. At this point you should have 6 scales interspersed with those from row 3. Row 6: ch 3, turn, dc at base of 3 ch (or in between the dc's set you are on top of), \*ch 2, 2 dc in center of next scale, ch 2, 2 dc between 2 scales\*; until the end of the row. Rows 7-34: Repeat Rows 3-6 until you have 17 rows of scales (or until desire high). Row 35: ch 1, turn, sc in each st util the end of the row. Fasten off.
To make the back:
Make slip knot. Chain 38. 5 dc in designated st count as 1 shell. Row 1: Sc in 2nd ch from hook and in each ch across - 37 sts. Row 2: ch 1, turn, \*skip 2 st, 5 dc in next st , skip 2 st, sc in next st\*, repeat from \* until the end of the row. (6 shells) Row 3: ch 3, turn, 2 dc in same stitch (base of ch-3 just made which is the last sc of previous row) to complete half shell, \*skip 2 dc, sc in 3rd dc of next shell, skip 2 dc, 5 dc in sc\*, repeat from \* until you make the sc on top of the last shell, skip 2 dc, 3 dc in last sc. (half shell, 5 shells, half shell) Row 27: ch 1, turn, sc in next dc, hdc in next dc, \*dc in sc, work (hdc, 3 sc, hdc) on shell\*; repeat from \* until last complete shell, dc in sc, hdc in next dc, sc in each of 3 remaining dc of the half shell. Fasten off. This row should make the top border of the shells even.
To make the strap:
Make slip knot. Chain 12 Row 1: Hdc in 3rd ch from hook, hdc in each st to the end of the row. Row 2: ch 2, turn. Hdc in same st then hdc in each st across. Repeat row 2 to desired length. The bag in the picture has 148 rows. \*\* If you have enough yarn, you can make a round of sc all around of the strap to give it a nicer finished look. \*\* You can make the strap really long so you can sew it all around the bag to give it more depth.
To asemble:
Sew together front and back with wrong sides facing each other with sc. Sew the strap to the inside of the bag with a darning needle.


