Bear Accessories
A Simple Knits design
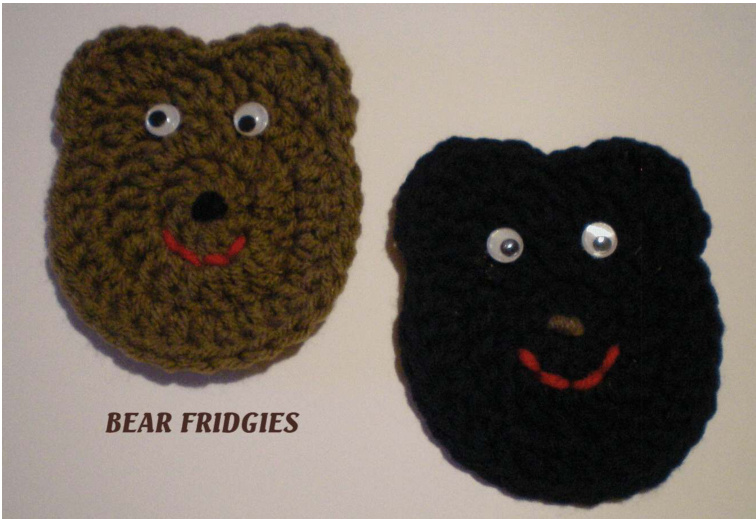
One of my testers for the Flower Power coasters, Wanda, adapted the pattern to create a cute bear fridgie. She worked the three center rows from the flower coaster and two petals from the petal round to form the ears. Add eyes, embroider on a nose and mouth, and add a magnet to the back and it's ready to hang on your refrigerator. Aren't they cute? These would also make great package tie-ons, Christmas tree ornaments, or appliques. Make a coin purse by crocheting a second plain circle that becomes the back of the purse. Have fun! ney: (u.s. Ierms) dc = double crochet sC = single crochet hdc = half double crochet tr = treble slip st - slip stitch BLO = back loop only FLO = front loop only
2012 Vicki Mikulak All rights reserved.
For personal, non-commercial use only. Questions? simple.knits@yahoo.com Revised 5/28/2012
Materials:

Crochet hook size H (5 mm) 20 yards worsted weight yarn Scraps of red, brown, and black yarn for nose and mouth Google eyes or 2 small buttons for eyes Small magnet (for fridgie) Gauge: 2 dc rows = 1" Finished size: about 3" across
Fridgie, Tie-on, Applique, or Ornament:
Round 1: Ch3 (counts as dc). Work 9dc into 3rd ch from hook. Join with sl st to ch3. (10 dc) Round 2: Ch3, dc in same st, work 2dc in each of the next 9 dc. Join with slip st to ch3. (20 dc) Round 3: Ch3, \*2dc in next dc, dc in next dc\* around. Join with slip st to ch3. (30 dc) Row 4 (ears): \*ln the 1st dc work (sc, hdc), in the 2nd dc work (dc, tr), in the 3rd dc work (tr, dc), in the 4th dc work (hdc, sc), slip st in the 5th dc\*, (one ear done) repeat between \* once more for 2nd ear. (Add a little space between the ears by working an extra slip st or two before starting the 2nd ear.) Cut yarn leaving a tail for sewing up. Pull yarn end out of the last st. Weave in all ends.
General Finishing:
Glue a couple of google eyes in place for the eyes (or sew on 2 small buttons). With scraps of black or brown yarn, stitch a French knot for the nose, and embroider a mouth with red yarn as shown. Fridgie: Glue (or sew) a small magnet to the back to hang it on the refrigerator. Package Tie-on or Tree ornament: Omit the magnet. Work a chain loop between the ears or add a length of yarn as a hanger. Applique: Omit the magnet. Sew onto clothing or other items as a decoration.
Bear Coin Purse:

Crochet hook size H (4 mm) 40 yards worsted weight yarn Scraps of red, brown, and black yarn for nose and mouth Google eyes or 2 small buttons for eyes Snap or velcro dot Gauge: 2 dc rows = 1" Finished size: about 3" across
Back Circle:
Round 1: Ch3 (counts as dc). Work 9dc into 3rd ch from hook. Join with sl st to ch3. (10 dc) Round 2: Ch3, dc in same st, work 2dc in each of the next 9 dc. Join with slip st to ch3. (20 dc) Round 3: Ch3, \*2dc in next dc, dc in next dc\* around. Join with slip st to ch3. (30 dc) Cut yarn leaving a tail for sewing up. Pull yarn end out of the last st. Weave in all ends.
Bear Head:
Round 1: Ch3 (counts as dc). Work 9dc into 3rd ch from hook. Join with sl st to ch3. (10 dc) Round 2: Ch3, dc in same st, work 2dc in each of the next 9 dc. Join with slip st to ch3. (20 dc) Round 3: Ch3, \*2dc in next dc, dc in next dc\* around. Join with slip st to ch3. (30 dc) Row 4 (ears): \*ln the 1st dc work (sc, hdc), in the 2nd dc work (dc, tr), in the 3rd dc work (tr, dc), in the 4'h dc work (hdc, sc), slip st in the 5th dc\*, (one ear done) repeat between \* once more for 2nd ear. (Add a litle space between the ears by working an extra slip st or two before starting the 2nd ear.) Do not cut yarn! You will use it to join the front to the back.
Joining & Finishing:
Add the eyes, mouth, and nose (see General Finishing on page one) before you join the pieces. Place the back circle behind the bear head, wrong sides together with the ears at the top. Starting by the ear that still has the yarn attached, slip stitch through both edges to join them. Use the back loop from the bear head on top and the front loop from the back circle as you make each slip st that joins the pieces together. This will give a nicer finish than working through both loops on each piece as you normally would. Continue slip stitching around until you get to the other ear. Cut yarn. Weave in all ends. Sew a snap or velcro dot inside the opening between the ears to close the purse.
Adding a handle (optional):
You can turn your coin purse into a tiny handbag by adding a length of ribbon as a handle or by adding a crocheted chain. Attach each handle end securely at the bottom edge of an ear.


