knit. crochet. design.
Sagramor: Cowl of Imperviousness
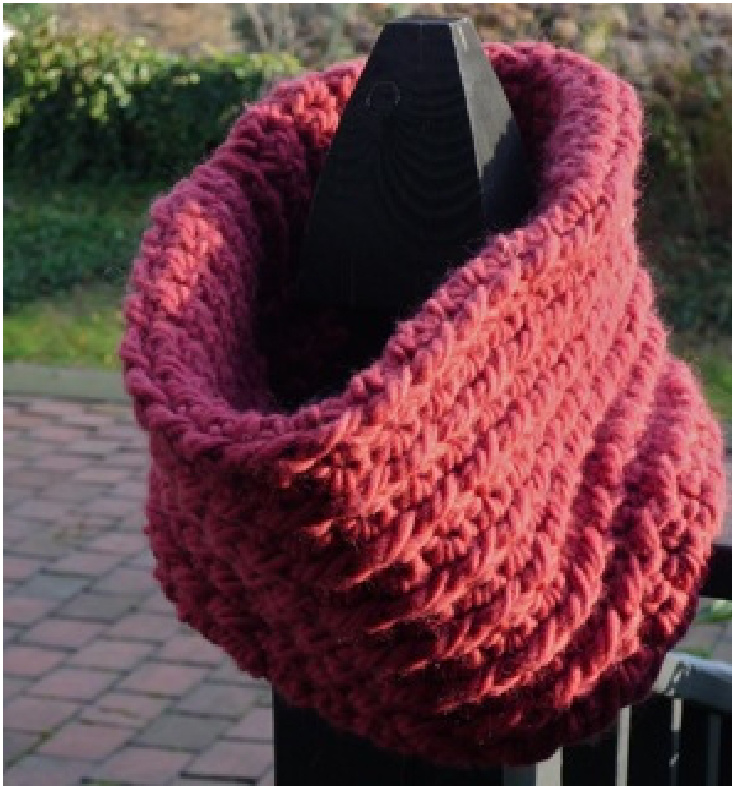
(crocheted neckwarmer) In one of my favorite scenes in Mark Twain's A Connecticut Yankee in King Arthur's Court, Hank, (aka, The Boss) is forced into a joust with his old enemy. Sir Sagramor who is under the the protection of Merlin, another old rival. Merlin supplies Sagramor with a "veil of invisibility,”" which everyone believes makes Sagramor invisible to the Boss. The Boss, however, can see quite clearly that a knight is charging toward him draped in an airy laceweight blankie, and defeats him with some Yankee ingenuity. Sagramor wouldwould have better off with a cowl of imperviousness like this one.Crocheted with a smooth, bulky yarn and doubled over for extra warmth, this reversible cowl will help you survive your battle royal with the wintry elements. If you prefer you armor a bit more light inweight, a simpleformulaforworking with other weights and gauges of yarn is included, or you could crochet it half-width for a less lance-proof design. Size: One Skills: Single crochet, chain stitch, slip stitch, front post double crochet, foundation single Crochet Finished Measurements: 6.5 ins(16.5 cm) height; 24 ins(61 cm) circumference
Materials:
Quince & Co Puffin, 112 yards (102m) per 100g,“Pomegranate", 3 skeins Actual yardage used in the pictured sample 260 yards. Substitute a solid color bulky single such as Reynolds Lopi, Lambs' Pride Bulky, Patons ClassicWool Roving or any similar yarn. Crochet Hook US L/ 8.00mm, or size to get gauge Locking stitch marker, safety pin or paper clip
Gauge:
Approximately 10 sc over 4 in (10 cm); row gauge is not crucial because the piece is worked to the desired length.
Notes:
The cowl is worked flat to create a rectangle which is slip stitched together lengthwise, and then joined with a round of slip stitches to form a double-thick ring. The cowl is reversible with a textured ridged fabric on one side, and a smoother fabric on the Other. The pattern can be easily adapted for other gauges by consulting the Crochet Math section at the end of the directions. This pattern uses US crochet stitch terminology. For British equivalents use this conversion. table. e foundation row can be found here: Foundation Single Crochet Tutoria
Stitches:
The stitch pattern consists of two rows. In Row 1, all the stitches are single crochet. Row 2 contains both single crochet and front post double crochet. After the set up rows, the FPDC (front post double crochet) is worked into the FPDC two rows below, jumping over the single crochet which is above that FPDC. In other words, the single crochet in Row 1 of the stitch pattern remains unworked. If you lose track of your stitch count and work that stitch you will create unwanted increases and cause the vertical line of the ridge created by the FPDC's to bias. In this pattern, the chain stitch (ch 1) worked at the end of each row is the turning chain and it does not count as a single crochet.
| Abbreviations (US terminology): | |
| ch=chainstitch | FSC = foundation single crochet FPDC = front post double crochet |
| sl st = slip stitch sC = single crochet | |
Directions:
Foundation Row: ither chain 30, sc in second chain from hook and sc to end , ch 1, turr Or work FSC 29, ch 1, turn Set-Up Rows: Row 1: Ch1 ( turning chain,does not count as a single crochet in any row), sc29, turn Row 2: Ch1, sc 7, [FPDC in next sc in the row below, sc1] 7 times, Sc 6, ch1, turn Stitch Pattern Rows: Row 1: Sc 29, ch 1, turn Row 2: Sc 7, [FPDC into FPDC two rows below, sSc1 ] 7 times, Sc6, ch 1, turn Repeat the two stitch pattern rows until the work measures 24 inches or the desired finished circumference. Do not fasten off. Remove the hook from the work and secure the open loop with a locking stitch marker, safety pin, or paper clip before proceeding to the finishing step. Finishing: Fold the work in half lengthwise with the ridged side out. Fasten it together in two or three places with clips or safety pins if desired. Replace the hook in the open loop and seam the piece together by working a line of slip stitches along the held-together edges. This will result in a long tube, and, depending on where you insert your hook, a wider or narrower ridged seam which is intended as a decorative element. If you prefer, you can work the slip stitches on the non-ridged side and then turn the resulting tube inside out. To complete the circle, pin the two ends of the tube together in two or three places and then join them by continuing the line of slip stitches. Since you will be joining the base chain at the beginning of the piece and the last row, you will see two rows of chains. You can experiment with the placement of your hook to join these chains. In the sample, with the work facing, the hook was inserted under the right leg of the chain stitch on the right and the left leg of the chain stitch on the left. Make sure you line up the rows and ridges. efer, instead of working slip stitches, you can sew all seams with yarn.
Crochet Math:
Sagramor can be easily adapted to another gauge. You want to create a rectangle that has a width of 13 inches (or double whatever neck height you want to end up with). Using your preferred yarn and a hook size that will create a fairly dense fabric with that yarn, figure out how many single crochet stitches you need for 4 inches. For a 13 inch width, take that number and multiply by 3.25 (which is the width, in this case 13 inches, divided by the 4 inch gauge number). The resulting number plus 1 will be the number for your starting chain. (lf you start with Foundation, Single Crochet, FSC, don't add 1). Sts in 4" X 3.25 = +1: chain sts in starting chain Sts in 4" X 3.25 = FSC To follow the construction described in the pattern, work the ridged pattern over the center stitches (one half the total), and work sc over the flanking stitches (one quarter of the total on either side) .


