Silver leaves shawlette
Styled by Karen Burns for AslanTrends
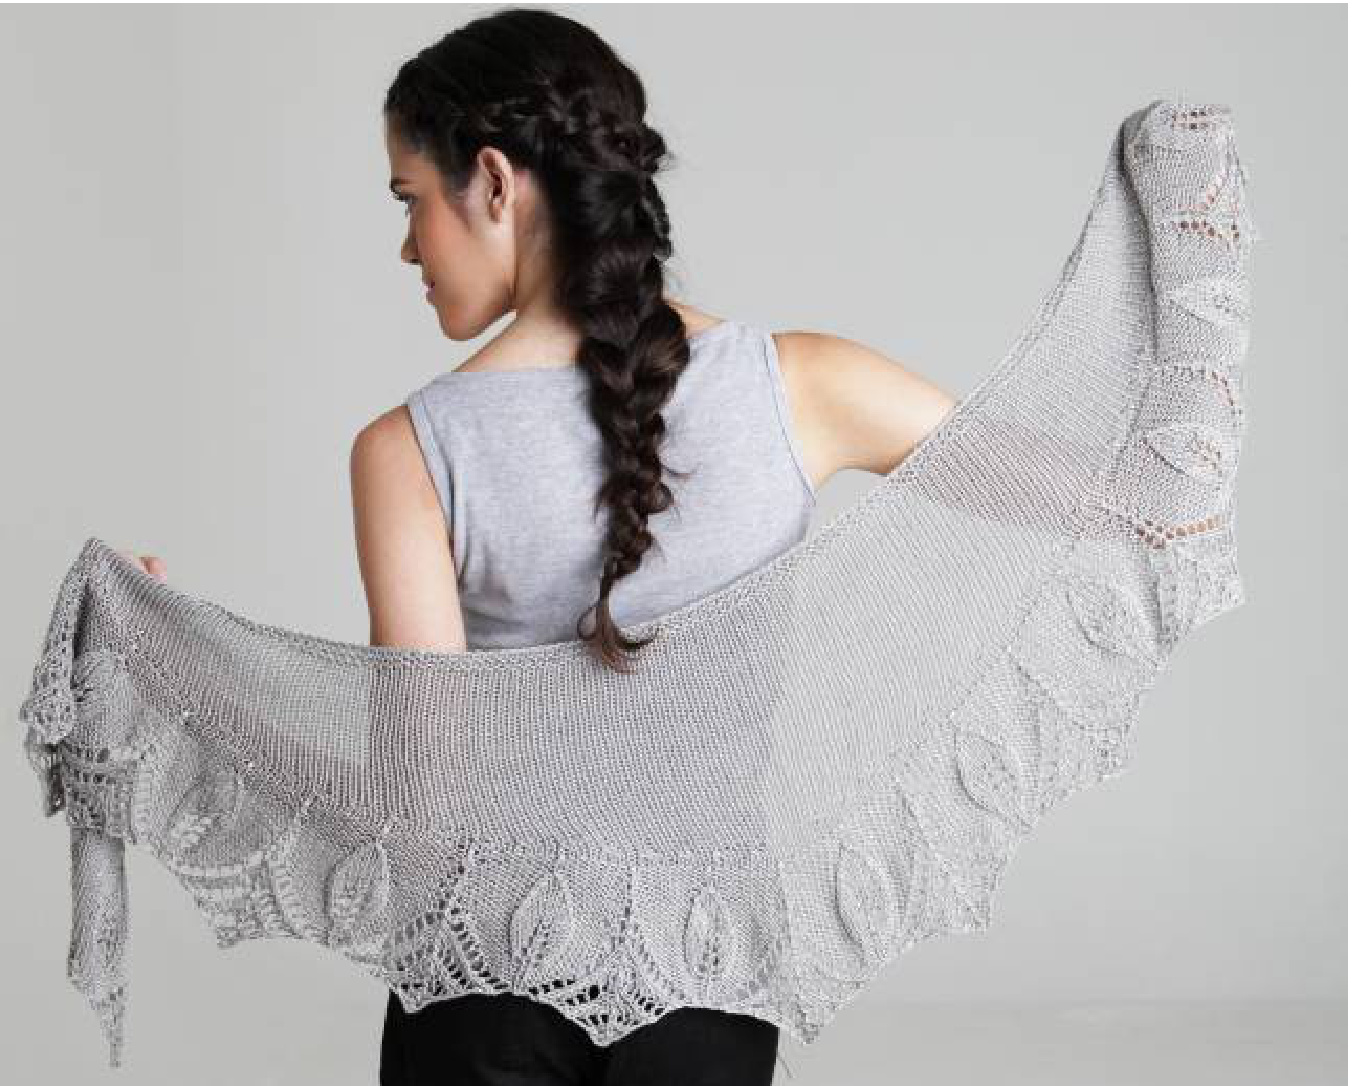
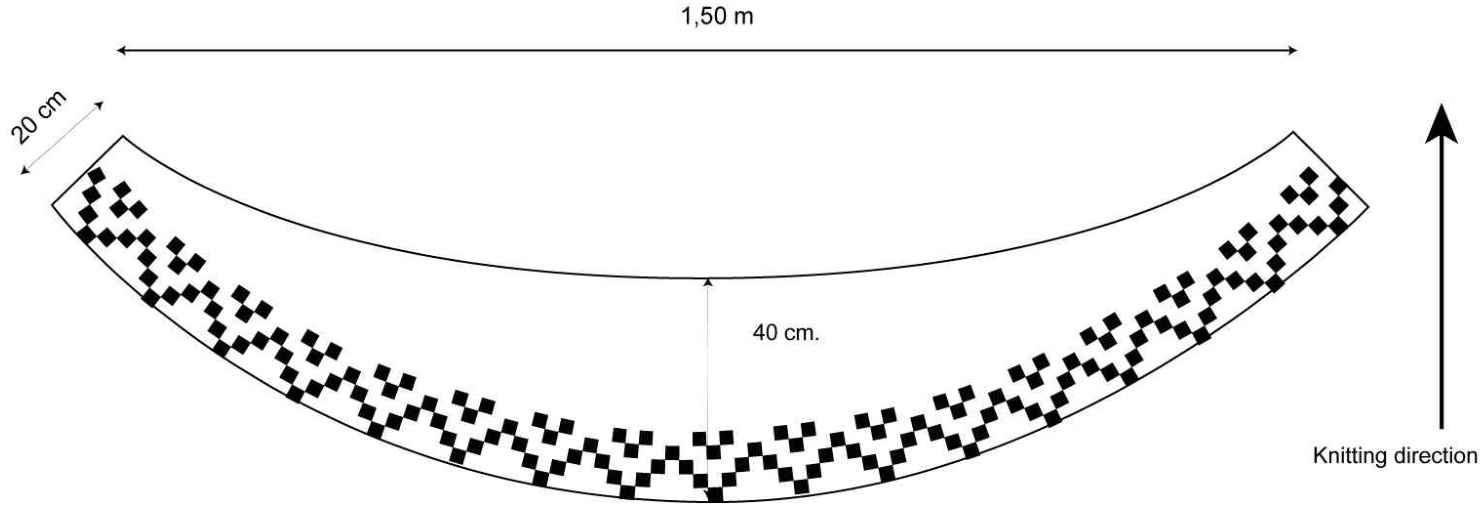
Level of difficulty: advanced begginer Finished measurments after blocking: 40 cm. (16") width in the central point and 1,50 m. (59") lenght
Materials
2 balls of Class from AslanTrends (100g 3.5 oz / 55% Cotton 45% Viscose) colour 18 (stone grey) US8 / 5mm and US10 / 6mm circular 32" / 80cm (or longer) \*\* The larger needle is used only for casting on to ensure a loosely edge. 31 pearls or beads size 6 (optional); crochet hook: 0,75 mm. (optional) stitch markers, roost- proof pins and darning needles
Stitches
·Garter Stitch: knit every row ?Stockinet stitch : knit on right rows, purl on wrong rows ?Lace edge: see chart or written instruction. ?Turn = W&T RS (wrap and turn on the right side): 1. Keeping the yarn in back, slip the next stitch purlwise from the left needle to the right needle. 2. Bring the yarn forward as if to purl. 3. Slip the stitch from the right needle back to the left needle. 4. Bring the yarn to the back of the work as if to knit. 5. Turn the work so the purl side is facing you, ready to purl. W&T ws (wrap and turn on the wrong side) 1. Keeping the yarn in front, slip the next stitch purlwise from the left needleto the right needle. 2. Bring the yarn back as if to knit. 3. Slip the stitch from the right needle back to the left needle. 4. Bring the yarn to the front of the work as if to purl. 5. Turn the work so the knit side is facing you, ready to knit. Note: To avoid holes on your work, knit or purl the wrapper strand together with the knit or purl stitch.
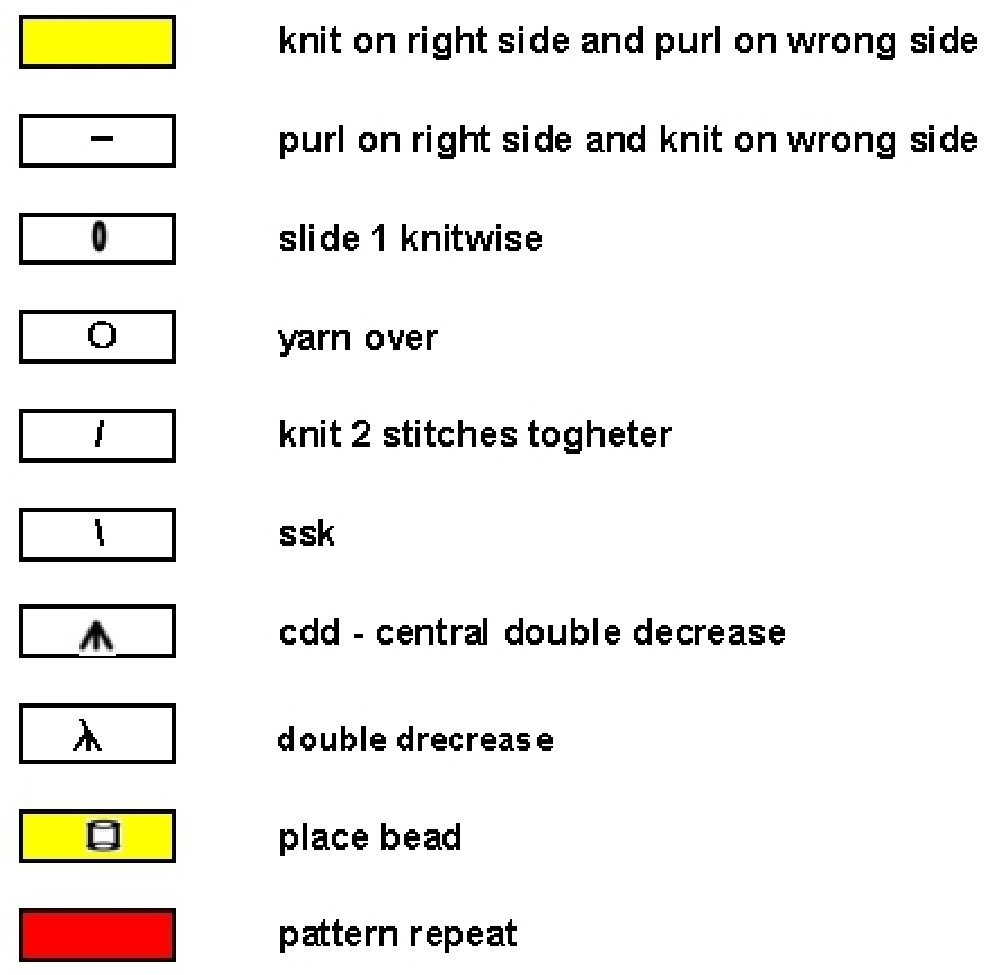
Abbreviations used in the pattern
k: knit; p: purl; yo.: yarn over; sts.: stitches, ssk: slip 2 stitches as if to knit, then knit those 2 stitches together ; k2tog.: knit two stitches together, cdd: central double decrease (slip 2 together, knit one, pass 2 slipped sts. over), double decrease: slip 1, knit 2tog., psso; p2tog: purl 2 stitches together.
Pattern Notes
The shawlette is knitted in one piece using circular knitting needle (back and forward) starting at the outside edge of the lace chart. The narrow curved shape is created by a set of short rows and decreases It might be easier to follow the lace pattern if you use stitch markers placed after each repeatition. For placing beads with the crochet hook, please take a look here. Read the chart from right to left. On the Rs, knit the stitches as shown on the chart. On the Ws, knit the stitches as they are shown (knit over knit and purl over purl). Purl the yarn over
Directions
With larger needle, loosely C0 355 sts. The larger needle is used only for casting on to ensure a loosely edge. Change for the smaller needle and work rows 1 - 34 of lace chart. At the end of chart 1 you may have 235 sts. on your needles. Next row: start the shapping with short rows as follows: ShortRows Note: “"Turning point" instructions refers to the point from the previous short row where the work was turned. Row 1 (rs): k125, turn work Row 2 (ws): p15, turn work Row 3 (rs): k14, ssk, k3, turn work Row 4 (ws): p17, p2tog, p3, turn work Row 5 (rs): k20, ssk, k3, turn to 1 st before last turning point, ssk, k3, turn work Row 6 (ws): p23, p2tog, p3, turn work Row 7: k until 1 st. before the last turning point, ssk, k3 Row 8: p until 1 st. before the last turning, p2tog, p3 Repeat rows 7-8 until you all stitches are knitted Knit 4 rows more and bind off.
Blocking
To enhance the shawl details: first pin along the longer edge, then pin along the centre and finally pin the other points. Remove the pins when the shawl is completely dry. Weave the ends
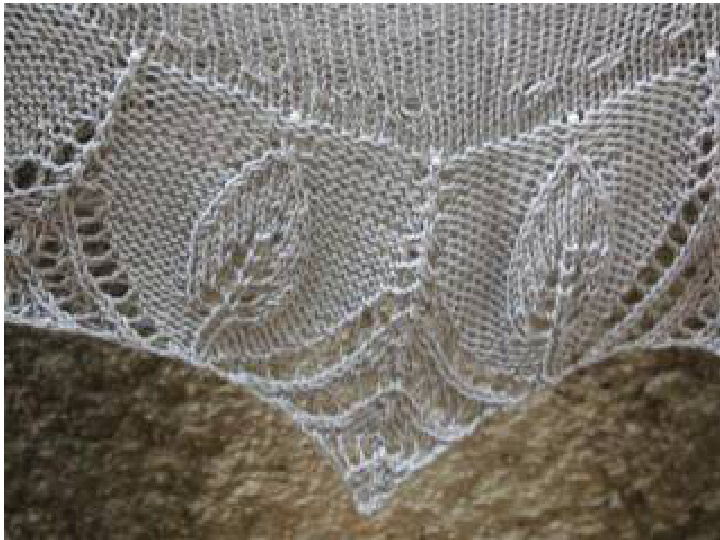
Edge detail with beads
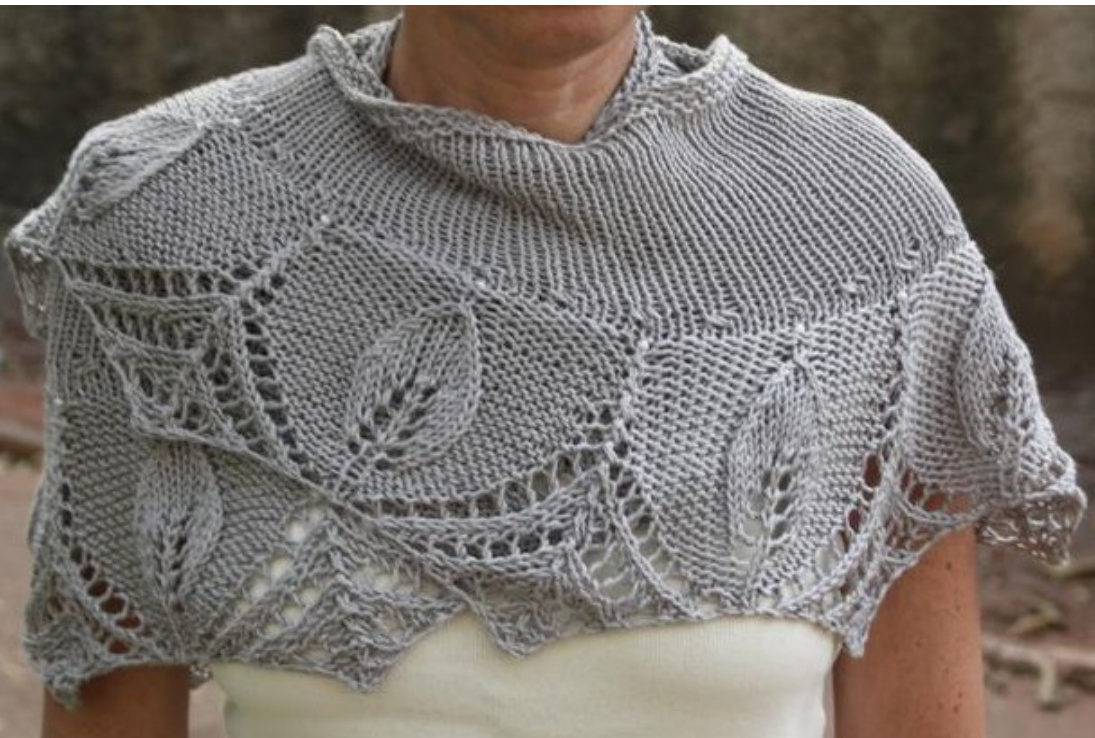
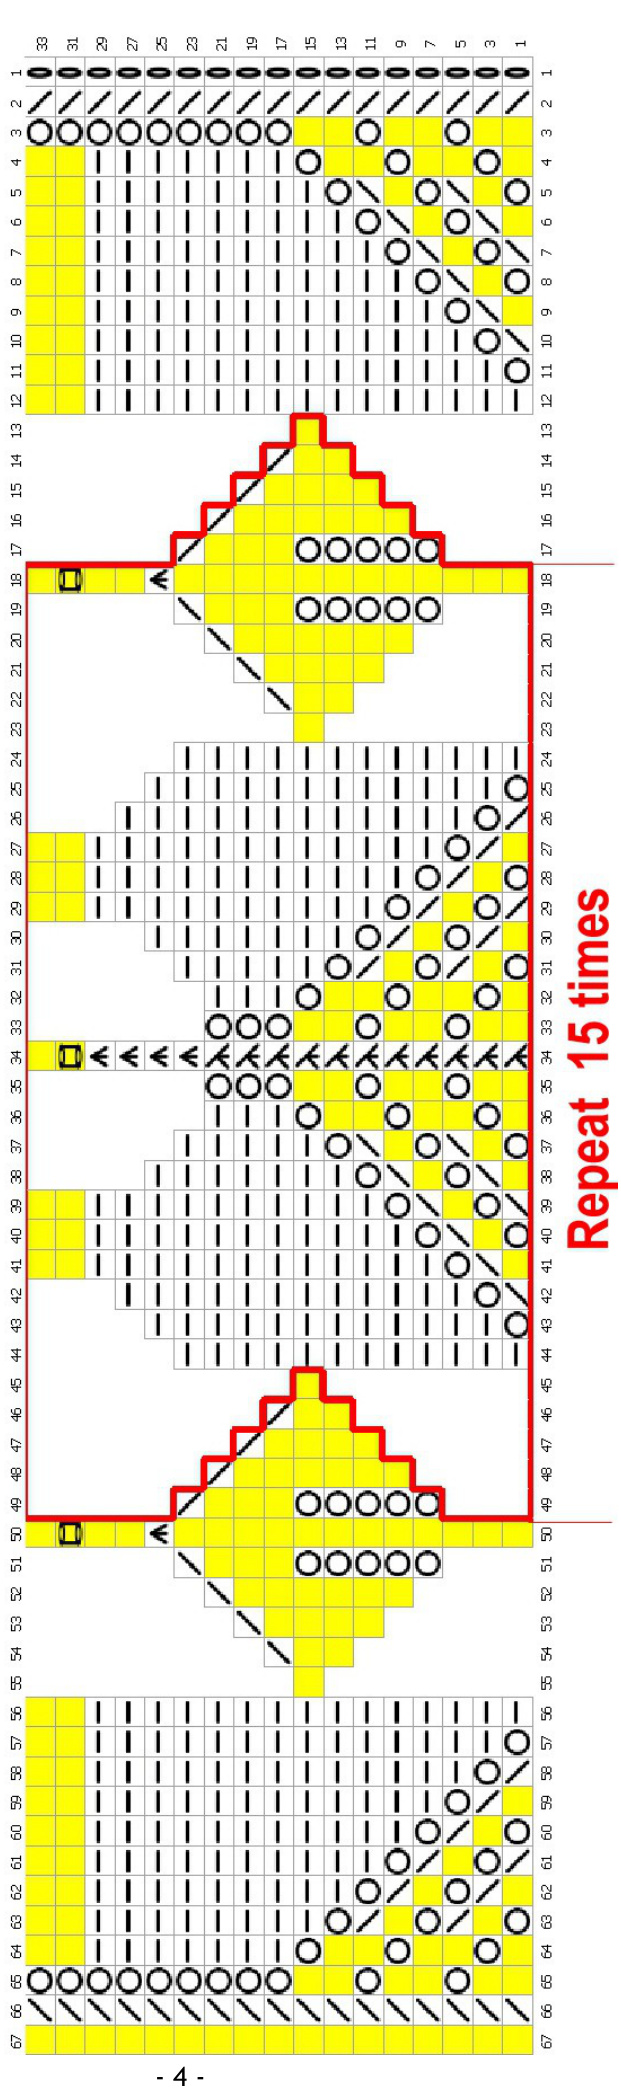
Chart key
Schematics
Final notes
You can change the size of your shawl by adding more or less repeats from the chart (22 sts. for the repeats + 25 stiches) These amount of repetitions should be an odd number. To knit a larger shawl cast on 17, 19, etc.. x 22 stitches for the repeats + 25 stitches (edges) To knit a smaller shawl cast on 13, 11, etc.. x 22 stitches for the repeats + 25 stitches (edges) To start the short rows shapping , after completing the chart, mark the center of the shawl, Knit 6 sts. after the central point, turn, purl 6 sts. after the central point, turn, and so, as explained before.


