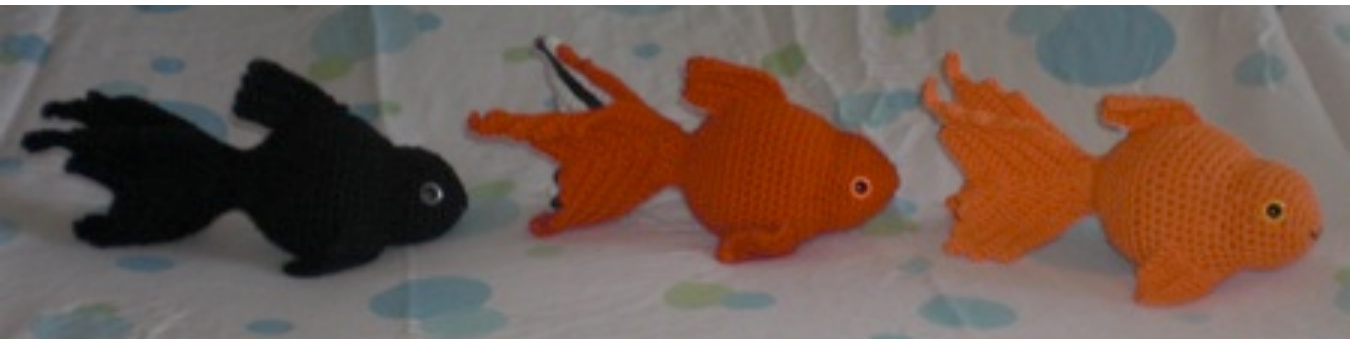
These fancy fantail goldfish work up quickly—-you may wind up with an aquarium's worth! Fantail goldfish come in a variety of colors, so experiment with hues like orange, black, white, yellow, and of course, gold. Play around and mix up your fin and body colors. Or make a fantasy fish in any color of the rainbow! You'll need... Approximately 85 yards of worsted weight yarn F hook Safety eyes, buttons, or scrap yarn in a contrasting color (for embroidered eyes) A small amount of embroidery floss (to sew on mouth) and a sewing needle Yarnneedle Stitch marker Fiber fill or other stuffing
BODY
The fish's body is worked continuously in the round. Use a stitch marker to keep track of your rounds. Round 1: crochet 6 sc in a magic ring Round 2: \* 2 sc in next st. Repeat from \* 6x. (12 sts) Round 3: \* sc 3, 2 sc in next st. Repeat from \* 3x. (15 sts) Round 4: \* sc 4, 2 sc in next st. Repeat from \* 3x. (18 sts) Round 5: \* sc 5, 2 sc in next st. Repeat from \* 3x. (21 sts) Round 6: \* sc 6, 2 sc in next st. Repeat from \* 3x. (24 sts) Round 7: \* sc 7, 2 sc in next st. Repeat from \* 3x. (27 sts) Round 8: \* sc 8, 2 sc in next st. Repeat from \* 3x. (30 sts) Round 9: \*sc 3, sc2tog. Repeat from \* 6x. (24 sts)
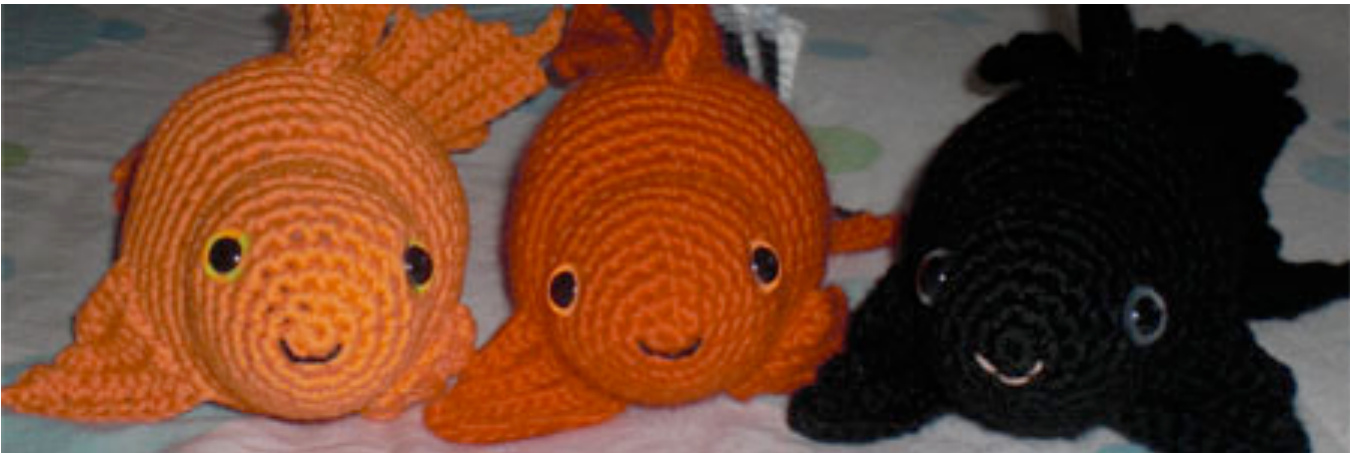
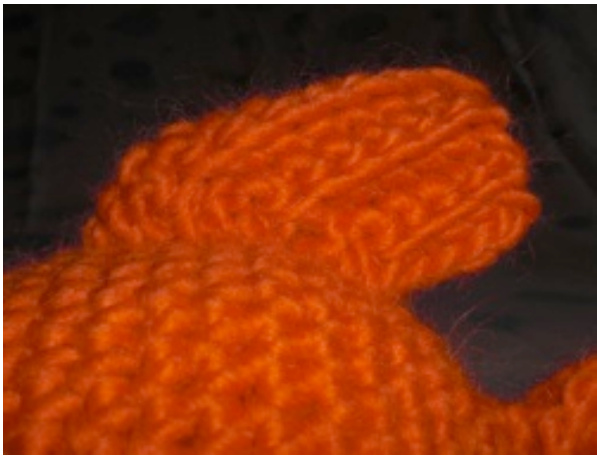
Round 10: sc around. (24 sts) Rows 9 and 10 define your fish's head. Pause here to make face. You can embroider eyes, affix safety eyes, or sew on buttons. Whichever you choose, they should sit around row 6 or so. Use embroidery floss to backstitch on a little mouth - I recommend a simple threestitch smile roughly following the contour of round 1 or 2. Use the photo below as a guide.
Round 11: \* sc 3, 2 sc in next st. Repeat from \* 6x. (30 sts) Round 12: \* sc 4, 2 sc in next st. Repeat from \* 6x. (36 sts) Round 12: \* sc 5, 2 sc in next st. Repeat from \* 6x. (42 sts) Work even for 8 rows to form fish's body. Rounds 13-20: sc around (42 sts) Pause here to attach eyes and sew on mouth, then stuff. Round 21: \*sc 5, sc2tog. Repeat from \* 6x. (36 sts) Round 22: \*sc 4, sc2tog. Repeat from \* 6x. (30 sts) Round 23: \*sc 3, sc2tog. Repeat from \* 6x. (24 sts) Round 24: \*sc 6, sc2tog. Repeat from \* 3x. (21 sts) Round 25: \*sc 5, sc2tog. Repeat from \* 3x. (18 sts) Round 26: \*sc 4, sc2tog. Repeat from \* 3x. (15 sts) Round 27: \*sc 3, sc2tog. Repeat from \* 3x. (12 sts) Finish stuffing. Rounds 28-30: sc around. (12 sts) Fasten off and sew closed, leaving a long yarn tail hanging.
FINS
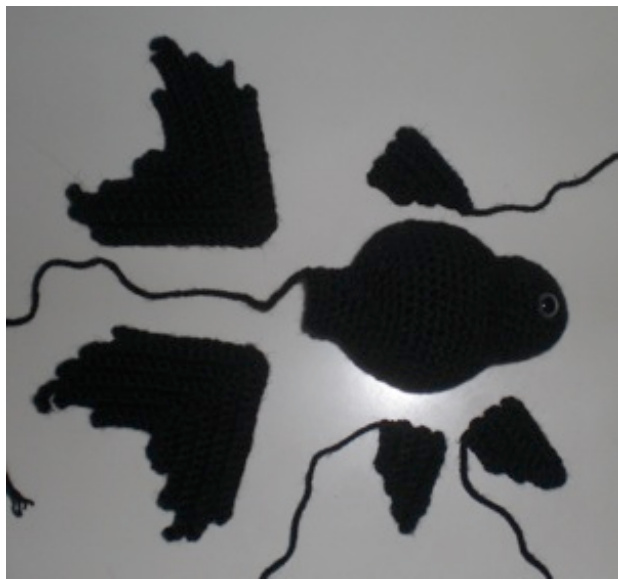
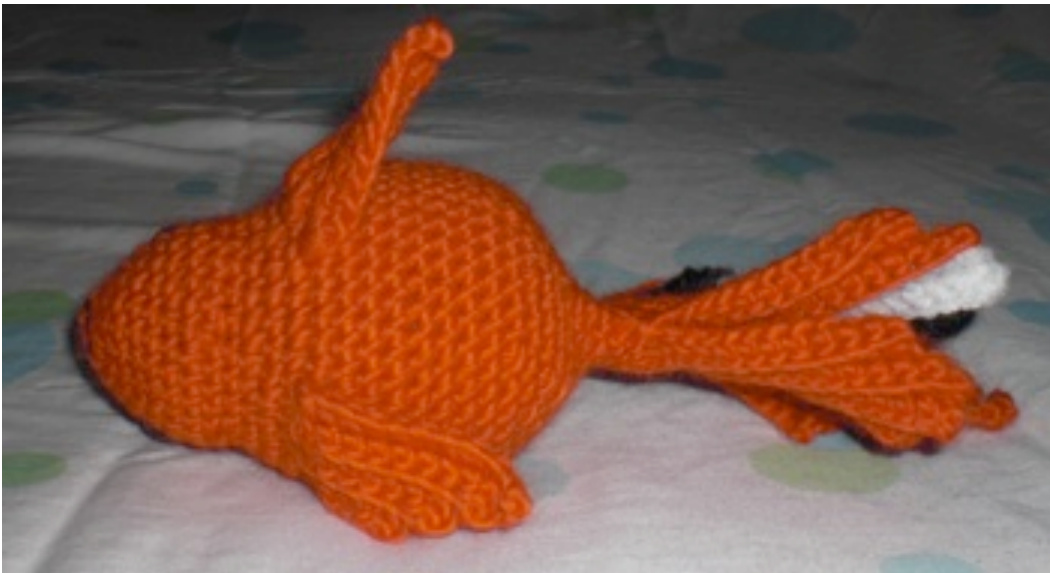
All of the fins are worked back and forth in rows of sc, working in the back loop only (blo). Ch 1 for a turning chain at the beginning of each row, working your first sc in the same stitch as the turning ch. Turning ch does not count as a sc. The photo above shows all the fins you are about to make next to a completed boc
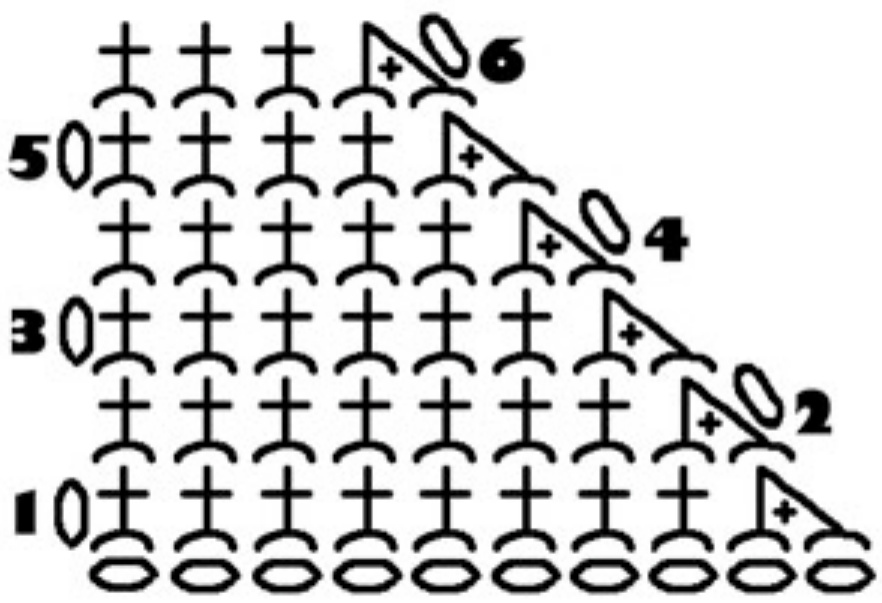
FINS (MAKE 3)
The top fin and the pectoral fins are all worked in the same way. The decreases (sc2tog) will cause your rows slant to one side, making the fish's fins diagonally ribbed. For the first one, leave a tail for sewing at the beginning of your work, and weave in your tail at the end. This one will be the top fin. For the other two, leave a yarn tail for sewing after you fasten off, and weave in the other end. These will be your pectoral/side fins. I have given written instructions as well as a chart - even if you don't use the chart, it can be helpful to visualize what you're making! See assembly instructions below for how to sew them on to your fish's body. Ch 10. Working in blo, Row 1: Ch 1, sc 8, sc2tog. Turn. Row 2: Ch 1, sc2tog, sc 7. Turn. Row 3: Ch 1, sc 6, sc2tog. Turn. Row 4: Ch 1, sc2tog, sc 5. Turn. Row 5: Ch 1, sc 4, sc2tog. Turn. Row 6: Ch 1, sc2tog, sc 3. Fasten off.
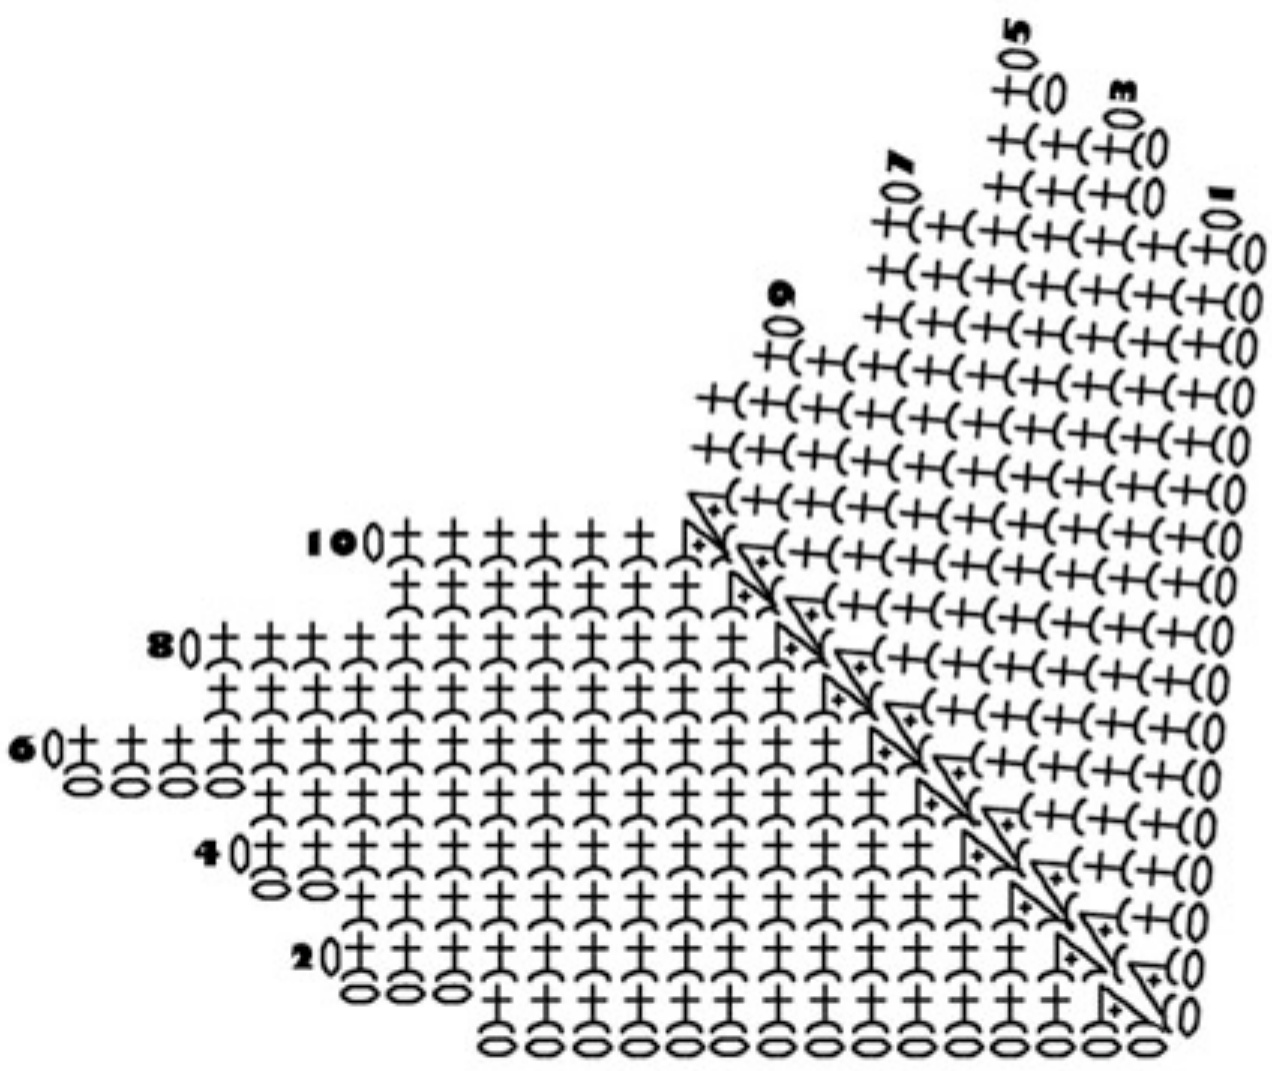
TAIL FIN (MAKE 2)
For a true fantail goldfish, you need to make two of these! If you want a less fancy fish, you can go ahead and just make one... but if you've got two it's much easier to prop up and pose your fish. And I promise, these aren't as scary or complicated as they might look at first. I have given written instructions for these below, as well as a chart on the next page. The tail fins are worked similarly to a chevron afghan - the pairs of decreases (sc2tog) at the center of each row will make your work form a "v" shape, giving the fish's tail its shape. Ch 32. Working in blo, Row 1: Ch 1, sc 15, sc2tog twice, sc 13, ch 3. Turn work. Row 2: Ch 1, sc 15, sc2tog twice, sc 14, ch 2. Turn work. Row 3: Ch 1, sc 15, sc2tog twice, sc 14, ch 2. Turn work. Row 4: Ch 1, sc 15, sc2tog twice, sc 14, ch 1. Turn work. Row 5: Ch 1, sc 14, sc2tog twice, sc 14, ch 4. Turn work. Row 6: Ch 1, sc 17, sc2tog twice, sc 10. Leave remaining stitches unworked. Turn work. Row 7: Ch 1, sc 9, sc2tog twice, sc 13. Leave remaining stitches unworked. Turn work. Row 8: Ch 1, sc 12, sc2tog twice, sc 5. Leave remaining stitches unworked. Turn work. Row 9: Ch 1, sc 4, sc2tog twice, sc 7. Leave remaining stitches unworked. Turn work. Row 10: Ch 1, sc 6, sc2tog twice, sc 2. Leave remaining stitch unworked. Turn work. Fasten off and weave in yarn ends.
ASSEMBLY
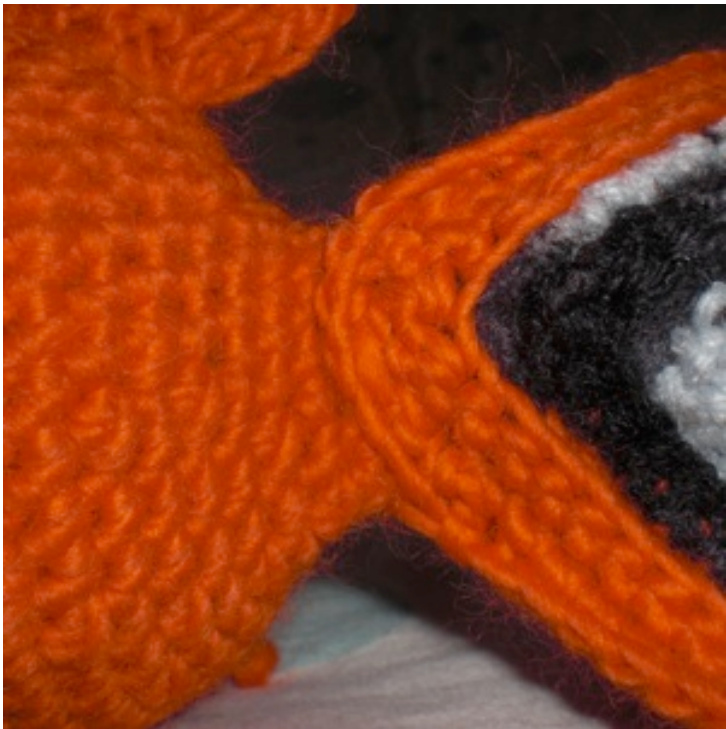
Using yarn tail, whipstitch the top fin along its slanted edge (the edge where you've made your decreases-the one with 2, 4, and 6 next to it on the previous page's chart) to the fish's body, around rows 15 to 20. It should sit perpendicular to the fish's face, and in a straight line with its tail. See photo on next page. Using yarn tails, whipstitch each of the side fins into place along their straight edges (the edge across from your decreases—the one with rows 1, 3, and 5 labeled next to it on the chart). These should sit around rows 12-17 of the body, with the front edge of the fin just about in line with the bottom of the fish's head. See photo on next page. Sew the fish's tail fins to the little stump made at the back end of the body by rows 27-30. Place both tail fins on the outside of the stump, aligned with one another (so one willhave its RS facing out, the other the WS - not that we're really keeping track of such things). Stitch the tail fins to the stump, working through both fins as well as the stump. Using a backstitch for this will hide your stitching amongst your crochet. You should also make a few stitches around both fins just above and below the stump - this will make the tail fins fan out more as well as concealing the stump. See photo on next page. Weave in any last loose ends from sewing, and your fish is ready to swim! Assembly photos...
Above: Detail of top fin Right: Detail of tail fin attachment—the tail can point straight like an arrow toward your fish's nose, or you can have the upper fin be slightly horizontal for a drooping tail.
Left: Placement for side fins. I hate how the fish looks like he's ailing in this picture— don't worry, he's fine!
Hope you like your new friend!