Unspun yarn felted beret Design and pattern instructions ? 2013 Elena Berezinskaya Translation from the Russian ⊙ 2013 Katharina Sokiran
Felted beret from un-spun yarn by Elena Berezinskaya
So many people do knit beautiful shawls, wraps and shawlettes from gradient yarn. But what to wear them with? With a color-coordinated beret, of course!
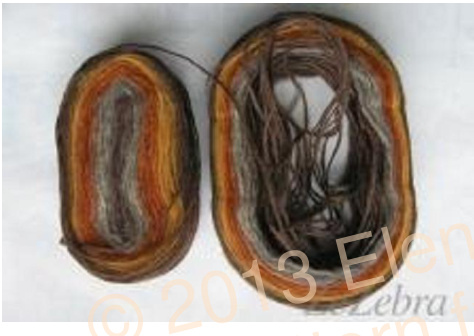
A simple felted beret in plain stockinette does not only enhance the beauty of any shawl but will look nice worn just by itself, too. Felting will cover up any irregularities in the knit fabric and other minor infractions so that the resulting beret will be a long way from the dreaded “homemade' look. The yarn amount needed is minimal - just 50-80 grams (1.8 to 2.8 ounces), depending on the size of your beret. Im my search for the ideal beret, I used up many an ounce of yarn, spun and un-spun, made a lot of mistakes and also had to send a few unfortunate “pancakes” away to serve as sauna hats. Today, I would like to tell you how to make such a beret from un-spun 2-ply yarr 1. It all started with a 110 gram spool of un-spun thin grey-orange yarn. The beret used up just 70 grams of it

2. There are two repeating color sections within the spool, so we are dividing the spool into two halves before we start. Reach into the center of the brown section and pull out the center portion of the spool as seen here. It's hard to do this neatly, some yarn will always spill in the process. Don't worry about how it looks, the main thing is to pull it out slowly and accurately to avoid tangles.
Unspun yarn felted beret Design and pattern instructions ? 2013 Elena Berezinskaya Translation from the Russian ⊙ 2013 Katharina Sokiran
When we start knitting, we'll carefully straighten out the stray strands, trying to avoid jerky tugging. This way, the yarn won't break.
3. After this, we slightly smooth the yarn. I started to knit from the center of the spool because ] wanted my beret to begin with a brown section. You can start from the outside as well if the color repeats suit you better that way. Which wat you start doesn't matter, but both ends have to be turned the same direction.M To cast on, I used nickel-plated 3.5 mm Addi circulars. 50 cm long.
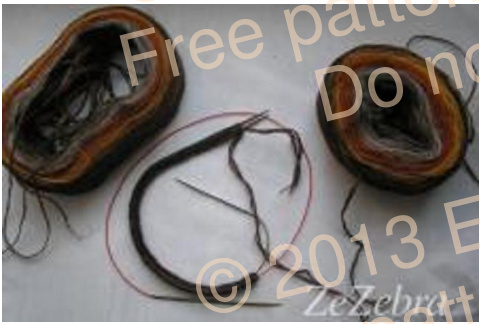
Short circulars are hard to fold in half for casting on, much easier will be using an additional second circular (shown in photo with red cable) for the cast-on. on, remove additional circular (here with red cable), join to round on short circula the beret in stockinette stitch rounds as shown at the end of the pattern instructions
5. When there are not enough stitches left any more to comfortably fit the circular, change to DPNs, or to longer (100 - 120 cm) circulars, using the magic loop technique: Divide stitches into two equal portions, knit in the round, first the first half of, then the other. The long circular is forming two loops, which in turn are dividing the knitting into two sections.
Unspun yarn felted beret Design and pattern instructions 2013 Elena Berezinskaya Translation from the Russian ⊙ 2013 Katharina Sokiran
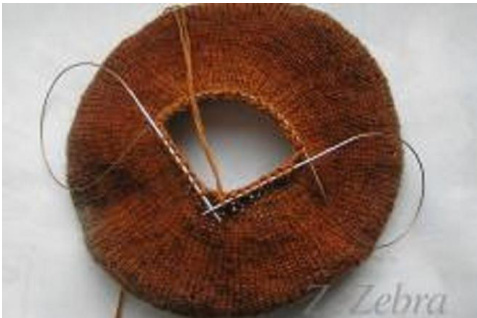
6. What is the most important part in a beret? Its spiffy tail or elegant point, of course! This is not hard to accomplish. from When there are only 9 sts left on the needles, work as follows: (k2to, k1)\* - repeat 3 times. 6 sts are left. Gather all 6 sts on a short circular as seen in the picture:
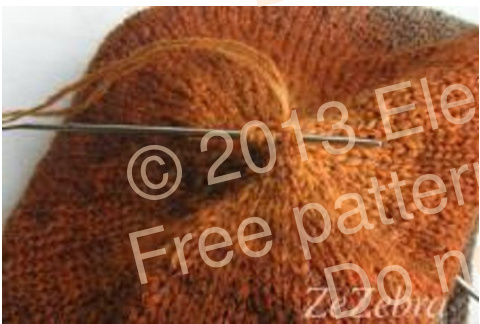
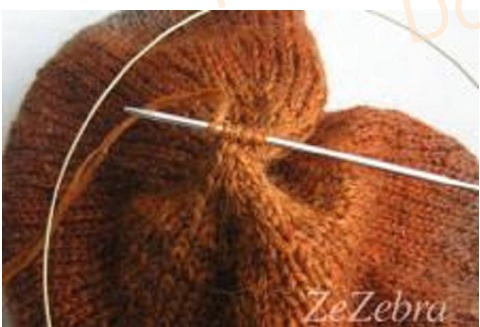
7. The point works up really fast - just work a 6-stitch-i-cord over 6 rounds. U1 Do not bind off. Pull tail through remaining 6 sts, but not too hard to avoid breaking the yarn. Use a crochet hook to pull the end inside the cord.
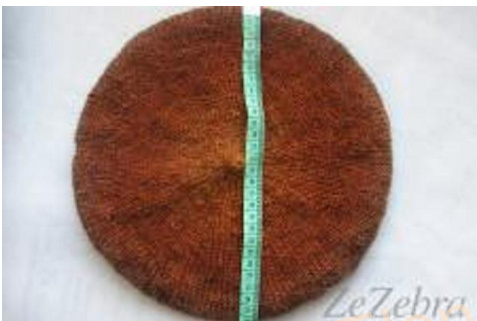
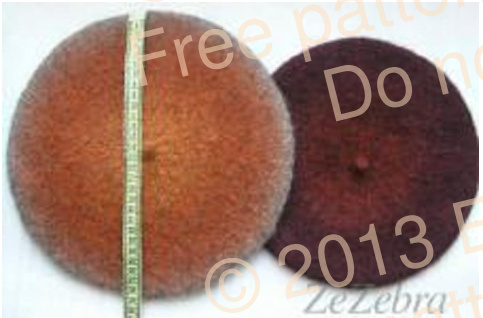
8. This is what we've got so far: Flat round berets with a tiny tail, diameter before felting 28 cm (11 inches).
Unspun yarn felted beret Design and pattern instructions 2013 Elena Berezinskaya Translation from the Russian ⊙ 2013 Katharina Sokiran
9. For comparison, let's have a look at a second beret in Red 8/2 yarn, before felting. Note the gauge, the diameter for both berets is identical before felting.
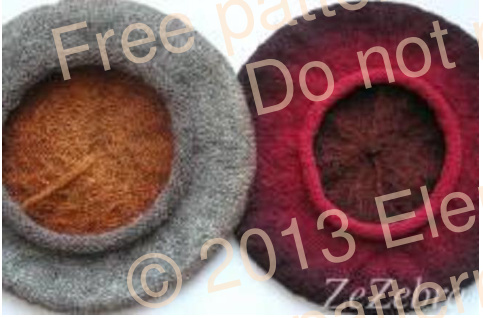
10. This picture was taken after one round in the wool cycle of the washing machine. The diameter of the berets has not changed, neither the one from un-spun yarn, nor the one from ready-to-use 8/2 yarn. Just the fibers turned fluffier. Ravd

11. Now the most important thing is going to take place. Let's start felting! Felting by hand takes a long time and is not very pleasant for one's hands, but it gives more precise control over the shrinkage. I usually felt berets in the washing machine using a regular (not wool) cycle with regular (not wool) detergent at 40°C = 104°F and 800 revolutions per minute. The berets from 8/2 yarn did felt just a litle bit, but the one from un-spun turned into the most fluffy thing.
Unspun yarn felted beret Design and pattern instructions ? 2013 Elena Berezinskaya Translation from the Russian @ 2013 Katharina Sokiran
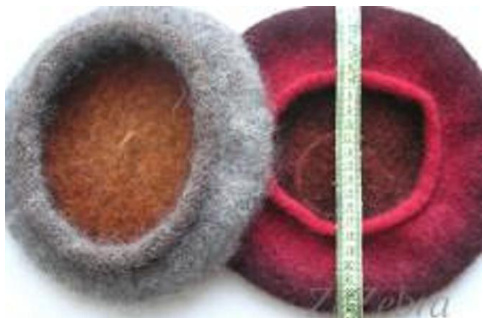
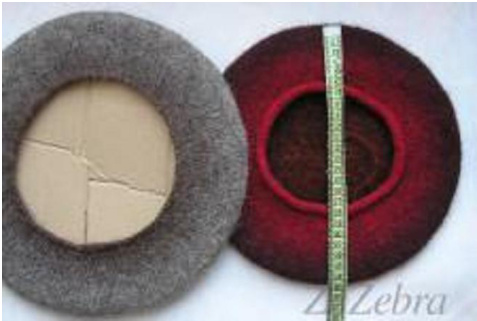
Please excuse the rather unfocused picture. When I retrieved the berets from the washing machine, I hurried and forgot to check whether the photo I had taken was indeed good enough or to take additional ones just in case.r Nn The most important thing can be seen: The diameter of the 8/2 yarn beret changed to 24 cm, while the diameter of the un-spun yarn beret turned out significantly less than that. 12. There is indeed good reason to hurry up - while the beret is still wet, it has to be put into shape by be pulled over a cardboard template. This template can be prepared while the beret is tumbling in the washing machine. Raven To accommodate a head circumference of 58 cm, I prepared a corrugated cardboard template with a diameter of 28 cm. YO-Ol
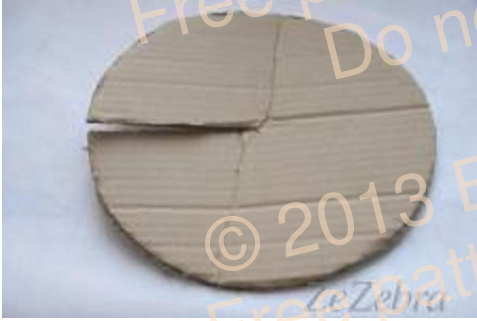
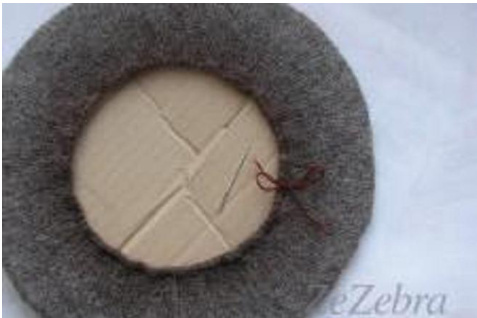
on and the bends in the circle will make it easier to insert the template into the bere When you follow the usual advice and try to pull the beret over a dinner plate or saucepan lid, the brim gets stretched out too much. Even if you now smooth out the stitches - upon removing the plate, it'll get stretched out again. 13. Stretching out the beret. Right after removing it from the washing machine, we pull our beret over the cardboard template. This has to be done somewhat forcefully since it will not be very compliant! 14. While being pulled over the cardboard, the opening of the beret gets stretched out a great deal. This has to be reversed by gathering the rim stitches onto a piece of non-stretchable waste yarn and pulling it tight.
Unspun yarn felted beret Design and pattern instructions 2013 Elena Berezinskaya Translation from the Russian ⊙ 2013 Katharina Sokiran
The beret in this picture was knitted with almost no rim at all and did therefore stretch out a lot when being pulled over the template.n A beret with a higher rimmight stretch out less, and perhaps may not require any threading and pulling of the rim stitches at all. Lro-OUN 14. Let the beret dry! The un-spun yarn beret is left to dry on the cardboard circle, but the other one from 8/2 yarn I need just as is (small, with a tiny rim). Raven
15. The berets have dried, and the thread used to tighten the rim stitches may now be removed. Fold the cardboard inside the beret, taking care not to re-stretch the opening of the beret.
Why did they turn out so different? The un-spun yarn beret was made for a head circumference of 58 cm, entirely rimless. The red one from 8/2 yarn was made for a head circumference of 56 cm, with a small rim added and turned out intentionally smaller.
Unspun yarn felted beret Design and pattern instructions ? 2013 Elena Berezinskaya Translation from the Russian ? 2013 Katharina Sokiran
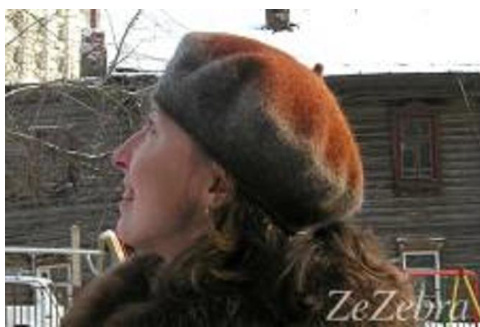
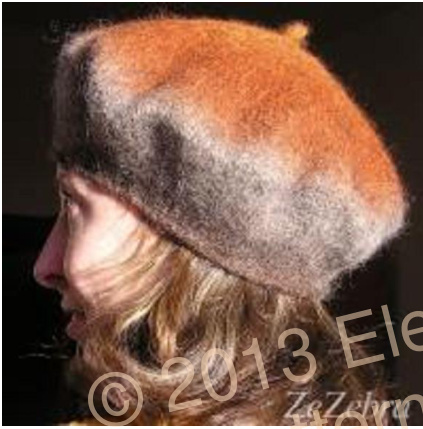
16. Here is the finished beret.
Important tips:
1. Cast on exactly as many stitches as you would have for a non-felted beret according to gauge and head circumference but deducting a little for the stretch. You don't need to cast on more because it will be felted. The opening of the beret will not shrink that much, and it has to be stretched out a little for a snug fit. It is much easier to stretch it out later than to tighten it! 2. A nice flat crown is achieved by increasing/decreasing 9 sts in every other round. The most important thing is not to place the increases/decreases atop of each other to avoid creating a polygon shape instead of a smooth circle. All increases and decreases have to be staggered to hide them in the knitted fabric and make the beret as round as possible. 3. Un-spun yarn will shrink significantly more with felting than spun yarn. A beret from un-spun will be thicker and warmer, and less yardage will be needed than with a beret from regular yarn. 4. Don't be afraid that the colors from both ends of the spool won't match. The color sections should be of equal length. If one of the color in one portion has changed earlier than in the other, you can always break the yarn and take out a small section from the second portion until colors match up again. You won't need a pharmacist's precision for matching colors! The extra long color sections will gloss over any small discrepancies, especially after felting and re-felting. 5. It is not necessary to divide the spool of un-spun exactly in the middle. It can be broken in any place, depending on what color will look best for the rim. For an average beret, 2.5 to 3 color sections are usually needed. For tri-colored yarns, there will be 3 repeats of the whole section per spool. In this case, divide in any spot with your preferred color.
Pattern instructions:
You will need: thin un-spun Aade Long (or Kauni) Needles and other tools: - 3.5 mm (US 4) Addi nickel-plated circular knitting needle, 50 cm (20 inch) long. - 3.5 mm (US 4) Addi nickel-plated circular knitting needle, 100 cm (40 inch) long. - Tapestry needle or crochet hook for weaving in ends. - Optional: Stitch markers (for marking the beginning of the round), row counter Gauge: 20 sts x 26 rows =10x10 cm (2.5 x 2.5 inches) in stockinette Head circumference: 58 (56) cm (numbers for 56 cm in parenthesis) 1. Rim For head circumference 58 cm, with shorter circular, cast on 86 sts, join to round and knit 6 rows in stockinette stitch. from In row 6, (M1) 4 times throughout round, equally distributed = 90 sts in all (divisible by 9) For head circumference 56 cm, with shorter circular, cast on 81 sts, join to round and knit 6 rows in stockinette stitch. vn7inSr The rim is finished, now we are going to widen it by adding increases. 2. Increases - 20 rounds For an ideal beret, increase by 9 sts in odd-numbered rounds (=every other round), evenly spaced throughout the round. Increases are worked as M1-ktbl (lift the bar between the st on the RN you just worked and the st on the LN that is going to be next and knit through the back of this newly formed loop). Continue increasing every other round until you have 180 sts (171 for the smaller size). ttern .hlish. Please note: The M1 increases have to be knit through the back loop to avoid holes. For an even and ideally round beret, avoid placing increases on top of each other and stagger them instead. In even-numbered rounds, work even in stockinette.
3. Four rows of stockinette.
4. Crown decreases - 37 rounds (35 rounds for smaller size)
For the crown decreases, decrease by 9 sts, evenly spaced, in every other round (the decreases have to be staggered, they should not sit atop of each other), until there are only 9 sts left. Even rounds: stockinette When there are only 9 sts left, the last rounds doesn't have to be worked in stockinette stitch any more, proceed directly to working the point instead.
5. Knitting the point -- 7 rounds
At the very end, when there are only 9 sts left on the needles, work as follows: (k2to, k1)\* -- repeat 3 times. 6 sts are left. Gather all 6 sts on a short circular and knit a 6 stitch i-cord over 6 rounds.
Unspun yarn felted beret Design and pattern instructions 2013 Elena Berezinskaya Translation from the Russian ⊙ 2013 Katharina Sokiran
6. Finishing
Break the yarn, leaving a 6-7 cm (2 to 3 in) tail. Do not bind off. Pull ending tail through remaining 6 sts, but not too hard to avoid breaking the yarn. Use a crochet hook to pull the end inside the cord. Don't forget to weave in the beginning tail, too, otherwise it would become thick and fluffy from felting and hard to weave in later. The knitting is all done, ready for felting now! Measurements for the corrugated cardboard template: Template 28 cm diameter for head circumference 58 cm Template 26-27 cm diameter for head circumference 56 cm Still having questions? Want to make a comment? Visit my thread on the “Osinka” forum. Successful knitting and best wishes, Elena Berezinskaya, paiiy re-p Proprietress of the “Green Zebra” internet store See you with the next beret, from 8/2 yarn.


