Rose and Heart Mitten
by alaskagirlknits! A good friend is like a rare rose, something to be cherished. My good friend was having surgery, and I had just finished a pair of mittens for another friend, that she thought they were lovely. I decided to make a pair for her. We picked a lovely mitten; the problem was, the part she liked was on the cuff, not the mitten itself. So, a new pattern was created, Rose and Heart Mitten, a gift made to celebrate true friendship.
Skill Level - moderate to expert; colorwork/stranded; working in the round.
Materials:
Needles - US 2 (2.75mm) and US 3 (3.25mm) DPN's and 16 in circulars, or 40 in circulars, if use magic loop method. Yarn - worsted weight 100% wool yarn. Misc - stitch markers, row counter, tapestry needle Gauge - 28 st x 34 rows \~ 4 inches in pattern in the round. Adjust needles or yarn to get required gauge or to adjust size.
Inspiration Location: Homer Spit, Alaska
Can you see the Invisible Thumb?
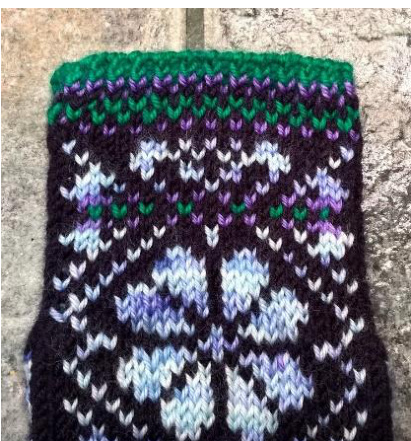
Cuff, flower, hearts detail C/O 5 st with Color A using the backward loop method. Produce a band of stockinette by knitting across 2 st with Color A, 1 st Color B (leaving a 3-4 inch tail), ending with 2 st Color A, and purling back a total of 18 rows maintaining the color stripe. At color changes bring new color under old, and consider trapping the color on the knit side to keep it stable). nit row, begin knitting in the round; this will also be Row 1 0 Round 1 - With Color A, and using additional DPN's, pick up and knit from the edge of your strip 9 st. Then, continuing to maintain the color stripe (use the Color B tail for the first set up band st on this round only), knit up the 5 st from the bottom of the band. Then pick up and knit 9 st from the other edge; then knit the final 5 band st. and set a Marker to show the beginning of your rounds. (28 st in the round) Continue chart, working in the round. Change colors at your discretion, or use chart for a guide. Pick up and knit 1 stitch using the first and last band st, at the beginning and end of each row at locations shown. Switch to a circular needle if preferred once there are enough stitches. I switched to magic loop method after the increases were completed. Round 10 - When increases are completed, decrease the band to 3 st by k2tog, k1, ssk. When reach the "crotch" of the thumb (for the hand of the person you are making these for), make a black mark across the first 12 st to indicate where to place the thumb; count down at least 14+ rows and make a 2nd mark. My marks are shown as an example. This area marks the pattern for your thumb. Most folks should plan for a 2+ inch thumb. Adjust length as needed. The last 12 st of the same row will be where to insert the thumb for your other mitten. \*\*\*\*\*\*\*\*
Knit the thumb(s):
Cast on - With Color A, using the figure 8 method, 6 st onto each of 2 DPN's, 12 st total. Round1a - knit Round 2a - k1, m1 (12 st each DPN; 24 st total) Round 3a - knit Begin pattern Rows previously marked for thumb with 12 st on each DPN. Work first 12 pattern st Right to Left, the second 12 st Left to Right. When you have completed the thumb, leave it on two DPN's, leaving a long tail. To prevent the color jog which will occur when using the last 12 stitch block for the 2nd mitten's thumb, use the same 12 stitch block as for the first thumb. When you are ready to insert the thumb for the 2nd mitten, flip it over and insert it using scrap yarn. Makes it much easier to make the thumb too! Inserting the thumb: For the left mitten: Put the first 12 pattern stitches of the mitten on a DPN (i.e. no band stitches). Put the thumb on its DPN's next to it, oriented as it will be once inserted. With Color A and another DPN, do a 3-needle bind off across the 12 mitten stitches and the inside 12 thumb stitches. Leave a tail to close gaps once completed. Now replace the bound off mitten stitches with the 12 outer thumb stitches to your working needle. Resume working in the round to the top of the chart. For the right mitten: Do similar as for left mitten, but put the last 12 pattern stitches of the mitten on a DPN. The thumb will have to be flipped over so that the thumb pattern matches the mitten pattern. Working the last 12 stitches will require slipping stitches around on your needles to get them set up correctly. Once complete, resume working in the round to the top of the chart. \*\*\*\*\*\*\*\* Row 34 - Decrease away band. K2tog last pattern st with first band st, knit center st, ssk last band st with first band st. Repeat on other side. Row 35 - K2tog last pattern st with remaining band st. Row 46 - increase to US 3 (3.25mm) Row 61 - return to US 2 (2.75mm) Row 71 - using last pattern st, M1 (this makes the pattern and the ribbing symmetrical (better than a decrease does). Bind off with a 3 needle bind off. Using yarn tails, close any gaps at thumb insertions. Notes: - made each mitten to where thumb would be inserted, set aside the mitten, and knit the thumb and inserted it. - These mittens are meant to be form fitting with no liner. To make the mitten fit better and slide on easier, after inserting the thumb, went up a needle size to a US 3 (3.25mm) at row 46; row 61, back to US 2 (2.75mm) This pattern was inspired by Anna Zilboorg's Magnificent Mitten's and Socks. This pattern has some minor differences in construction that should be easily understood by knitters who have made a pair of mttens previously, and is offered for free. For knitters new to making mittens, for a comprehensive tutorial on the techniques used to construct these mittens, to fully understand the techniques used, and for multiple beautiful colorwork patterns, please consider purchasing Anna's book. It is a great book!
Rose and Heart Mitten
StitchGlossary k-knit. k2tog-knit 2stitchestogether. k-tbl-knit throughthebackloop,createsatwistedst. p-purl. ssk-slip2stitchesknitwisethenknit slippedstitchestogether. 3029282726252423222120191817161514131211109876543 2 1