Chicago Flag Baby Hat
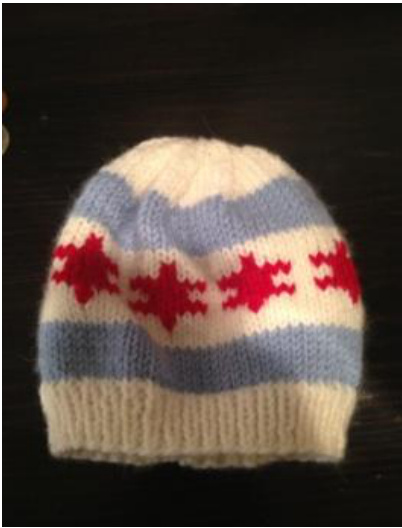
knitting pattern by Sonia Wilson soniawilsonknits@gmail.com This hat is a great way to welcome a new Chicago baby or send some Chicago love to someone far away! Chicagoans have a lot of pride in their flag, and few city flags are as pretty (and fun to knit!) or as recognizable as Chicago's. This hat is knit in the round, and you may learn some Chicago flag facts as you follow this pattern. Simple yarn changes are used to create the white and blue stripes in the hat, and the stars are made with duplicate stitch.
Sizes:
To fit sizes 0-3 (6-12) months Finished dimensions: Vhen laid flat, approximately 12 (13.5) inches in circumference and 6.5 (7) inches ta
Gauge:
In stockinette, 4 inches = 24 stitches across and 30 rounds (6 stitches per inch)

Materials:
100 yards white worsted weight yarn, such as Cascade 220 Superwash in 871 White 40 yards light blue worsted weight yarn, such as Cascade 220 Superwash in 897 Baby Denim 6 yards red sport weight yarn, such as Cascade 220 Sport in 809 Really Red Size 3 and 5 DPNs, or size needed to obtain gauge Tapestry needle for duplicate stitch and finishing
Instructions for body of hat:
CO 72 (80) sts with smaller needles and white yarn. Divide stitches onto 3 DPNs and join for working in the round, being careful not to twist your stitches. Work 9 (10) rounds in kl, pl rib. This is the bottom white stripe on the flag, which represents the south side of the city. Next, switch to blue yarn and larger needles. You'll use the larger needles for the remainder of the hat. Work in stockinette for 6 (7) rounds to create the lower blue stripe of the flag. This stripe represents the south branch of the Chicago River as well as the canal that links the Great Lakes to the Mississippi River. Switch back to the white yarn. Work 14 (15) rounds in stockinette. NOTE: in round 4 of this section, place a clip marker (a safety pin or piece of waste yarn will also work) through the 23rd (25th) stitch. (Do NOT place this marker on the knitting needle like you would normally do—this marker will show you where to begin the bottom of the right-most star in the chart, so the marker should stay on this stitch in the fourth round for now. In the charts that follow, the marked stitch is highlighted.) This large middle section of the hat represents the west side of Chicago. Switch back to the blue yarn. Work 6 (7) rounds in stockinette. The upper blue stripe represents Lake Michigan and the north branch of the Chicago River. Switch back to the white yarn to begin the crown decreases. The uppermost white stripe on the flag represents the north side of the city, and the crown decreases form the corresponding part of the hat: Crown round 1: k all sts Crown round 2: \*k6, k2tog\*; repeat from \* to \* until end of round Crown round 3: k all sts Crown round 4: \*k5, k2tog\*; repeat from \* to \* until end of round Crown round 5: k all sts Crown round 6: \*k4, k2tog\*; repeat from \* to \* until end of round Crown round 7: k all sts Crown round 8: \*k3, k2tog\*; repeat from \* to \* until end of round Crown round 9: k all sts Crown round 10: \*k2, k2tog\*; repeat from \* to \* until end of round Crown round 11: k all sts Crown round 12: \*k1, k2tog\*; repeat from \* to \* until end of round Crown round 13: k all sts Crown round 14: \*k2tog\*; repeat from \* to \* until end of round Crown round 15: k all sts
To seam the top of the hat, cut a tail of about 8 inches. Thread the tail onto a tapestry needle and pull through remaining (9, 10) stitches. Tighten up and pul yarn through to the inside of the hat. Weave in ends to prepare for adding the stars. Now you're ready to use duplicate stitch to create the six-pointed stars that were designed specifically for the Chicago flag. T.E. Whalen created the flag design that won a 1917 contest and became the city's official flag. The original flag design had only two stars: one to represent the Chicago Fire, and one to represent the World's Fair. A star representing the Century of Progress Exposition was added in 1933, and a star representing Fort Dearborn was added to the flag in 1939. It's possible that additional stars may be added to the flag to commemorate important events—with duplicate stitch, it will be easy to add a fifth star to your hat!

Instructions for using duplicate stitch:
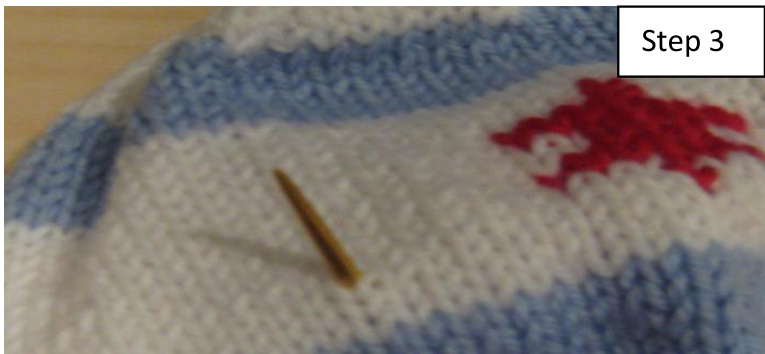
The big idea of duplicate stitch is to trace the shape of the existing stitches using a yarn-threaded tapestry needle, creating a top layer that is a different color than the background. Duplicate stitch makes iteasy to addcolortoworkthat has alreadybeenknit. Step 1: Thread a tapestry needle with about 3 feet of the red yarn. Step 2: In the middle white section of the hat, locate the stitch with the marker you placed. Step 3: Take your threaded tapestry needle from the inside of the hat to the outside of the hat, going through the stitch that is just below the bottom of the V of the marked stitch. Note: Chart showing marked stitch and other stitches is on last page.
Step 4: Pull the yarn through this stitch until only a tail of about 6 inches remains on the inside of the hat. marker. The (formerly) marked stitch is now the stitch directly above your red yari Step 6: Going from the bottom of the V that forms the marked stitch to the top left of that stitch, follow the left leg of the V. Note that the stitch continues to a loop that is hidden behind the V of the stitch above it. Step 7: Use the tapestry needle to trace the hidden loop from left to right by putting your tapestry needle (from left to right) under both legs of the stitch above the marked stitch, ending with the tapestry needle and yarn back on the outside of the hat.
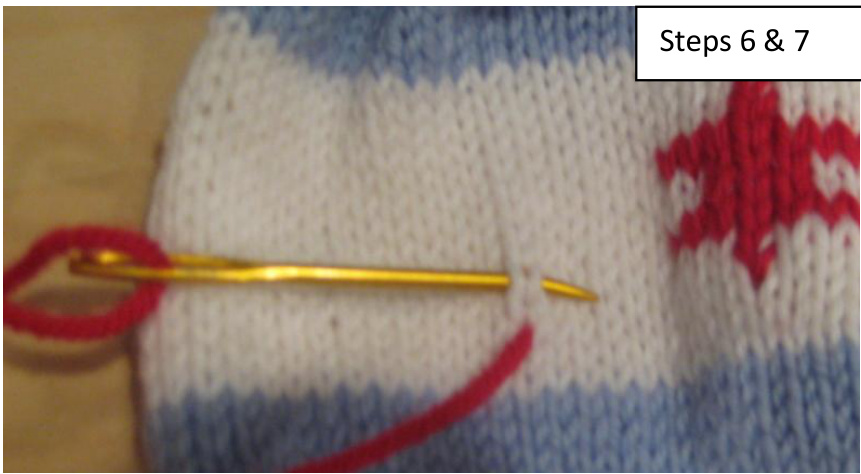
Step 8: Pull the needle and yarn through, matching the tension of your knitting.
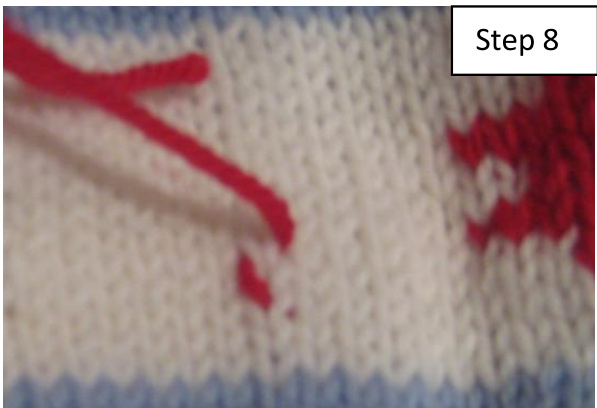
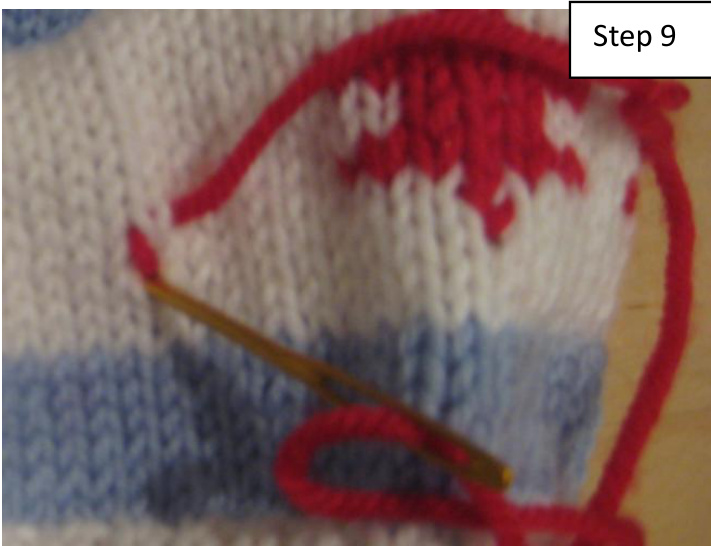
Step 9: Following the right leg of the V from top to bottom, put the tapestry needle into the stitch just below your marked stitch. Pull your tapestry needle into the inside of the hat and try to match the tension of your knit stitches. The tapestry needle is now back to the inside of the hat where it started.
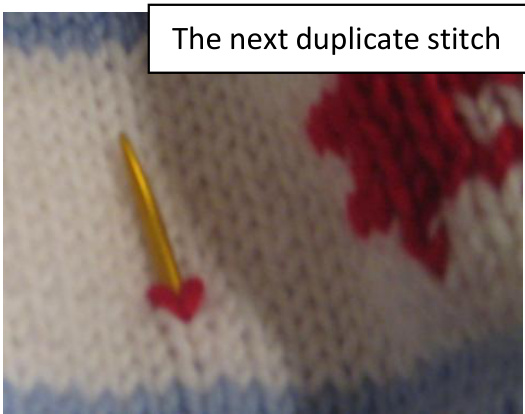
Repeat these steps to use duplicate stitch for each of the marked stitches in the chart. You'll need a different piece of yarn for each of the four stars. In star this pattern, the second duplicate stitch should be the one directly above the stitch you just completed. Pull your tapestry needle from the inside of the hat to the outside, going just above the middle of the V that you just traced in red.
For the third duplicate stitch of the star (and for the duplicate stitches starting subsequent rows), it is best to go all the way to the left- or right-most stitch in that star row so that you can work each row from left to right or right to left without jumping around. e all four stars are complete, secure the red yarn and weave in the remaining ends.
Star chart for 0-3 month hat size:
| 1 | 5 | 1 0 | 1 5 | 2 0 | 2 5 | 3 0 | 3 5 | ||||||||||||||||||||||||||
| 14 | |||||||||||||||||||||||||||||||||
| 13 | |||||||||||||||||||||||||||||||||
| 12 | |||||||||||||||||||||||||||||||||
| 11 | r | r | r | r | |||||||||||||||||||||||||||||
| 10 | r | r | r | r | |||||||||||||||||||||||||||||
| 6 | r | r | r | r r | r | r r | r | r | r | r | r | r | r | r | r | r | r | r r | r | r | r | r | r | ||||||||||
| 8 7 | r | r | r | r | r | r | r | r | r | r | r | r | |||||||||||||||||||||
| 6 | r | r | r | r r | r | r | r | r | r | r | r | ||||||||||||||||||||||
| 5 | r | r | r | r | r | r r | r r | r | r | rr | r | r | r | r | r | r | r | r | r | r | |||||||||||||
| 4 | r | r | r | ||||||||||||||||||||||||||||||
| 3 | r | r | r | r | |||||||||||||||||||||||||||||
| 2 1 |
Star chart for 6-12 month size:
| 1 | 5 | 1 0 | 1 5 | 20 | 2 5 | 3 0 | 3 5 | |||||||||||||||||||||||
| 15 | ||||||||||||||||||||||||||||||
| 14 | ||||||||||||||||||||||||||||||
| 13 12 | r | r | ||||||||||||||||||||||||||||
| 11 | r | r r | r | r r | ||||||||||||||||||||||||||
| 10 | r | r | r | r | rr | rr | r | r | r] rr | r | r | |||||||||||||||||||
| 6 | r | r | r | r | r | r | r | r r | r | r r | ||||||||||||||||||||
| 8 | r | r | r | r | r | r | r | r r | r | r r | ||||||||||||||||||||
| 7 6 | r | r | r | r | r | r | r | r r | r | r r r | r | |||||||||||||||||||
| 5 | r | rr] | r | r r | r | rr | rr | r | r r | rr | r | r | rr | |||||||||||||||||
| 4 | r | r | r | |||||||||||||||||||||||||||
| 3 | r | r | r | |||||||||||||||||||||||||||
| 2 | ||||||||||||||||||||||||||||||
| 1 |
Chart key:
| Useduplicatestitchtomakethisstitchred | |
| This is the marked stitch and will be red. Start your duplicate stitch by taking the yarn from inside the | |
| hatthroughthestitchdirectlybelowthisone. | |
| Thisstitchwillremainwhiteanddoesnotneedduplicatestitch. |


