Mini Doctor Whos
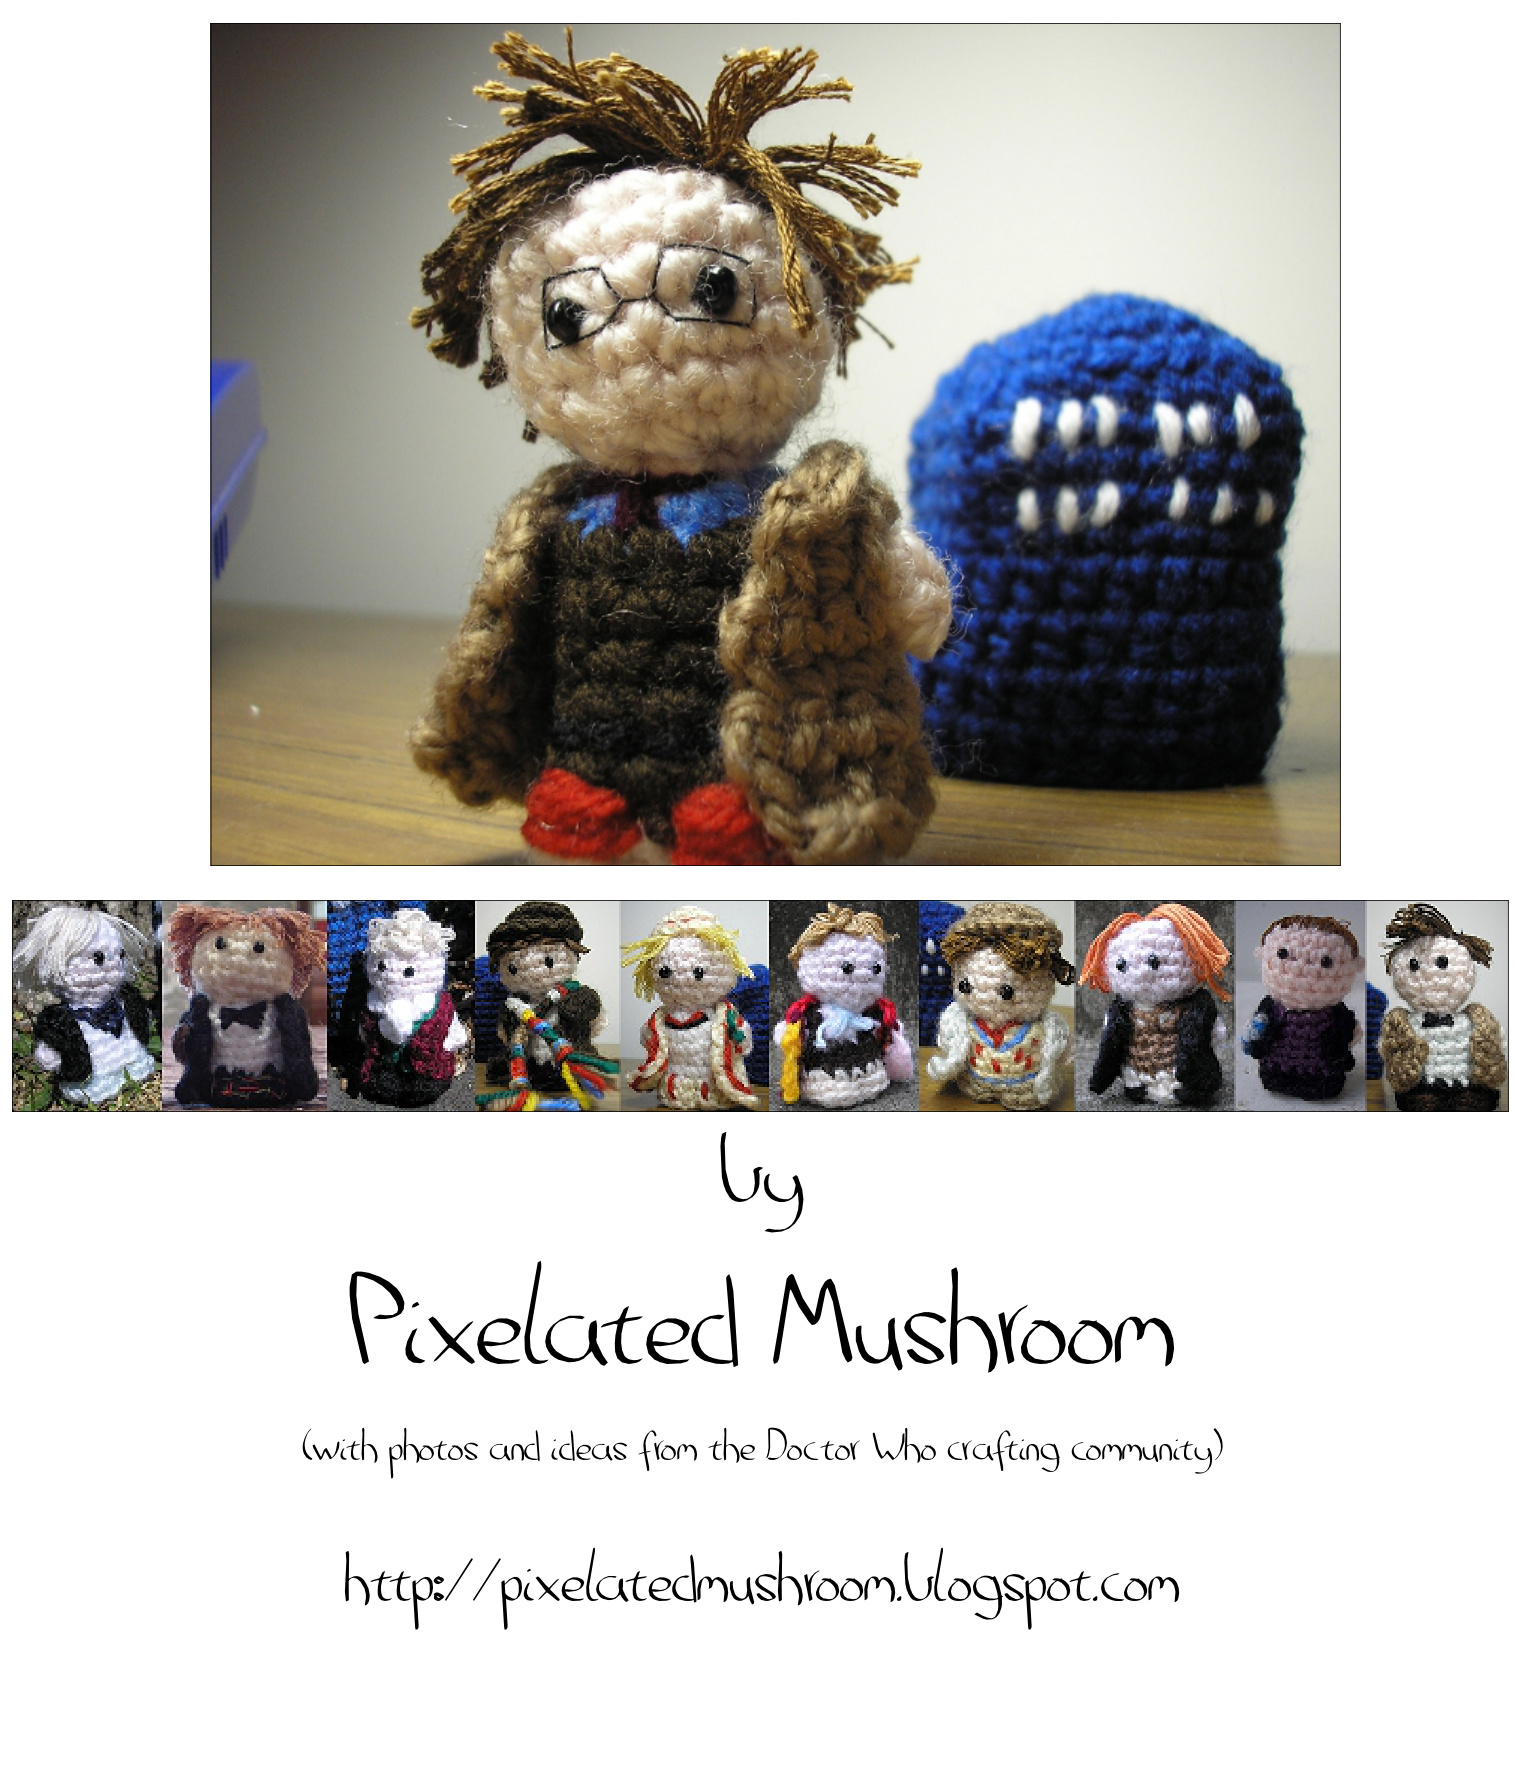
Select a construction method
Select a Doctor and crochet using his colours
Add accessories and details
Arms separate from body (easy) Arms and body as one piece (more complex but faster) Each Doctor comes with a list of wool colours to use making the basic body pattern Each Doctor comes with accessory patterns or instructions to make him recognizable
Skills Required / Abbreviations
Copyright
Uses US crochet terms
Magic circle (video) Ch: chain Sc: single crochet Inc: increase Dec: decrease Slip: slip stitch Hdc: half-double-crochet ( video ) Hdc-dec: half-double-crochet decrease. Make for yourself, friends or charity, but please respect BBC trademarks and do not sell finished items. Help keep these patterns available for everyone to use by respecting these terms.
Materials
Contact and updated versions
3mm crochet hook. See each individual Doctor page for other materials. For comments or questions please email pixelatedmushroom@gmail.com I am always happy to help if you are having trouble with anything in the patterns. The most recent version of this pattern will always be available from my blog or from Ravelry.
Thank yous
Thanks to those who have sent me photos, posted photos on Ravelry and generally helped out since the mini doctor patterns have been available. Thanks also to those who have allowed me to use their images on my blog and in this pattern - without them all the Doctors would never have been finished ;)
Tardis pattern
A pattern for a mini Tardis which will fit a doctor inside is available from Pixelated Mushroom. Great wrapping if you're giving the doctor as a gift \~_^
Method 1 Arms separate from body
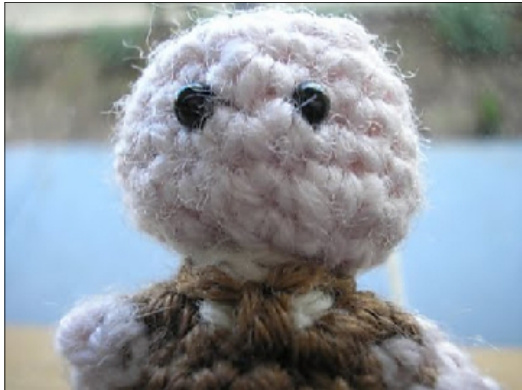
Head
Using skin colour:
1) magic circle 6 Insert a safety pin or stitch marker to keep track of the row beginning as you go. 2)inc every st = 12 3) inc every 3rd st = 16 4-6) sc all (3 rounds) 7) dec every 3rd st = 12 8) dec all = 6 9) sc all Carefully stuff the head.
Shoulders, chest and tummy
Change to body colour:
10) inc every st = 12 11) inc every 5th st = 14 12-13) sc all (2 rounds) 14) sc3, inc2, sc5, inc2, sc2 = 18 Add a little stuffing to the shoulders now
Legs
Change to pants colour:
15-16) sc all (2 rounds) 17) dec every 2nd st (working into the inside loop of each stitch - makes a ridge) = 12 Stuff the rest of the body. Do not tightly stuff the base of the legs. 18) dec all = 6 Break yarn leaving a long tail, and pull tail through last loop on hook. Thread with needle and pick up the six sts, pulling tight to close the base.
Arms (make 2)
Using skin colour:
1) magic circle 5 2) sc all (pull magic circle tight) Break off yarn leaving a long tail.
Make coat (see decorative details section) before sewing arms to body. Sew arms to their positions on the body to correspond with arm holes in coat. Skip to pages 9-14 for decorative details.
Head
Using skin colour:
1) magic circle 6 Insert a safety pin or stitch marker to keep track of the row beginning as you go 2)inc every st = 12 3) inc every 3rd st = 16 4-6) sc all (3 rounds) 7) dec every 3rd st = 12 8) dec all = 6 9) sc 1 round Carefully stuff the head
Shoulders
Change to body colour:
Left arm
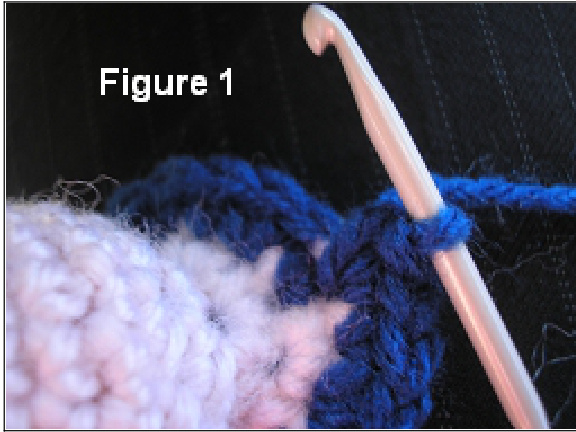
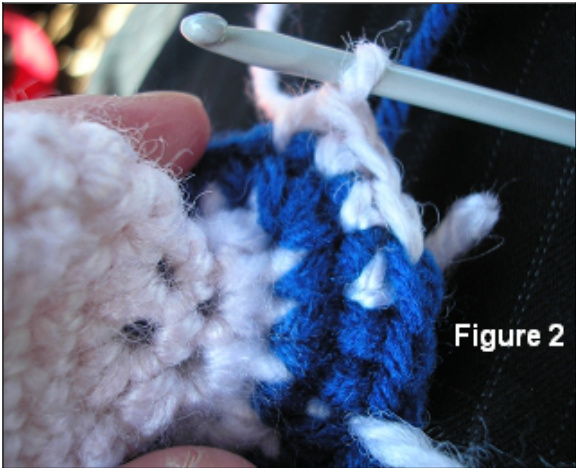
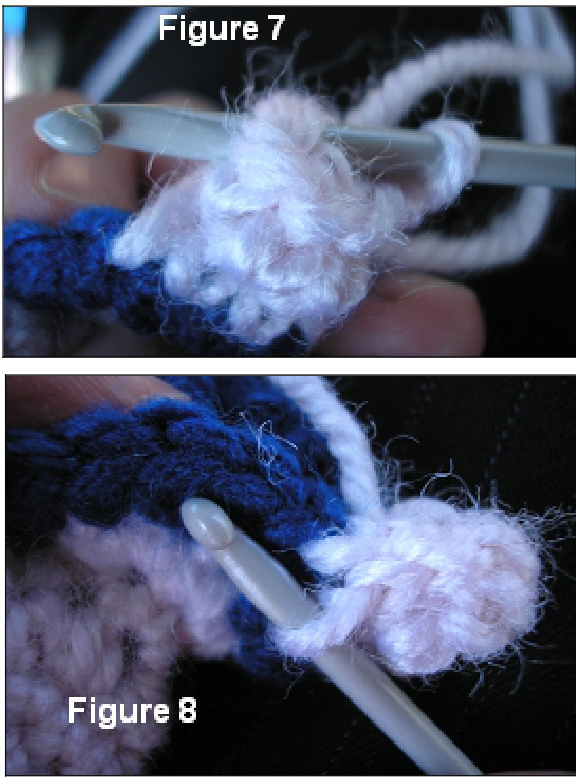
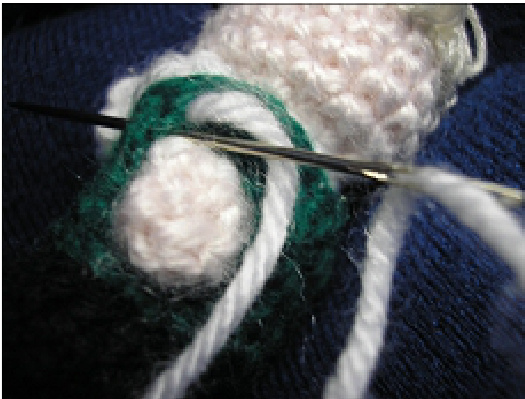
If you find this method too tricky, pull out round11andusemethod1instead left arm round 1) sc2, change to skin colour, sc4 (figure 2), insert hook into 2nd stitch of the row (figure 3) and slip1 (figure 4) = 5 10) inc every st = 12 11) inc every 2nd st = 18 (figure 1)
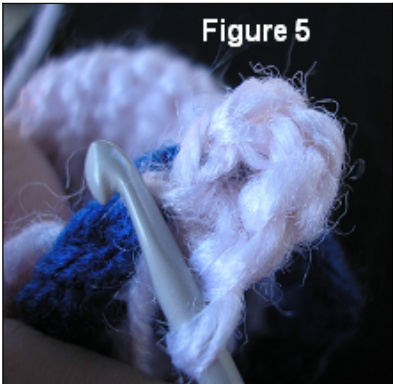
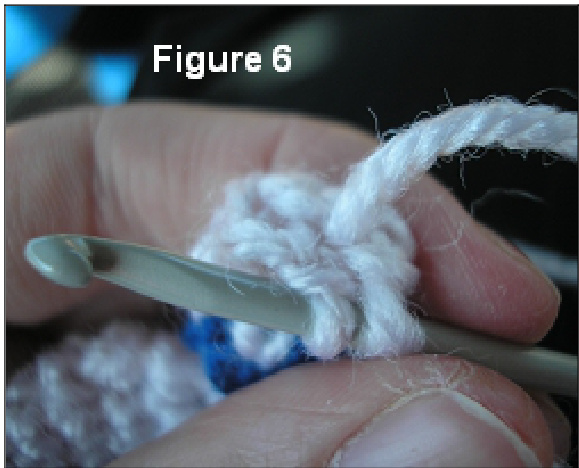
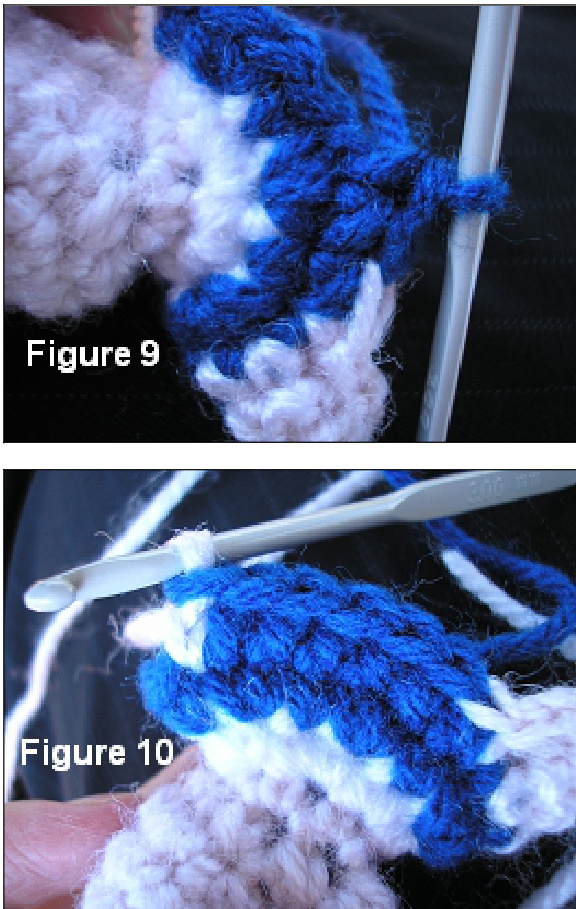
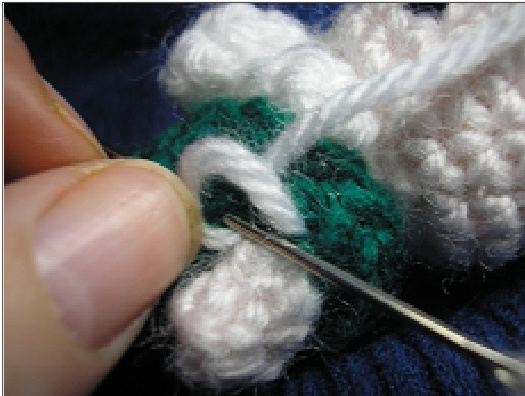
left arm round 2) to lengthen the arm, sc another round of sts (figure 5) left arm round 3) slip3, skip1 and slip1 to close the end of the hand (figure 6 and 7) left arm round 4) slip stitch twice or three times along inside of arm to return to body (figure 8) - left arm now complete change to body colour, sc5 (figure 9),
Right arm
change to skin colour:
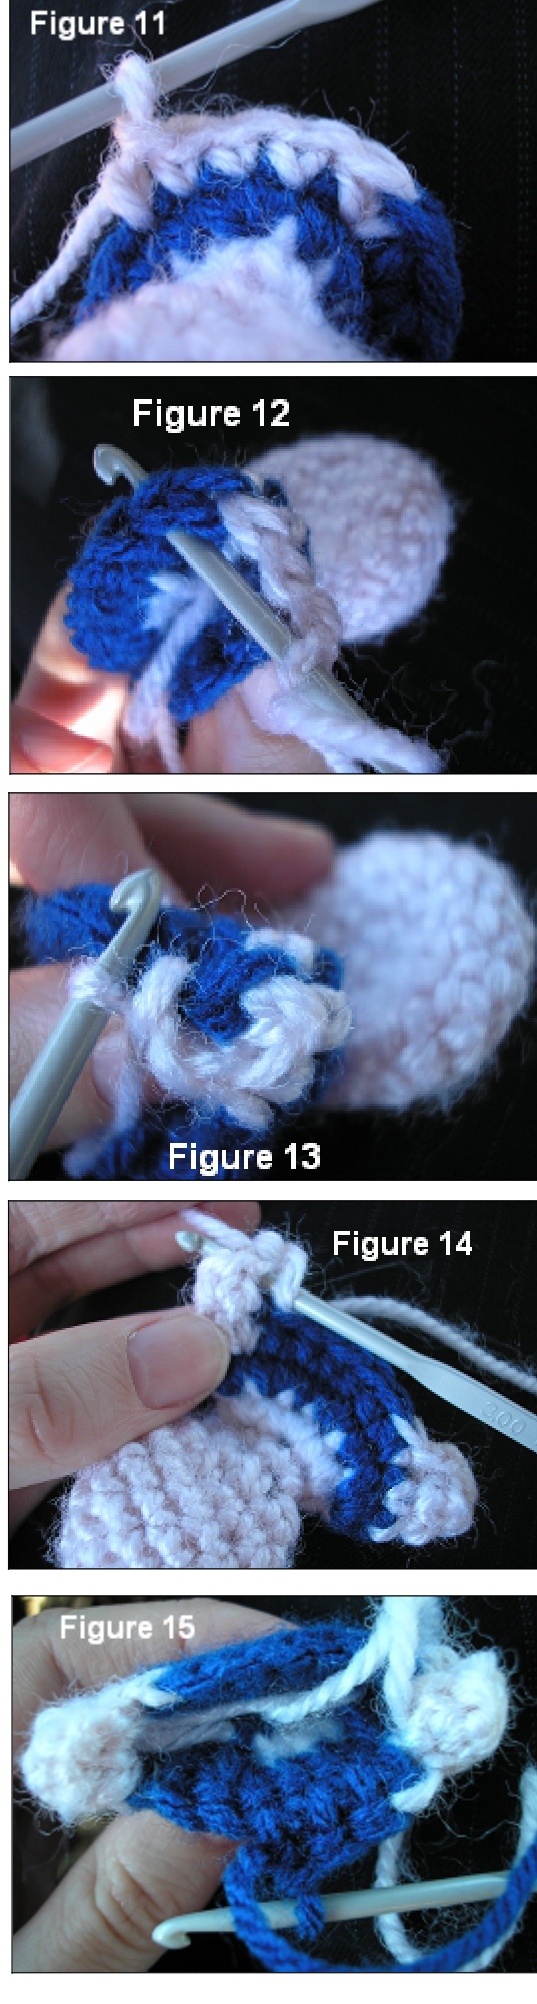
right arm round 1) sc4 (figure 10),
| inserthookintothest5beforeyourcurrentst (figure 12) and slip1 (figure 13), right arm row 2) |
| to lengthen the arm, sc another round of sts right arm round 3) |
| slip3, skip1 and slip1 to close the end of the hand (figure 14) right arm round 4) slipstitchtwice or three times along inside of |
| arm to return to body (figure 8) - right arm now complete change to body colour, sc5 (figure 15) |
| Tummy 13) sc2, ch1, sc5, ch1, sc3 = 12 |
| 14) sc2,inc1,sc5, inc1,sc3 = 14 Add a little stuffing to the shoulders now. |
| Legs Change to pants colour: |
| 15) sc3, inc2, sc7, inc2, sc4 = 18 16) sc all |
| Base 17) dec every 2nd st (working into the inside |
| loop of each stitch - makes a ridge) = 12 Stuff the rest of the body. Do not tightly stuff the base of the legs. |
| 18) dec every st = 6 Break yarn leaving a long tail, and pull tail through last loop on hook. Thread with needle and pick up the six sts, pulling tight to close the base. |
General decorative details
Finishing details for the body
After making your body by one of the above methods, you may like to thread the remaining long tale with a needle and take it up through the body, out the head, then back down again to the base, pulling gently then securing yarn. This just makes him a bit chubbier and cuter. You can also shape his pants a little by weaving back and forth to distinguish the legs.
Eyes
Coat
Use sewing thread to add eyes to the face (you can use beads if desired). Weave out and in many times to secure the eyes, and when they feel secure, exit the top of the head and tie ends together for extra security (this knot will be covered by the hair).
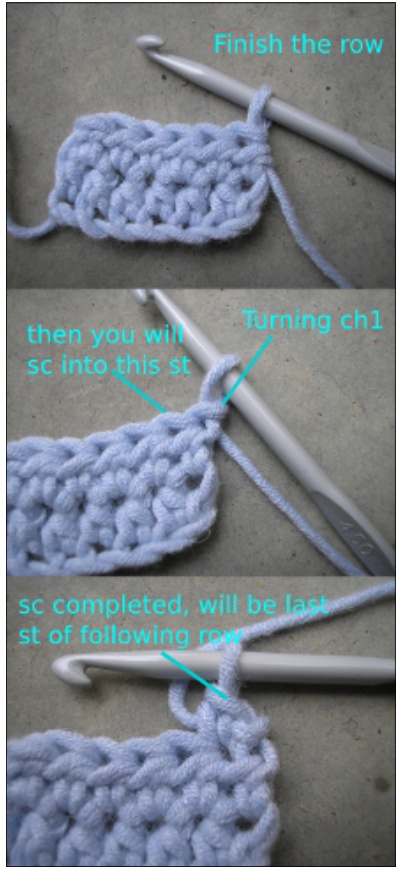
Tips on turning at the end of a row See left panel for tips on turning at the end of a row.
Using coat colour:
1) ch14 2) turning ch1, sc to end of row 3) turning ch1, sc3, ch5, skip 1 and sc6, ch5, skip1 and sc3 = 22 4) turning ch1, dec2, sc6, dec1, sc6, dec2 = 17 5) turning ch1, slip6, hdc-dec1, hdc1, hdc-dec1, slip6 = 15 Break yarn leaving a long tail, and pull tail through last loop on hook. Sew in ends.
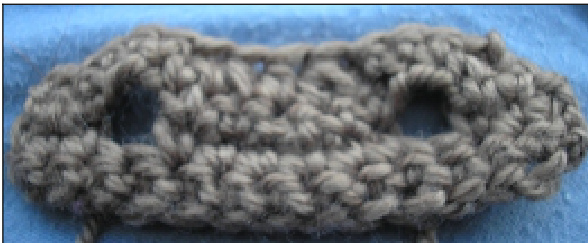
Check that the coat fits - you will need to pull the Doctor's arms quite forcefully through the sleeves so that it is a tight fit.
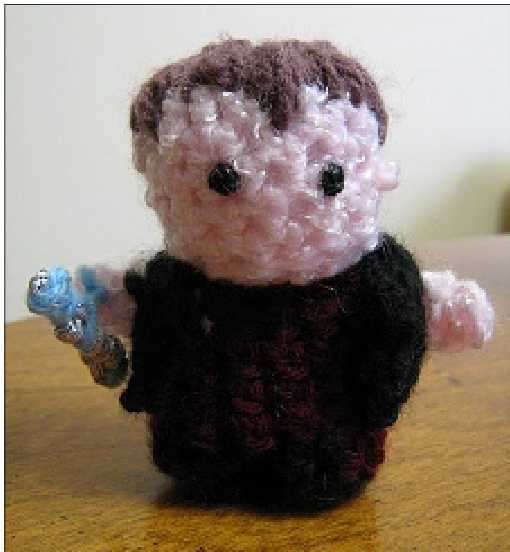
Matt Smith \~ Eleven
"I am definitely a madman with a box!" (The Eleventh Hour)
| Materials | |
| Wool | |
| Pale e pink (skin) Pink (shirt) Black (pants Beige (coat) Brown shoes Maroon bowtie and Red (fez | suspenders |
Other supplies
3mm crochet hook Brown embroidery thread (hair) Two black beads (eyes) Sewing thread (for sewing on the eyes and hair)
feymuse
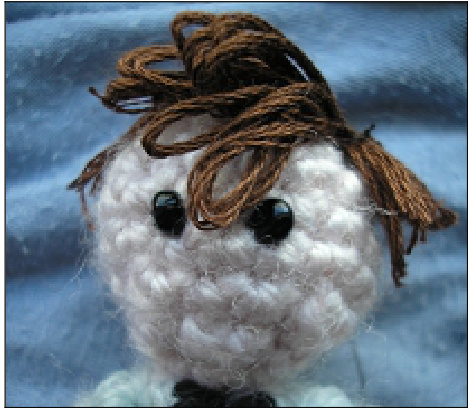
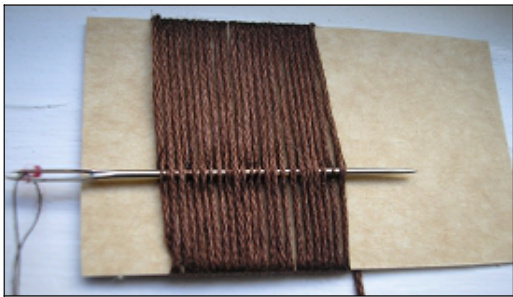
Hair
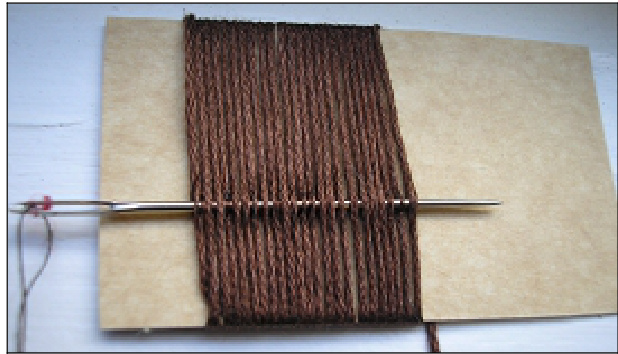
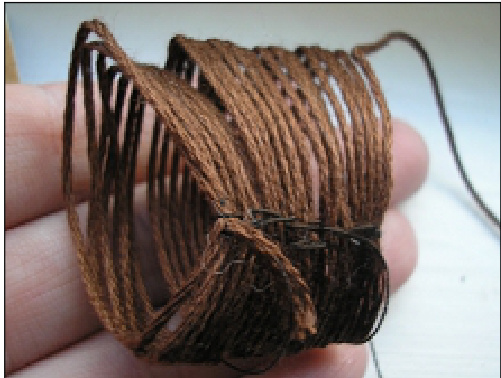
Take a piece of cardboard measuring 7.5cm x 12cm
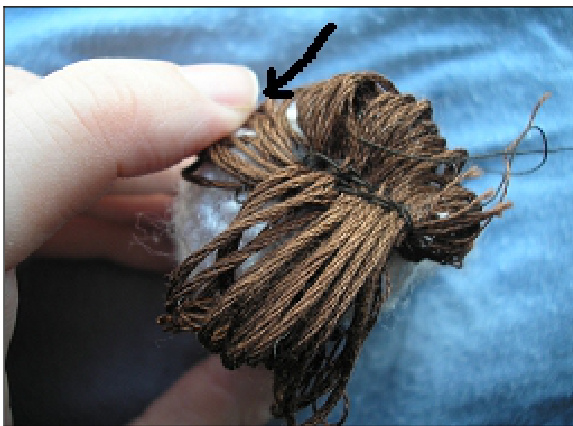
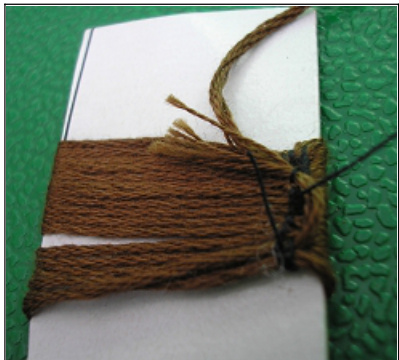
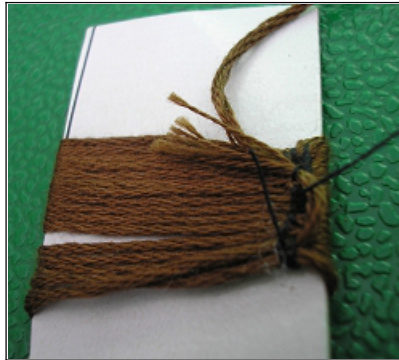
Wrap brown embroidery thread around the horizontal side of the card 22 times from one end to the other (not too tightly). With sewing thread, sew a part in the wig 2/3 of the way down.

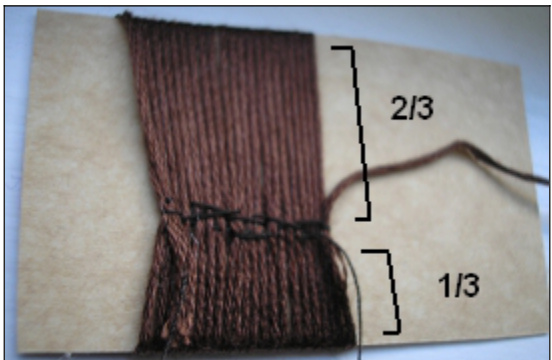
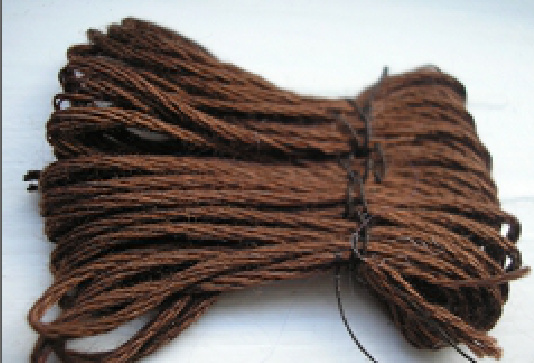
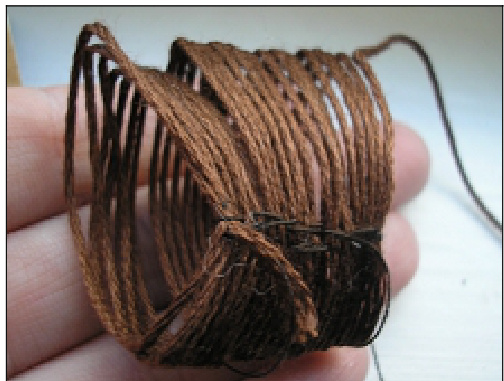
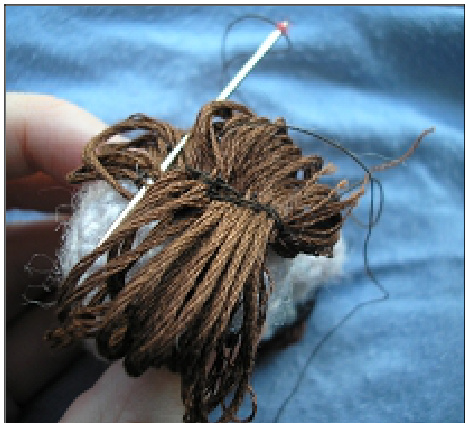
Remove the cardboard from the centre (you may need to cut it out) and press flat
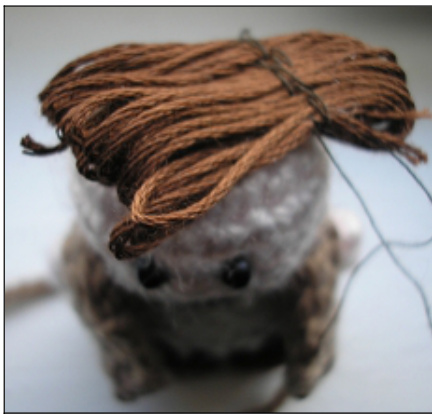
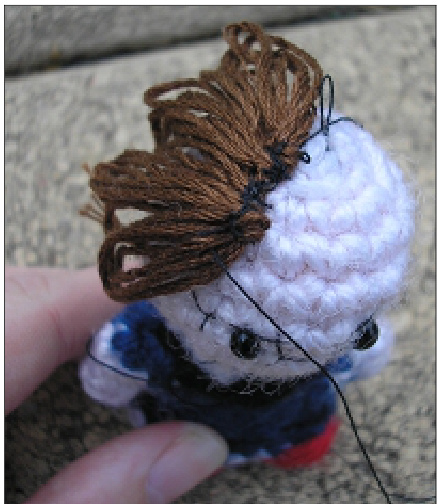
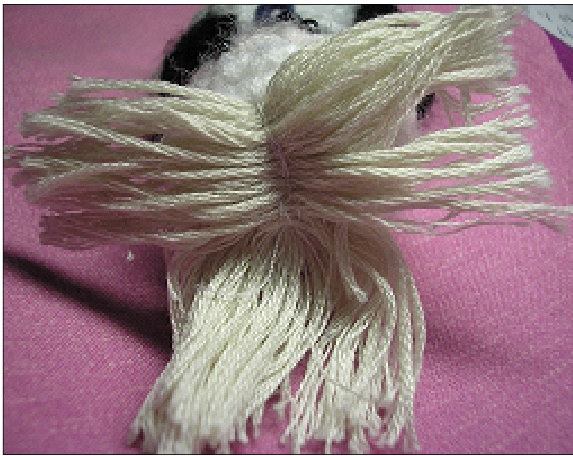
Place the wig on the head at the angle shown and sew securely down. Carefully hold the piece flat and use backstitch and go over the centre part several times, entering through different parts of the embroidery threads to make sure it holds.
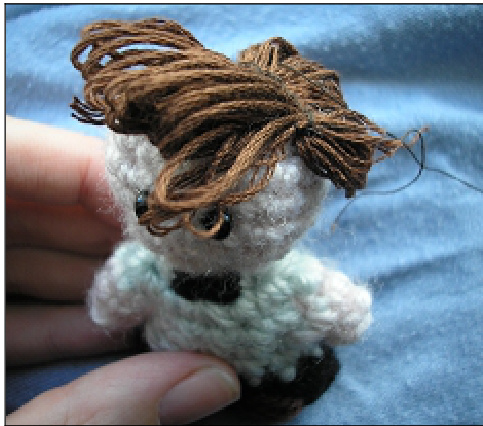
Take a few strands from the longer front section, pull them to the side to close the gap at the left side of the head.
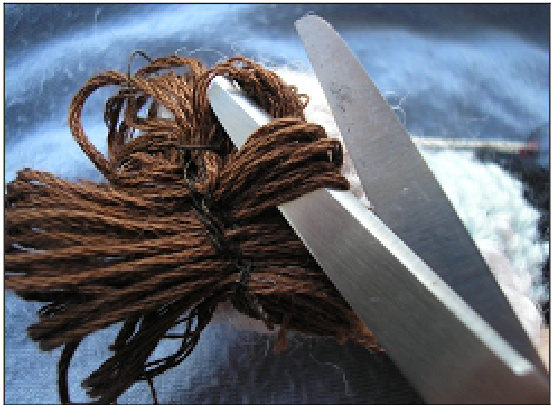
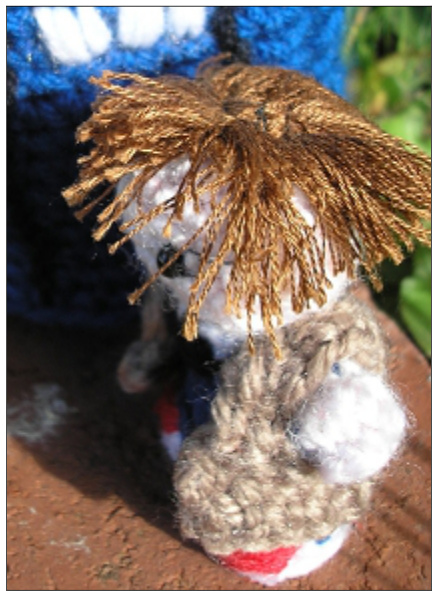
Cut the loops of the shorter section to separate the ends of hair (leave to the front uncut)
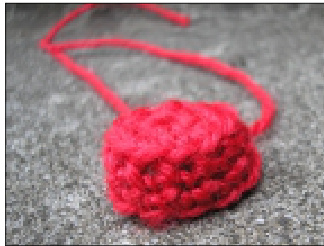
Fez (optional)
1) magic circle 6 2) inc all = 12 3) sc outside loop of stitches (makes a ridge) 4) sc all Break yarn leaving a long tail, and pull tail through last loop on hook. Sew to top of head.
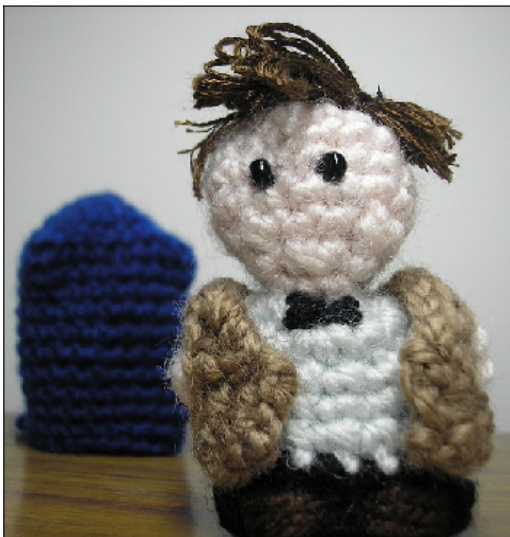
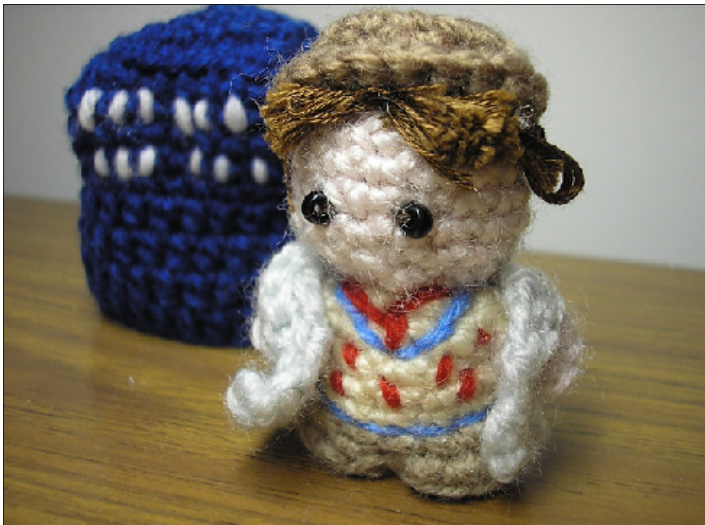
David Tennant \~ Ten
"Correctamundo! A word I've never used before and hopefully, never will again" (School Reunion)
| Materials |
| Wool |
| White (shirt and shoes) Pale pink (skin) |
| Beige (coat) Scrap of black(vest detail) |
| Decideifyou wouldprefer theDoctor's blue or brownsuit,thenuse: Brown (body colour) |
| or Blue (body colour) Scrap of red (shoes detail) |
| Other supplies |
| 3mm crochet hook Brown embroidery thread (hair) Two black beads (eyes) Sewing thread (for sewing on the eyes and |
| hair) |
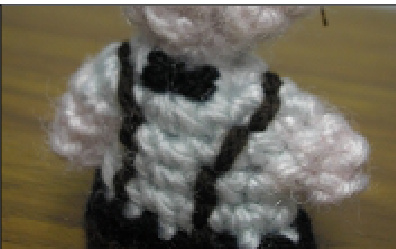
| Instructions |
| Body and coat Complete body, arms and coat pattern using |
| the colours listed. Add eyes. |
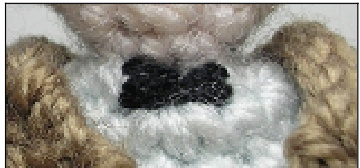
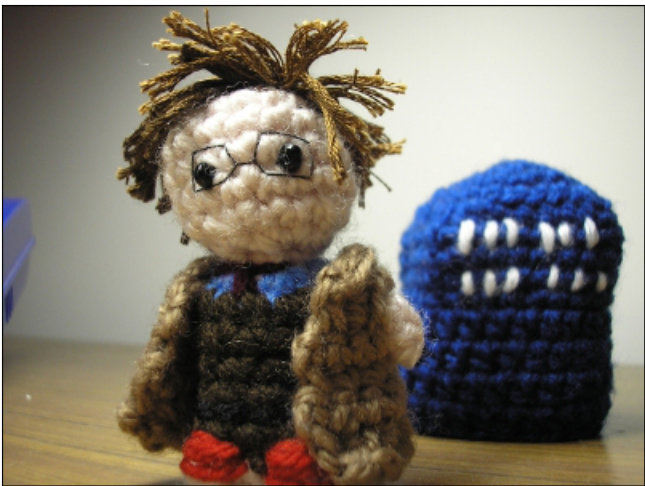
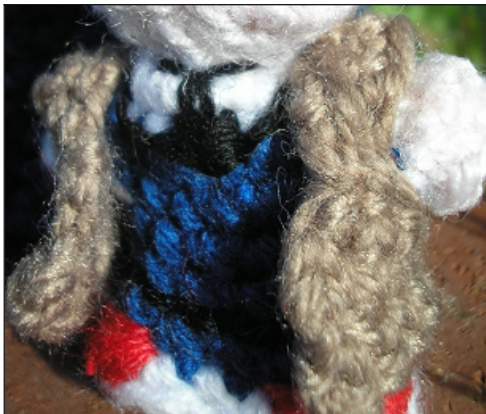
| Suit detail Usingwhitewooladdafewstitchesabout the neck for an inner shirt. Using black wool add a U shape around the |
| border of the white inner shirt. Following this image, add a T shape above for a tie. Stitcharound the waist to mark the separation between the suit top and pants. |
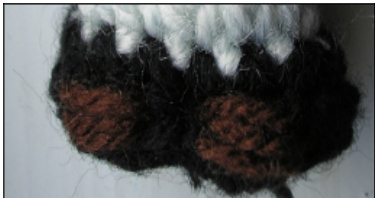
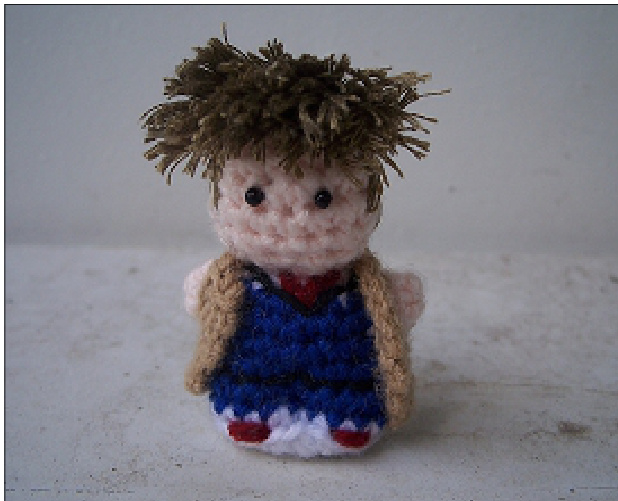
| Feet details If you chose to dress the doctor in his blue suit, using red stitch some blanket stitch across thetopofeachfoot todefine the Doctor's converse. |
Frenchaddict
Reading glasses (optional)
Thread a needle with black sewing thread and use the stitch diagram to create the glasses (recommended neatest order is marked). Make sure stitch 11 pulls together stitches 5 and 10 for the nice shape you can see in the image.

Hair
I based this hair on Geek Central Station's 'short hair tutorial'.
Top Piece
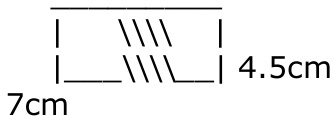
Take a piece of cardboard measuring:
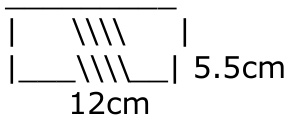
Wrap a 1.5metre piece of brown embroidery thread around the horizontal side of the card from one end to the other (not too tightly) With sewing thread, sew a part in the wig across the centre of the piece. Remove the cardboard from the centre (you may need to cut it out) and press flat. Use backstitch to go over the part several times.
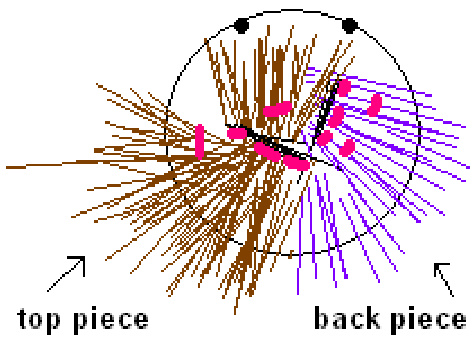
Back Piece
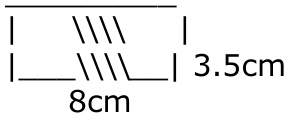
Make another piece the same way, this time using card measuring 4cm x 8cm
Wrap the brown embroidery thread again, but this time carefully sew across the top line, sewing both layers together. This will form the hair at the right side of the doctor's head (purple in diagram below).
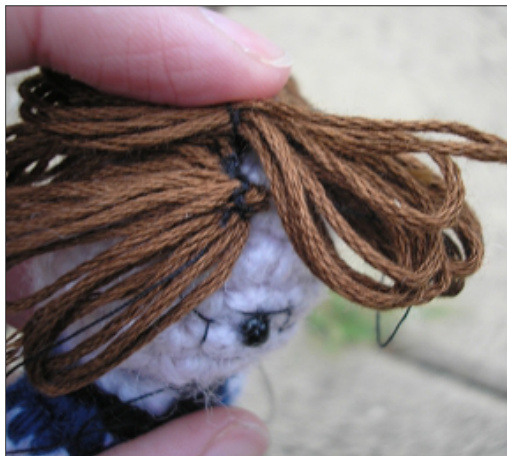
Adding hair to head
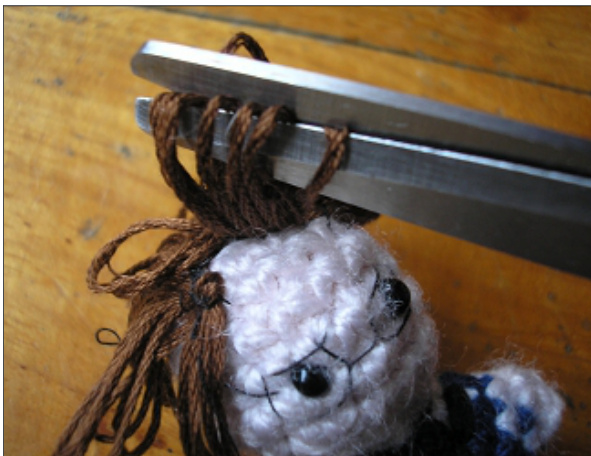
Add the back piece first (see purple on diagram). Add the front piece by sewing down the part and letting one end hang as a fringe, and the other cover the left and back sides of his head. Add some stitches to make different parts of the hair go in different directions (suggested stitches illustrated in pink on diagram). Use your judgment in seeing what looks good. Cut the loops to separate the ends of hair, and give it a little trim if needed.
top of 10's head
Christopher Eccleston \~ Nine
c! Oh, fantastic! Powerless! Look at you. The great space dustbin!" (Dalek
| Materials |
| Wool Pale pink (skin) |
| Purple (shirt) Black (pants, coat and shoes) |
| Other supplies 3mmcrochethook |
| Brown embroiderythread(hair)if desired Two black beads (eyes) Sewing thread (for sewing on the eyes and hair) |
| Instructions |
| Body and coat |
| Complete body, arms and coat pattern using the colours listed. Add eyes. |
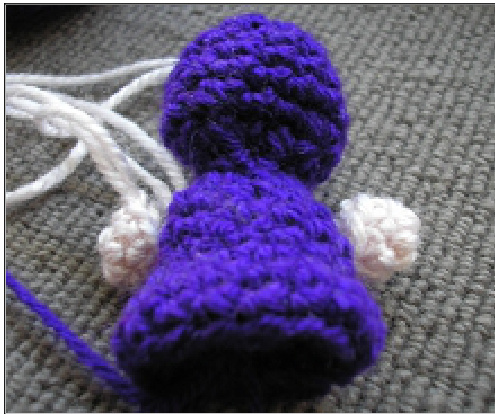
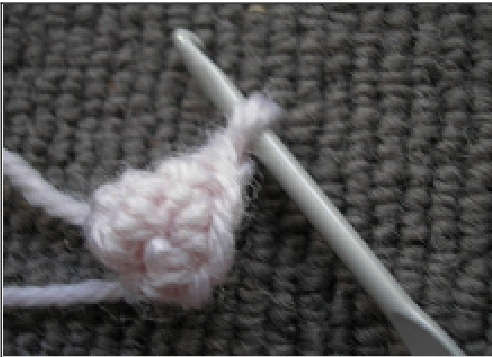
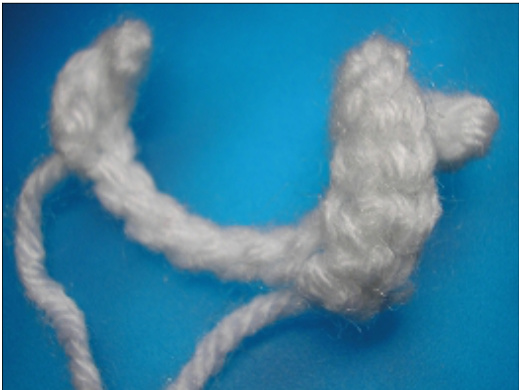
| Ears You can add some ears to your Doctor by |
| tying two knots (on top of each other in the centreofapieceofskincolouredwool. |
| Hair |
| Some crafters have added hair using rows of brown sewing thread or wool (see pics). |
Frenchaddict
Marina
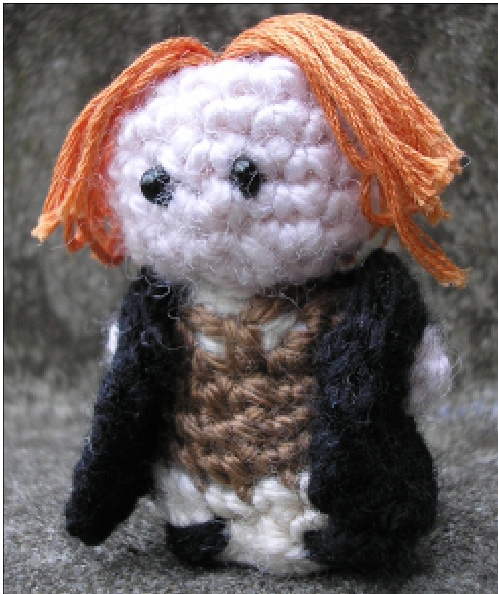
Paul McGann \~ Eight
"I shall just find out by using my super Time Lord powers of .... looking out of the window. (Memory Lane - Big Finish)
Other supplies
3mm crochet hook Orange embroidery thread (hair) Two black beads (eyes) Sewing thread (for sewing on eyes and hair)
Instructions
Body and coat
Complete body, arms and coat pattern using the colours listed. Add eyes.
Necktie
Using gold and a darning needle, stitch a tie below the neck as shown.
Shoe details
Using brown wool stitch some blanket stitch across the top of each foot to define the Doctor's boots.
Hair
Top piece
Take a piece of cardboard measuring:
Wrap orange embroidery thread around the card many times. Sew down the middle to make a part (see Matt Smith pattern if more detail required).
Claire
Back piece
Take a piece of cardboard measuring:

This time sew the part along the side of the card. Sew the back piece, then the top piece onto the head as shown.
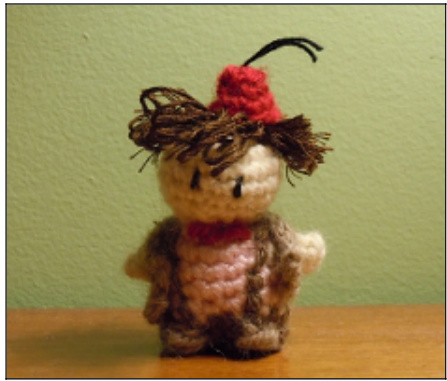
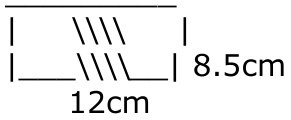
Sylvester McCoy \~ Seven
"'Time and tide melts the snowman." (Time and the Rani)
Materials
Wool
Other supplies
3mm crochet hook Brown embroidery thread (hair) Two black beads (eyes) Sewing thread (for sewing on the eyes and hair)
Instructions
Body and coat
Complete body, arms and coat pattern using the colours listed. Add eyes.
Shirt detail
Using blue wool stitch a V shape under the neck. Stitch around the waist to mark the bottom of the vest. Stitch around the upper armstomarktomarkthesleevesofthevest. Using red stitch small dots on the front and back of the vest as shown. Stitch a tie below the neck.
Claire
Hair
Using light brown embroidery thread make the same hair as for Matt Smith but simply add hat after hair is sewn to head and trim ends of hair shorter so they poke out beneath the brim.
Hat
Using light brown wool: 1) magic circle 6 2) inc every st = 12 3) sc outside loop of stitches (makes a ridge) 4) sc inside loop of stitches (curves the brim) 5) inc every st = 24 Break yarn leaving a long tail, and pull tail through last loop on hook. Sew to top of head.
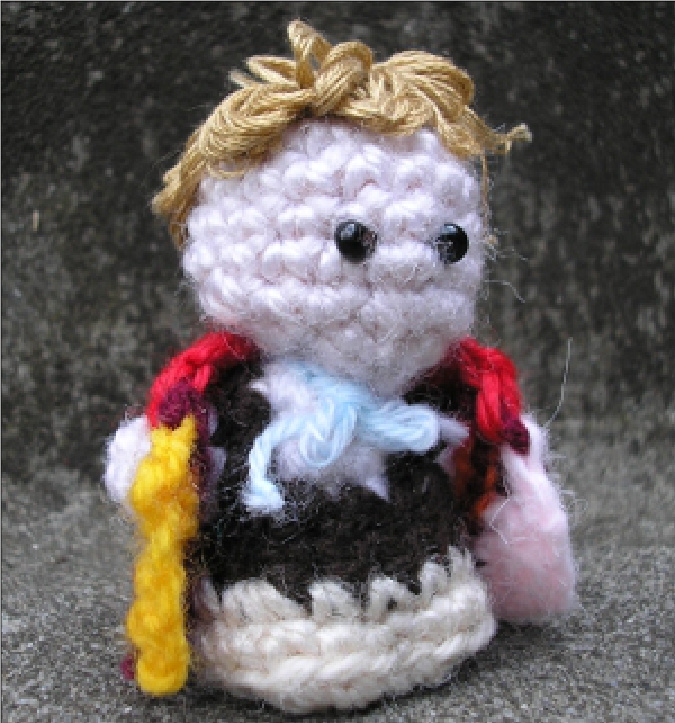
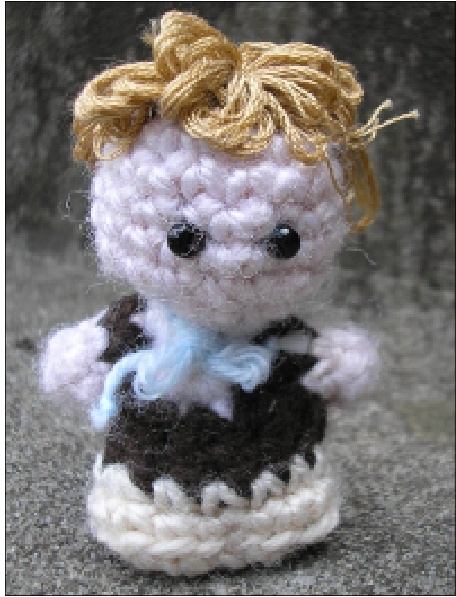
Colin Baker \~ Six
"You'd be astounded how many of my former companions were predisposed to ambulation" (The fourth wall - Big Finish)
| Materials |
| Wool |
| Pale pink (skin) Beige (pants) Brown (shirt) Yellow (coat) Maroon (coat) Red (coat) Green (coat) |
| Orange (coat) Pale pink (coat) Scrap of pale blue (tie) |
| Other supplies 3mm crochet hook |
| Light brown / gold embroidery thread (hair) Two black beads (eyes) Sewing thread (for sewing on the eyes and |
| hair) Instructions |
| Body (not including coat) |
| Complete body and arms using the colours |
| listed. Add eyes. Coat |
| ThebestwayIfound todothiswas to crochet the coat side to side using stripes of appropriate colours. This means quite a few ends to weave in, but I preferred that to embroideringthecoloursontoabasecoat. Try the coat on Colin as you go to ensure it doesn't end up too wide. |
| Using yellow wool: 1) chain 4 2) turning ch1, sc3, inc1 = 5 Change to maroon 3) turning ch1, inc1, sc4 = 6 Change to red 4) turning ch1, sc3, ch4, skip 1 st and sc2 = 9 5) turning ch2, hdc2, slip4, hdc3 Change to green 6)turning ch1,sc3,dec3 = 6 |
Change to maroon 7) turning ch1, sc6 8) turning ch1, sc6 Change to red 9) turning ch1, sc6 (do not break red yarn) Change to orange 10) turning ch1, sc3, ch4, skip 1 st and sc2 =9 Change to red 11) turning ch1, hdc-dec1, change to maroon, slip4, hdc3 = 8 Change to pink 12) turning ch1, sc4, dec2 = 6 13) turning ch1, dec1, sc4 = 5 Break yarn leaving a long tail, and pull tail through last loop on hook. Sew in all ends.
Hair
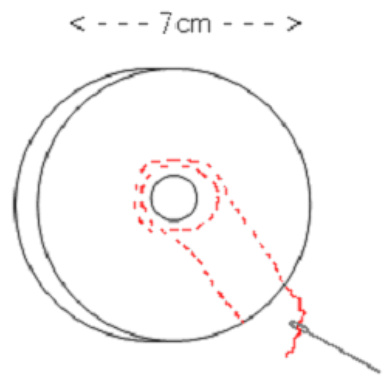
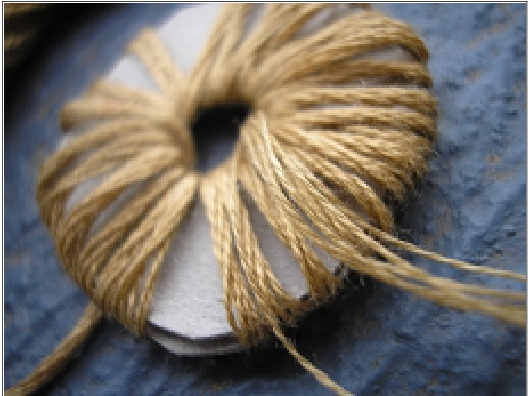
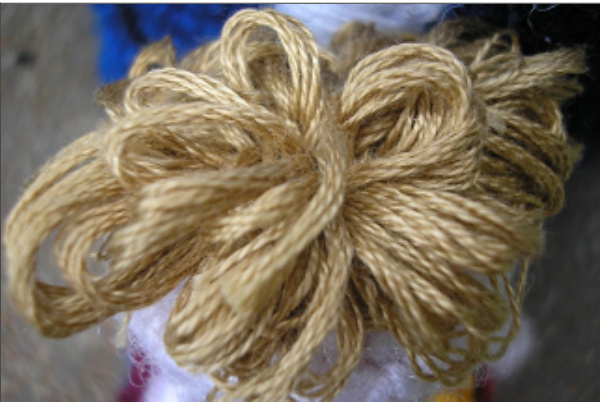
Take a piece of thin cardboard and cut two circles measuring 7cm in diameter. Cut a 1 cm hole from the middle. Wind it around all of the circle until is it covered as shown (uses about 1.5 meters of thread). Cut the cardboard very carefully away until you have a flat circle of curls. Sew to head. Tie a scrap of pale blue wool around his neck in abow.
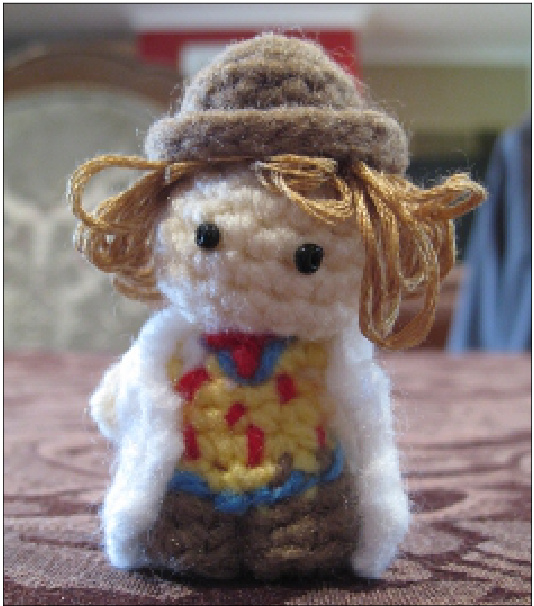
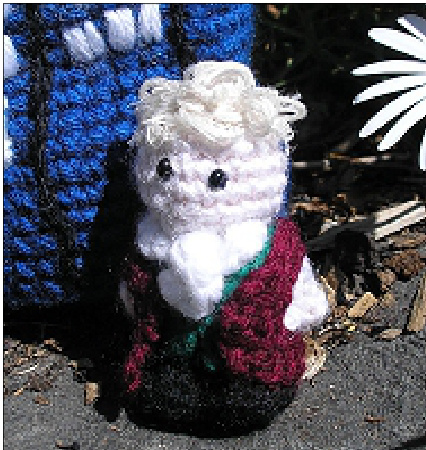
Peter Davison \~ Five
"I'm mortally offended. I may not offer you a biscuit' (Circular Time - Big Finish)
Materials
Wool
Pale pink (skin) White (shirt) Pale yellow (shirt) Beige (jacket, pants & hat) Scrap of green (celery
Scrap of black (shirt detail)
Other supplies
3mm crochet hook Yellow embroidery thread (hair) Two black beads (eyes) Sewing thread (for sewing on the eyes and hair)
Instructions
Body and coat
Complete body, arms and coat pattern using the colours listed. Add eyes.
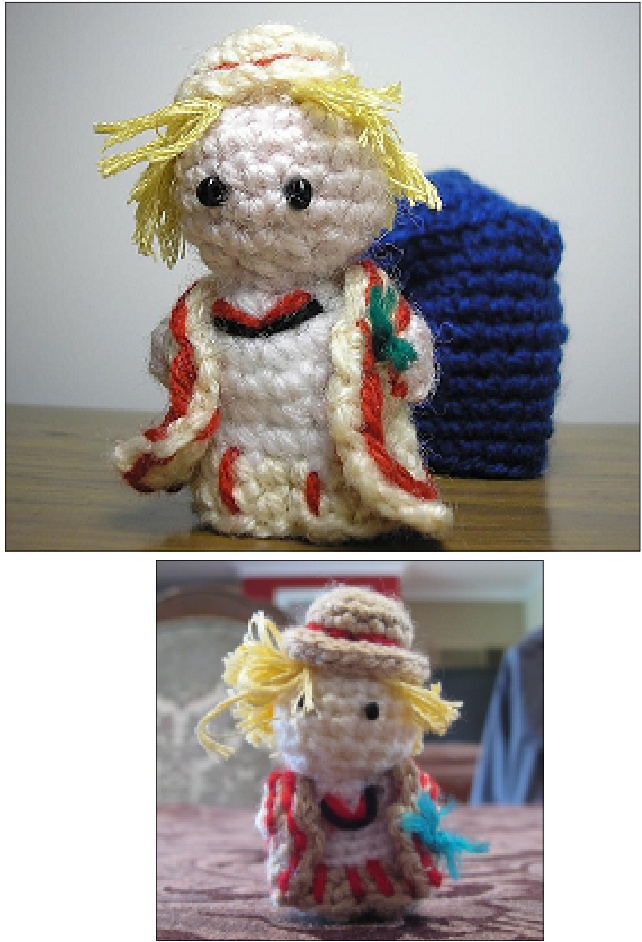
Coat detail
Using read wool follow the diagram to stitch borders onto the outside of the Doctors jacket, and around the arm holes. Be careful when doing this, as pulling the stitches too tight can make the arm holes close and not allow the Doctor's hand through.
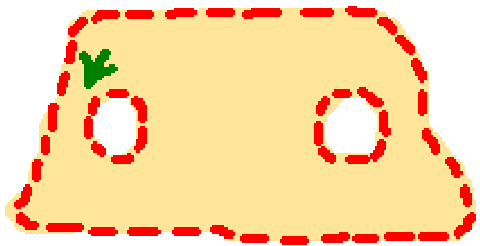
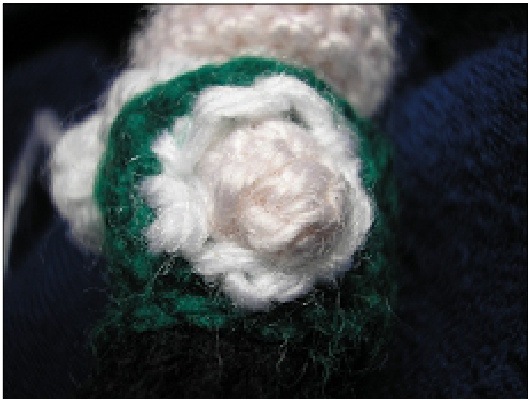
Use a length of green wool for celery. Exit close to where you entered and tie a knot with the ends held together.
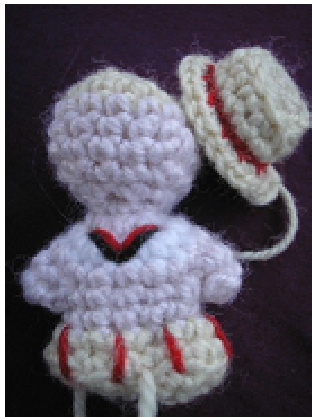
Hat
Using beige wool: 1) magic circle 6 2) inc all = 12 3) sc outside loop of stitches (makes a ridge) 4) sc inside loop of stitches (curves the brim) 5) inc every st = 24 Break yarn leaving a long tail, and pull tail through last loop on hook. Take a piece of red wool and stitch around the hat brim. Sew the hat to the top of the head.
| Cut the ends, leaving some space after the knots. Carefully separate the strands of your wool so that you achieve a fuzzy look for the end of the celery. |
| Trim to achieve a look that you like. Hair |
| Using yellow embroidery thread (hair) make hair as per Paul McGann. |
| Shirt detail |
| Usingblackwool andadarning needle,add a V to the frontof theDoctor's chest.Dothe same with red wool (see image). |
| Pants detail |
| stitch pinstripes up the sides of the pants all the way around. You probably want about 3 - 4 stripes on each theback and the front |
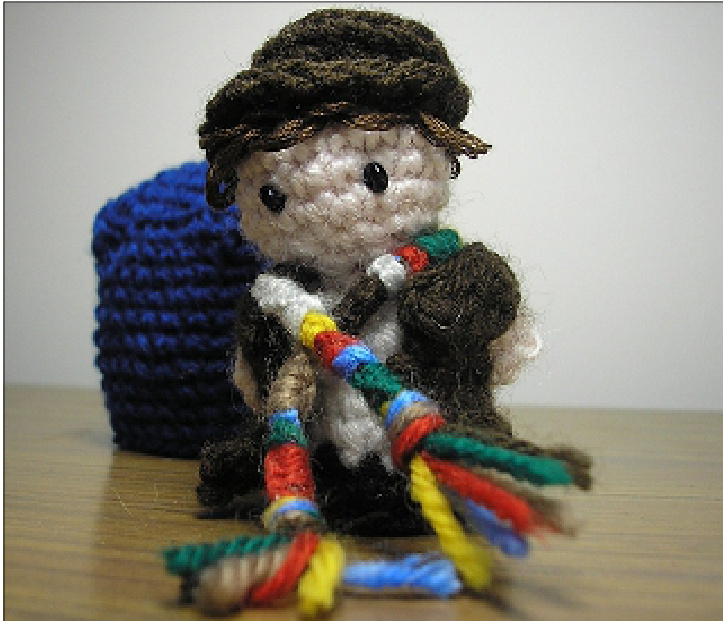
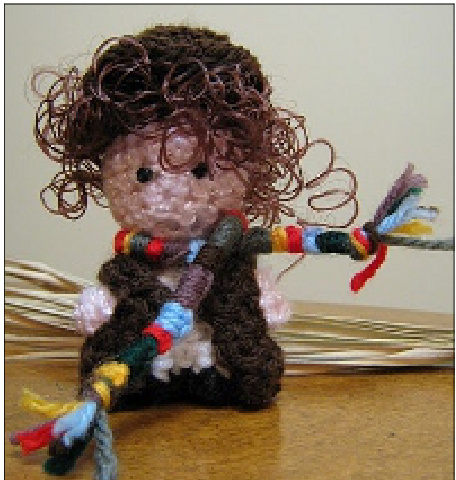
Tom Baker \~ Four
"Run as if something very nasty were after you, because something very nasty will be after you" (The Stones of Blood)
Other supplies
3mm crochet hook Brown embroidery thread (hair) Two black beads (eyes) Sewing thread (for sewing on the eyes and hair)
Instructions
Body and coat
Complete body, arms and coat pattern using the colours listed. Add eyes.
Marina
Hair
Hat
Back piece
With brown embroidery thread, make a back piece as per David Tennant.
Top piece
With brown embroidery thread, make a top piece as per Colin Baker.
Adding hair to head
Add the back piece first. Using brown wool: 1) magic circle 6 2) inc all = 12 3) slip all 4) sc outside loop of stitches (makes a ridge) 5) sc all 6) slip all 7) inc all = 24 8) slip all Break yarn leaving a long tail, and pull tail through last loop on hook.
| Then add the top piece to cover the part. |
| Usesomebrownthreadtomakesome random stitches and pull various parts of the hair up to make it look more curly. Add the |
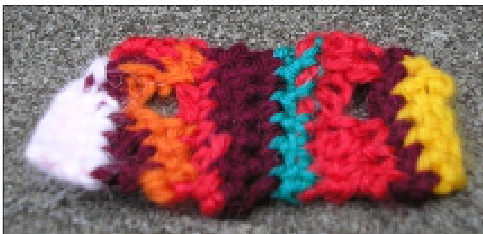
| hat Scarf This scarf is made by a series of half-hitch |
| knots, whichmakes aneatscarfwithnoneed for weaving in ends. Take a length of 40 cm length of the 7 scarf |
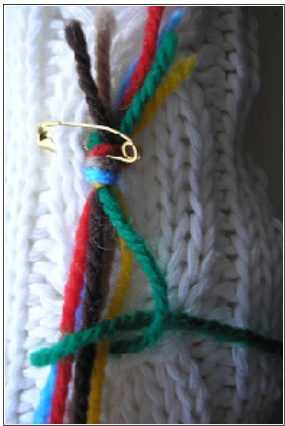
| colours. Tie a very tight knot at one end, leaving a cm or 2 free. Take a safety pin and attach the knot to the |
| thigh of your pants (for support while knotting). Take the colour required (green first for |
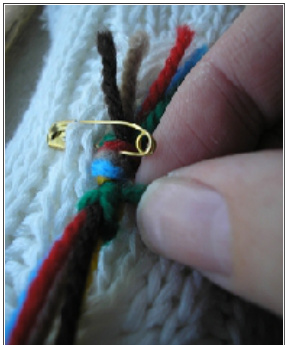
| example), and make a half-hitch around all the other threads (as pictured below). Whileholdingtheotherthreadsfirmlytowards |
| you, draw the green thread gradually up and tighter until it forms a small tight knot at the top of the scarf. Continue following the guide, numbers |
| indicate how manyknots of eachcolour touse before changing colours. TieatightknotattheendoftheScarfwhen |
| pattern is complete. Thisshouldbelongenoughtogoaroundthe neck anddown tothe ground. |
John Pertwee \~ Three
"A straight line may be the shortest distance between two points, but it is by no means the most interesting"(The Time Warrior)
| Materials |
| Wool |
| Pale pink (skin) White (shirt, necktie and cuffs) Black (vest and pants) Green (coat) Maroon (overcoat) |
| Other supplies 3mm crochet hook White embroidery thread (hair) Two black beads (eyes) |
| Sewing thread (black and white for sewing on the eyes and hair) |
| Instructions |
| Body and coat Complete body, arms and coat (in green) pat- |
| tern using the colours listed. Add eyes. |
| Hair |
| Usingwhiteembroiderythreadfollowthe instructions for Colin Baker. |
| Overcoat |
| Using maroon wool: |
| 1) ch16 2) turning ch1, sc 3) turning ch1, sc 4)turning ch1, sc4, ch5, skip 1 & sc6, ch5, skip1 and sc4 = 24 5) turning ch1, slip1, dec2, sc6, dec1, sc6, dec2 = 17 6) turning ch1, slip6, hdc-dec1, hdc1, hdc- dec1, slip6 = 15 |
Marina
Necktie
Using white wool and leaving a long tail 1) ch14 2) sc1, inc4, sc5, inc3, sc1 = 21 Break yarn leaving a long tail, and pull tail through last loop on hook. Do not sew in ends.
| Break yarn leaving a long tail, and pull tail through last loop on hook. |
| Putting on the undercoat & necktie |
| Put on the coat, tugging each arm securely through the arm holes. |
| Sew the coat closed at the front. Cut off any loose ends. Take the necktie and wrap it around is neck with the row ends to the front. Let the tie curl naturally (as above) so that it makes a ruffle at the front. Sew in place. Use thelongendsofwooltomakethesleeves (below) |
| Sleeve Ruffles |
| Using an end of white wool from the necktie, exit at the top of the sleeve. Make a small stitch near to where you started |
| andjustasyou arepullingthestitchclosed, enter through the loop the stitch created (like blanket stitch). Pull stitch firm (but not too tight). |
| Repeat the process around the sleeve, making loops and them going through them and pulling firm. |
| Repeat for the other sleeve. |
| Pull on his overcoat, and cut off any loose ends. |
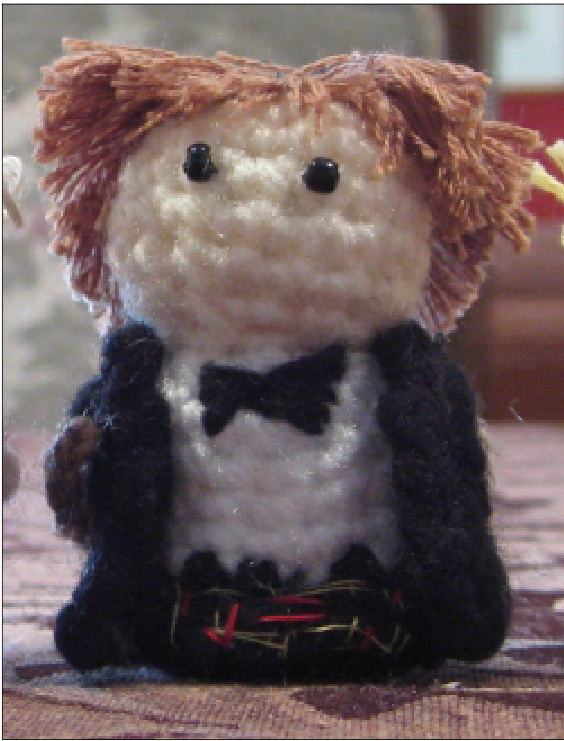
Patrick Troughton \~ Two
pe, merely enables one to be wrong with authority." (The Wheel in Space
| Materials |
| Wool Pale pink (skin) |
| White (shirt) Black (pants, coat and bowtie) |
| Other supplies |
| 3mmcrochethook Brown embroidery thread (hair) Two black beads (eyes) Black sewing thread (for sewing on the eyes) Yellow and red sewing thread (for pants |
| detail) |
| Instructions Body and coat |
| Complete body, arms and coat pattern using the colours listed. Add eyes. |
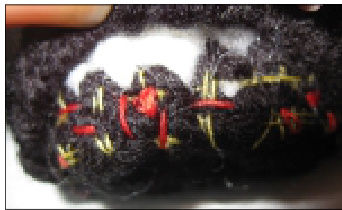
| Pants detail With thanks to Claire for this instruction: stitchedwithyellowandredcottonoverone stitchand thenunder thenextso itwas nice andeven.I did two closetoeachother and |
| thenanothertwolowerdown |
| Hair Using brown embroidery thread, follow initial instructions for Matt Smith but sew the part |
| 1/2 way across cardboard instead and sew piece straight to head rather than slanted. Trim ends evenly |
| Bow tie With black wool, sew a bowtie shape to the |
| Doctor's neck. |
Claire (see more of Claire's doctors here)
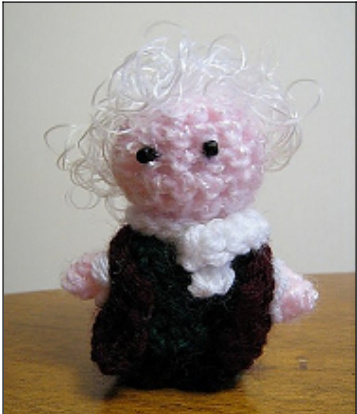
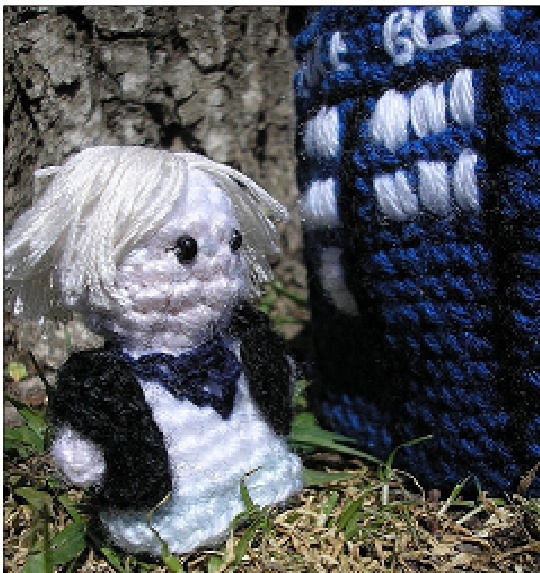
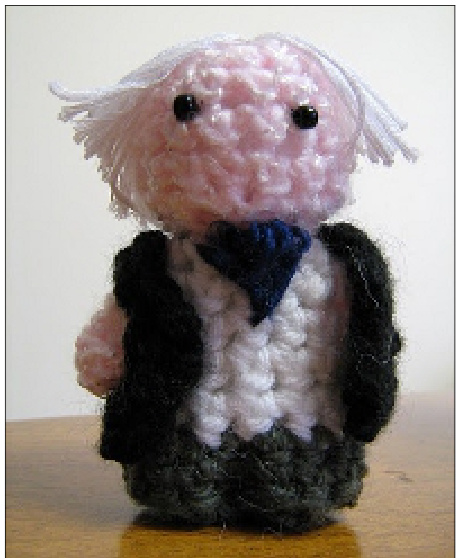
William Hartnell ~○ne
"Always search for truth. My truth is in the stars" (The Daleks)
| Materials |
| Wool White wool (shirt) |
| Pale pink wool (skin) Dark blue wool (shirt details) (or dark grey if you'd like your doctor to be 'black and white') Grey wool (pants) Black wool (coat) |
| Other supplies 3mm crochet hook |
| White embroidery thread (hair) Two black beads (eyes) Sewing thread (for sewing on the eyes and hair) |
| Instructions |
| Body and coat Complete body, arms and coat pattern using |
| the colours listed. Add eyes. |
| Waistcoat UsingdarkbluewoolsewaVto the front of the Doctor's chest. Exit close to the throat and addafewlittleloopstosimulatealooseneck |
| tie. Tie off carefully. Hair |
| Using white embroidery thread make hair as per Paul McGann. |
Marina