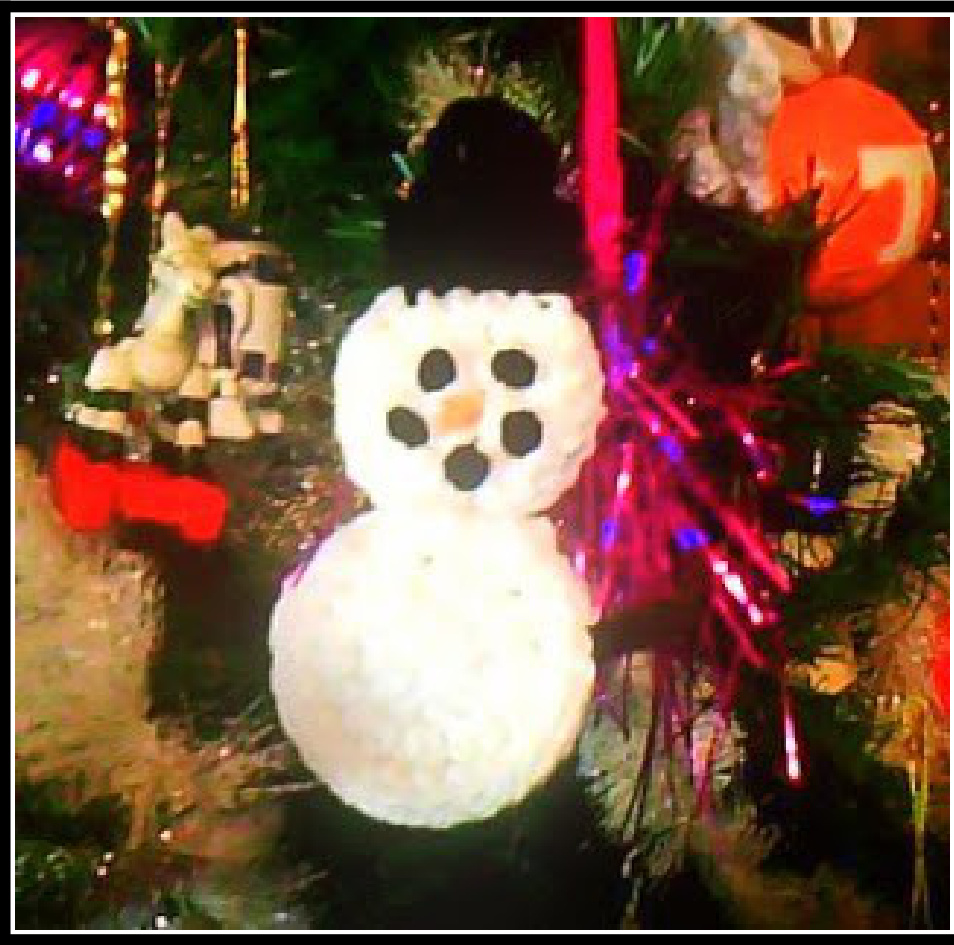
SNOWMAN TREE ORNAMENT
threejqdesigns@gmail.com http: / /threejqdesigns.wordpress.com www.facebook.com/ThreeJQDesigns www.ravelry.com/stores/three-j-q-designs
Abbreviations Used:
ch-chain; ss-slip stitch; st-stitch; ()-number of stitches at end of round; dc-double crochet; hdc-half double crochet; sc-single crochet; sts-stitches
Materials:
Materials: F crochet hook, Tapestry needle, worsted weight yarn in white, black, brown and orange Feel free to use the products of this pattern as you wish. The designer asks to be credited with the pattern \* Designed by Tara Quarles - “Three J Q Designs"@ 2011 Snowman's head: Make two (they will be stitched together near the end of the project) Round 1: Ch 4 (slip knot to begin counts as first chain, here and for the Snowman's body). 10 dc in 4th ch from hook. Join with s to top of beginning. (10) chdc in each st around. Join with ss to top of beginning ch 2 fasten off. (20) Snowman's body: Make two (they wil be stitched together near the end of the project) Round 1: Ch 4. 10 dc in 4"h ch from hook. Join with ss to top of chain 3. (10) Round 2: Ch 2. 2hdc in each st around. Join with ss to top of chain 2. (20) Round 3: Ch 1. \*1sc in each of next 3 sts. 2sc in next st\* repeat from \* to \* 4 more times. Join with ss to beginning ch 1. (25) fasten off. Snowman's Arms: For this portion of the project, you will be joining brown yarn to one of the big circles made for the Snowman's body. With the wrong side of the circle facing you, join brown yarn to circle with a ss in the spot where you wish for the arm to start. Ch 7, ss into the second stitch from the hook and into each of the next 6 sts. Join with a ss to body. I like to tie a little knot with the starting and finishing ends of the brown just to hold them inside better. Repeat on other side. Don't worry about weaving in the ends, they will be covered when the other circle is sewn on top of the body.
Snowman's Face:
Eyes and mouth: For this portion, you will be using one of the circles made from the directions for the snowman's head portion of the pattern. Cut about 10 inches of black yarn and thread the tapestry needle. You will now make French knots for the Snowman's “coal" eyes and mouth. Tie a knot in the end of the string and insert needle on the back side of the face circle in the spot where you wish to place the first eye. Make one French knot. Now your yarn and needle should be on the backside of the circle. Insert the needle where you want the second eye and make another French knot. Follow this same method for the coal that makes the mouth. Nose: Cut about 5 inches of orange yarn and thread the tapestry needle. Tie a knot in the end and insert hook where you wish to begin nose. Stitch a small carrot shaped triangle. Tie off on back side of work. Don't worry about weaving in ends, they will be covered when the other circle is sewn on the back of the work. Hat: (optional)Row 1: Using black yarn, ch6 (7 if you count beginning chain). Hdc in third ch from hook and in next 4 sts. (5) Row 2: ch 1, turn. Ss in first st, ch 1, hdc in next 2 sts, ch 1, ss in next 2 sts. (2hdc) Row 3: turn. ss in first st, and in ch 1 from last row, ch 2, dc in next 3 sts. Fasten off. Finishing Touches: Now we join the head to the body! The snowman's face should be facing up and the 'messy part where you connected the arms should be facing up. Using tapestry needle and white yarn, stitch the head to the body. Now, lay the second body circle on top of the first and stitch them together. At this point if you want to add the optional hat, you will sew it to the top of his head, then flip the ornament over so you are looking at the back. Lay the second head circle on the first one and stitch them together. To make the loop to hang the ornament, join which ever color yarn you wish to use to the top center of the ornament with a ss and ch 12. Ss to the ornament where you began the loop and then fasten off. Weave in all loose ends with the needle. Hang from tree! Feel free to use the products of this pattern as you wish. The designer asks to be credited with the pattern \* Designed by Tara Quarles - “Three J Q Designs"@ 2011


