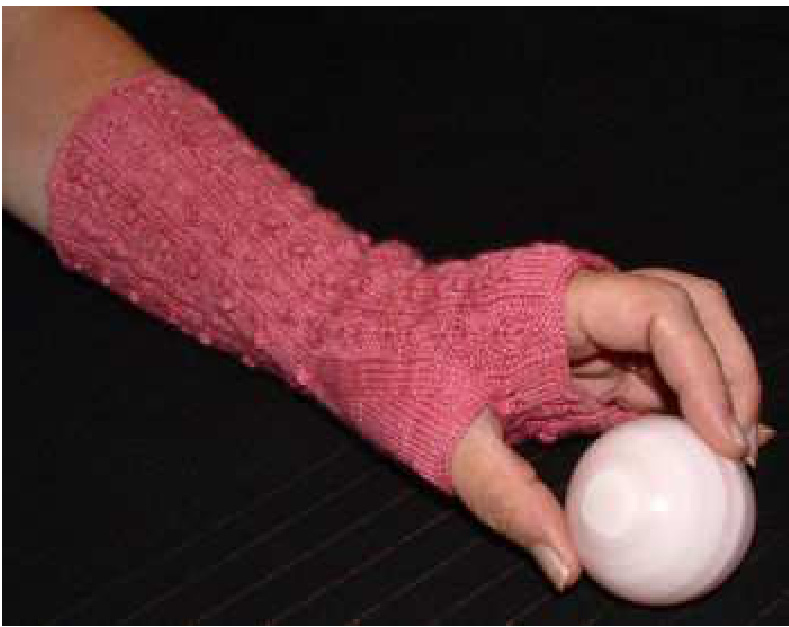
Dana Victoria
by Robbyn Kenyon I have no real notion where the idea for this originated. Well, you all know it was supposed to be a pair of socks - but that got sidetracked :) Some small part of my utilitarian, pragmatic soul wanted something that was feminine and pretty. And not just feminine but over the top. That made me think of the Victorians who elaborately decorated everything and then decorated the decorations! If I could have infused this yarn with attar of roses, I would have :) I also wanted to start using some of the yarn I've been so enthusiastically dyeing over the last couple of months but it didn't seem that this splendid pink should go for something hum-drum and ordinary. There was also the idea that it might be fun to insert a design element into the purl troughs of the ribbing (letting no potential decorative space lie fallow!) and, finally, that off-setting that with the design element on the knit panels would present a pleasing sort of symmetry to the eye. Dana Victoria
Materials
100 grams merino wool, fingering weight (I used hand-dyed KnitPicks yarn in Tea Rose) Four size 1 US $(2.25\mathrm{mm})$ needles (or five needles if you prefer, or two circulars, or one magic loop - whatever method for knitting in the round best floats your boat!). 2 stitch markers (I used a couple of silver jump rings left over from my beading days because size one needles are skinny!)
Gauge
About 9 sts per inch in pattern
Terms
K - Knit K1b - Knit through the back loop P - Purl M1 - Increase by making a backwards loop Inc3 - Increase by K1, yo, K1 into the same stitch. Dec3 - Centered double decrease. Slip 2 together knitwise. K1. Pass the slipped stitches over and off the needle. YO - yarn over MB - Make bobble - Inc3. Turn and P3. Turn. Lift second stitch over first and drop off the needle. Lift next stitch over and off. One bobble stitch remaining on left needle - knit it through the back loop. pm - Place marker sm - Slip marker
Notes
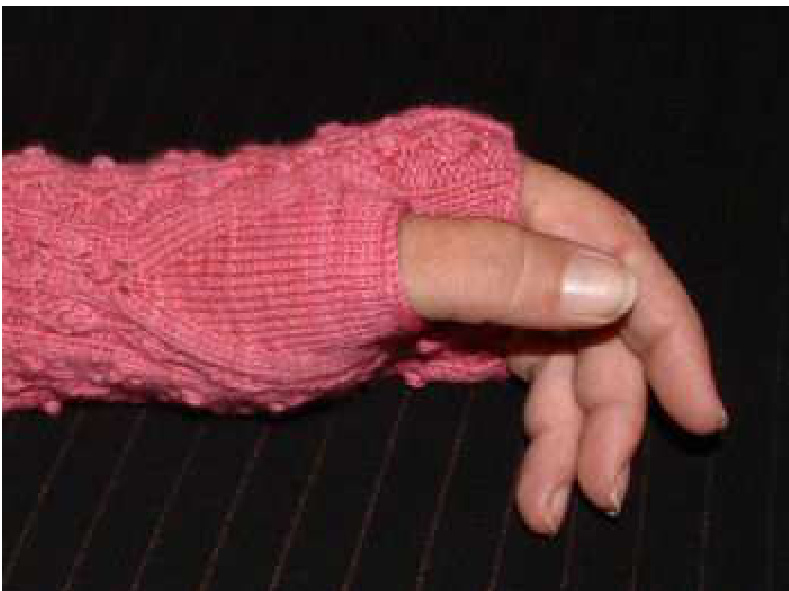
This will make a glove which will smoothly fit a hand that is $8^{\circ}$ in diameter (around the palm below the base of the fingers). That's because both Myria and I have large hands :) However, the wide ribbing has lots of give and take so it should fit a fair range of sizes. To size it down, eliminate one of the repeats (12 stitches). If this would make it to0 small, try going up a needle size. I won't fib to you, at this scale the bobbles - even if you like them - are a mite fiddly to work :) However, you may enjoy working them anyways. I had a mini-party in my head every time another one popped of the needles successfully! If you would rather not have bobbles, simply substitute a purl stitch when the pattern call for a bobble to be worked. The pattern is named, in part, for the sweet daughter of a dear friend who is having a "pink’ year and in part for the elaborate and decorative Victorian era. In fact it occurred to me as I was finishing it up that knitting the first and last three rounds in black would have only enhanced that association.
Pattern
Cast on 72 stitches (multiple of 12) divided on three needles. Join and work three rounds Oof $\bf{*}K7$ $\mathrm{P}5^{\ast}$
Preliminary rounds
1. $^{*}\mathrm{K}1$ ,K2tog, yo, K1, yo, SSK, K1, $\mathrm{P}5^{\ast}$ ; repeat around 2. $\bf{*}K7$ , $\mathrm{P}5^{\ast}$ ; repeat around 3. $^{*}\mathrm{K}3$ , Make Bobble (MB), K3, $\mathrm{P}5^{\ast}$ ; repeat around 4. $\bf{*}K7$ , $\mathrm{P}5^{\ast}$ ; repeat around Now you can continue with the written directions directly below or skip them and go down to the chart. Repeat this sequence for desired length to base of thumb gusset. Work through round 2 of pattern.
Commence pattern rounds - Written
1. $^{*}\mathrm{K}1$ , SSK, yo, K1, yo, K2tog, K1, P2, Inc3, $\mathrm{P}2^{*}$ ; repeat around 2. $\bf{*}K7$ , P2, K3, $\mathrm{P}2^{*}$ ; repeat around 3. \*K7, P2, K1, yo, K1, yo, K1, $\mathbf{P}2^{*}$ ; repeat around 4. \*K7, P2, K5, $\mathrm{P}2^{*}$ ; repeat around 5. \*K7, P2, SSK, K2tog, $\mathbf{P}2^{*}$ ; repeat around 6. \*K7, P2, K3, $\mathrm{P}2^{*}$ ; repeat around 7. \*K1, K2tog, yo, K1, yo, SSK, K1, P2, Dec3, $\mathrm{P}2^{*}$ ; repeat around 8. \*K7, P2, K1b, $\mathbf{P}2^{*}$ ; repeat around 9. $^{*}\mathrm{K}3$ , MB, K3, P2, K1b, $\mathbf{P}2^{*}$ ; repeat around 10. \*K7, P2, K1b, $\mathrm{P}2^{*}$ ; repeat around
Commence pattern rounds - Chart
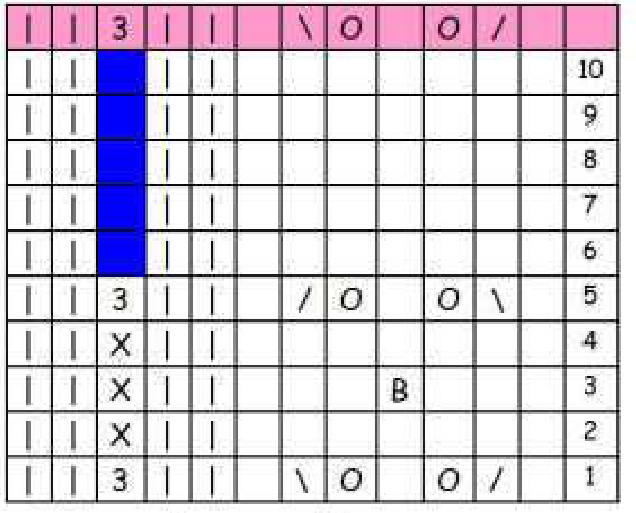
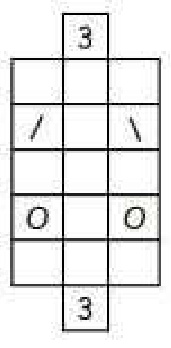
Blank space - Knit | - Purl / - Knit 2 together \- SSK3 - At beginning of leaf, Inc3. At end of leaf, Dec3 ( see Terms above). B - Make bobble (see Terms above) O - Yarn over X - Knit one through the back loop Chart notes Since this piece is worked in the round, allrows (rounds) are worked in the same direction. The chart should be read from right to left for each round. The boxes shaded inblue represent the laf chart which is to the right of the main pattern chart. The top row of pink boxes aren't part of the pattern sequence, but are there to show how the bobble-lace flower and the leaf patterns fit together.
Thumb gusset
We are going to take over the first flower lace panel and use it to create the thumb gusset. So... Next row: K3, pm, M1, K1, M1, K3 - and proceed with the rest of round 3 as usual. Next row: K3, sm, K3, sm, K3 - and proceed with the rest of round 4. Next row: K3, sm, M1, K3, M1, K1 - and proceed with the rest of round 5. Next row: K3, sm, K5, sm, K1 and proceed with the rest of round 6. Starting with round 7, you'll increase every three rows while working the rest of the mitt in pattern (increase in the first row, knit the next two rows plain). Do this until the gusset is as big as you need it to be - for me it was 10 times total. If you find you're getting the width you want but not the length, work a few more rounds plain (without increases) until you're ready to close the gusset. Try to end with round 9 of the pattern. Next round: K3, bind off all gusset stitches, M1 and join to the opposite side. Knit 3. You should now be back to your original 7 stitches for that panel and on round 10. Work one more repeat of the bobble lace flower and then one more leaf. Then work three rounds of $\bf{*}K7$ , $\mathrm{P}5^{\ast}$ and bind off in pattern. Now, make another one and grace your arms with your beautiful work!