EMBERS CAP SLEEVE T-SHIRT
BY CARINE LAI EDGING PATTERN ADAPTED FROM KNITTING STITCHES" BY MARY WEBB
Difficulty
Intermediate
Techniques needed:
Knitting in the round, short rows, and optional grafting (see note 1).
Measurements
3 Sizes Available: small $(32{-}34^{\prime\prime}/81{-}86.5\,\mathsf{c m})$ , medium $(36{-}38^{\prime\prime}/91.5{-}96.5\,\mathrm{cm})$ and large $(40{-}42^{\prime\prime}/101.5{-}$ $106.5\,\mathsf{c m}_{\phantom{.}}$ ) bust circumferences. Very close fitting with up to 4 inches negative ease—ribbing provides stretchiness. Unstretched finished garment measures ${15^{\prime\prime}}/{38}$ cm; $16.5^{\prime\prime}/42\,\mathrm{cm};\,18.25^{\prime\prime}/46.5\,\mathrm{cm}$ wide from armpit to armpit after washing and drying flat. Unless otherwise specified by section titles, this pattern denotes stitch counts for the 3 sizes in the format S (M, L). E.g. knit 9 (11, 13) stitches.
Gauge
19 stitches and 27 rows to $4^{\prime\prime}/10\mathsf{c m}$ square in stockinette stitch, knitted in the round, Knit on $3.75\mathsf{m m}$ to $4.0\mathsf{m m}\,24^{\prime\prime}/$ 60cm circular and double-pointed needles (US size 5 to US size 6) Note: this gauge is quite loose, producing a soft, stretchy fabric. Tight knitters are recommended to use larger needles.
Recommended Yarns
Light worsted/heavy dk cotton yarn, or, 2 strands of fingering weight cotton yarn held together.
Yardage
Small: 450 yards $(420\,\mathsf{m})$ of 1stcolour, 220 yards(200 m) of 2nd colour. Medium: 530 yards $(480\,\mathsf{m})$ of1stcolour, 280yards $(250\,\mathsf{m})$ of 2nd colour. Large: 590 yards $\langle540\,\mathsf{m}\rangle$ of 1st colour, 310 yards $(280\,\mathsf{m})$ of 2nd colour.
Abbreviations:
RS - Right Side of knitting WS - Wrong Side of knitting k - knit p-purl r - 1 by 1 ribbing. Alternate 1p, 1k, 1p, 1k etc. k2tog - knit 2 together. skpo - slip 1, knit 1, pass slipped stitch over. p2tog - purl 2 together. p2tog tbl - purl 2 together through back loops. m1 - make one stitch by picking up strand in front of next loop and knit it through back loop (i.e. twist it before knitting). bo - bind off - work contents of brackets the number of times specified. w&t - wrap next stitch and turn. (See note 2).
Reading Charts
Some parts of this pattern use charts. Charts are read starting from the bottom right hand corner. Odd numbered rows are read right-toleft and represent the right side of the knitting. Even numbered rows are read left-to-right and represent the wrong side of the knitting. Chart symbols are listed next to charts on pages 3 and 8.
Notes
Note 1: Grafting (Kitchener Stitch) An option is to graft the shoulder seams together for a seamless look. This involves grafting 1X1 ribbing, which is slightly different from normal grafting. For detailed instructions on grafting ribbing, see Appendix. Note2:w&t Wrapping and turning ensures that you don't create holes when you make short rows. To wrap and turn on the RS, knit up to specified point in the pattern, move yarn to front of needles, slip next stitch knitwise from left needle to right needle, bring yarn around this stitch to back of needles, and slip the stitch back from right needle to left needle. Turn knitting. To wrap and turn on the WS, purl up to specified point in the pattern, move yarn to back of needles, slip next stitch purlwise from left needle to right needle, bring yarn around this stitch to front of needles, and slip the stitch back from right needle to left needle. Turn knitting. Working wrapped stitches from previous row: When knitting wrapped stitches from the previous row, knit (or purl) both the stitch and the wrap together. RS: insert right needle into both wrap and stitch, and knit them together. WS: Use tip of right needle to pick up wrap and place it on left needle, purl wrap and stitch together.
Edging Pattern
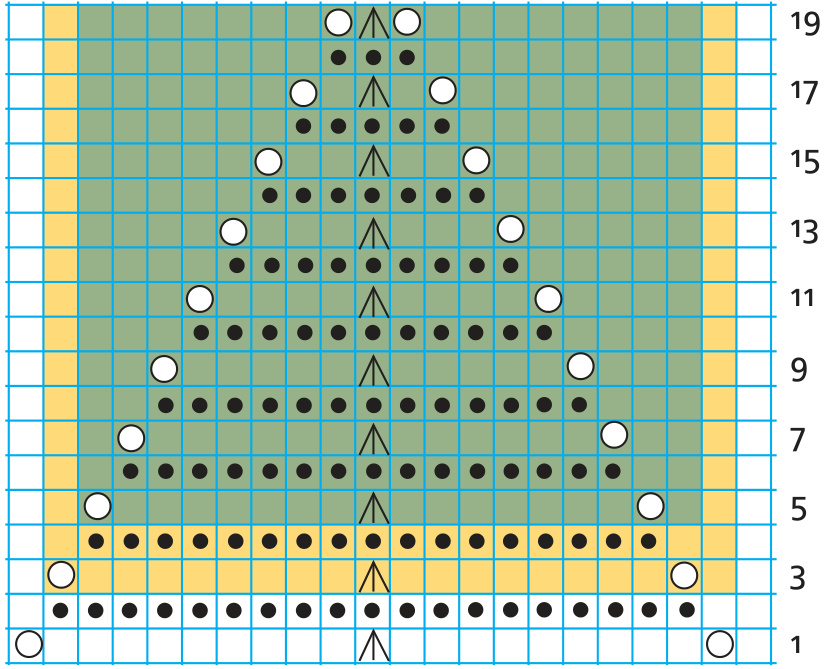
Adapted from "Medium Lace Stitch $\#36^{\prime\prime}$ in Knitting StitchesbyMaryWebb. Cast on 144, (160, 175) stitches on circular needles and join ends, being careful not to twist. Insert marker to mark beginning of round ('BOR marker'). Knit 1 full round, then refer to diagram below. Small size: begin on round 5 of chart and follow only the green area. (8 repetitions of 18 stitch pattern) Medium size: begin on round 3 of chart and follow yellow and green areas. (8 repetitions of 20 stitch pattern) Large size: begin on round 1 and follow whole chart. (8 repetitions of 22 stitch pattern) Pass BOR marker. Knit 1 full round. RemoveBORmarker. K5 (6, 7); p1, k3. Reinsert BOR marker to mark new beginning of round. Edging complete.
Diagram 1: Stitch pattern for edging
Note: Because garment is knit in the round, every round on chart is worked on the RS, and is therefore read from right to left.
Symbols:
Knit on RS rows, purl on WS rows Purl on RS rows, knit on WS rows Yarnover Slip 2 stitches as if to knit 2 together, knit 1, pass slipped stitches over.
Body
The body is worked in alternating columns of ribbing and stockinette stitch (see diagram 1). There are 16 columns in total, and each column of ribbing is centred above the double-decrease in the edging. As ribbing columns are located on the left and right sides of the shirt, waist shaping decreases are worked on the adjacent stockinette columns. (See schematic on page 13). Stitch markers are inserted to isolate these side panels. The first round establishes 16 alternating columns of 3 by 1 ribbing and stockinette stitch. Each ribbing column is 9 (9,9) stitches wide, and each stockinettecolumnis 9,(11,13)stitcheswide. Round 1: Pass BOR marker. p1, k3, p1. K9 (11, 13). Insert 1st stitch marker. \*[P1, k3, p1, k3, p1, k9 (11, 13)] twice; p1, k3, p1, k3, p1.\* Insert 2nd stitch marker. K9 (11, 13). P1, k3, p1, k3, p1. K9 (11, 13). Insert 3rd stitch marker. Repeat \* to \*. Insert 4th stitch marker. K9 (11, 13). P1, k3. Rounds 2 to 8: Continue in this pattern. From now on, the pattern will not mention the BOR marker - simply pass it at the beginning of every round.
Round 9:
(converts 3 by 1 ribbing to 1 by 1 ribbing): 1 by 1 ribbing—p1 k1 etc.—for 5 stitches. K9 (11, 13). Pass 1st marker from left to right needle. \*[p1 k1 ribbing for 9 stitches, k9 (11, 13)] twice; p1 k1 ribbing for 9 stitches.\* Pass 2nd marker. K9 (11, 13); p1 k1 ribbing for 9 stitches; k9 (11, 13). Pass 3rd marker. Repeat \* to \*. Pass 4th marker. K9 (11, 13); p1, k1, p1, k1. The rest of the shirt will continue in this pattern.
Round 10:
(Decreaseround) Rib 5, skpo, knit to 1st marker and pass. Continue pattern to 2nd marker and pass. Knit to last 2 stitches before ribbing, k2tog, rib 9, skpo, knit to 3rd marker and pass. Continue pattern to 4th marker and pass. Knit to last 2 stitches before ribbing, k2tog, rib 4. 8 (10, 12) stitches remain on each stockinette side panel column. Continue working pattern, decreasing as described above every 10th round, (rounds 20 and 30). There should be 6 (8, 10) stitches remaining in each stockinette side panel column. Work up to Round 39. Waist decreases complete. 7 (9, 11) stitches in each stockinette side panel column. Continue working pattern, increasing as described below on rounds 40, 50 and 60. There are now 9, (11, 13) stitches in each stockinette side panel. Waist Increase Round: Rib 5, k1, m1, knit to 1st marker and pass. Continue pattern to 2nd marker and pass. Knit to last stitch before ribbing, m1, k1; rib 9; k1, m1, Knit to 3rd marker and pass. Continue pattern to 4th marker and pass. Knit to last stitch before ribbing, m1, k1; r4. Continue until piece measures $13^{\prime\prime}/33c m$ from points of edging, or reaches just above your underbust line.
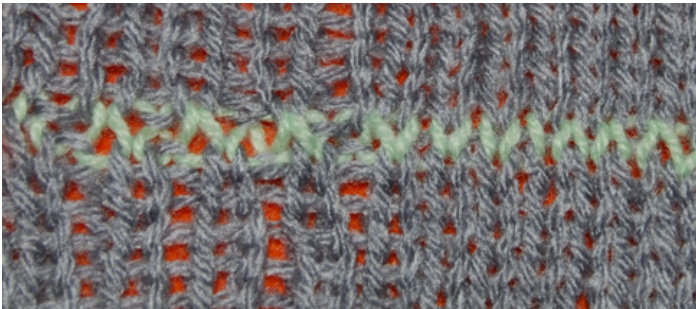
Colour Change
Work 2 rounds in the new colour, then 2 rounds in the original colour, then switch back to new colour. Measure vertically from your underbust line to your armpit, and then subtract an inch. Continue working pattern until new colour's length reaches this measurement. If you are using only one colour, simply continue working in pattern until whole piece measures $16.5^{\prime\prime}/42\,{\mathsf{c m}}\,(16.75/42.5{\mathsf{c m}},17^{\prime\prime}/43\,{\mathsf{c m}})$ from points of edging, or to 1 inch below your armpit. Go to armhole shaping section on page 7.
Armhole Shaping
At this point, the knitting is divided in two and the front and back panels are worked flat separately. Place 70 (78, 86) stitches for the back of the shirt on scrap yarn, and the other half of the stitches on needle to work on front panel.
Front Panel Armholes (small):
Row 1 (RS): Bind off 3 stitches, continue pattern to end. Row 2 (WS): Bind off 2 stitches, continue pattern to end. Row 3: p, skpo, continue pattern to end. Row 4: k, p2tog, continue pattern to end. Row 5: k, skpo, continue pattern to end. Row 6: p, p2tog, continue pattern to end. Rows 7 and 8: Continue working in pattern Row 9 [RS]: k1, skpo, continue pattern to end. Row [WS]: p1, p2tog, continue pattern to end. Rows 11 and 12: Continue working in pattern. Row 13: k1, skpo, continue in pattern to end. Row 14: p1, p2tog, continue in pattern to end. Continue in pattern until $3^{\prime\prime}/7.5\,\mathsf{c m}$ from beginning of armholes. 57 stitches remaining.
Front Panel Armholes (medium)
Row 1 (RS): Bind off 3 stitches, continue in pattern to end. Row 2 (WS): Bind off 2 stitches, continue in pattern to end. Row 3: p, skpo, continue pattern to end. Row 4: k, p2tog, continue pattern to end. Row 5: k, skpo, continue pattern to end. Row 6: p, p2tog, continue pattern to end. Rows 7 and 8: Repeat rows 5 and 6. Rows 9 and 10: Continue working in pattern Row 11 [RS]: k1, skpo, continue pattern to end. Row 12 [WS]: p1, p2tog, continue pattern to end. Rows 13 and 14: Continue working pattern. Row 15: k1, skpo, continue pattern to end. Row 16: p1, p2tog, continue pattern to end. Continue working pattern until piece measures $3.5^{\prime\prime}/9$ cm from beginning of armholes. 63 stitches remaining.
Front Panel Armholes (large)
Row 1 (RS): Bind off 3 stitches, continue pattern to end. Row 2 (WS): Bind off 2 stitches, continue pattern to end. Row 3: p, skpo, continue pattern to end. Row 4: k, p2tog, continue pattern to end. Row 5: k, skpo, continue pattern to end. Row 6: p, p2tog, continue pattern to end. Rows 7 to 10: Repeat rows 5 and 6, twice. Rows 11 and 12: Continue working pattern Row 13 [RS]: k1, skpo, continue pattern to end. Row 14 [WS]: p1, p2tog, continue pattern to end. Rows 15 and 16: Continue working pattern. Row 17: k1, skpo, continue pattern to end. Row 18: p1, p2tog, continue pattern to end. Continue working pattern until piece measures $4^{\prime\prime}/10\,\mathsf{c m}$ from beginning of armholes. 67 stitches remaining.
Shoulder Bands
Divide knitting for shoulder bands. Holding knitting with the RS of the panel facing you, place first 16 (18, 19) stitches for the right band on a needle, the middle 25 (27, 29) stitches onto a holder, and the remaining 16 (18, 19) stitches for the left band on a secondholder.
Right band
Counting the stitches from right to left, there are be 6 (7, 7) stockinette stitches; 9 rib stitches, and 1 (2, 3) knit stitches. A short row is placed at the bottom of the band to create the shoulder slope. Row 1 (RS): k6 (7, 7), r9, k 1 (2, 3) Row 2 (WS): p 1 (2, 3) r9, w&t Row 3: r9, k 1 (2, 3) Row 4: p 1 (2, 3), r9, p6 (7, 7) Row 5: k6 (7, 7), r9, k 1 (2, 3) Row 6: p 1 (2,3), r9, p6 (7, 7). Repeat rows 5 and 6 until armhole depth reaches $6.5^{\prime\prime}/16.5\;\mathrm{cm}$ (7"/18 cm; 7.5", 19 cm). If you want to graft shoulder seams, transfer stitches to stitch holder. If you want to sew them, bind off.
Left Band
Transfer the 16 (18, 19) stitches on the holder to knitting needle. Counting the stitches from right to left, there are 1 (2, 3) knit stitches, 9 rib stitches, and 6 (7, 7) stockinette stitches. Attach yarn on the right hand side, closest to the centre of the garment. Row 1 (RS): k1 (2, 3), r9, k6 (7, 7) Row 2 (WS): p6 (7, 7), r9, p1 (2, 3) Row 3: k1 (2, 3), r9, w&t Row 4: r9, p1 (2, 3) Row 5 (RS): k1 (2, 3), r9, k6 (7, 7) Row 6 (WS): p6 (7, 7), r9, p 1 (2, 3) Repeat rows 5 and 6 until armhole depth reaches $6.5^{\prime\prime}/16.5\:\mathsf{c m}\:(7^{\prime\prime}/1\otimes\mathsf{c m};7.5^{\prime\prime}/1\otimes\mathsf{c m})$ .Transfer stitches to holder or bind off.
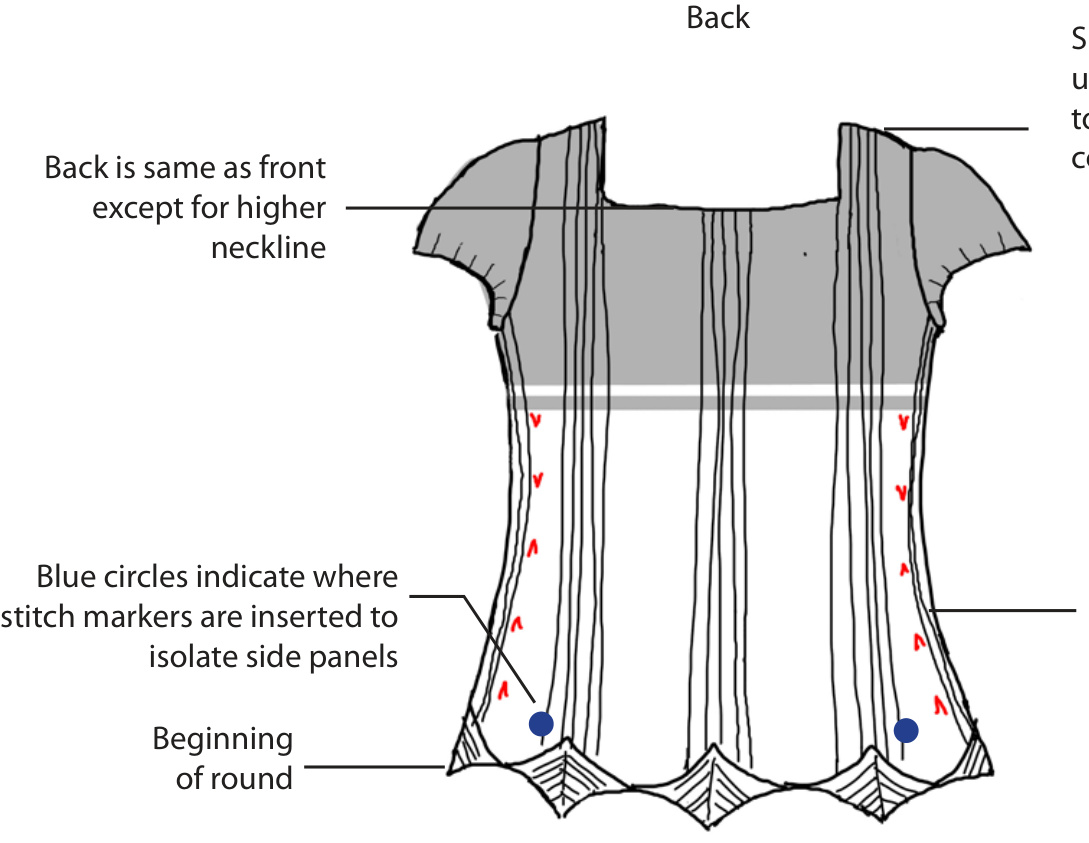
Back Panel and Shoulder Bands (All sizes)
Back panel decreases are worked the same as front, but neckline is an inch higher. Continue piece piece measures $4^{\prime\prime}/10\mathsf{c m}$ $\!\!\!\!\!\!\!\!\!\!\!\!\!\!\!\!\!\!\!\!\!\!\!\!\!\!\!\!\!\!\!\!\!\!\!\!\!\!\!\!\!\!\!\!\!\!\!\!\!\!\!\!\!\!\!\!\!\!\!\!\!\!\!\!\!\!\!\!\!\!\!\!\!\!\!\!\!\!\!\!\!\!\!\!\!\!\!\!\!\!\!\!\!\!\!\!\!\!\!\!\!\!\!\!\!\!\!\!\!\!\!\!\!\!\!\!\!\!\!\!\!\!\!\!\!\!\!\!\!\!\!\!\!\!\!\!\!\!\!\!\!\!\!\!\!\!\!\!\!\!\!\!\!\!\!\!\!\!\!\!\!\!\!\!\!\!\!\!\!\!\!\!\!\!\!\!\!\!\!\!\!\!\!\!\!\!\!\!\!\!\!\!\!\!\!\!\!\!\!\!\!\!\!\!\!\!\!\!\!\!\!\!\!\!\!\!\!\!\!\!\!\!\!\!\!\!\!\!\!\!\!\!\!\!\!\!\!\!\!\!\!\!\!\!\!\!\!\!\!\!\!\!\!\!\!\!\!\!\!\!\!\!\!\!\!\!\!\!\!\!\!\!\!\!\!\!\!\!\!\!\!\!\!\!\!\!\!\!\!\!\!\!\!\!\!\!\!\!\!\!\!\!\!\!\!\!\!\!\!\!\!\!\!\!\!\!\!\!\!\!\!\!\!\!\!\!\!\!\!\!\!\!\!\!\!\!\!\!\!\!\!\!\!\!\!\!\!\!\!\!\!\!\!\!\!\!\!\!\!\!\!\!\!\!\!\!\!\!\!\!\!\!\!\!\!\!\!\!\!\!\!\!\!\!\!\!\!\!\!\!\!\!\!\!\!\!\!\!\!\!\!\!\!\!\!\!\!\!\!\!\!\!\!\!\!\!\!\!\!\!\!\!\!\!\!\!\!\!\!\!\!\!\!\!\!\!\!\!\!\!\!\!\!\!\!\!\!\!\!\!\!\!\!\!\!\!\!\!\!\!\!\!\!\!\!\!\!\!\!\!\!\!\!\!\!\!\!\!\!\!\!\!\!\!\!\!\!\!\!\!\!\!\!\!\!\!\!\!\!\!\!\!\!\!\!\!\!\!\!\!\!\$ $5^{\prime\prime}/12.5\,\mathsf{c m}$ from start of armholes. The back shoulder bands are worked the same as the front bands, except that because the neckline in the back is 1 inch higher, the back bands should be correspondingly shorter.
Shoulder Seams
Either graft or sew shoulder seams together. For detailed instructions on how to graft ribbing, see Appendix.
Sleeves
The sleeves are knit top down, in the round, using short rows to create the sleeve cap. On double-pointed needles, pick up and knit 68, (76, 84) stitches evenly around the armhole. There should be 34, (38, 42) stitches on the front and back. Place marker at shoulder seam. Starting from shoulder seam: Row 1 (RS): k5, (6, 7), w&t Row 2: (WS): p10 (12, 14), w&t Row 3: Knit up to wrapped stitch, knit stitch and wrap, w&t next stitch. Row 4: Purl up to wrapped stitch, purl stitch and Wrap, w&t next stitch. Repeat Rows 3 and 4, adding 1 stitch to either side of short row, until there are 44 (50, 54) stitches between the wrapped stitches.
Ribbing:
\* Next RS Row: Begin working in 3 by 1 ribbing (k3, p1). Keeping ribbing consistent, work up to wrapped stitch, work wrapped stitch, w&t next stitch. WS Row: Keeping ribbing consistent (p3, k1), work up to wrapped stitch, work wrapped stitch, w&t next stitch. \* Repeat \* to $\ast3$ times, until there are 50 (56, 60) stitches between wrapped stitches. 42 (48, 52) rows. On RS, work back to stitch marker.
Finishing Sleeve:
Continuing on RS: In 3 by 1 ribbing, make 1 full round, working through the wrapped stitches, ending at stitch marker. Bind off loosely in ribbing bind-off
Neckline finishing
Using a 3 mm crochet hook, make 1 round of single crochet around neckline as follows: Crochet into each live stitch (27, 29, 33) from back panel. Then crochet into 2 out of every 3 stitches along inner edge of shoulder band. Crochet into each live stitch from front panel (27, 29, 33), and then into 2 out of every 3 stitches along the inside edge of the second shoulder band. Join and tie off.
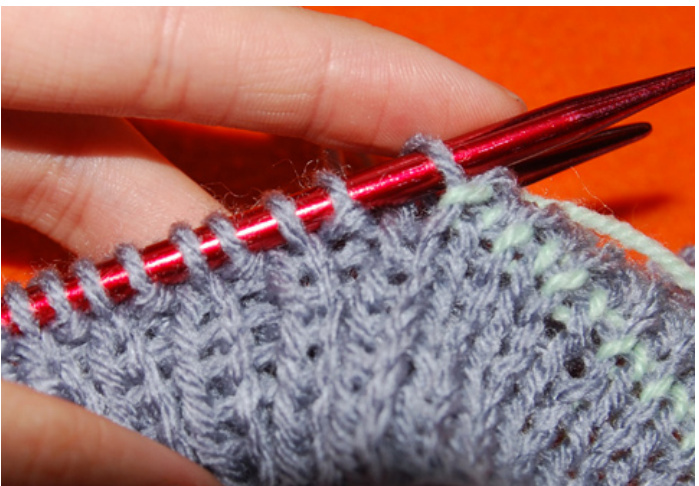
Appendix Grafting Stockinette Stitch
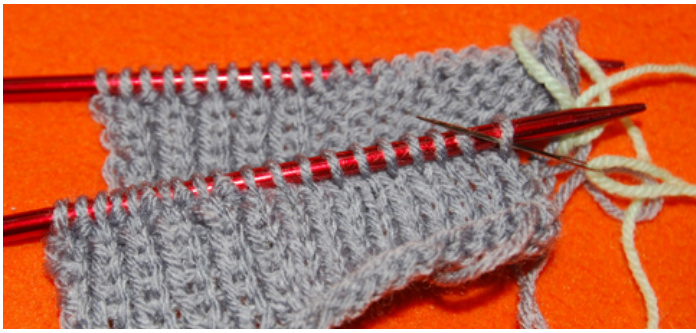
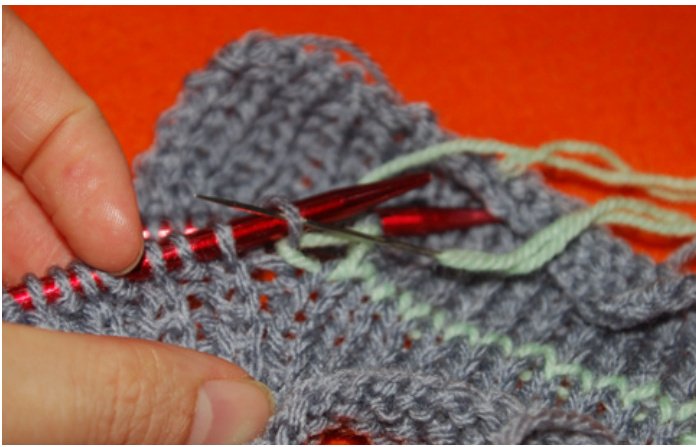
Line up the two pieces the way they you intend to graft them and hold the two needles parallel to each other.
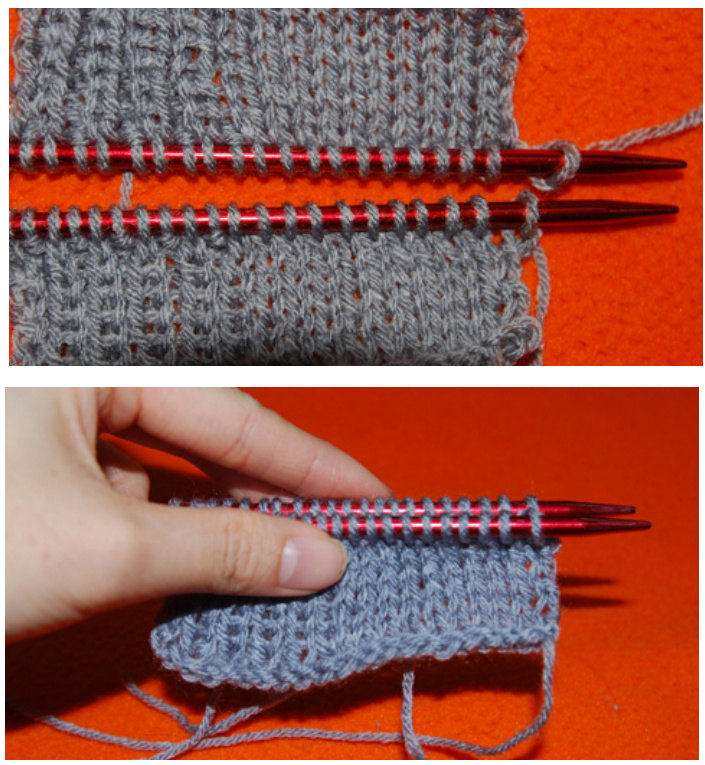
Thread a large tapestry needle with yarn and make two preparatory stitches as follows: thread needle purlwise into first stitch on front needle, then thread needle knitwise into first stitchonbackneedle.
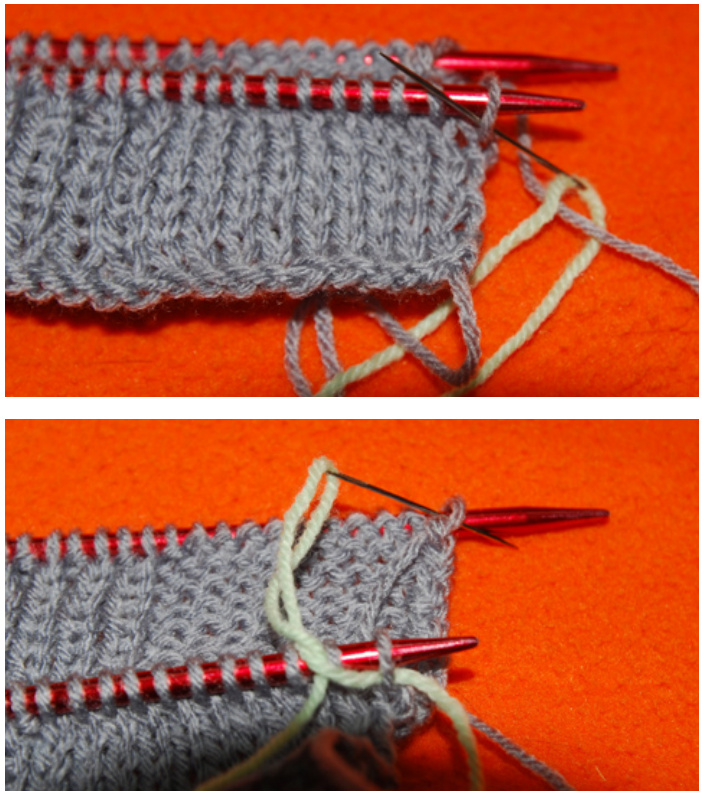
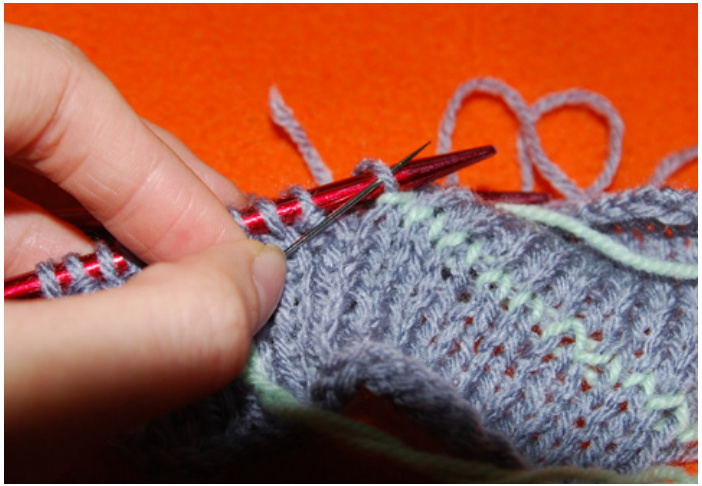
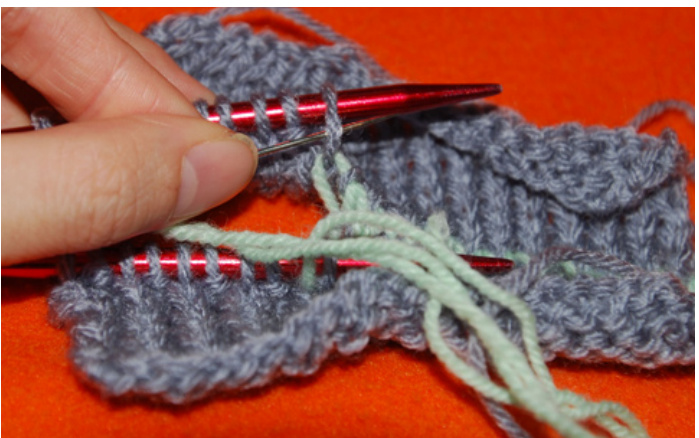
Now you are ready to start grafting. Grafting consists of four repeated steps. 1. Thread needle into first stitch knitwise, and slip it off the knitting needle.
2. Thread needle into second stitch purlwise. Keep it on the needle. Pull yarn through.
3. Thread needle into first stitch in the back purlwise, and slip it off the knitting needle.
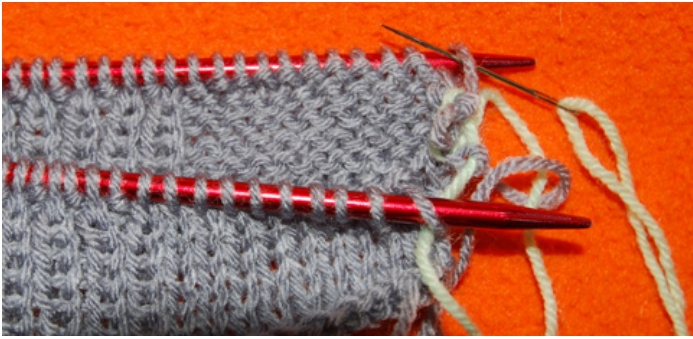
4. Thread needle into second stitch in the back knitwise, and keep it on the knitting needle. Pull yarn through.
Repeat steps 1, to 4 until end. The sequence is knit, purl, purl, knit. Tightening the yarn will result in a seamless join that mimics stockinette stitch.
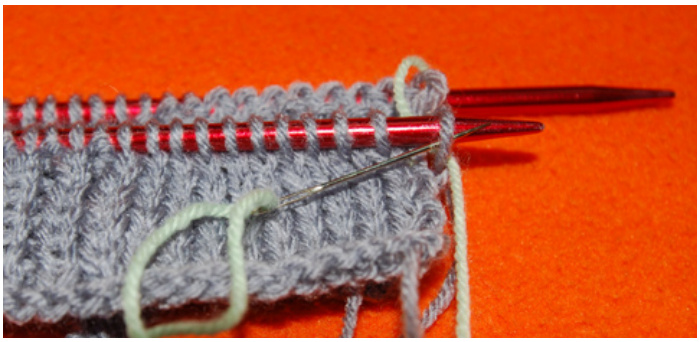
Notice that every stitch on the needle is threaded through twice: the first time a stitch is passed through, it is kept on the knitting needle. On the second pass, it is slipped off the needle. Stitches on the FRONT knitting needle are threaded purlwise the first time, and knitwise the second time. Stitches on the BACK knitting needle are threaded knitwise the first time, and purlwise the second time.
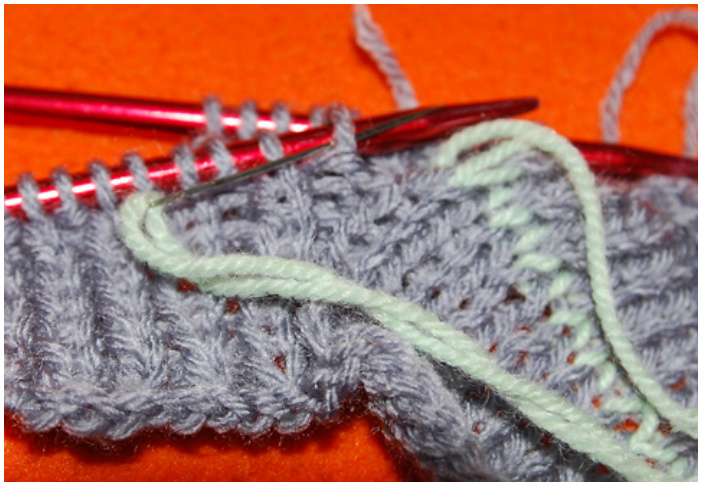
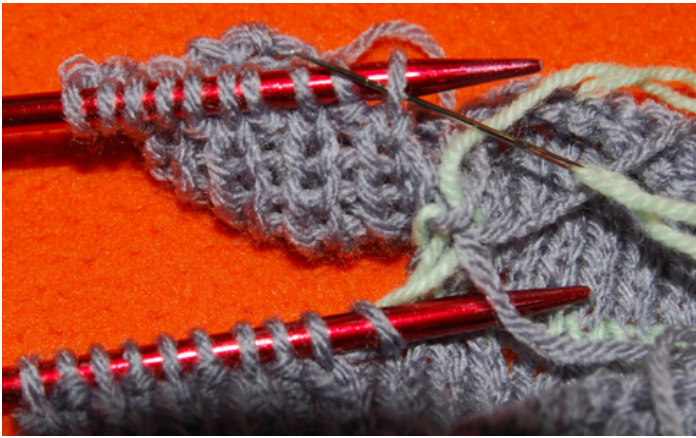
Grafting 1 by 1 Ribbing
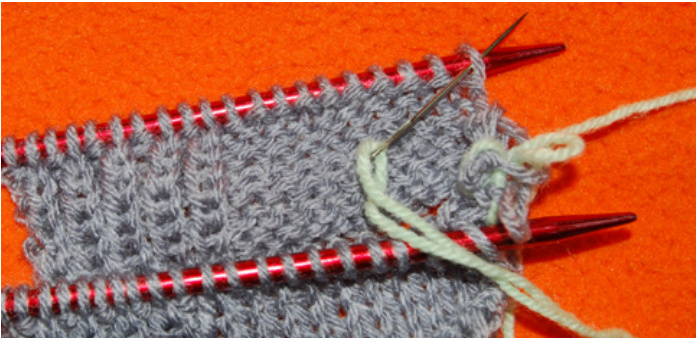
When ribbing is grafted together, the seam will never be completely invisible because the ridges and valleys of the ribbing will not quite match up, but instead by offset by half a stitch. This is normal. However, grafting ribbing still offers the advantage of avoiding bulky seams. When grafting 1 by 1 ribbing, knit stitches are threaded in the same order as in stockinette grafting, and purl stitches are threaded in reverse order. It is an 8 step process: You have reached the point in the seam where 1 by 1 ribbing begins. Note that the first stitch on the front needle is a knit stitch and the second is a purl stitch. The first stitch has already been threaded through once.
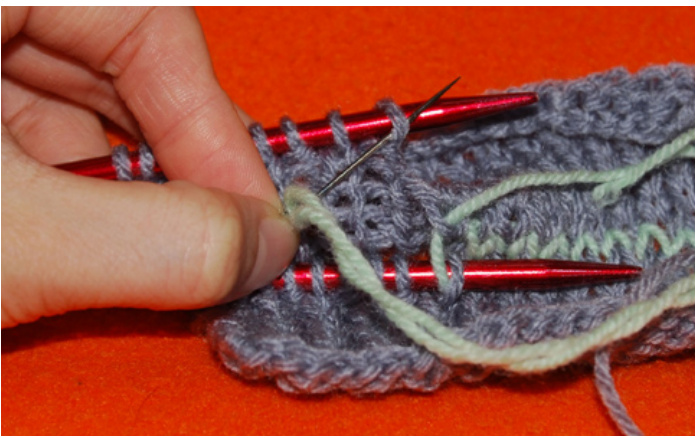
1. Thread the first (knit) stitch knitwise, and slip it off the needle.
2. Thread the second (purl) stitch in the front knitwise, and keep it on the needle. Pull yarn through.
3. Thread through the first (knit) stitch on the back needle purlwise, and slip it off the needle. (Note: it is a knit stitch on the RS, but since you are viewing the Ws, it appears as a purl stitch).
4. Thread through the second (purl) stitch on the back needle purlwise, and keep it on the needle. Pull yarn through. (Note: it is a purl stitch on the RS, but since you are viewing it from the Ws, it appears as a knit stitch.)
5. Return to the first stitch on the front needle (a purl stitch), and thread through it purlwise, and slip it off the needle.
6. Thread through the second stitch on the front needle (a knit stitch) purlwise, and keep it on the needle. Pull yarn through.

7. Return to the first stitch on the back needle (a purl stitch on the RS), and thread knitwise. Slip it off the needle.
8. Thread the second stitch on the back needle (a knit stitch on the RS) knitwise. Keep it on the needle. Pull yarn through.
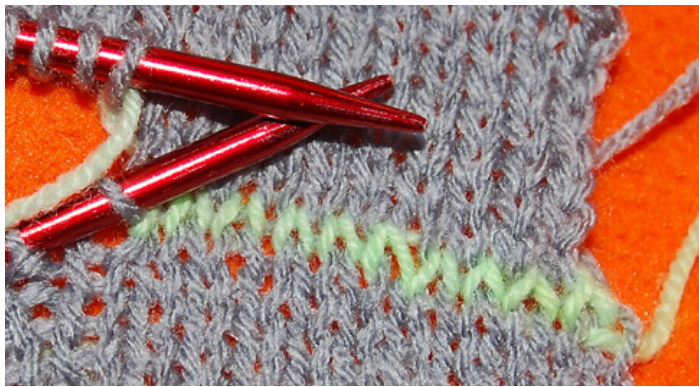
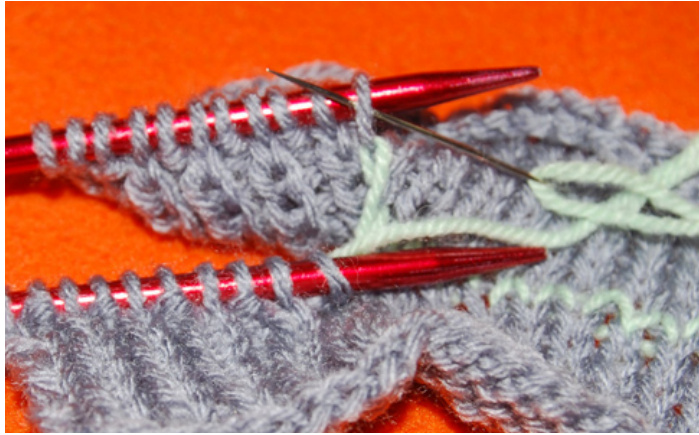
Repeat these 8 steps until end and tighten yarn The finished grafting is shown below, with the ribbing graft on the left. The sequence for 1 by 1 ribbing is: knit, knit, purl, purl, purl, purl, knit, knit.
Grafting other ribbing combinations
The sequence for 2 by 2 ribbing etc. will be different, but you can graft any ribbing sequence by following these principles:
On the front needle:
When a knit stitch is threaded the first time, thread as if to purl. When a knit stitch is threaded for the second time, thread as if to knit. When a purl stitch is threaded for the first time, thread as if to knit. When a purl stitch is threaded for the second time, thread as if to purl.
On the back needle:
(This refers to knit and purl stitches as they appear on the right side. Note that the wrong side faces you, so that knit stitches will appear as purl stitches and vice versa. If in doubt, spread the piece out flat as in the first photograph on page 10 to see whether you are working on a knit or purl stitch.) When a knit stitch is threaded for the first time, thread as if to knit. When a knit stitch is threaded for the second time, thread as if to purl. When a purl stitch is threaded for the first time, thread as if to purl. When a purl stitch is threaded for the second time, thread as if to knit.
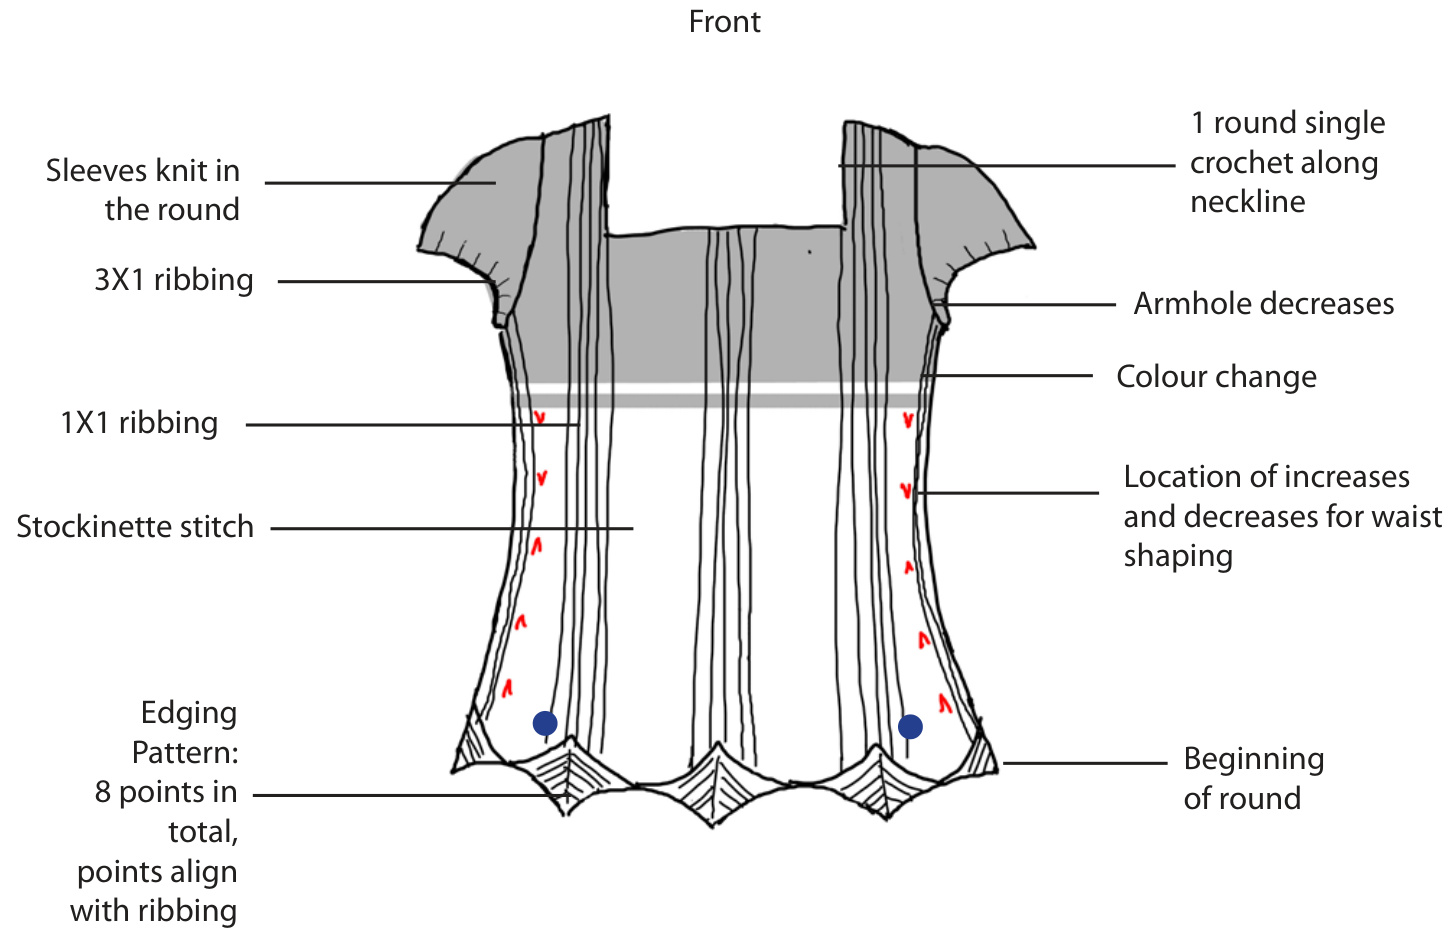
Shoulder slope created using short row; grafted together for seamless construction.(optional) Band of ribbing on either side. Therefore, waist shaping decreases and increases are worked on the stockinette panel immediately adjacent to the side ribbing. Note there are 4 increases/ decreases per round


