Forever Friends Bear Amigurumi Pattern By: Rena Kristanti IG: projectsofrena
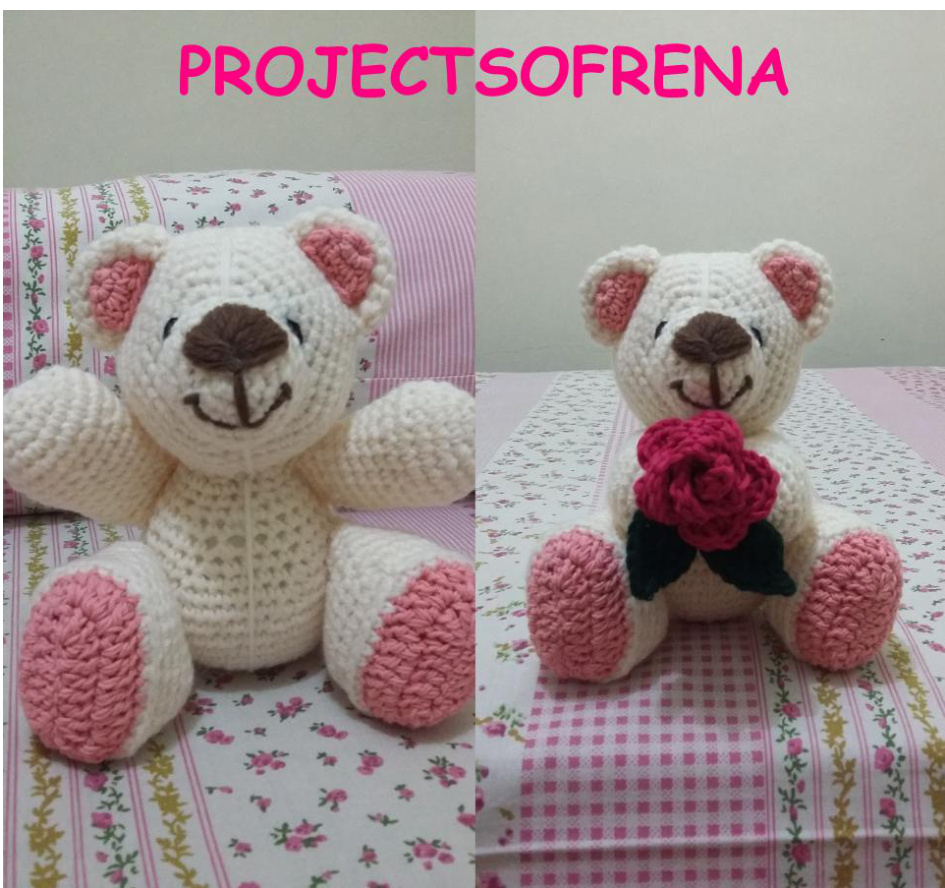
I love the cute things, and I love to crochet too so I'd like to combine it. Lately I found Forever Friends Bear in my shelf.. I really like the bear and never let it out of its packaging hahaha. And how about make it as an amigurumi? Well, sometimes I like to browse free pattern in Ravelry, but since there's no free pattern for this bear, I decided to develop it myself. This the first time I make a written pattern, so if you find difficulty to understand it feel free to ask it to me ^^. And in add, don't forget to follow my Instagram: projectsofrena. I share my hobbies there. Hopefully, you can also attach pictures of your bear after you make it from this pattern. Happy crochetting! \~ CRena Kristanti- 1-3rd January 2015.
Forever Friends Bear Amigurumi Pattern
Yarn : Soft wool or soft acrilic, I used local wool. You will need:
Abbreviations (US crochet terms)
Sts : stitches Ch : chain SI st : Slip stitch Sc :single crochet Dc : Double crochet Rnd : Round (since we will make amigurumi, working round without any turns) Inc : Increase (2 sc in same stitch) Dec : Decrease (working off 2 sts as 1)
Directions
Head (Use Creamy White Yarn)
Rnd 1 : Start with a magic ring (6 sts) Rnd 2 : 2 sc in each sc around (12 sts) Rnd 3 : 1 sc in next stitch, 2 sc (Inc) in next stitch , do 6 times (18 sts) Rnd 4 : 2 sc in next stitch, 2 sc (Inc) in next stitch , do 6 times (24 sts) Rnd 5 : 3 sc in next stitch, 2 sc (Inc) in next stitch , do 6 times (30 sts) Rnd 6 : 4 sc in next stitch, 2 sc (Inc) in next stitch , do 6 times (36 sts) Rnd 7 : 5 sc in next stitch, 2 sc (Inc) in next stitch , do 6 times (42 sts) Rnd 8 : 6 sc in next stitch, 2 sc (Inc) in next stitch , do 6 times (48 sts) Rnd 9 : 7 sc in next stitch, 2 sc (Inc) in next stitch , do 6 times (54 sts) Rnd 10-14 : Sc around (54 sts) Rnd 15 : 7 sc in next stitch, Dec (2 sts) in next stitch , do 6 times (48 sts) Rnd 16 : 6 sc in next stitch, Dec (2 sts) in next stitch , do 6 times (42 sts) Rnd 17 : 5 sc in next stitch, Dec (2 sts) in next stitch , do 6 times (36 sts) Rnd 16 : 4 sc in next stitch, Dec (2 sts) in next stitch , do 6 times (30 sts) Start to fill your amigurumi's head Rnd 15 : 3 sc in next stitch, Dec (2 sts) in next stitch , do 6 times (24 sts) Rnd 16 : 2 sc in next stitch, Dec (2 sts) in next stitch , do 6 times (18 sts) Rnd 17 : 1 sc in next stitch, Dec (2 sts) in next stitch , do 6 times (12 sts) Rnd 18 : Dec (2 sts) make 6 sts. Weave the end
Nose (Use Creamy White Yarn)
Rnd 1 : Start with a magic ring (6 sts) Rnd 2 : 2 sc in each sc around (12 sts) Rnd3 : 1 sc in next stitch, 2 sc (Inc) in next stitch , do 6 times (18 sts) Rnd 4 : 2 sc in next stitch, 2 sc (Inc) in next stitch , do 6 times (24 sts) Rnd 5 : Sc around (24 sts) Rnd6 : 3 sc in next stitch, 2 sc (Inc) in next stitch , do 6 times (30 sts), leave long tail to sew At the center of your nose (around rnd 1), start to embroider your nose and mouth like the picture below
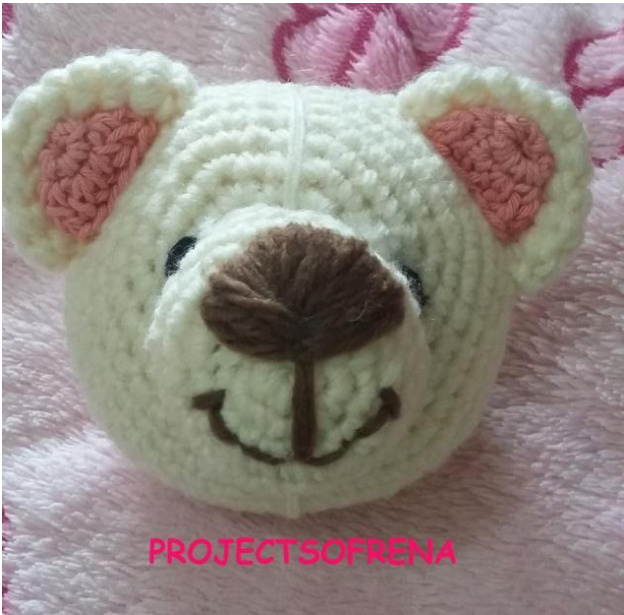
After embroidery, attach nose to head using tapestry needle. After you attach nose to head, don't forget to embroider the eyes using black yarn
Outer Ears (Use Creamy White Yarn) - Make 2 pcs
Rnd 1 : Start with a magic ring (6 sts) Rnd 2 : 2 sc in each sc around (12 sts) Rnd 3 : 1 sc in next stitch, 2 sc (Inc) in next stitch , do 6 times (18 sts) Rnd 4 : 2 sc in next stitch, 2 sc (Inc) in next stitch , do 6 times (24 sts) Rnd 5 : Sc around (24 sts), leave long tail to sew Inner Ears (Use Pink Yarn, switch your hook to 3 mm) - Make 2 pc Rnd 1 : Start with a magic ring (6 sts) Rnd 2 : 2 sc in each sc around (12 sts), Chain 3 Rnd3 : 2 dc in each sc around (12 sts), leave long tail to sew After it, you will get fully ears, now, attach them to the head. Mark you ears positions if you need. After you finish the face, don't forget to make center line among the face (the characteristic of Forever Friends Bear); Locate the center of the ears, then insert your hook, make a slip stitch, then insert the yarn to center of upper nose; Let your yarn out from the bottom of the nose and do the same thing to the bottom of its face. Do it to back too.
Body
Rnd 1 : Start with a magic ring (6 sts) Rnd 2 : 2 sc in each sc around (12 sts) Rnd 3 : 1 sc in next stitch, 2 sc (Inc) in next stitch , do 6 times (18 sts) Rnd 4 : 2 sc in next stitch, 2 sc (Inc) in next stitch , do 6 times (24 sts) Rnd 5 : 3 sc in next stitch, 2 sc (Inc) in next stitch , do 6 times (30 sts) Rnd 6 : 4 sc in next stitch, 2 sc (Inc) in next stitch , do 6 times (36 sts) Rnd 7 : 5 sc in next stitch, 2 sc (Inc) in next stitch , do 6 times (42 sts) Rnd 8 : 6 sc in next stitch, 2 sc (Inc) in next stitch , do 6 times (48 sts) Rnd 9 : 7 sc in next stitch, 2 sc (Inc) in next stitch , do 6 times (54 sts) Rnd 10-11 : Sc around (54 sts) Rnd 12 : 7 sc in next stitch, Dec (2 sts) in next stitch , do 6 times (48 sts) Rnd 13 : 6 sc in next stitch, Dec (2 sts) in next stitch , do 6 times (42 sts) Rnd 14 : 5 sc in next stitch, Dec (2 sts) in next stitch , do 6 times (36 sts) Rnd 15 : 4 sc in next stitch, Dec (2 sts) in next stitch , do 6 times (30 sts) Rnd 16 : 3 sc in next stitch, Dec (2 sts) in next stitch , do 6 times (24 sts) Rnd 17-18 : Sc around (24 sts) Rnd 19 : 2 sc in next stitch, Dec (2 sts) in next stitch , do 6 times (18 sts) Rnd 20-21 : Sc around (18 sts) Fill your amigurumi body, it will look like a big egg. Leave long tail to sew. Join the body and the head. After joining them, don't forget to make the center line again. Do the same thing like you want to make center line in head. This time, you can join body center line with head center line to fix if it's not balance. Join them in neck. Before I made the back body center line, I also make a sew in the bottom of the body to make sure that the center line is tight.
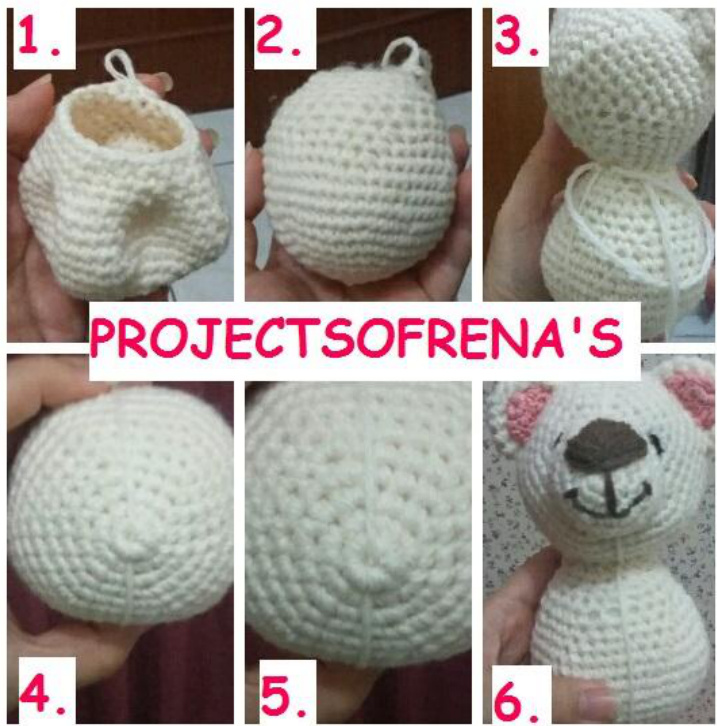
Here the notes for the pictures so it would help you to understand: 1. The body before you stuff it. A little bit wavy? That's fine. 2. The body after you fill it with the stuff. Look like a big egg. 3. Join centerline body and head (do it in back and forward) 4. Sew the center line to the bottom of the body 5.Same picture like number 4 6.You amigurumi look like from front
Hands (Use Creamy White Yarn)
Rnd 1 : Start with a magic ring (6 sts) Rnd 2 : 2 sc in each sc around (12 sts) Rnd 3 : 1 sc in next stitch, 2 sc (Inc) in next stitch , do 6 times (18 sts) Rnd 4 : 2 sc in next stitch, 2 sc (Inc) in next stitch , do 6 times (24 sts) Rnd 5-6 : Sc around (24 sts) Rnd 7 : 2 sc in next stitch, Dec (2 sts) in next stitch , do 6 times (18 sts) Rnd 8-12 : Sc around (18 sts) Rnd 13 : 2 dc in each sc around (12 sts), start to stuff the hand (12 sts) Rnd 14-15 : Sc around (12 sts) Fill it with doll stuffing, but this time, don't stuf too much. Just a litle stuffing, so you can lightly press the hands. At the tip of the hands, press it and sew to the body. Just sew it one side (from the back to the front). By sewing like that, you can set any movements of your amigurumi's hand.
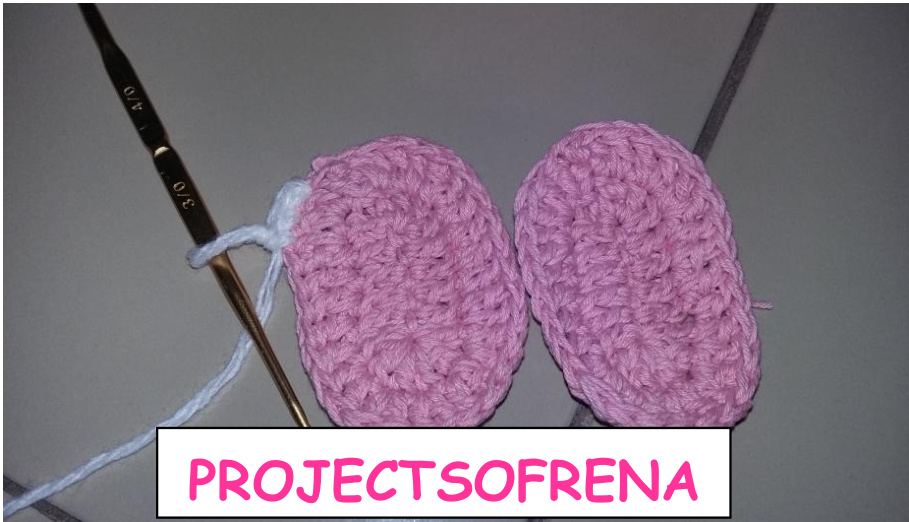
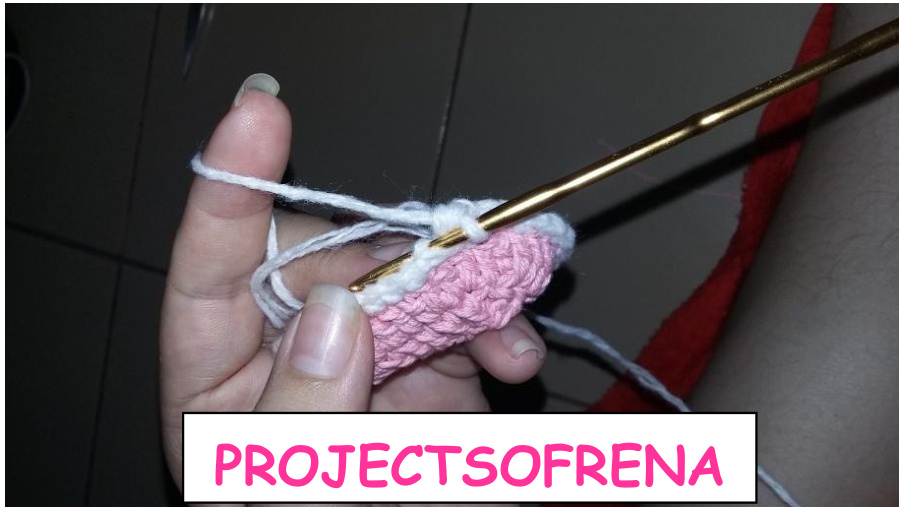
Legs (Use Pink Yarn, 4 mm hook)
I used small ply pink yarn, so to get similar size with the white yarn, I use double strand of this pink yarn. If you have similar size yarn no need to double it. Rnd 1 : Start with 9 chains, turn and you will see two sides of your chain. Dc in 4th ch in one side of your base ch. Dc in next 4 ch. 6 ch in the last stitch. Now do the same thing in the other side. Dc in next 4 ch, then 3 dc in last stitch. Join to the top of the chain 3 (you beginning stitches). Ch 3, don't turn. Rnd 2 : Dc in the same stitch of the ch 3. 2 dc in next 3 sts. Dc in next 4 sts. 2 dc (Inc) in next 6 sts. Dc in next 4 sts. 2 dc in next 3 sts. Join the stitch to the top of ch 3. (32 sts). Rnd3 : Change the colour to white. Ch 1. Sc around the sts (32 sts). Ch 1
Rnd 4 : Now, working in the loop behind loop. Sc around in the loop behind the loop. Join stitch to the beginning chain (32 sts). By working like this, you pink part will be the base of the legs. Ch 1. The Picture below show how you do working in loop behind loop.
Rnd5-10 : Now working like usual, both in front and back loops. Sc around (32 sts), ch 1, sc around in next sts. Rnd 11 : Sc in 8 next sts. 4 dec in next stitches. Sc in next 8 sts. Make 4 dec again (24 sts) Rnd 12 : Sc around the sts (24 sts) Rnd 13 : Sc in next 2 sts, dec Dec (2 sts) in next stitch , do 6 times (18 sts) Rnd 14 : Sc around the sts (18 sts). Stuff the leg, make sure to stuff it firmly in the base but don't stuff to much in th top of the legs. Leave long tail to sew. Sew from the back side to the front, and sew the inner side of legs stick to the body. NB: After the bear finished, you can attach any kind of brooch to make it cuter. I added rose brooch ^^


