FRAMIENS
BY NATALIA VASILIEVA
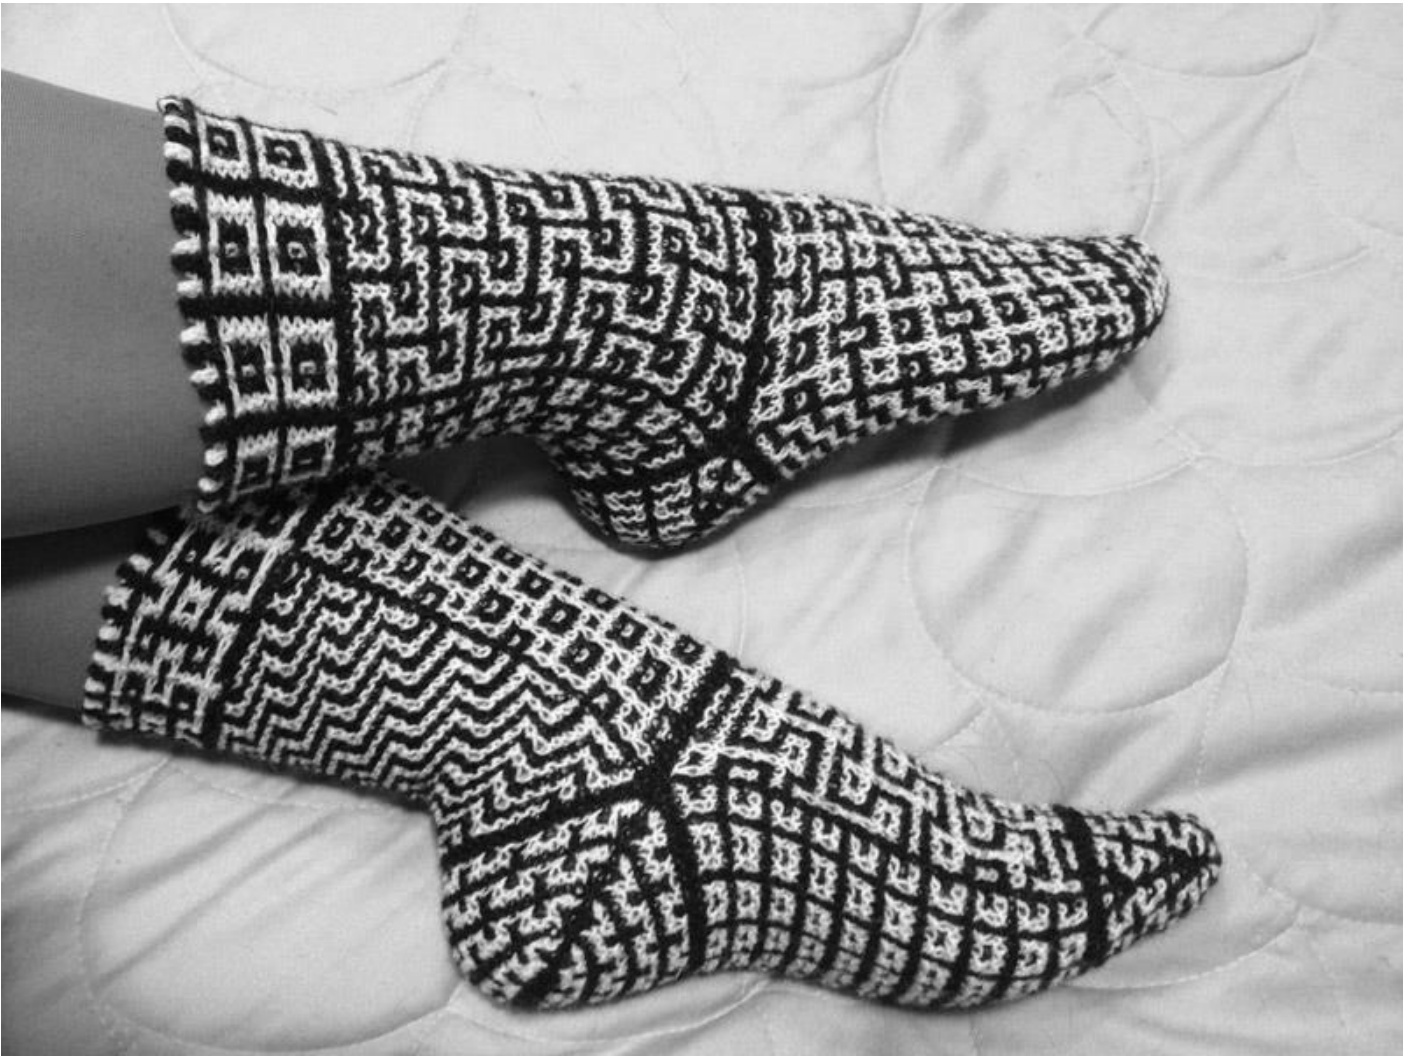
SKILL LEVEL:INTERMEDIATE TECHNIQUES USED: MAGIC LOOP, MOSAIC KNITTING (SLIPPEDSTITCH KNITTING IN TWO COLORS), FOLLOWING CHARTS, CROCHETED PROVISIONAL CAST-ON, KNITTED CAST-ON, PICKING-UP STITCHES, FORETHOUGHT HEEL, TRICORNER TRICK, GARTER-STITCH GRAFTING.
FINISHED MEASUREMENTS
Sock length: 81/4" (21 cm) to fit foot length 10" (25.5 cm). Sock circumference: 71/2" (19 cm) to fit foot circumference 9" (23 cm). Leg length: 63/4" (17 cm).
TOOLS AND MATERIALS
· Zwerger Garn Opal Solids 4-ply (75% wool, 25% polyamide (nylon); 465 yds (425 m) per 100 g): 0 1 skein in #2619 (black) - about a half of a skein 0 1 skein in #3081 (natural) - about a half of a skein · Circular needles US 1/ (2.5 mm) or size to get the gauge; at least 32" (80 cm) length · Crochet hook 2.5 mm ·Spare yarn ●Spare circular or double point needle of any size ·Blunt sewing needle
GAUGE
Mosaic pattern: 24 sts x 24 rows = 31/8" x 2%/4" (8 x 7 cm).
PATTERN NOTES
These socks are worked in Magic Loop technique with the beginning of the round (BOR) at inner side of leg. You may utilize any other technique of your choice preserving BOR position. Each sock starts with a provisional cast-on for a sideways cuff. Completed cuff is grafted using a long tail left from a set-up row. Each sock features up to four different mosaic stitch patterns, two on the leg and two on the foot. Patterned heel is worked in a forethought fashion. Standard toe is also patterned.
STITCH PATTERN NOTES
This particular design is inspired by floor mosaics of Notre Dame d'Amiens Cathedral. You may find similar stitch patterns for substitution in Barbara G. Walker's mosaic collections. In mosaic knitting, you work with one yarn at a time for two consequent rows/rounds. Patterning is created by slipped stitches of the color not in use. Each stitch pattern is presented in 2 versions: black on white background and white on black background; and also in 2 mirrored versions if applicable. You may switch them interchangeably; please note white-on-black and black-onwhite versions aren't the exact copies of each other. Most stitch patterns here expand easily in either direction, but some may require more thorough planning. In such cases try to avoid floats longer than 1 stitch at the sides. Charts in this pattern are designed with this limitation already (except for heels and toes where some trade-offs are inevitable).
DIRECTIONS
Decide which yarn will be MC and CC.
Right Sock
Select a chart for cuff. Depending on the color of the first row of the chart, proceed to Cuff (12-rows chart) in case of CC, or to Alternative Cuff (20-rows chart) in case of MC. Both sets of instructions describe the same operations but in reversed colors, and put this way to prevent possible confusion.
Cuff. (12-rows.chart)
Using a crochet hook and a spare yarn, cast on 15 sts around the needle. Attach MC leaving a 10" (25 cm) tail, knit 1 stitch and return it onto left needle, (\*) [knit 1 stitch but don't slip it off the needle, return new stitch onto left needle] 2 times (= 14+3 sts) and then bind off 2 sts (\*\*) for selvedge picot (= 14+1 sts), knit to last stitch, drop the yarn, attach CC, purl the last stitch, turn the work. You have worked the set-up (WS) row for the cuff. Next CC row (RS): slip first stitch for chain selvedge, work next CC row of Cuff Chart knitting CC stitches and slipping MC stitches wyib to last stitch and knit it, turn the work. Next CC row (WS): make selvedge picot (sequence between (\*) and (\*\*) above); leave last bound-off stitch on right needle and work the same CC row of Cuff Chart knitting CC stitches and slipping MC stitches wyif to last stitch, drop CC yarn, pick up MC yarn from below, purl the last stitch, turn the work. Next MC row (RS): slip first stitch for chain selvedge, work next MC row of Cuff Chart knitting MC stitches and slipping CC stitches wyib to last stitch and knit it, turn the work. Next MC row (WS): make selvedge picot (sequence between (\*) and (\*\*) above); leave last bound-off stitch on right needle and work the same MC row of Cuff Chart knitting MC stitches and slipping CC stitches wyif to last stitch, drop MC yarn, pick up CC yarn from below, purl the last stitch, turn the work. These 2 rows from one mosaic ridge in MC Continue in this manner making selvedge picots at the left edge of the cuff and switching yarns every two rows before last WS stitch for 118 rows/59 mosaic ridges in total (almost 10 repeats). End with WS row in CC. Release open loops of the set-up row. Thread a blunt sewing needle with caston tail and graft both ends of the cuff forming a garter stitch on RS.
Alternative.Cuff.(20-rows.chart)
Using a crochet hook and a spare yarn, cast on 15 sts around the needle. Attach CC leaving a 10" (25 cm) tail, knit 1 stitch and return it onto left needle, (\*) [knit 1 stitch but don't slip it off the needle, return new stitch onto left needle] 2 times (= 14+3 sts) and then bind off 2 sts (\*\*) for selvedge picot (= 14+1 sts), knit to last stitch, drop the yarn, attach MC, purl the last stitch, turn the work. You have worked the set-up (WS) row for the cuff. Next MC row (RS): slip first stitch for chain selvedge, work next MC row of Cuff Chart knitting MC stitches and slipping CC stitches wyib to last stitch and knit it, turn the work. Next MC row (WS): make selvedge picot (sequence between (\*) and (\*\*) above); leave last bound-off stitch on right needle and work the same MC row of Cuff Chart knitting MC stitches and slipping CC stitches wyif to last stitch, drop MC yarn, pick up CC yarn from below, purl the last stitch, turn the work. These 2 rows from one mosaic ridge in MC. Next CC row (RS): slip first stitch for chain selvedge, work next CC row of Cuff Chart knitting CC stitches and slipping MC stitches wyib to last stitch and knit it, turn the work. Next CC row (WS): make selvedge picot (sequence between (\*) and (\*\*) above); leave last bound-off stitch on right needle and work the same CC row of Cuff Chart knitting CC stitches and slipping MC stitches wyif to last stitch, drop CC yarn, pick up MC yarn from below, purl the last stitch, turn the work. These 2 rows form one mosaic ridge in CC. Continue in this manner making selvedge picots at the left edge of the cuff and switching yarns every two rows before last WS stitch for 118 rows/59 mosaic ridges in total (almost 6 repeats). End with WS row in CC. Release open loops of the set-up row. Thread a blunt sewing needle with caston tail and graft both ends of the cuff forming a garter stitch on RS.
Leg
Using MC, pick up and knit 60 sts along the straight (two-color) edge of the cuff. Distribute for working in the round. Beginning of the round is at the inner side of the leg. Next round (MC): Purl. Select two charts for leg making sure the first row of each chart is in CC, and Work as follows: Next round (CC): Drop MC yarn, pick up CC yarn from below. Needle 1: Work next CC row of Leg Chart I knitting CC stitches and slipping MC stitches wyib; Needle 2: Work next CC row of Leg Chart II knitting CC stitches and slipping MC stitches wyib. Next round (CC): Needle 1: Work the same CC row of Leg Chart I purling CC stitches and slipping MC stitches wyib; Needle 2: Work the same CC row of Leg Chart II purling CC stitches and slipping MC stitches wyib. These 2 rounds form one mosaic ridge in CC. Next round (MC): Drop CC yarn, picking up MC yarn from below. Needle 1: Work next MC row of Leg Chart I knitting MC stitches and slipping CC stitches wyib; Needle 2: Work next MC row of Leg Chart II knitting MC stitches and slipping CC stitches wyib. Next round (MC): Needle 1: Work the same MC row of Leg Chart I purling MC stitches and slipping CC stitches wyib; Needle 2: Work the same MC row of Leg Chart II purling MC stitches and slipping CC stitches wyib. These 2 rounds form one mosaic ridge in MC Continue in this manner switching yarns every two rounds, for desired height Sample socks have 86 rounds (43 ridges) in the leg. With MC, knit one round, purl one round (=one garter ridge in MC)
Heel placeholder
Drop MC. Using a spare dpn or short circulars, knit 31 stitches with a spare yarn (=30 sts of Needle 1 +1 st of Needle 2) for forethought heel. These stitches will be knitted again for sole on the next round, and the heel will be finished later.
Foot
Pick up MC and work one garter ridge. Select two charts for instep and sole making sure the first row of each chart is in CC, and work mosaic ridges in the same manner as for leg for desired length. Sample socks have 78 rounds (39 ridges) in the foot. End with CC ridge. Work one garter ridge in MC
Toe.
Select a chart for toe making sure the first row of the chart is in MC, and work mosaic ridges in the same manner as for leg, maintaining decreases in pattern on odd-numbered rounds only. After end of chart purl all stitches with MC on Needle 1 only. Cut the yarn leaving 8" (20 cm) tail and use it to graft the remaining stitches forming a garter ridge along Needle 2.
Heel
Ifin doubt, make the heel Starting from the inner side of the leg, slide the needle before the toe, using other ends of the same skeins, a through the back-of-leg stitches beneath the spare yarn adjust the length of the fo according to your needs. for heel placement and then through the foot stitches above the spare yarn for heel placement = 31+32 sts. Remove spare yarn. Attach MC and work Heel Set-up Round as follows: Needle 1: k31, twist the left leg of the next stitch of the same round and pull the right leg of the same stitch through1 = 1 st increased; Needle 2: knit the half-stitch twisted, k14, k2tog, k14, knit the half-stitch twisted, twist the right leg of the stitch before retrieved backof-leg stitches and pull the left leg of the same stitch through = 1 st decreased, 1 st increased. 32+32 sts. Next round (MC): Purl. Select a chart for heel making sure the first row of the chart is in CC. Attach CC and work mosaic ridges in the same manner as for leg, maintaining decreases in pattern on odd-numbered rounds only. After end of chart purl all stitches with MC on Needle 1 only. Cut the yarn leaving 9" (23 cm) tail and use it to graft the remaining stitches forming a garter ridge along Needle 2.
Left Sock
Work as for Right Sock (you may use different charts for Cuff, Leg, Foot, Toe and Heel, either in reversed colors or mirrored), and also use 30 sts of Needle 2 +1 st of Needle 1 for Heel placeholder, plus don't forget the decrease at the middle of the sole on Heel Set-up Round should be at the Sole side (i.e. on Needle 1).
FINISHING
Weave in all ends. Block if desired.
Key to charts
on odd-numbered rows/rounds of the same color: knit on even-numbered rows of the same color: knit on even-numbered rounds of the same color: purl on rows/rounds of the opposite color: slip 1 with yarn at WS on odd-numbered rows/rounds of the same color: knit on even-numbered rows of the same color: knit on even-numbered rounds of the same color: purl on rows/rounds of the opposite color: slip 1 with yarn at WS CC can be used instead of MC to prevent an elongated float on odd-numbered rows: cast on 1 stitch using knitted cast-on method on even-numbered rows: bind off 1 stitch on odd-numbered rows: knit on even-numbered rows: leave stitch on right needle on odd-numbered rounds: k2tog on even-numbered rounds: purl on odd-numbered rounds: ssk on even-numbered rounds: purl selvedge stitch at the beginning of the row: slip 1 selvedge stitch at the end of the row: drop working yarn before and purl last stitch with opposite color
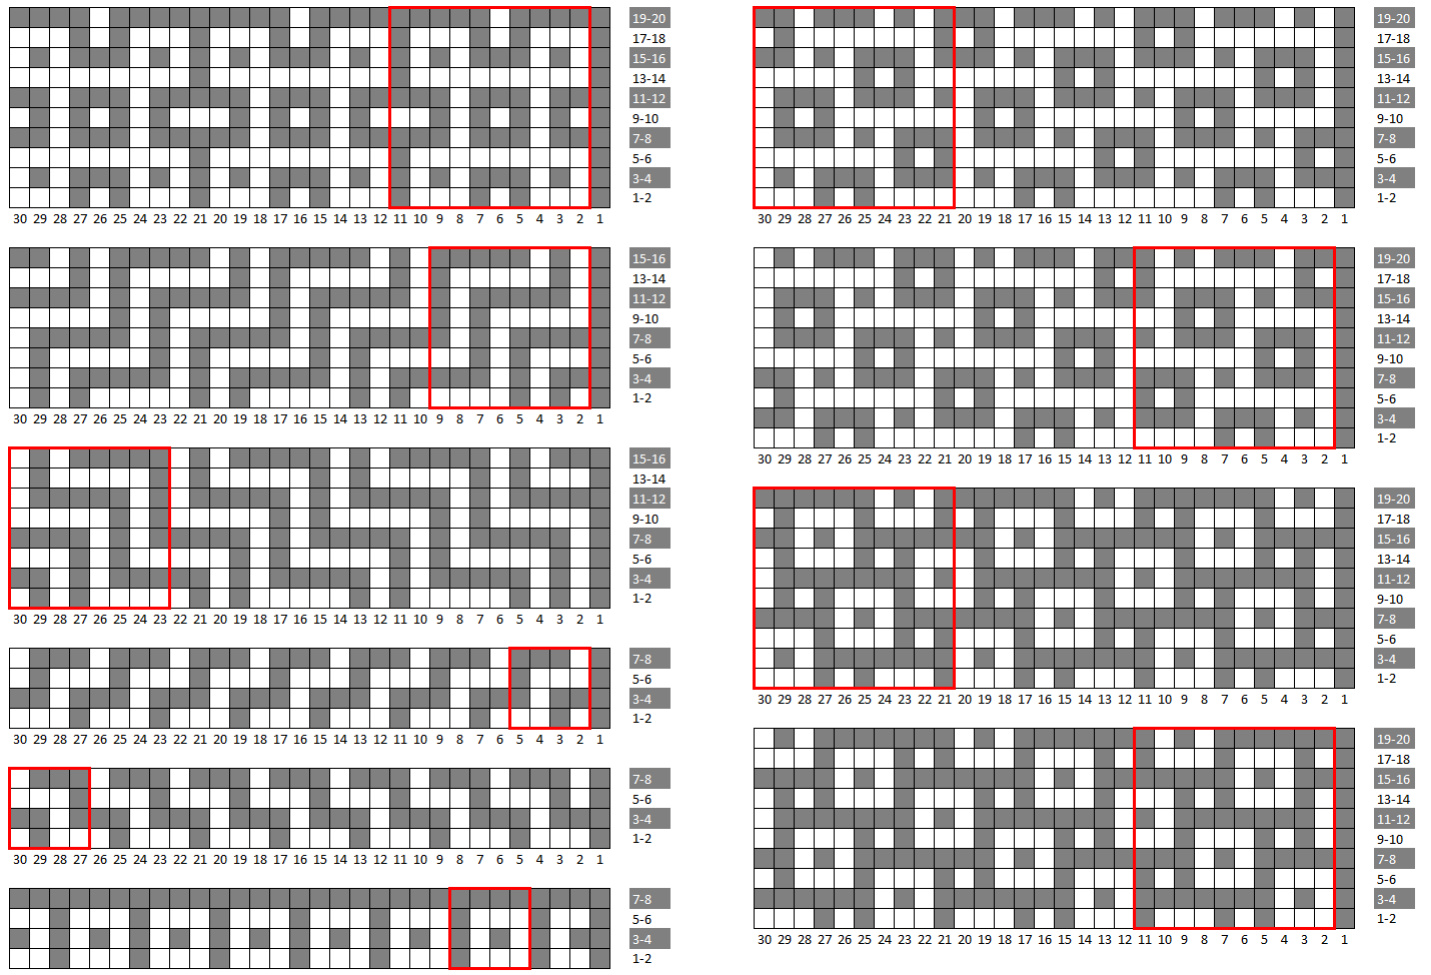
Cuff Charts
Dark MC, light CC
Light MC, dark CC
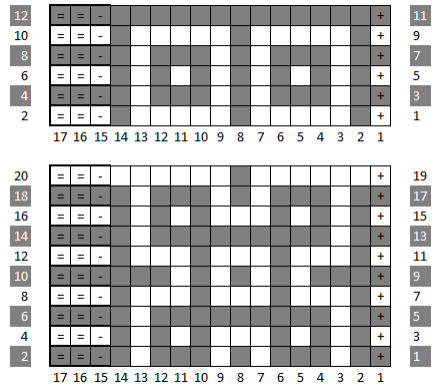
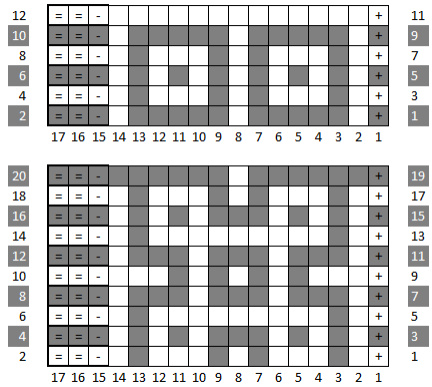
Please note 20-rows Cuff Charts start from MC row and need a set-up row in CC. "Framiens" by Natalia Vasilieva
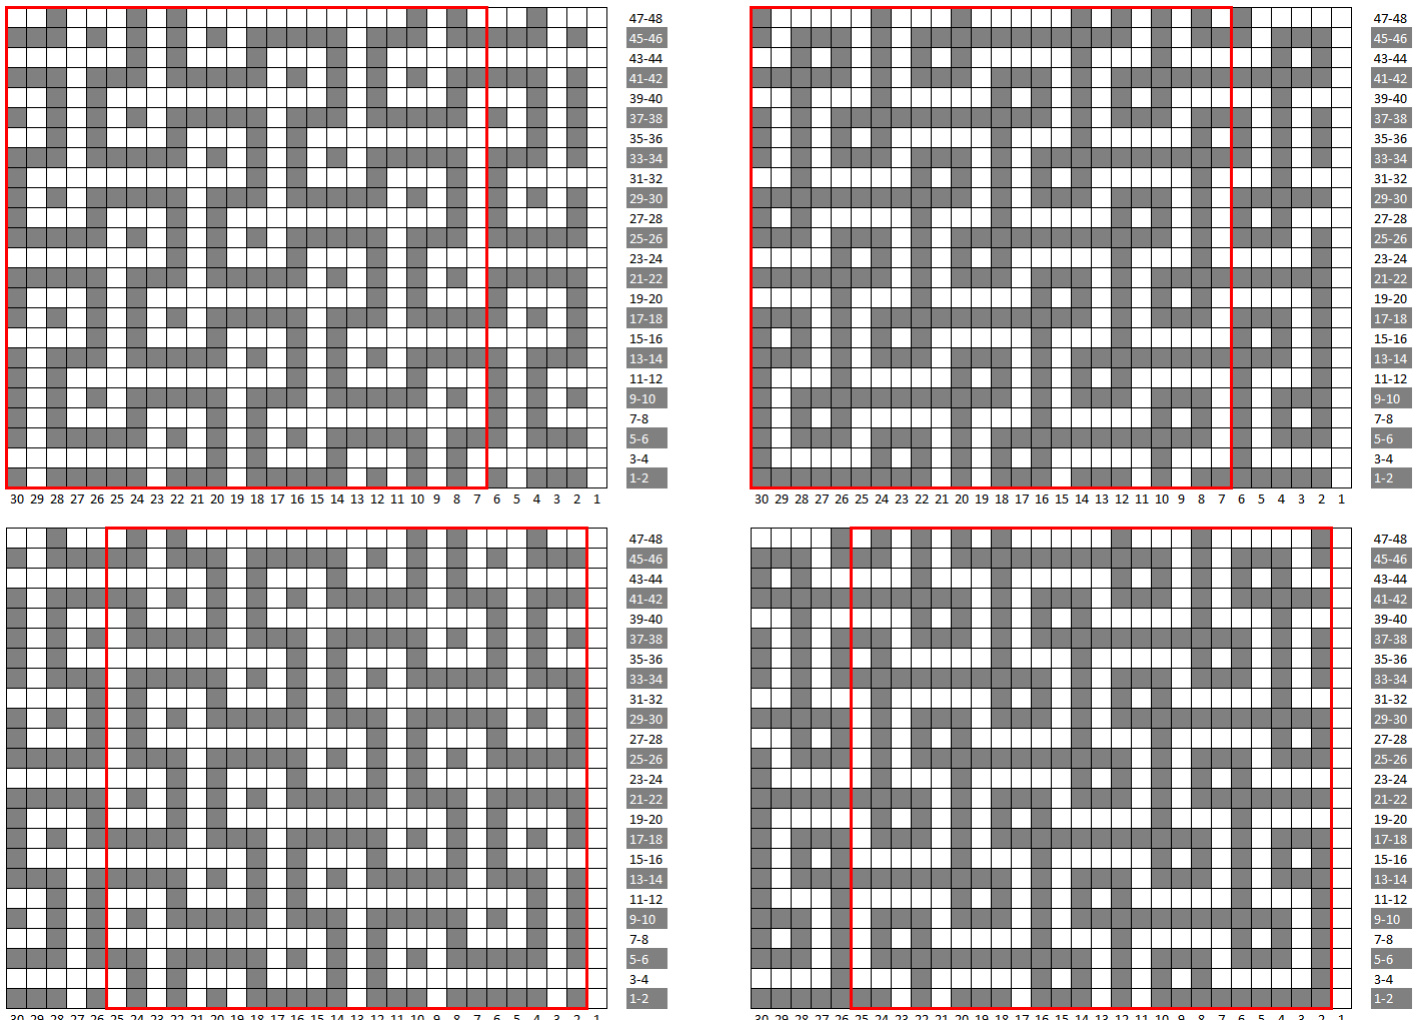
Leg and Foot Charts
Dark MC, light CC
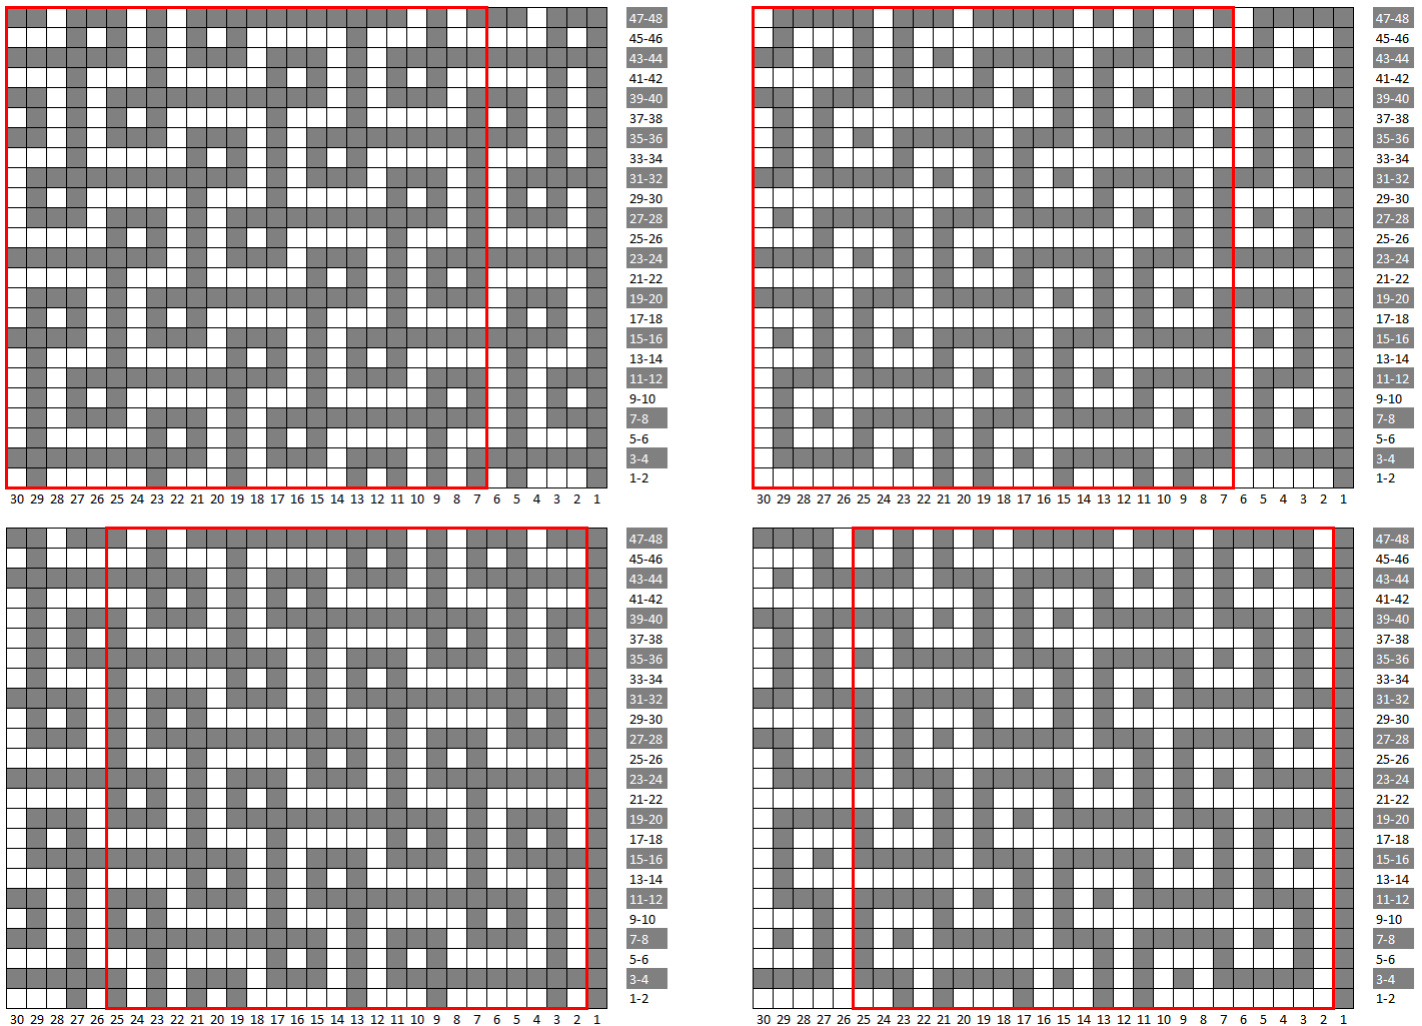
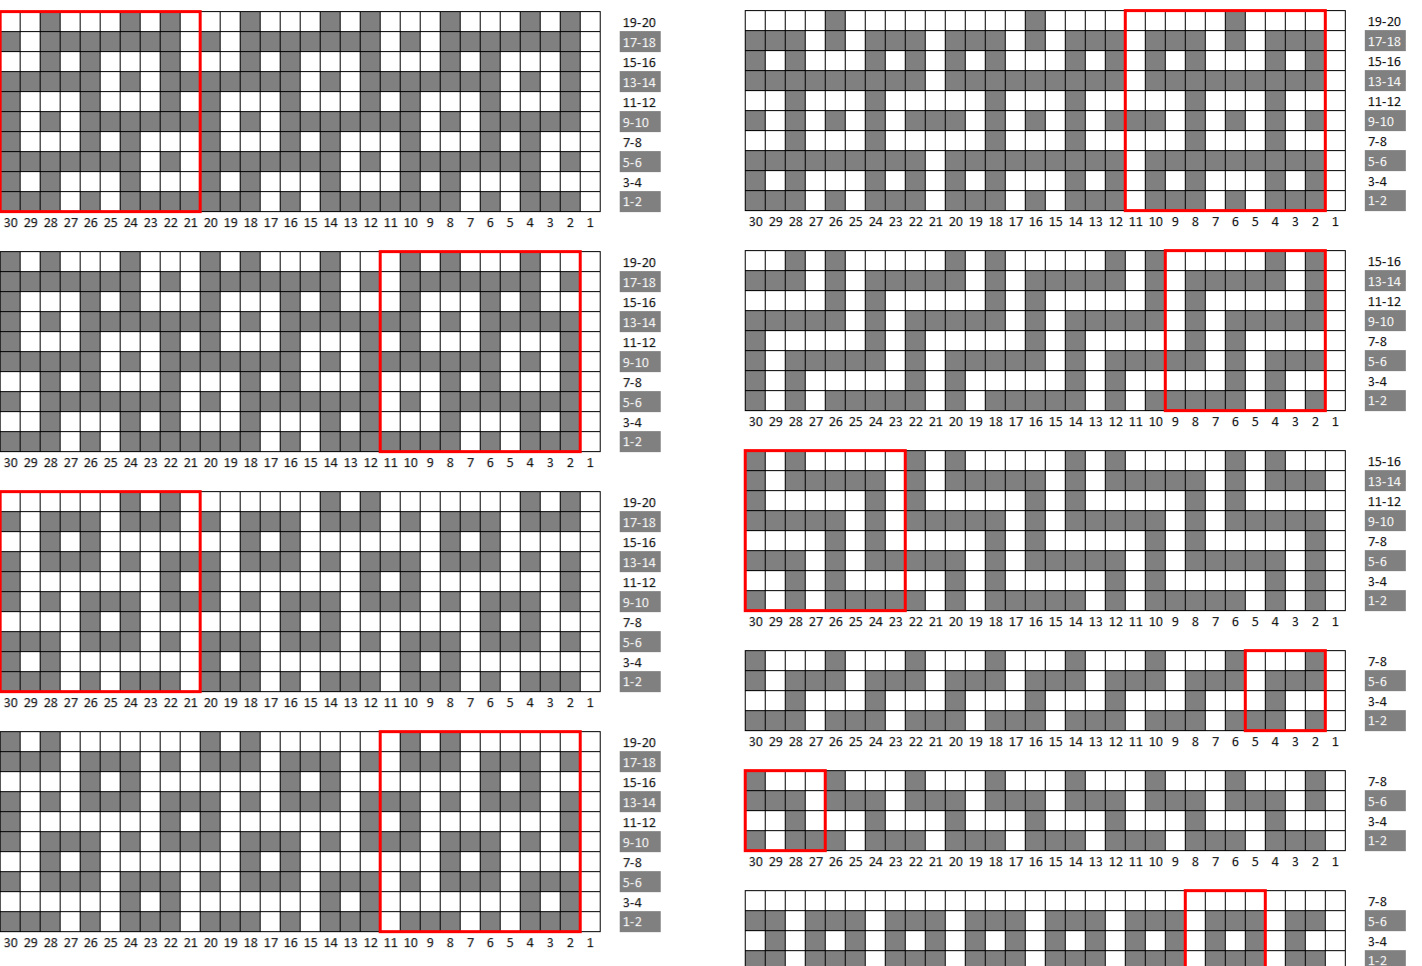
Leg and Foot Charts (continued)
Dark MC, light CC
Leg and Foot Charts (continued)
Light MC, dark CC
Leg and Foot Charts (continued)
Light MC, dark CC
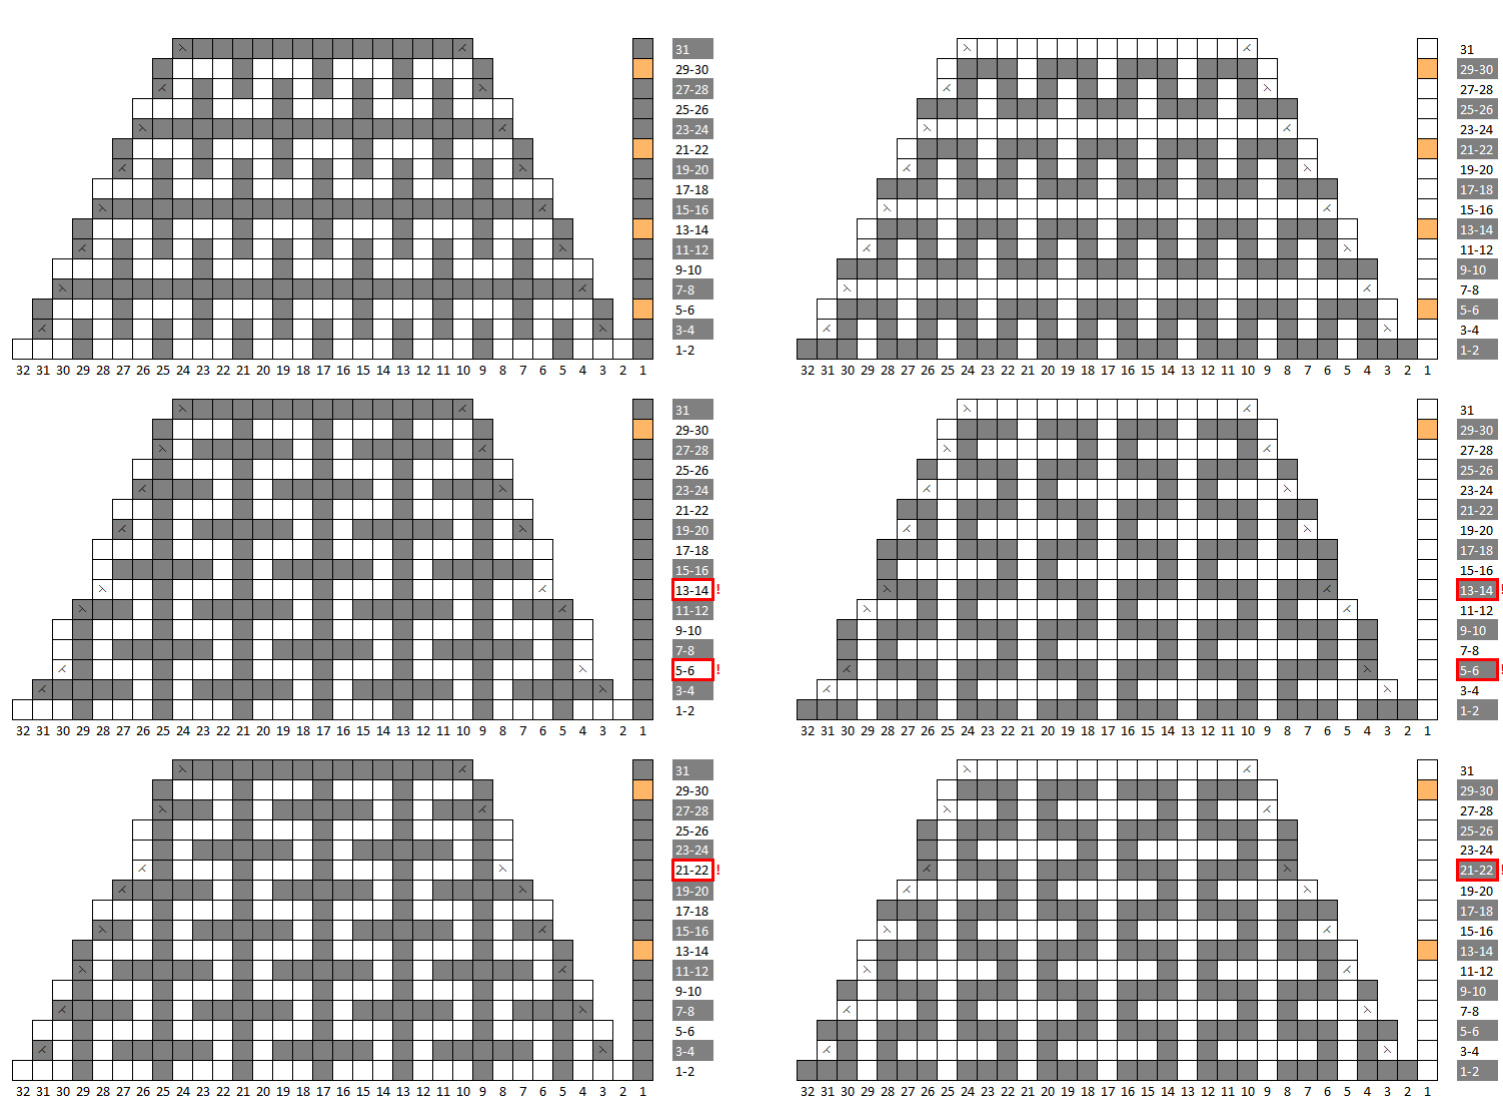
Toe Charts
Dark MC, light CC
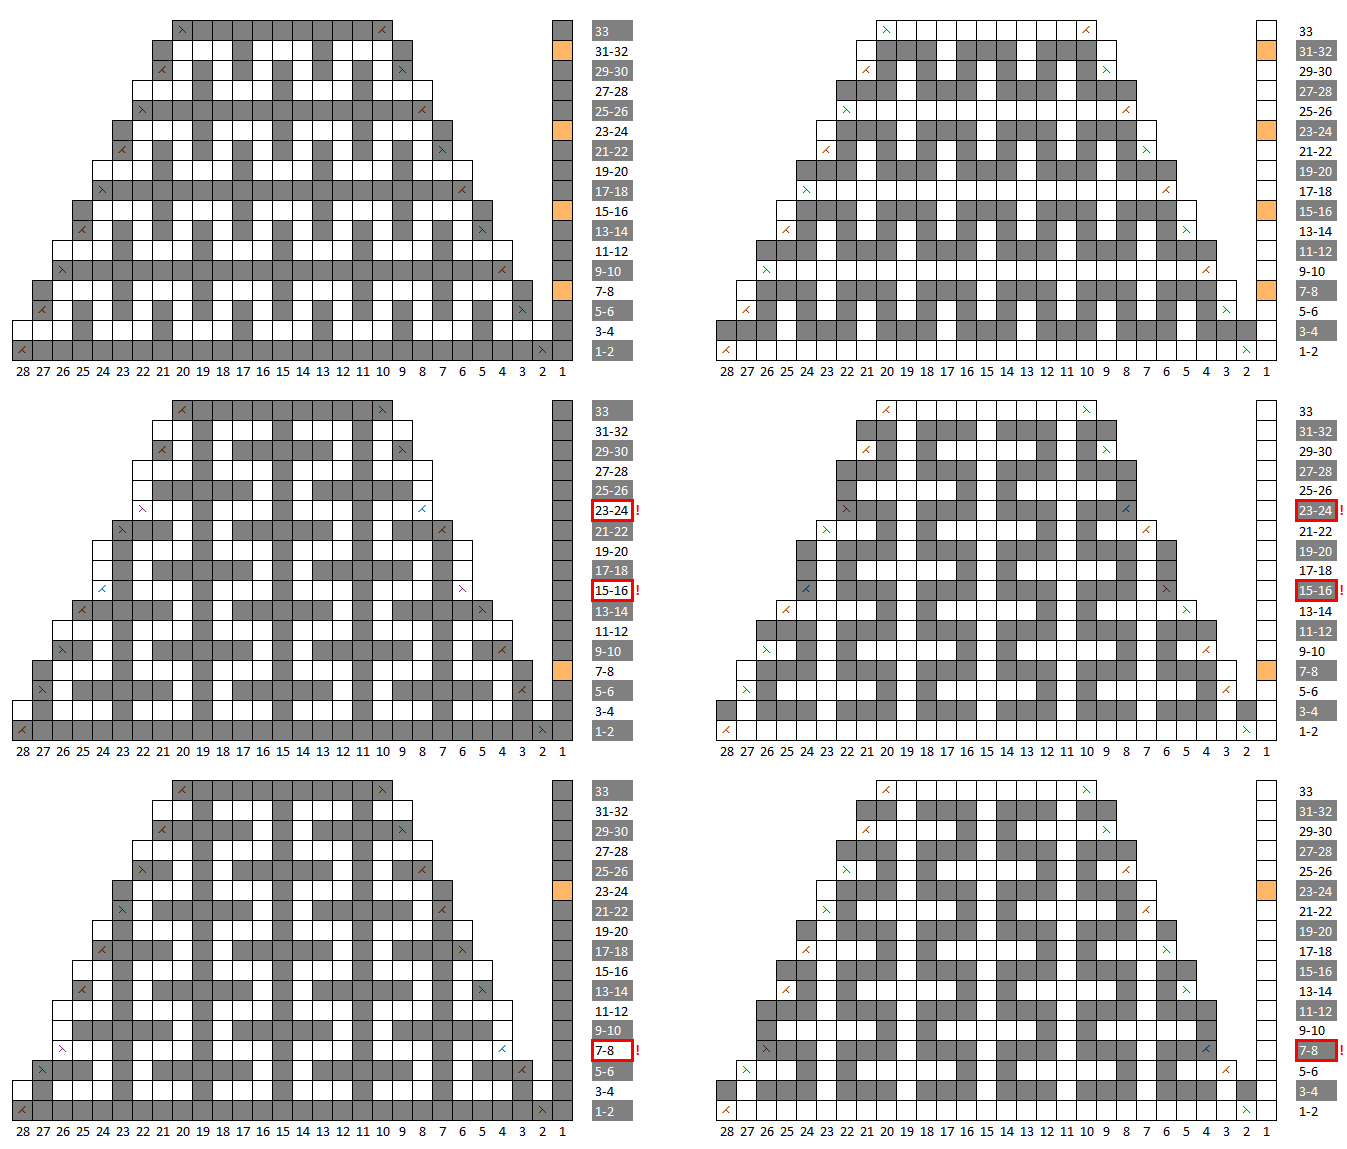
re worked on odd-numbered rounds and purled on even-numbered round Please note Toe Charts start from MC row. Please note some decreases are moved one ridge down to keep the continuity of mosaic patterns. Please note some decreases are moved one ridge down to keep the continuity of mosaic patterns.
Heel Charts
Dark MC, light CC
re worked on odd-numbered rounds and purled on even-numbered round Please note some decreases are moved one ridge down to keep the continuity of mosaic patterns. Please note some decreases are moved one ridge down to keep the continuity of mosaic patterns.


