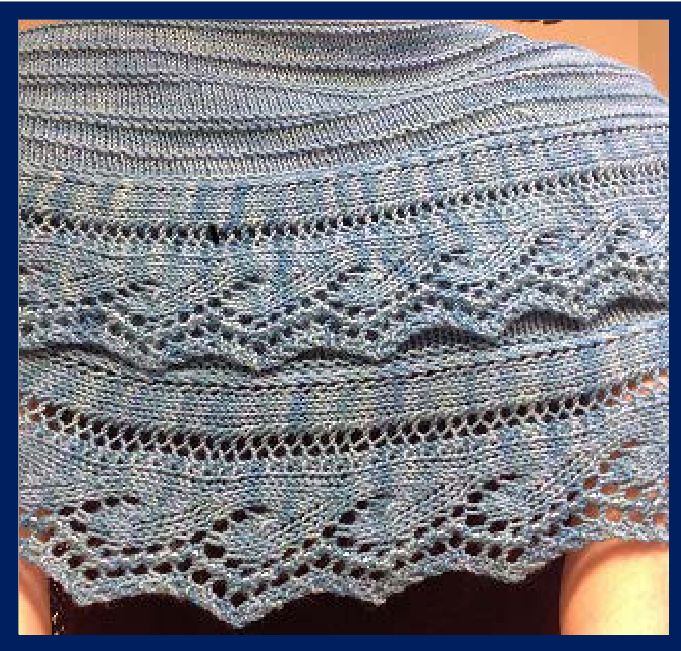
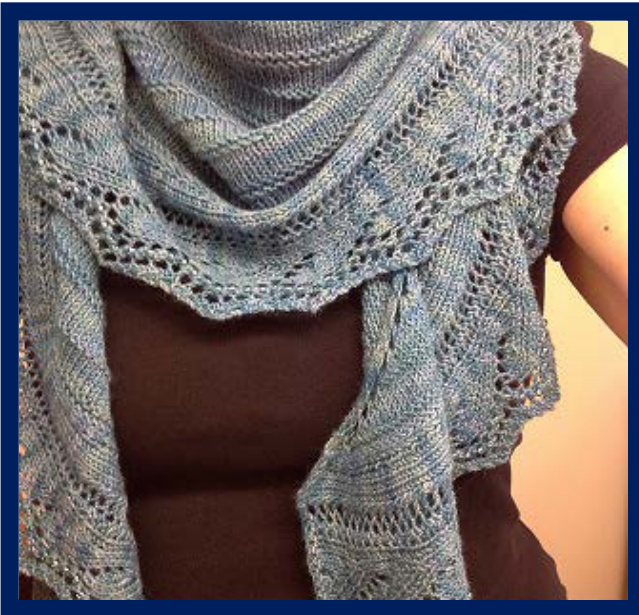
Shoreline Shawl
By Sherri Matteo
Pattern Notes:
This crescent-shaped shawl is knit from the top down in a garter stitch ridge pattern with a lace border knitted on as an applied edging. The design was inspired by the beautiful California shorelines that lead into our lovely Pacific Ocean. The shawl uses one main color though you might consider a contrasting color for the lace panel, and (optional) beading to achieve the “sea foam sparkle." The shawl can be worked in any of your favorite colors or combinations. Increases are made on the edges of every RS and WS rows using the techniques described in the pattern instructions. The yarn overs should be knit loosely and as evenly as possible to allow for a stretchy edge. Beads are optional and are placed on stitches along the border as charted on each WS row. Beads are always worked on the WS row on a purl stitch between the last two yo's.
Abbreviations:
BO: bind off CO: cast on DD: Double Decrease: slip one st knitwise, k2 tog, pass slipped st over the k2tog st (2 sts decreased) k: knit kyok: knit one st, do not remove from left needle, yo, k same st, remove st from left needle (2 increases achieved) k2tog: knit 2 together m: marker pm: place marker PB: place bead (see Notes) RS: right side skp: slip 1 as if to k wyib, k1 from shawl body, pass slipped st over k st slm: slip marker ssk: slip first st knitwise, slip second st knitwise, knit the 2 together by bringing left needle through the front loops on the right needle st: stitch sts: stitches WS: wrong side wyib: with yarn in back wyif: with yarn in front yo:yarn over
Pattern Specs & Notes:
Finished Measurements: approximately 68" wingspan along the top edge and 22 inches along the center stitch, depending on yarn choice, needle size and gauge. · Yarn: Handwerks Super Twist BFF, in Shearwater Yardage: 800 yds Gauge: 20 sts and 32 rows = 4" / 10cm in st st after blocking Needle size: US 5 / 3.75 mm circular needle or size to get gauge; Crochet hook 0.9mm (Size 13/14); Big Eye Beading needle 2.125” Beads: \~560 beads of Miyuki Size 6 in Seafoam Luster (Item #6- 92445) Be sure to have extra beads in case you drop some! Stitch markers Placing a Bead on a stitch: Beads are placed on WS rows using the crochet hook\* method. Purl to the st represented by B on the chart, place bead on crochet hook, insert hook on front part of stitch removing it from the needle and slide bead over stitch; place stitch back on left needle and purl the stitch.
Pattern Instructions
Setup Rows:
CO 4 stitches. Row 1 (RS): k4 Row 2 (WS): k1, yo, k2, yo, k1. (6 sts) Row 3 (RS): k6 Row 4 (WS): k2, yo, p2, yo, k2. (8 sts) Row 5 (RS): k2, kyok, k to last 3 sts, kyok, k2. (12 sts) Row 6 (WS): k2, yo, p to last 2 sts, yo, k2. (14 sts)
Body:
For the remainder of the shawl body (before the border), continue increases on each edge of every RS and WS row as follows: RS: k2, kyok, work to last 3 sts, kyok, k2 WS: k2, yo, work to last 2 sts, yo, k2 The shawl body pattern is knit with alternate garter ridges with st st as follows: 2 garter ridges (4 rows of garter stitch) 6 rows st st 2 garter ridges (4 rows of garter stitch) 4 rows st st 1 garter ridge (2 rows of garter stitch) 4 rows st st Repeat these 24 rows 5 times. Repeat 2 garter ridges one more time, ending with the WS row (386 sts.) A worksheet is provided to help you keep track of the pattern and the number of sts per repeat column.
Border\*:
Begin with the leftside of the RS edge (where your live yarn is) and CO 22 sts using knitted CO method. K back across the RS row beginning with Row 1 of the chart or follow the written instructions: Row 1 (RS): k2, yo, ssk, yo, k5, yo, k3, pm, k2, yo, ssk, k3, skp\*\* Row 2 (WS): sl st wyif, p5, yo, k2tog, slm, p10, PB, p1, k2 Row 3 (RS): k1, ssk, yo, ssk, yo, k2, DD, k4, slm, k2, yo, ssk, k3, skp\*\* Row 4 (WS): sl st wyif, p5, yo, k2tog, slm, p8, PB, p1, k2 Row 5 (RS): k1, ssk, yo, ssk, yo, k2, k2tog, k3, slm, k2, yo, ssk, k3, skp\*\* Row 6 (WS): sl st wyif, p5, yo, k2tog, slm, p7, PB, p1, k2 Row 7 (RS): k1, ssk, yo, ssk, yo, k2, k2tog, k2, slm, k2, yo, ssk, k3, skp\*\* Row 8 (WS): sl st wyif, p5, yo, k2tog, slm, p6, PB, p1, k2 Row 9 (RS): k1, ssk, yo, ssk, yo, k2, k2tog, k1, slm, k2, yo, ssk, k3, skp\*\* Row 10 (WS): sl st wyif, p5, yo, k2tog, slm, p5, PB, p1, k2 Row 11 (RS): k2, yo, ssk, yo, k1, yo, k1, k2tog, k1, slm, k2, yo, ssk, k3, skp\*\* Row 12 (WS): sl st wyif, p5, yo, k2tog, slm, p6, PB, p1, k2 Row 13 (RS): k2, yo, ssk, yo, k3, yo, k3, slm, k2, yo, ssk, k3, skp\*\* Row 14 (WS): sl st wyif, p5, yo, k2tog, slm, p8, PB, p1, k2 Repeat chart or rows 1-14 55 times, until two sts remain. RS row: K across the row to the last st, skp\*\* WS row: sl st wyif, k across row. Repeat these two rows one more time and then BO on RS. Weave in ends, block, and enjoy your shawl \*See Paula Emons-Fuessie's wonderful YouTube video on “Knitting an Applied Border." \*\* slip 1 as if to k wyib, k1 from shawl body, pass slipped st over k st
Stitch Pattern Worksheet
| Stitch | First set: | Repeat 1 | Repeat 2 | Repeat 3 | Repeat 4 | Repeat 5 |
| Pattern | ||||||
| 2 | RS | k | [k | k | k | k |
| garter | WS | k | k | k | k | k |
| ridges | RS | k | k | k | k | k |
| WS | k | [k | k | k | k | |
| RS | k | k | k | k | k | |
| WS | p | p | p | p | ||
| 6 st st | RS | k | k | k | k | |
| rows | WS | p | p | p | p | |
| RS | k | k | k | k | ||
| WS | p | p | p | p | ||
| 2 | RS | k | k | k | k | |
| garter | WS | k | k | k | k | |
| ridges | RS | k | k | k | k | |
| WS | k | [k | k | [k | ||
| 4 | RS | k | k | k | k | |
| st st | WS | p | p | p | p | |
| rows | RS | k | k | k | k | |
| WS | p | p | p | p | ||
| 1 | RS | k | k | k | k | |
| garter ridge | WS | k | [k | k | [k | |
| 4 | RS | k | k | k | k | |
| st st | WS | p | p | p | p | |
| rows | RS | k | k | k | k | |
| Stcountafter | WS | p | p | p | p | |
| eachcolumn: | 86 | 158 | 230 | 302 | 374 390 | |
| Once you have completed 390 sts,you will caston 22 sts at the end of the RS row and begin the border chart, working from the right side of the shawl to the left. | ||||||
| Note: I started my second skein of yarn at 356 sts and then had 7 g left at the end. | ||||||
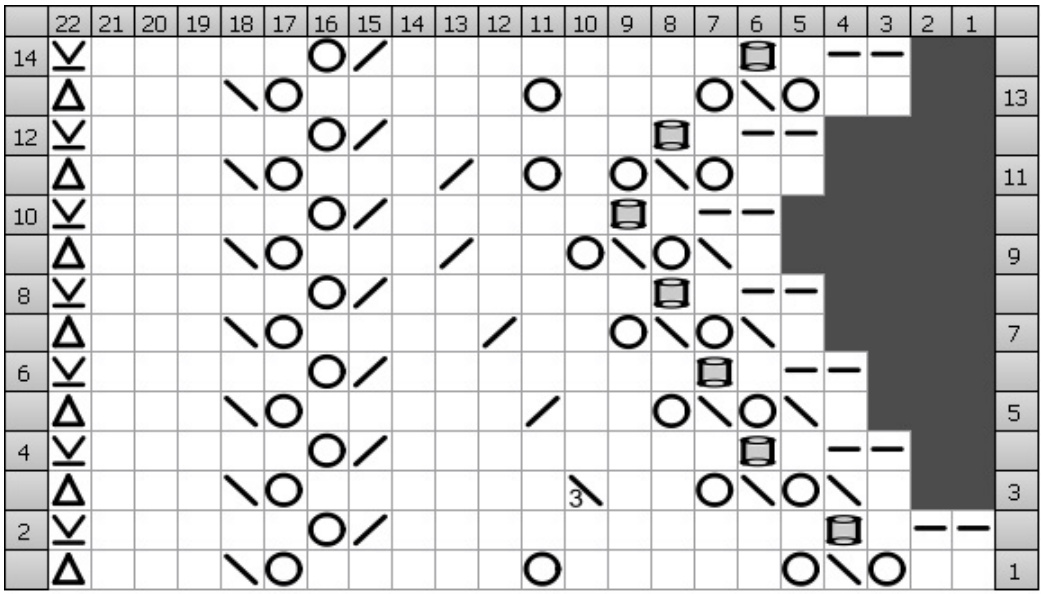
Snoreline Lace Boraer Cast on 22 stitches Row 1 (rs): k2, yo, ssk, yo, k5, yo, k5, yo, ssk, k3, sl1 kwise, k1 from shawl body, psso Row 2 (ws): slip wyif, p5, yo, p2tog, p10, p1b, p1, k2 Row 3 (rs): k1, ssk, yo, ssk, yo, k2, sk2p, k6, yo, ssk, k3, sl1 kwise k1 from shawl body, psso Row 4 (ws): slip wyif, p5, yo, p2tog, p8, p1b, p1, k2 Row 5 (rs): k1, ssk, yo, ssk, yo, k2, k2tog, k5, yo, ssk, k3, sl1 kwise k1 from shawl body, psso Row 6 (ws): slip wyif, p5, yo, p2tog, p7, p1b, p1, k2 Row 7 (rs): k1, ssk, yo, ssk, yo, k2, k2tog, k4, yo, ssk, k3, sl1 kwise k1 from shawl body, psso Row 8 (ws): slip wyif, p5, yo, p2tog, p6, p1b, p1, k2 Row 9 (rs): k1, ssk, yo, ssk, yo, k2, k2tog, k3, yo, ssk, k3, sl1 kwise k1 from shawl body, psso Row 10 (ws): slip wyif, p5, yo, p2tog, p5, p1b, p1, k2 Row 11 (rs): k2, yo, ssk, yo, k1, yo, k1, k2tog, k3, yo, ssk, k3, sl1 kwise k1 from shawl body, psso Row 12 (ws): slip wyif, p5, yo, p2tog, p6, p1b, p1, k2 Row 13 (rs): k2, yo, ssk, yo, k3, yo, k5, yo, ssk, k3, sl1 kwise k1 from shawl body, psso Row 14 (ws): slip wyif, p5, yo, p2tog, p8, p1b, p1, k2
| Key | ||
| Knit K (RS) Knit (WS) Purl | Sl1 Kwise K1 Psso sl1 kwise k1 psso (RS) Sl1 Knitwise knit next stitch, pass slipped stitch over (WS) Sl1 Knitwise knit next stitch, pass slipped stitch over Slip With Yarn In Front | |
| Knit 2 Together k2tog | ||
| (RS) Knit 2 stitches together (WS) Purl 2 Together Purl | ||
| p (RS) Purl (WS) Knit | slip wyif (RS) Slip stitch as if to purl, holding yarn in the front (WS) yarn in back Slip Slip Knit ssk (RS) slip, slip, knit slipped sts together (WS) slip, slip, purl slipped sts together | |
| Place Bead P p1b (RS) Place a bead at this stitch (WS) Place a bead at this stitch | ||
| 3 SK2P sk2p (RS) Slip K2tog PSSO (WS) Slip purl2 tog PSSO | No Stitch X (RS) No Stitch (WS) No Stitch | |
| Yarn Over yo (RS) Yarn Over (WS) Yarn Over | ||
Please ignore what the symbol for "slip wyif' says for the ws. For this pattern, the first st slipped on the purl side is done WYIF, not in back. I could not figure out how to change Intwined symbol description!


