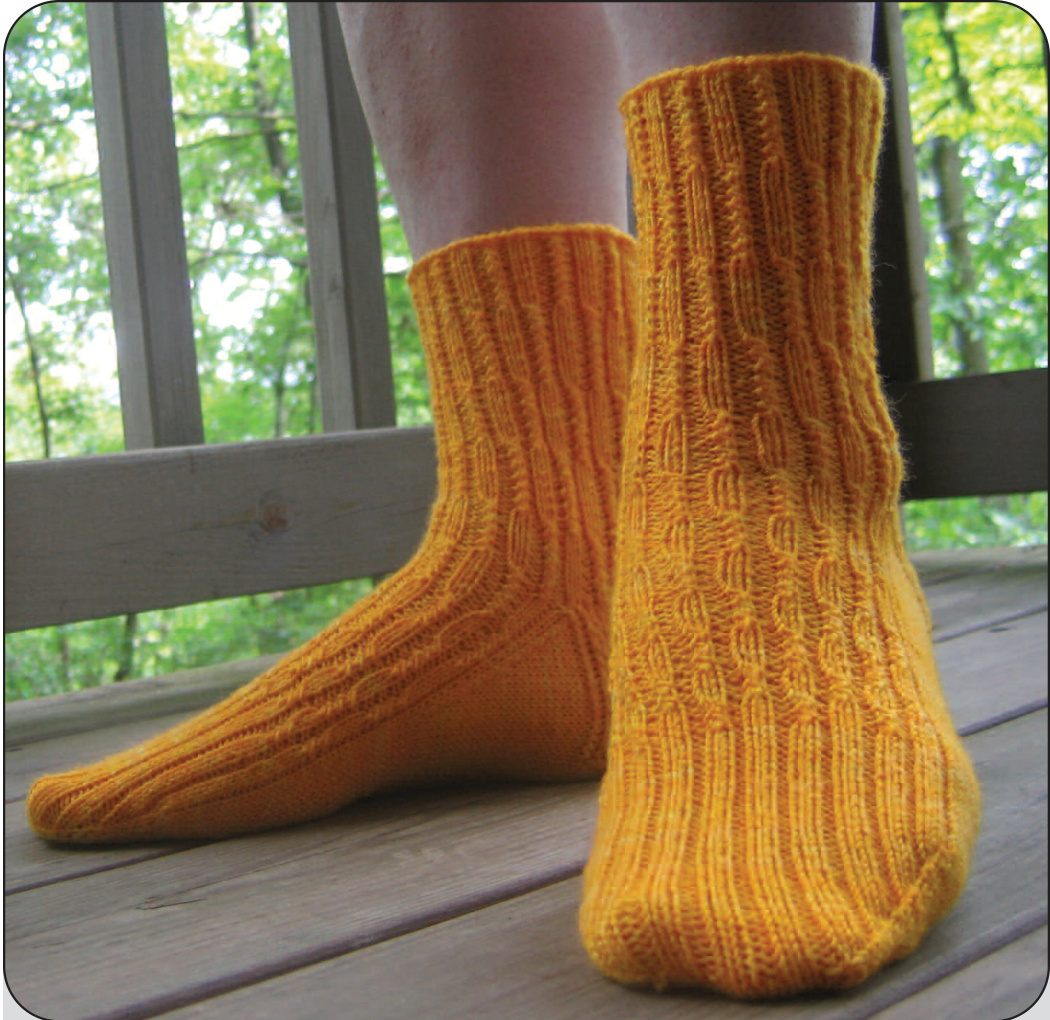
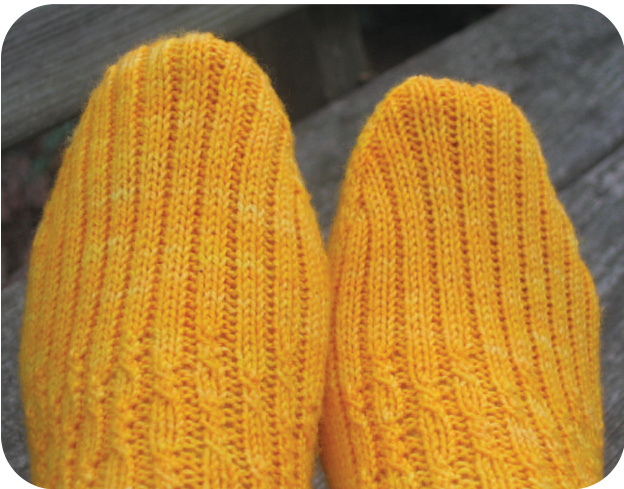
Shelton's Folly sock shown in medium. Photo by Susan Woodley @ 2013 All rights reserved. Skill Level: Intermediate, knitter should be familiar with basic cuff-down sock construction. Attention adventurous beginning sock knitters - if you can knit in the round and know basic sock construction you too can knit this sock. Pattern Size(s): Women's Small (Medium, Large) - shown in medium Finished Measurements: 7"(7 1/2", 8") in foot circumference unstretched Needles: Two 24" or longer - 1 1/2 US/ 2.5 mm circular needles Notions: Tapestry needle, stitch marker(s). Yarn Brand & Weight: Miss Babs Yummy Monochrome Sock & Baby - 2 ply, 100% Superwash Merino Wool, 400 yds / 366m - (approximately 300 yds used for medium) in Squash Blossom - Fingering Weight. Or any other similar weight yarn. Gauge: 32 sts x 44 rounds = 4" in St st / 8 stitches per inch in St st.
Shelton's Folly
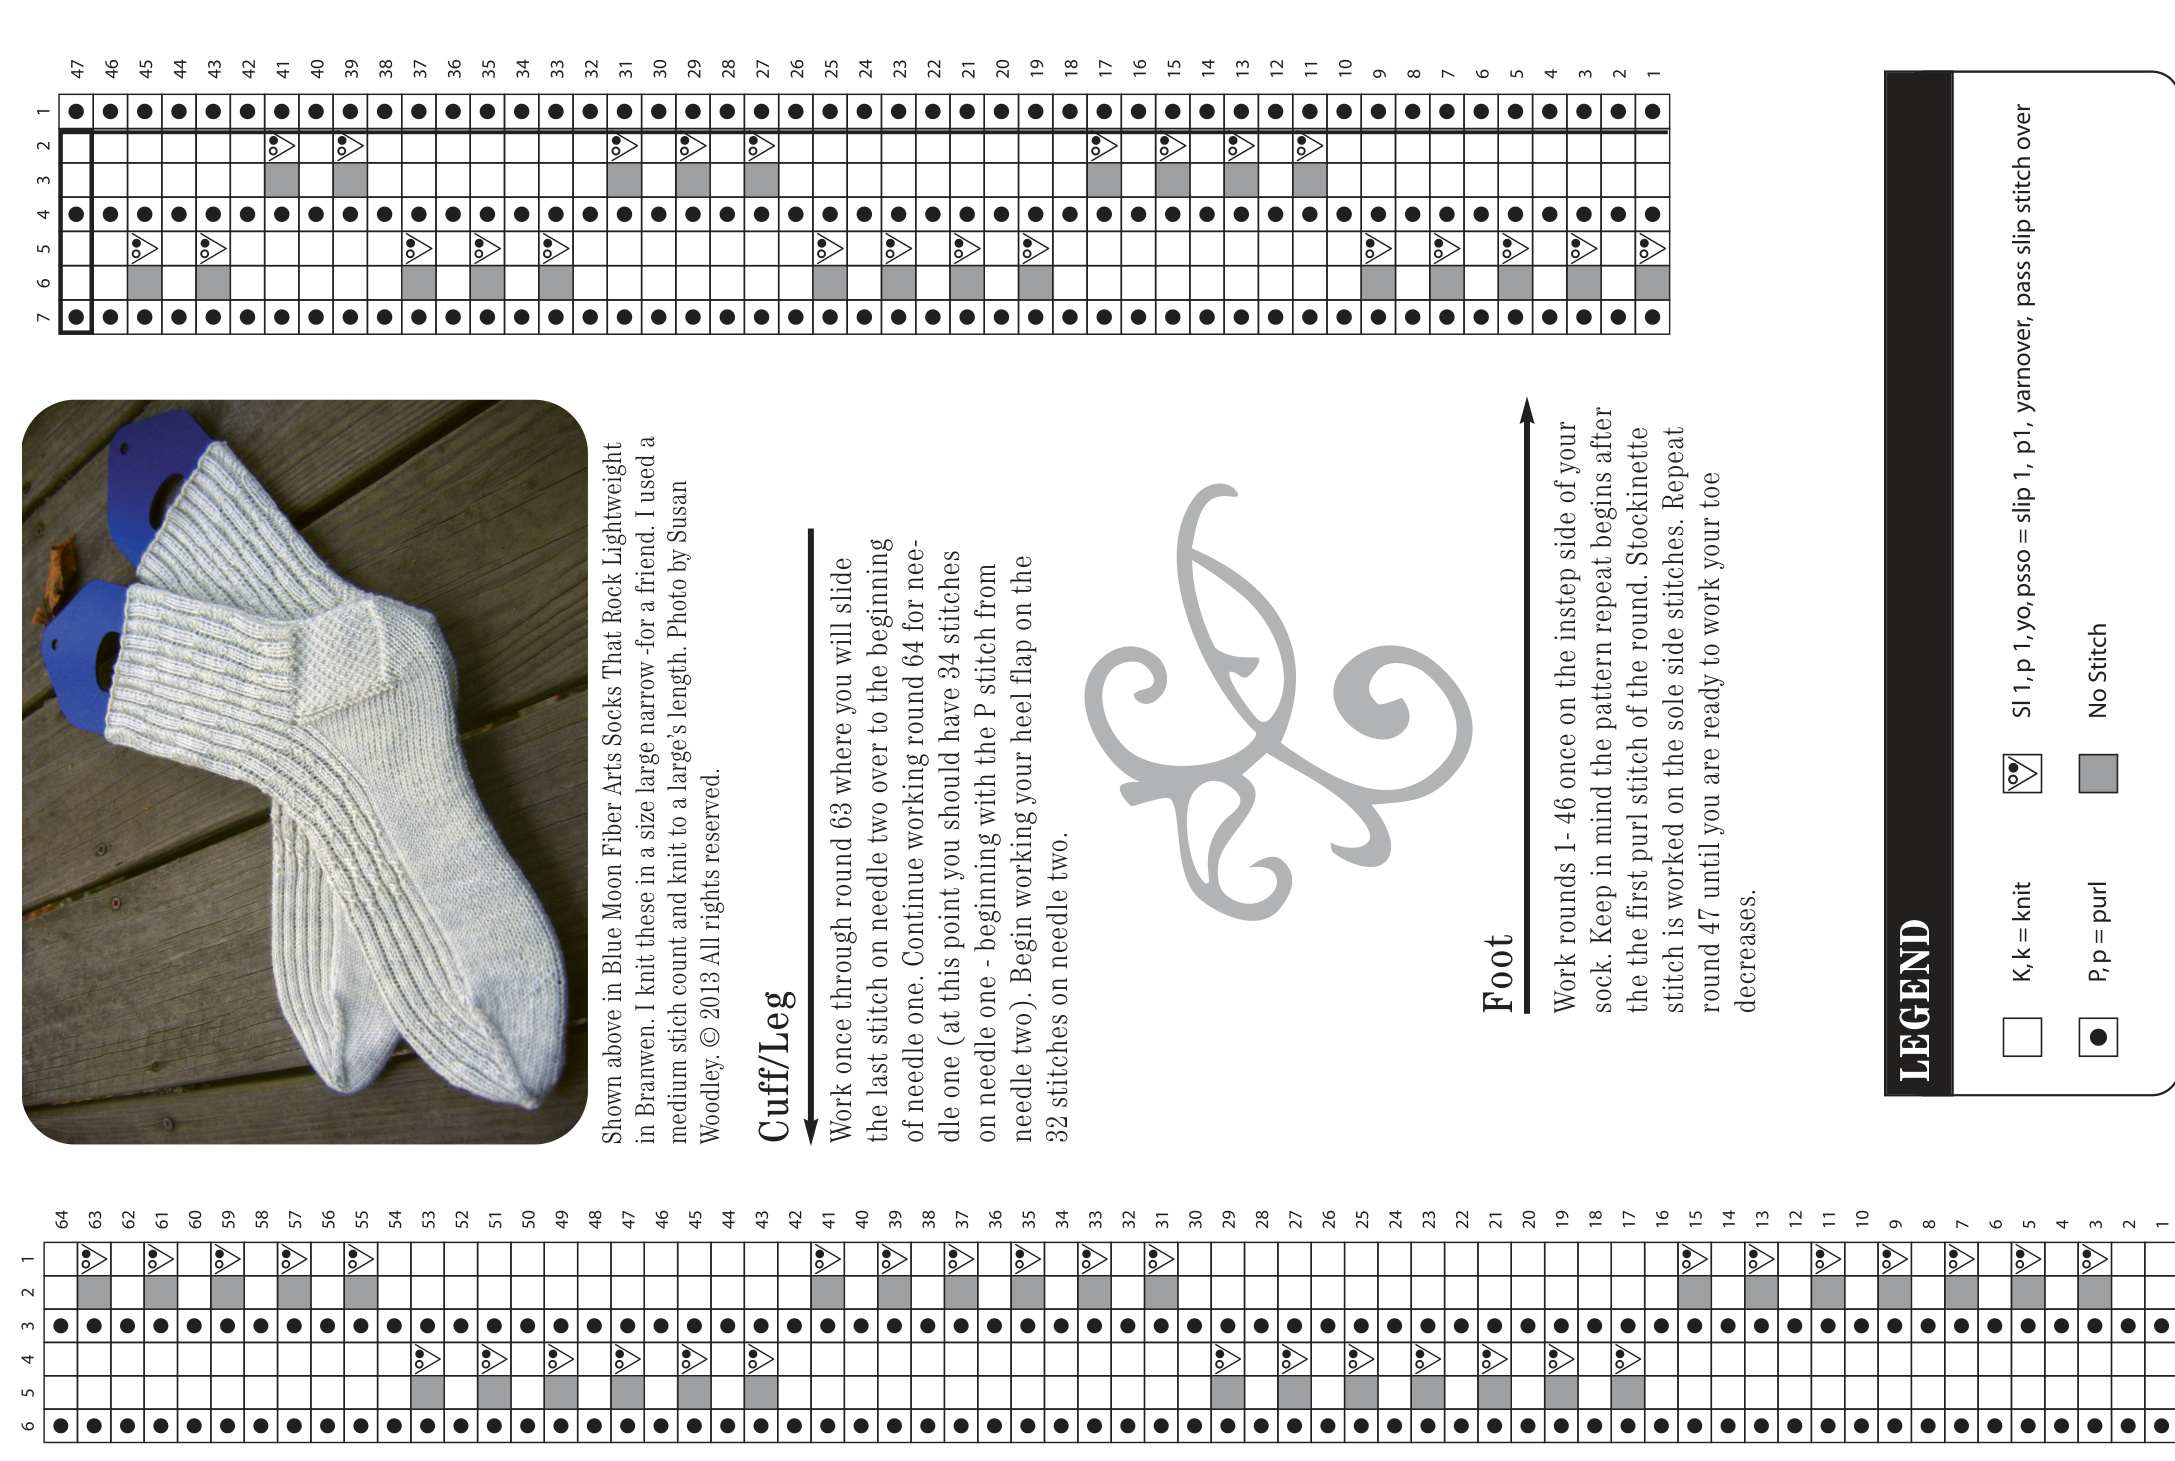
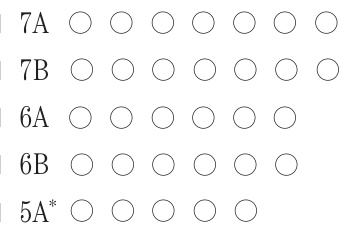
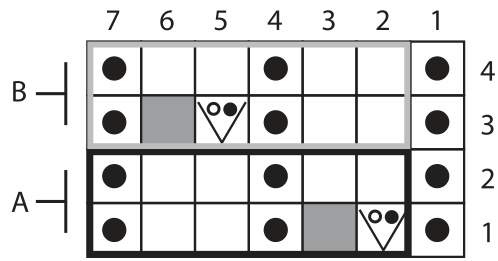
by Susan Woodley Accidentally locking a door shut can be a headache - especially if it is the only bathroom in the house. This is exactly the situation Mrs. Shelton, a lifelong friend and neighbor of my husband's family, found herself in one day. She called us for help and since a friend of ours was a locksmith we were pretty sure we could remedy the situation. We were correct - no more than ten minutes later the door was open and the problem solved or so we thought. You see, Mrs. Shelton is of that generation who feels she should pay you for any little service you may do her and frankly we were having none of it. No need to pay, we were happy to do this... only she wasn't budging and began arguing with us to take some money. At this point my husband and our friend conveniently left me to deal with her near hysterics at our refusal of funds. So it was up to me to soothe her worries at "owing us" payment for services rendered. Perplexed as to what to do my eyes landed upon this gorgeous afghan draped across a sofa and it gave me an idea. It made me think of how my mom used to crochet and knit, but sadly it was something I hadn't been interested in as a child so I said, "Could you teach me how to do that instead?" There wasn't anything else in the world that I could have said to make her perk up so much and go to absolute delight in a second. You see, Mrs. Shelton was a teacher and there is nothing she loves more than teaching - be it English or crochet (which eventually led me to knitting). She set my hands and mind on fire and I have not looked back since. With every stitch Mrs. Shelton just weaves herself a little deeper into my heart. This pattern is a tribute to her folly in accepting this fiber challenged individual as a pupil, and I am so grateful she did as it truly is the gift of a lifetime. That locked door has unlocked so many magical things for me, most notably many new dear and inspiring friends. Pattern Notes: This pattern is written for and worked in the round using the two circular needles at the same time technique. It can easily be adapted for DPNs or Magic Loop by the knitter. There will be an odd number of stitches per needle until the next to last round of the cuff (round 63), at which point you will work the final purl stitch on needle two before slipping it to the beginning of needle one to mark the new beginning of the round. Continue by working round 64 on needle one only - needle tuo will be the beginning of your heel flap. At this point you will have 28 (32, 36) stitches on needle two and 30 (34, 38) stitches on needle one - which now begins with a purl Stitch. When you arrive at the toe decreases you will have an uneven amount of stitches per needle. Work decreases on needle one only for the first round of decreases. After that you should have 28 (32, 36) one both needles and work your decreases evenly across both needles until you reach your desired foot length. Folly Stitch Pattern (see chart to the right): Worked over a multiple of 6 stitches; alternating versions of the 2 round repeats and worked in ever decreasing amounts from seven total repeats down to two total repeats. Repeat A outlined in black, repeat B outlined in gray.
ABBREVIATIONS
| circs | circular needles | RS | right side |
| dec(s) | decrease(s) | SM, sm | slip marker |
| K, k | knit | Ssk ,ssk | slip,slip knit |
| K2tog, k2tog | knit2together | St st | stockinettestitch |
| LH | lefthand needle | Sl1, pl, yo, psso | slip 1, purl 1, yarn over, |
| P, p | purl | pass slipped stitch over | |
| PM, pm | place marker | WS | wrong side |
| RH | right hand needle | YO, yo | yarn over |
Needful Strings I www.needfulstrings.com
Pattern Instructions
Cuff: Cast on 58 (66, 74) stitches using your preferred method of cast on - I used the long-tail method. Divide stitches evenly and join for working in the round. If desired place a stitch marker to note the beginning of the round - I use my cast on tail to mark mine.
Round 1: \*K2, pl; repeat from \* to end. Photo by Susan Woodley. @ 2013 All rights reserved. Round 2: \*K2, pl; repeat from \* to end. Round 3: \*Sl 1, p1, yo, psso, pl, k2, pl; repeat from \* to end. Repeat the last 2 rounds 6 times for a total of 7 repeats. Round 16: \*K2, pl; \* repeat from \* to end. Round 17: \*K2, pl, sl 1, pl, yo, psso, pl; repeat from \* to end. Repeat the last 2 rounds 6 times for a total of 7 repeats. Round 30: \*K2, pl; repeat from \* to end. Round 31: \*Sl 1, pl, yo, psso, pl, k2, pl; repeat from \* to end. Repeat the last 2 rounds 5 times for a total of 6 repeats. Round 42: \*K2, pl; \* repeat from \* to end. Round 43: \*K2, p1, sl 1, p1, yo, psso, pl; repeat from \* to end. Repeat the last 2 rounds 5 times for a total of 6 repeats. Round 54: \*K2, pl; repeat from \* to end. Round 55: \*Sl 1, p1, yo, psso, pl, k2, pl; repeat from \* to end. Repeat the last 2 rounds 4 times for a total of 5 repeats, on the final round slip the last purl stitch from needle two to the beginning of needle one. Continue to work round 64 on needle one only - needle two will begin the heel flap. Round 64: \*Sl 1, p1, yo, psso, p1, k2, pl; repeat from \* to end of needle one. You should now have 30 (34, 38) stitches on needle one beginning with the purl stitch from the end of the previous round (these are your foot stitches) and 28 (32, 36) stitches on needle two (your heel/sole stitches).
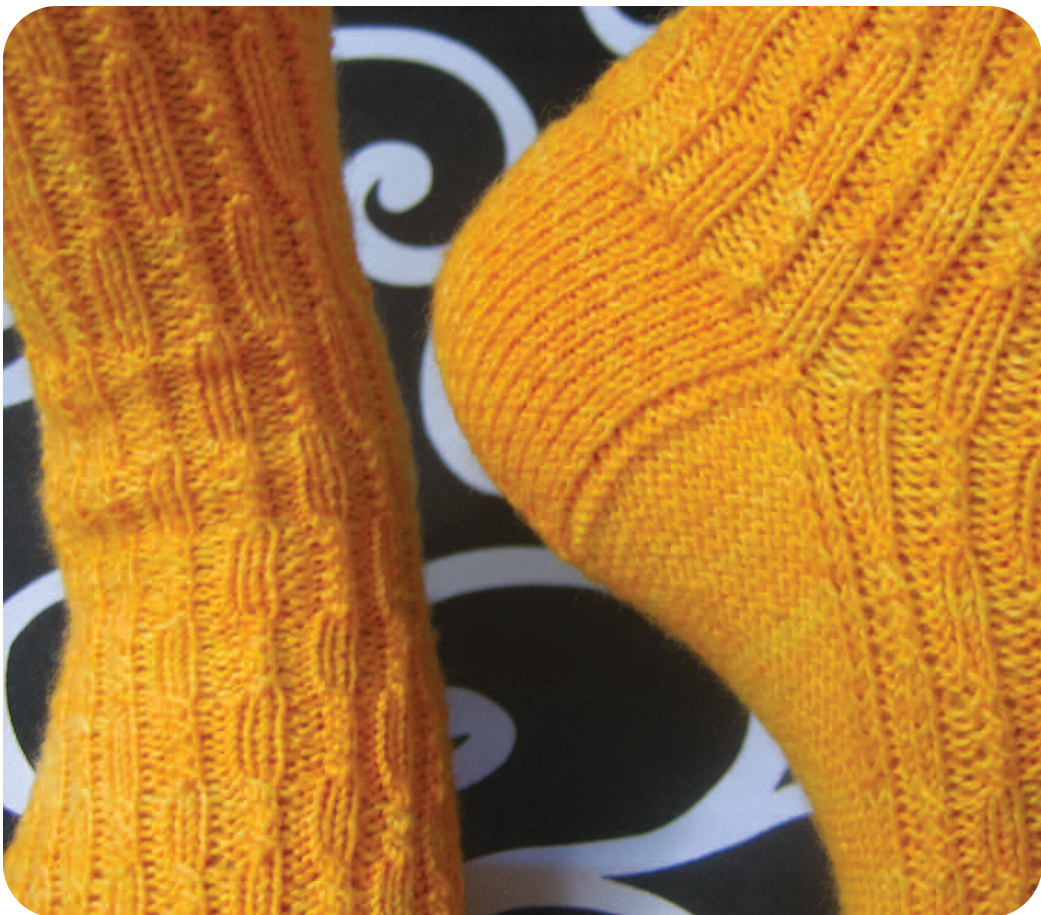
Photo by Susan Woodley. @ 2013 All rights reserved. Heel Flap: After working round 64 on needle one begin working the Eye of Partridge Heel four row repeat over the 28 (32, 36) stitches on needle two. Work to desired length ending on a row 2 or 4 to be ready to work the heel turn. \~Eye of Partridge Heel \~ Row 1 (RS): Sl 1, \*k1 tbl, sl 1; repeat from \* ending with k1 tbl. Row 2: Sl 1, p to end. Row 3: Sl 2, \*k1 tbl, sl 1; repeat from \* ending with k2 tbl. Row 4: Work as row 2.

Heel Turn: Work to desired length ending on a row 2 or 4 to be ready to work the gusset. Row 1 (RS): Sl 1, k14 (16, 18), k2tog, k1, turn. Row 2: Sl 1, p3, p2tog, p1, turn. Row 3: Sl 1, k to 1 stitch before the gap, k2tog, k1, turn. Row 4: Sl 1, p to 1 stitch before the gap, p2tog, p1, turn. Repeat the last two rows until 16 (18, 20) stitches remain. Then work the following two rounds: Row 1: Sl 1, k to 1 stitch before the gap, k2tog, turn. Row 2: Sl 1, p to 1 stitch before the gap, p2tog, turn. You should now have 14 (16, 18) stitches left on your needle. Knit 7 (8, 9) stitches, place marker to mark the new beginning of your round. Gusset: Work as follows. Keeping in mind that the round begins in the middle of needle one throughout the gusset decreases. Round 1: First 1/2 of needle one: Knit 7 (8, 9) sts. Then pick up 16 (20, 24) stitches along the edge of the heel flap. Needle two: Work Round 65: P1, \*k2, p1, sl1, p1, yo, pss0, p1\* to end. Second 1/2 of needle one: Pick up 16 (20, 24) stitches along heel flap edge, then knit 7 (8, 9) stitches to finish up the round. Round 2: Knit 7 (8, 9) stitches, purl to the last 2 stitches on the needle, p2tog. On needle two P1, then work stitches in established pattern to the end of the needle. Switching back to the second half of needle one P2tog tbl, purl 14 (18, 22), knit to endofround. Round 3: Knit to end of needle one. Purl one then work stitches in established pattern to the end of the needle. Switch back to needle one knit to the end of the round. Round 4: Knit to last two stitches on needle one, k2tog. Purl one then work stitches in established pattern to the end of the needle. Switch back to needle one ssk, knit to the end of the round. Repeat rounds 3 and 4 until you have 28 (32, 36) stitches left on needle one, 14 (16, 18) sts on each side of the marker. Remove marker and knit to the end of the needle. Your instep needle is now needle one (formerly needle two) and will become the beginning of the round. Foot: You will now work the foot as follows until you've completed the entire series of decreases and repeats: Needle one: P1, continue to work in pattern. Needle two: Knit. Once you've finished with the pattern repeats you will work the following until you've reached your desired heel-to-toe length. Needle one: P1, \*k2, p1\* to end of needle. Needle two: Knit. Toe: Continue working in established rib pattern on the instep/needle one and stockinette stitch on the sole/needle two as you decrease stitches on both needles every other round. However, on your first decrease round you will decrease stitches on your instep needle only to even up the stitch count on both needles. Round 1: Ssk, continue working in established rib pattern until last two stitches of the needle, k2tog. Knit across needle two - no decreases. Round 2: Continue working in established rib pattern on needle one. Knit to the end on needle two. Round 3: Ssk, continue working in established rib pattern until last two stitches of the needle, k2tog. Repeat for the second needle. Round 4: Continue working in established rib pattern on needle one. Knit to the end on needle two. Repeat rounds 3 and 4 until you have a total of 16 (20, 24) stitches, or 8 (10, 12) stitches per needle. Finishing: Graft stitches together. Weave in ends and enjoy! Copyrighted 2013 Susan Woodley. This pattern - including text, charts, and images it contains - is my intellectual property. You are free to use it for personal use only.

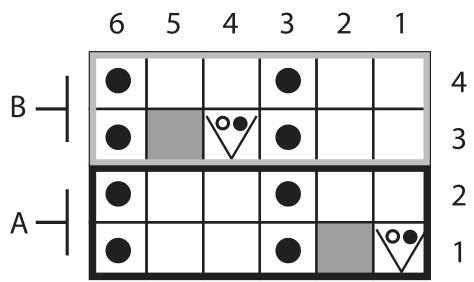
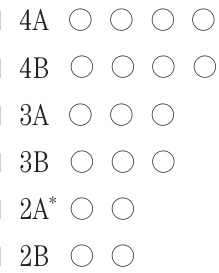
SIMPLE CHARTS
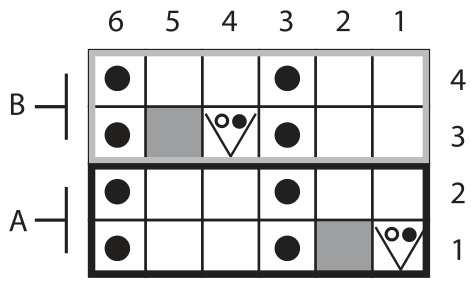
Here is an easy way to keep track of your work if you do not wish to follow the larger charts for the pattern. Simply mark off the rounds of repeats as you work them. For example, if your number is 7A, the 7 represents the amount of times you will work rounds 2 and 2 of your chart. If your number was 7B it would mean you would work rounds 3 and 4 of your chart seven times. ] Work round 4 of Simple Cuff Chart twice Simple Cuff Chart Use through 5A
\*see pattern notesfor special instructions Heel Flap
\*Pick up hee flap stitches on your first round, then continueto workgusset decreasesas written.Youwill workstockinetteonlyfromthis pointforyoursolestitches. Simple Foot Chart Use from 5B to end Work round 4 until you reach the desired length of your foot.
Toe Shaping (Be sure to see pattern notesfor special instructions.)
LEGEND
Sl1,p 1,yo, psso = slip 1, p1, yarnover, pass slip stitch over