
For many knitters, the rhythm of our needles and the slip of our stitches is a huge part of daily life. It is our passion, our therapy, and our creative outlet. It is a wooly heartbeat
that underscores much of what we do and how we see ourselves. This cowl was inspired by two great things: the rhythm of our knitting and some really fantastic yarn. Caterpillargreen Yarns' Concrete and Tulips colourway is one of my all-time favourites. Carrying it along with a strand of undyed yarn increased the mileage of a single skein, and created the possibility of a unique "heartbeat" cable floating over a marled striping base. If you would like to substitute yarns, choose a sock-weight selfstriping and a co-ordinating solid that will stand out against the stripes. "The Beat Goes On" is knit lengthwise in a tube and then grafted into an infinite loop. This toroid shape makes the perfect cowl: no wrong side, deliciously dense and warm, purl free, and long enough to loop twice around your neck. Enjoy!
Size
66 cm(26 inches) laid flat and measured end to end.
Gauge
21 stitches and 25 rows per 10cm/4 inches.
Materials Required
Caterpillargreen Yarns MCN Fingering: Classic 370m (405yd) per 115g (405yd). · 1 skein "Concrete and Tulips' 1 skein natural · 3 stitch markers . Cable needle · Darning needle for grafting
Needles
5mm (US 8) or whatever you need to obtain correct gauge.
Abbreviations
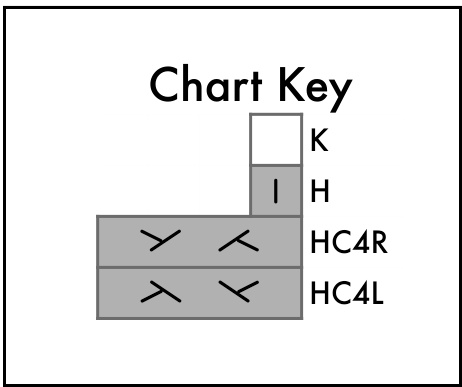
CO Cast on. HC4L Heartbeat cable left: slip 2 stitches from PM Place marker. left needle to cable needle, hold to front, K Knit. In this pattern all sts marked k are k2, h2 from cable needle. to be knit carrying the two yarns HC4R Heartbeat cable right: slip 2 stitches together as one. from left needle to cable needle, hold to H Heartbeat stitch: knit, using only the back, h2, k2 from cable needle. solid coloured yarn.
Pattern Instructions
· Using your preferred provisional cast-on, CO 56 stitches holding both yarns together. Join in the round, taking care not to twist. · PM to denote beginning of round, k5, pm for beginning of motif, k8, h2, k8, pm for end of motif, k to end of round. ·K5, work round 1 of Heartbeat cable motif (following either the charted or written instructions), k to end of round. · Continue working in established pattern (k to motif marker, work appropriate row of motif, k to end of round), until all 45 rounds of the motif have been worked. · Continue as established, repeating rounds 1-45 of motif, ending on row 45 when you have either: A. Only 3 yards remaining of either of the yarns you are using. B. The cowl has reached 152cm(5 feet) in length. C. The cowl has reached your desired length. If you have enough yarn to make it very long, or you prefer a shorter cowl, make what you love! \*To use up as much yarn as possible (or to squeeze out an extra few inches of length), you may wish to attempt another partial motif. If you choose to do this, end on any round between 26 and 45. Alternatively, you can repeat round 45 for as many rounds as you like. These options will give you an uneven heartbeat section in your finished cowl. These "palpitations" can add character!
Tips: Carrying Two Yarns At Once
Carrying your yarn double lets you use it at a heavier gauge. In this pattern it opens up a world of marled effects and slipped stitch patterns. ·With the exception of two heartbeat stitches per round, all stitches in this pattern (including the provisional caston and kitchener stitch) are worked carrying one strand of self striping yarn and one stand of solid yarn together. · If a pattern has no special stitches that use just one stand of yarn, you can wind your two yarns into one ball. That is not the case for this cowl. Wind your yarns into two separate balls. · The solid yarn (or whichever yarn you choose for the heartbeat cable) will run Out faster. · Watch out for split stitches - be careful not to knit into each yarn of the same stitch (accidentally increasing your stitchcount) and beware of unintentionally knitting with only one of your carried yarns. · Put stitches on waste yarn, or, if you are using a circular needle with a plastic cable, leave the stitches on the cable. Wet block your cowl by soaking it in warm water (keep your needles out of the water!) and a gentle wool wash. Gently squeeze out excess water in a rolled towel, and lay the cowl flat on blocking boards or a flat surface that you can stick pins into. Gently smooth the cowl, so that edges are straight and the heartbeat cable runs evenly down the centre of the long strip.
Tips: The Heartbeat Cable
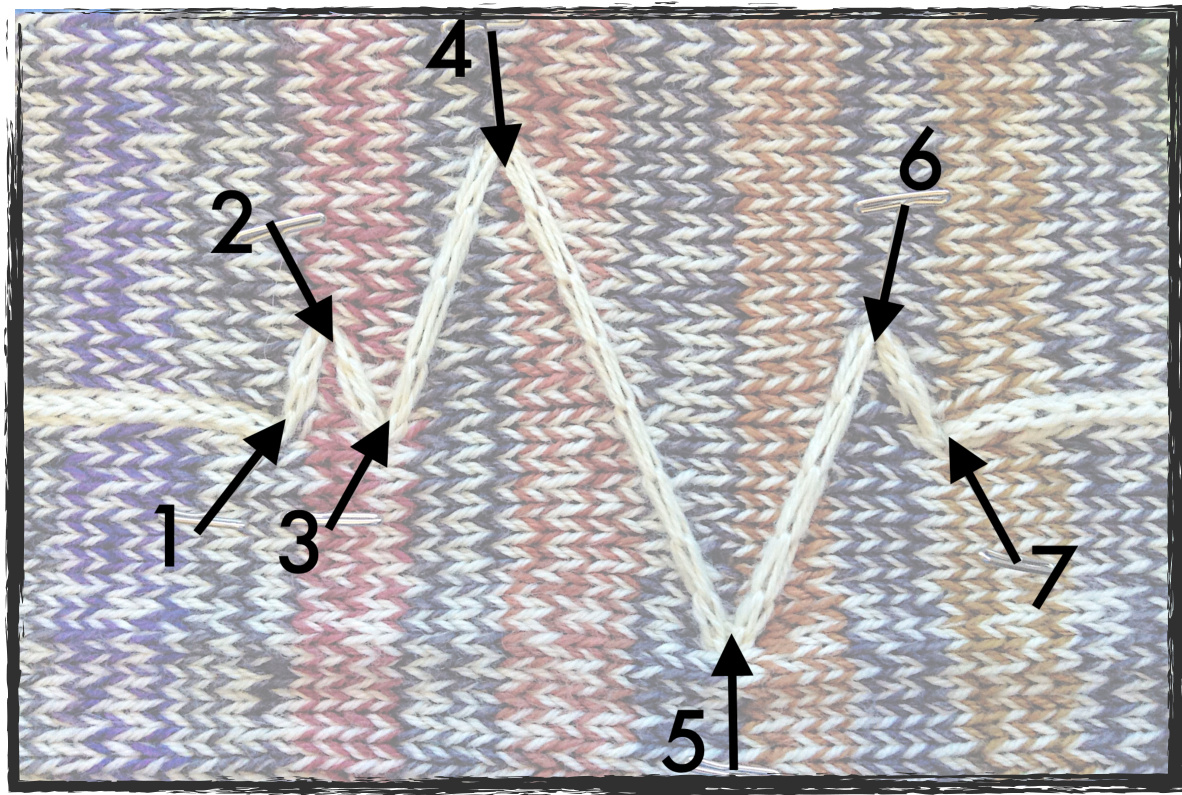
•For rows 1-25 of the motif, work the "h" stitches very loosely. •After ever pair of "h" stitches, retension the yarn in your hand so that the floats behind the heartbeat cable are small and have an even tension. · Your cable won't look quite right until you block it. It may pull at the turning points, or look uneven. Don't worry! Firmly pin out the cable at each turning point to sharpen the points of the heartbeat motif. See photo on page 5 for correct pinning points. Allow to dry. ·Remove the provisional cast-on and return the stitches to a separate needle. Graft the two ends of the cowl together using kitchener stitch. Ensure that the beginning and end of the heartbeat cable are lined up together and that the cowl isn't twisted. Secure end and pull to inside of cowl tube. \* If you are very comfortable with kitchener stitch you may wish to attempt to use only the solid yarn to graft the cable stitches. Remove the striping yarn from your darning needle for every stitch that it is not needed, holding it to the inside of the cowl. Only pick up the solid yarn from this stitches in the provisional caston, leaving the striping yarn to hang loose behind. This is an advanced technique to attempt, as keeping even tension can be quite difficult.
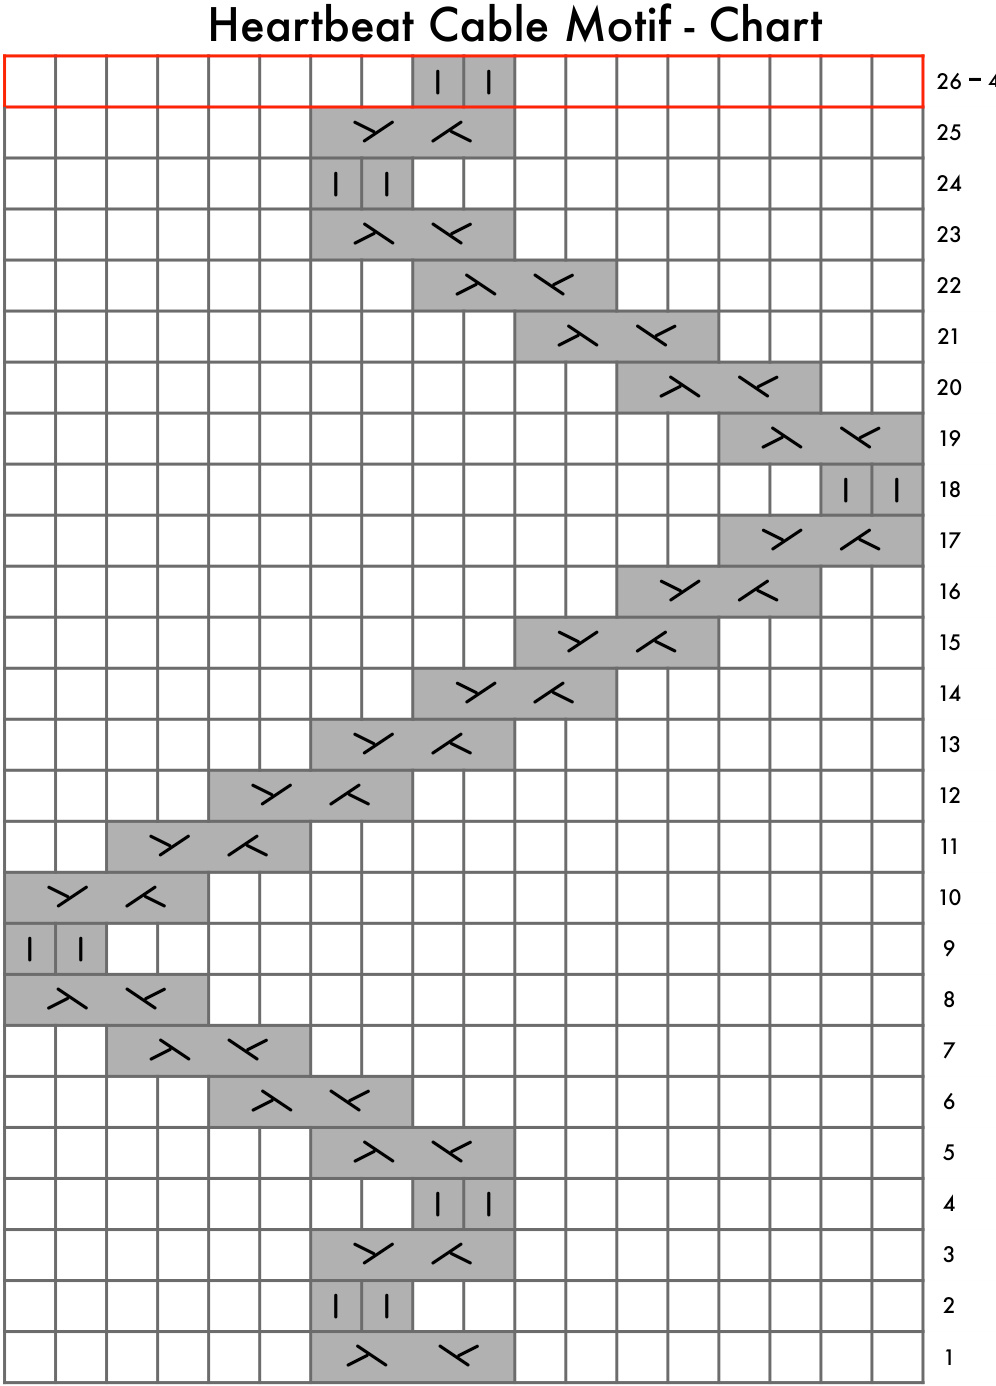
Heartbeat Cable Motif - Written Instructions
· Round 1: k8, HC4L, k6. · Round 14: k6, HC4R, k8. · Round 2: k10, h2, k6. · Round 15: k4, HC4R, k10. · Round 3: k8, HC4R, k6. ·Round 16: k2, HC4R, k12. · Round 4: k8, h2, k8. · Round 17: HC4R, k14. · Round 5: k8, HC4L, k6. ·Round 18: h2, k16 · Round 6: k10, HC4L, k4. · Round 19: HC4L, k14. · Round 7: k12, HC4L, k2. · Round 20: k2, HC4L, k12. · Round 8: k14, HC4L. · Round 21: k4, HC4L, k10. · Round 9: k16, h2. · Round 22: k6, HC4L, k8. · Round 10: k14, HC4R. · Round 23: k8, HC4L, k6. · Round 11: k12, HC4R, k2. ·Round 24: k10, h2, k6. · Round 12: k10, HC4R, k4. · Round 25: k8, HC4R, k6. · Round 13: k8, HC4R, k6. ·Round 26 - 45: k8, h2, k8.
Blocking Pin Locations
uch for knitting my pattern! Please visit www.EmmaKnits.net for more All text and images Copyright Emma Galati 2013. Not for resale or reproduction. You are free to do whatever you like with your finished object, but please credit me as the designer should you choose to sell it!


