
1 <3 NEON
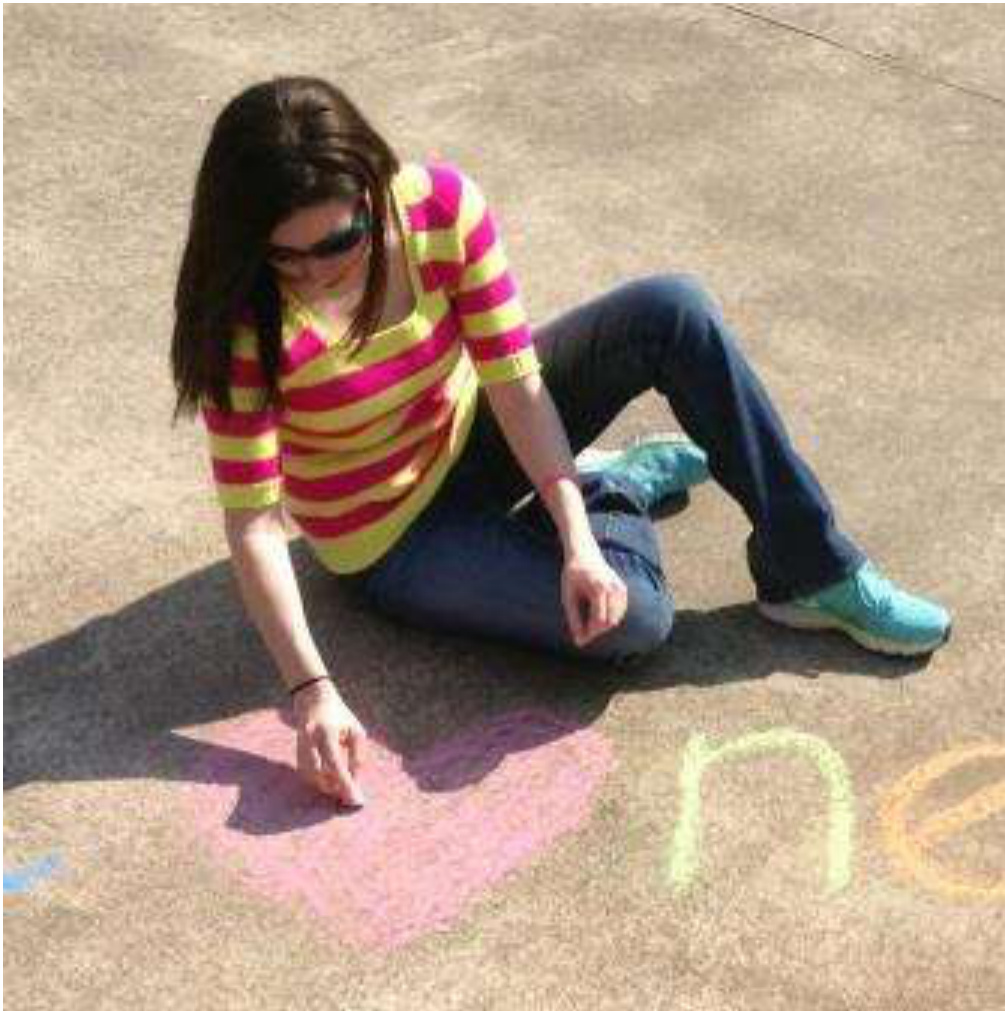
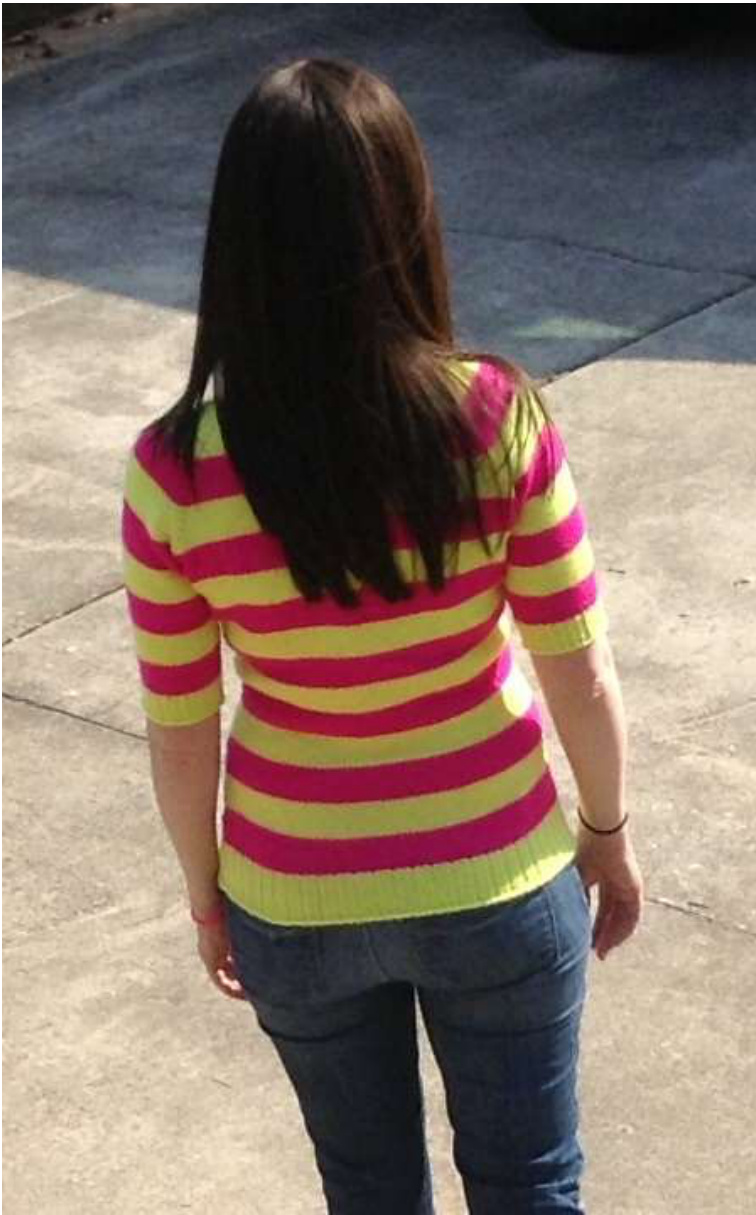
by Amanda B. Doody Difficulty: Advanced Beginner Browsing through a popular clothing shop a few months ago, I encountered an entire section devoted to the sale of neon-colored garments. I. Loved. It. In that moment, I knew that the colors of my childhood, spentduring the late 80s and early 90s, were resurfacing in the world of fashion. I spent several minutes weaving in and out of the racks in search of happy colors to wear. I ended up leaving with a neon yellow sweatshirt and a neon pink handbag that I am in love with. I have never had so many compliments on a purse before. I <3 Neon was inspired by the yarn itself, a beautiful neon pink called “Fluoro Rose" and an electric yellow called “Edison Bulb," both of which are new solid colorways from Madelinetosh. I saw them and knew that they had to be a striped sweater. My search for a simple, stockinette square-neck sweater pattern commenced. While there are some gorgeous scoopneck and square-neck sweater patterns available, I found none that quite fit my vision, and not wanting to wait, I took a gauge swatch and cast-on for an adventure. Fueled by excitement for the project, my sweater was finished in just a few short days, and I couldn't wait to share it with everyone. Not only is I <3 Neon great for bright, happy colors, it would also look awesome in contrasting colors (black & white, blue & orange, anyone?), and the stripes could be widened or narrowed to get different effects or left out altogether for a simple, quick stockinette square-neck, which, if I do say so myself, is very flattering for the ladies! SIZE XS (S, M, L) [1XL, 2XL, 3XL]
FINISHEDMEASUREMENTS
Bust: 29 (33, 37, 41) [45, 49, 53] inches / 74 (84, 94, 104) [114, 124, 135] cm Arm Depth: 6.0 (6.5, 7.0, 7.5) [8.0, 8.5, 9.0] inches / 15 (16.5, 18, 19) [20, 21.5, 23] cm Waist: 23.4 (27.4, 31.4, 35.4) [39.4, 43.4, 47.4] inches / 59.5 (69.5, 80, 90) [100, 110, 136.5] cm Hips: 29.8 (33.8, 37.8, 41.8) [45.8, 49.8, 53.8] inches / 75 (86, 96, 106) [116, 126.5, 136.5] cm Upper Arm Circumference: 10.4 (11.4, 12.2, 13.2) [14.0, 15.2, 16.0] inches / 26.5 (29, 31, 33.5) [35.5, 38.5, 40.5] cm Sleeve (Underarm to Cuff Edge): 7.5 (7.0, 8.25, 7.0) [6.5, 9.0, 8.5] inches / 19 (18, 21, 18) [16.5, 23, 21.5) cm Total Length: 24.0 (24.0, 25.0, 25.75) [25.75, 27.0, 27.0] inches / 61 (61, 63.5, 65.5) [65.5, 68.5, 68.5] cm I<3Nen is designed tofit with positive one tonegative two inchesof ease at the bust. o XSwoul fit a 831ust, S wouldfit 35" bust, and so on. The model is wearing a size S (33") and has a bust size of 34 inches. ① copyright 2013, Amanda B. Doody; Photo Credits: Abigail R. Vickery Pattern for personal, non-commercial use only. For pattern support, designer may be contacted at missblane@gmail.com.
YARN
Main Color (MC) 375 (425, 475, 550) [600, 700, 750] yards / 341 (387,432, 500) [546, 637, 683] meters worsted weight yarn Contrast Color (CC) 300 (350, 375, 425) [475, 550, 600] yards / 273 (319, 341, 387) [432, 500, 546] meters worsted weight yarn Shown inMadelinetosh 80/10/10 Worsted MCN (Worsted, 80% Merino, 10% Cashmere, 10% Nylon, 187 yards / 171 meters per 4 oz skein) Edison Bulb (MC) and Fluoro Rose (CC).
NEEDLES
Size US #6 (4 mm) circular needle (32" / 82 cm) and DPN or other needle for knitting sleeves in the round Size US #5 (3.75 mm) circular needle (32" / 82 cm) and DPN or other needle for knitting sleeves in the round Use the needle size that gives you the correct gauge.
GAUGE
20 stitches and 32 rows = 4 inches (10 cm) in stockinette stitch, using larger needles. Gauge is knit in the round and measured after blocking. For a tutorial on how to make a gauge swatch in the round, see this post by TechKnitter. Row gauge is important for the stripes and length to work out. If you are unable to obtain row gauge, you may need to work more or fewer strpes, and I would encourage you to use lifelines and try on the sweater as you go to make sure that your waist increases and decreases end up in the right place.
NOTIONS
crochet hook large enough for worsted weight yarn four stitch markers in one color, one stitch marker in another color smooth waste yarn for provisional cast on and holding sleeve sts tapestry needle
ABBREVIATIONS
beg (beginning) BO (bind off) CC (contrasting color) CO (cast on) dec (decrease/decreases/decreasing) inc (increase /increases/increasing) k (knit) k2tog (knit two stitches together; one stitch decreased) ·ktbl (knit through the back loop) m (marker) M1 (increase one st in field of stockinette; see pattern note 3) ① copyright 2013, Amanda B. Doody; Photo Credits: Abigail R. Vickery Pattern for personal, non-commercial use only. For pattern support, designer may be contacted at missblane@gmail.com. M1L (make a left-leaning increase; see pattern note 2) ·M1R (make a right-leaning increase; see pattern note 2) MC (main color) p (purl) ptbl (purl through the back loop) pm (place marker) rem (remain/remaining) rnd(s) round(s) sm (slip marker) SYTK (slip, yank, twist, knit; one stitch decreased, see pattern note 4)
PATTERN NOTES
8. Color changes are made every 12 (12, 11, 13) [13, 16, 16] rows. While working flat, the yarn is broken at the end of the section, and knitting is continued with the new color. If you do not use the recommended number of rows per stripe, your stripes may not work out evenly. All "work even" instructions will need to be adjusted if you alter the number of rows per stripe. 9. Once you begin working in the round, jogless color changes are made using a stationary slipped stitch, where the first stitch of the second round of a color change is slipped. Stripes are still 12 (12, 11, 13) [13, 16, 16] rows. See this post by TechKnitter for a picture tutorial. 10. For the first color change after sleeve separation and front neckline cast-on, work to the end of the round. Remove beginning of round marker, and slip all stitches for the left front of the sweater {25 (28, 30, 33) [35, 38, 40] sts} without twisting to the right needle. Place marker at the side. Begin knitting with new color, slipping the first stitch of the round on the second round of the color. 11. Following the sleeve separation and front neckline cast-on, the sweater is worked even to the high point of the bust, and then the decreases begin. Decreasing earlier willslightly draw down the neckline. To raise the neckline, cast-on the front neckline stitches and join in the round earlier. shaping altogether or to adjust it as necessary to achieve the desired fit.
PATTERN INSTRUCTIONS
Yoke:
With MC and larger (US #6) needles, CO 42 (52, 58, 68) [74, 86, 92] using provisional crochet cast-on method. (Notes 1 &8) Set up: (RS): k2 (3, 3, 4) [4, 5, 5] {this is the front right), pm, k6 (7, 7, 8) [8, 10, 10] {this is the right sleeve}, pm, k26 (32, 38, 44) [50, 56, 62] {this is the back}, pm, k6 (7, 7, 8)[8, 10, 10] {this is the left sleeve}, pm, k2 (3, 3, 4)[4, 5, 5] {this is the front left} . (WS): Purl one row. Raglan increases (Note 2): Row 1 (RS): \*\*k to 1 st before m, M1L, k1, sm, k1, M1R\*\* k to end. (8 sts inc) Row 2 (WS): \*\*p to m, sm, p1, p1tbl\*\* p to end. Repeat these two rows 22 (24, 26, 28) [31, 33, 35] more times, ending with row 2. You should have 226 (252, 274, 300) [322, 350, 372] sts following the raglan increases. Piece should measure 6.0 (6.5, 7.0, 7.5) [8.0, 8.5, 9.0] inches from castOnedge. Separate sleeves (Note 6), CO front neckline sts, and begin working in the round as follows (Notes 7, 9, & 10): (RS): k to first m, remove m, slip 52 (57, 61, 66) [70, 76, 80] sleeve sts to waste yarn, slip second m, k to third marker, remove m, slip 52 (57, 61, 66) [70, 76, 80] sts to waste yarn, slip fourth marker, kto end of row, C0 23 (27, 33, 37) [43, 47, 53] sts with waste yarn using provisional crochet CO. Without turning, k these CO sts. Place m to mark beginning of round and join to knit in the round. You should have 145 (165, 185, 205) [225, 245, 265] sts.
Body:
Continue working in the round for 16 (16, 17, 17) [17, 18, 18] rounds, making sure to move the beginning of round sm as described in the pattern notes when you reach the first color change after the join. (Note 11) Waist shaping (Notes 3, 4, & 12): Waist decreases are the same for all sizes. That is, a total of seven decrease rounds are worked (28 sts decreased), and each decrease round is positioned one inch from the previous. One inch of even knitting is worked following the last decrease round, then waist increases are worked every 3/4" for a total of eight increase rounds (32 sts increased). Some testers found that they did not need to work the suggested number of decreases /increases for their desired fit, so I would encourage you to try on the sweater as you go to make sure you like the fit. Dec rnd: k1, k2tog, kto 3 sts before m, SYTK, k1, sm, k1, k2tog, kto 3 sts before end of rnd m, SYTK, k1. Knit even for 7 rnds. Repeat last 8 rnds 6 times more. You should have 117(137, 157, 177) [197, 217, 237] sts. Inc rnd: k1, M1, k to 1 st before m, M1, k1, sm, k1, M1, kto 1 st before end of rnd m, M1, k1. Knit even for 5 rnds. then work one more inc rnd. You should have 149 (169, 189, 209) [229, 249, 269] s Knit even for 5 (1, 4, 6) [2, 7, 3] rnds. If following the suggested stripe height, kniting these rounds even should bring you to the end of a CC stripe. Knit one round even in MC, increasing by 1 (0, 0, 1) [0, 0, 1] sts or decreasing by 0 (1, 0, 0) [1, 0, 0] sts at the end of the round. You should have 150 (168, 189, 210) [228, 249, 270] sts. to smaller (US #5) needles, work in 2x1 (k2, p1) ribbing for 19 rounds. BO (Note 5)
Neck Edge:
Unzip and transfer original cast-on stitches to US #5 needles. Starting at the right edge of these sts, knit across. Pick up and knit three sts for every four rows down the left front. Unzip and transfer front neckline sts to left needle, then knit across. Pick up and knit three sts for every four rows up the right front. You should have 137 (157, 175, 195) [213, 235, 253] sts. Join to begin working in the round, then work in 1x1 (k1, p1) ribbing until one st remains. Knit this last st together with the first st of the next round to make the ribbing even. Work in 1x1 rib for three more rounds. BO using Elizabeth Zimmerman's sewn BO (Note 5).
Sleeves:
While working slees, maintain the strpe patern as established for the body. leeve decreas are spread evenly over the length of the sleeve, and a total offour decrease rnds (8 sts decreased) are worked for each size. Because the stripes need to work out, sleeve length will vary for each size. If you are unable to achieve row gauge, you may need to alter the length of the sleeve for your strpes to work out. Transfer sts to needles for working in the round (magic loop or DPNs). Rnd 1: knit one round even, then pick up and knit 4 sts under the arm, placing an sm ater these four sts. You should have 56 (61, 65, 70) [74, 80, 84] sts. Rnd 2: knit to two sts before sm, SYTK, slip m, k2tog. (2 sts dec.) Rnd 3: work as for Rnd 2. You should have 52 (57, 61, 66) [70, 76, 80] sts. Move the beg of rnd m one st to the right Knit 5 (5, 5, 5) [5, 7, 7] rnds even. Dec rnd: k1, k2tog, k to 3 sts before end of rnd m, SYTK, k1. (2 sts decreased) Knit even for 11 (10, 12, 10) [9, 14, 13] rnds. Repeat these 12 (11, 13, 11) [10, 15, 14] rnds 2 times more, then work one more dec rnd. You should have 44 (49, 53, 58) [62, 68, 72] sts. Continue working even for 3 (2, 6, 2) [1, 4, 3] rnds. This should bring you to the end of a CC striped section. Knit one round even in MC, increasing by 1 (0, 1, 0) [1, 1, 0] sts or decreasing by 0 (1, 0, 1) [0, 0, 0] sts at the end of the round. You should have 45 (48, 54, 57) [63, 69, 72] sts. Ribbing: Changing to US #5 needles, work in 2x1 (k2, p1) ribbing for 12 rounds. BO (Note 5). Repeat for second sleeve. Weave in ends, block, and wear with happiness.
@ copyright 2013, Amanda B. Doody; Photo Credits: Abigail R. Vickery Pattern for personal, non-commercial use only. For pattern support, designer may be contacted at missblane@gmail.com.


