Casy Tog-Up Socks
Katherine Foster
Easy Toe-Up Socks
Toe-up socks are an excellent design choice, especially for the more expensive, self-patterning_ European sock yarns - you don't have to worry buying a 3'd skein just to finish the last inch of the toe. With the foot already done, you can knit to the very end of the skein and let that determine the length of the sock leg. Knitting toe-up also provides more options when choosing a decorative stitch pattern for the leg - what you knit will be displayed right-side up, the same as in the stitch treasury or other source of inspiration. Top-down socks will present patternsupside-down.
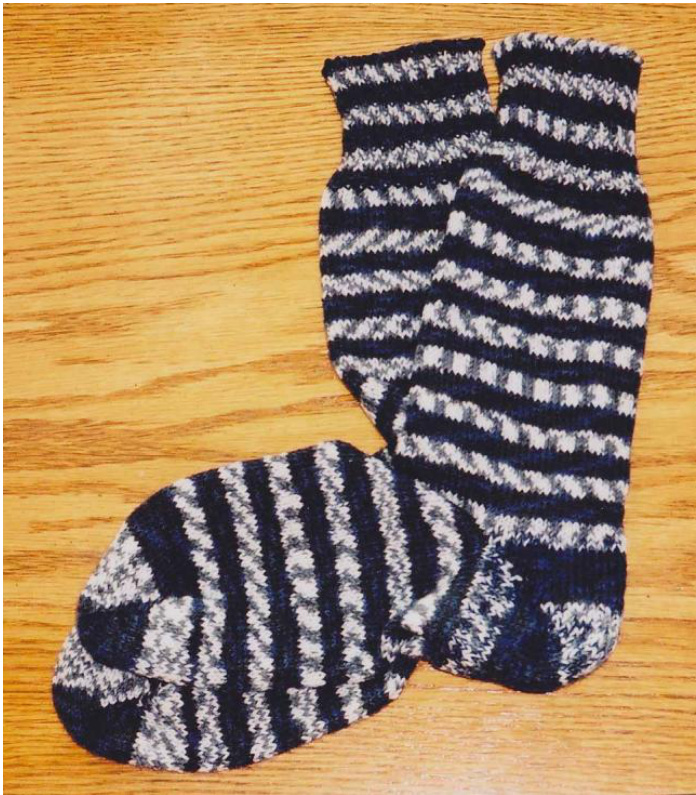
My Easy Toe-Up Socks method uses a combination of common knitting techniques to simplify sock knitting. The instructions for each sock part are presented sequentially and with illustrative photos. Begin with a Provisional (temporary) Cast On of half the total number of stitches, and then work a Short-Row Toe on 2 needles. Remove the cast on yarn and place the stitches on needles. Knit the foot in the round for the necessary length followed by a Short-Row Heel. Then work plain or patterned knitting for the leg and finish off with a stretchy Darning Needle Cast Off.
Yarn, Needles & Gauge
The Lightweight Socks in this booklet are developed for the common 4-ply sock yarn ("4-fadig" for German yarns). It is a litl lighter than the 4-ply/fingering sweater yarn that is typically knit to a gauge of 28 sts = 4". Patons (Spinrite) has recently introduced a new Kroy 4-ply sock yarn that is the heavier, sweater weight. The old Kroy 4- ply, now discontinued, is comparable to the European sock yarns and works OK with this booklet. See the note at on the next page about adjusting the formula for different weight yarns, including the new Kroy Socks. My preferred needle size for this weight yarn is 2.25 mm, achieving a gauge of 32 sts and 46 rows to 4". The knitted fabric is firm enough to last well but not so stiff that it is uncomfortable to wear. There isn't an exact conversion to American sized needles → charts will indicate either size 0 or size 1. If you don't have a source for metric needles (more precisely, needles not made in the US) then try both the size 0 and size 1 and choose the one that gives you the fabric you like best. This may require a change to the number of stitches for the foot and number of rounds between toe and heel. Once you have finished the toe and are beginning to knit the tube for the foot you may use a set of 4 or 5 doublepointed needles, 1 or 2 circulars, according to your preference for knitting in the round. The Sport Weight Socks in this booklet are developed for a double knitting (DK) weight yarn ("6-fadig" for German yarns). I've typically used German 6-fadig yarn and also 2 strands of 3-ply Kroy (now discontinued) when making these socks. I've also successfully used a mostly-cotton sweater yarn. Yarns labelled DK cover quite a range of yarn weights and because of the larger gauge, even a few stitches extra around the foot can make the sock uncomfortably large so you may need to adjust the stitch counts for the yarn you've chosen. ize for these heavier socks is 3.00 mm, achieving a gauge of 28 sts and 36 rows to ^ With both weight socks, I have occasionally increased the needle size once past the heel so the sock leg is stretchier and especially if I've added a decorative stitch pattern that pulls the yarn tighter, e.g. cables. In these smaller needle sizes, metric needles are available in.25 mm increments.
Lightweight Socks
100 grams 4-ply sock yarn; possibly 150 grams for longer sock legs 2.25 mm needles Gauge: 32 sts & 46 rows to 4"
| Stitch Counts: | Cast On | Toe/Heel Reduction | Foot/Leg |
| Ladies'a average | 34 | 10 | 68 |
| Ladies'large, Men'saverage | 36 | 12 | 72 |
Sport-Weight Socks
100 grams DK weight sock yarn; possibly 150 grams for longer sock legs 3.00 mm needles Gauge: 28 sts & 36 rows to 4"
| StitchCounts: | Caston | Toe/Heel Reduction | Foot/Leg |
| Ladies'average | 26 | 8 | 52 |
| Ladies'large, Men'saverage | 27 | 9 | 54 |
Adapting to Other Weight Yarns
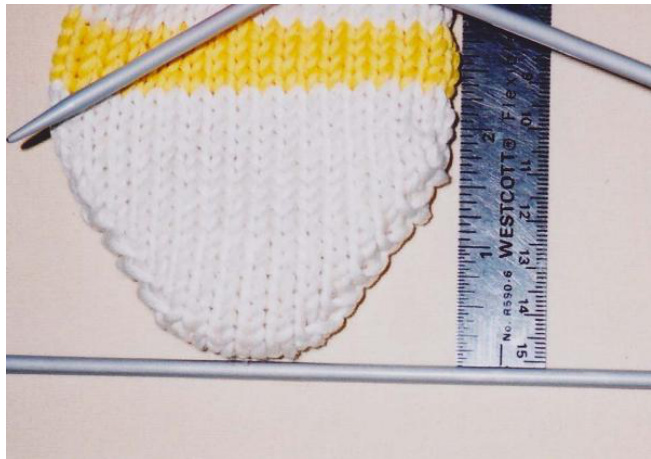
This basic sock formula is easy to adapt so that other weight yarns or differing stitch gauges can be accommodated. Likewise, it can be adjusted for larger or smaller feet. 1. Start with an even number of stitches for the foot. 2. Divide in half to determine the number of stitches to cast on for the toe. 3. The toe/heel reduction number is based on a measure. The width of the tip of the toe is 1" for narrow feet and 114" for all other sizes. There are an even number of rows worked to reduce to this width so if you cast on an even number of stitches, reduce to an even number of stitches. If you cast on an odd number, reduce to an odd number. 4. For larger feet, the heel can be made wider by stopping the short-row reduction 2 stitches sooner. This shortens the heel by 2 rows so increase the foot length by 2 rounds to compensate.
Provisional Cast On
A provisional cast on is one which will be removed later on leaving live stitches that can be knitted. While any yarn can be used, mercerized cotton works well because it doesn't leave behind stray fibers when it is removed and it can be re-used many times. Also, a contrasting colour to the sock yarn is easier to see when removing the cast on and picking up the live stitches. I like to use a crochet chain cast on since it is the easiest to remove ... simply pullthe tail end out of the last loop and keeppulling to unravel.
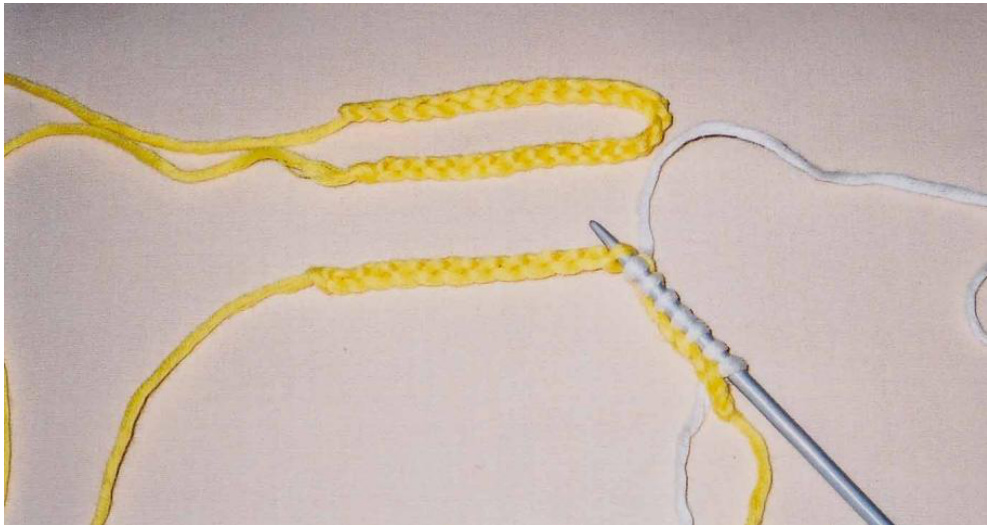
The trick with this method is to crochet a very loose chain so it is easy to pick up stitches through the bumps on the underside of the chain. I always chain a few extra stitches so I can skip the ones that are too tight. ethod is also a good choice since it doesn't take much time and is fairly easy to unpit With length of contrast yarn, cast on the required number of sts for your size.
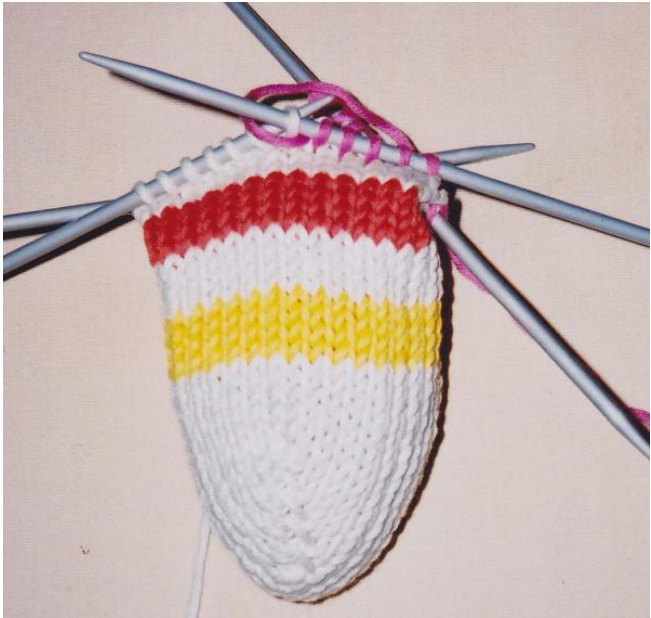
Short-Row Toe
Short-rows is a technique where on successive rows fewer stitches are worked, leaving the unworked stitches on the end of the needles. After a pre-determined number of rows the unworked stitches are worked again, either all at once or in stages, resulting in seamless shaping. It is used here to produce a seamless cup for the toe of the sock. 1st row: With sock yarn, knit the cast on sts.-34, 36, 26 or 27 sts, according to the chart. (lf using a crochet chain cast on, these sts will be picked upknitwiseratherthan actuallyknitted) 2nd row: Purl until 1 st remains then move yarn to back, slip 1 purlwise, move yarn to front, slip "wrapped" st back to left needleandturnwork. 3'd row: Knit until 1 st remains then yarn to front, slip 1 purlwise, yarn to back and slip the wrapped st back to left needle and turn. 4th row: Purl until 2 sts remain then wrap next st and turn. 5th row: Knit until 2 sts remain then wrap next st and turn. Repeat, working 1 less st on each row until X sts remain (toe/heel reduction number from chart). The last row will be aKrow. Next row: Purl X sts + 1, which will be (11, 13, 9 or 10) and turn. Nextrow: Knit X sts + 2, which will be (12, 14, 10 or 11) and turn. Next row: Purl the active sts (12, 14, 10 or 11), with point of left needle pick up the wrap at the base of the last active st and then purl it together with next st on left needle. Turn.

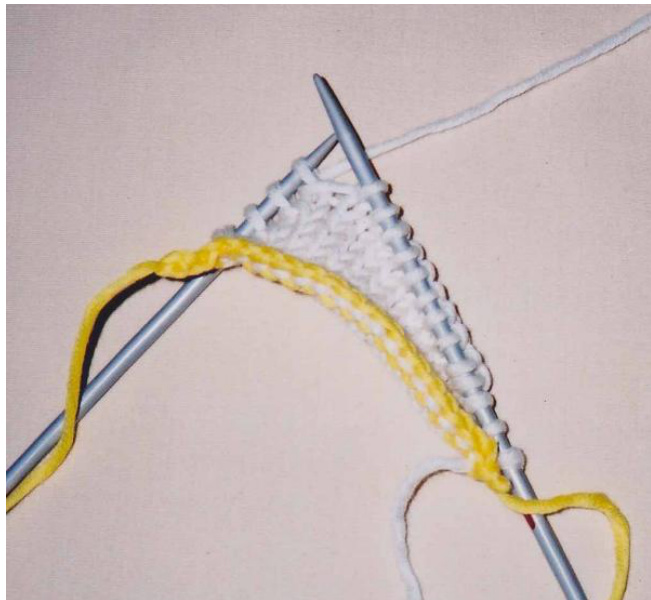
Next row: Knit the active sts, pick up the wrap and knit it together with next st. )rking 1 more st each row until all sts have been worked. The last row will be a K rov Unpick/unravel the cast on row, placing the sts on needles.
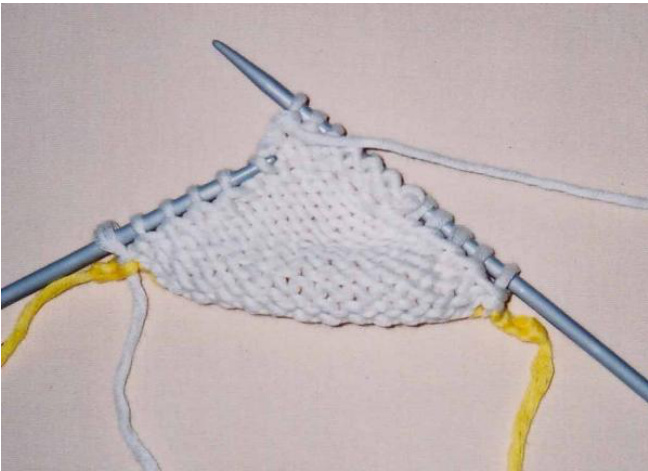
There will be an extra loop at the beginning that you have to pull the cast on yarn out of- untwist this loop and put it on theneedle.Thenumberofstsrecoveredfrom thecast onshouldequal thenumbercast on.
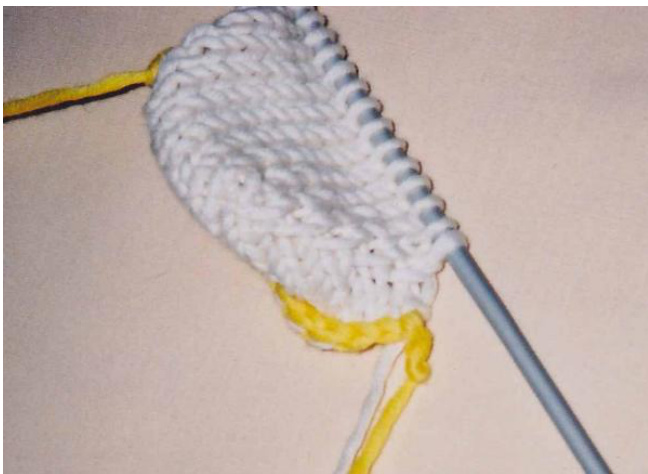
K across these sts, including the extra loop at the beginning. The total number of sts should be as indicated for Foot/Leg in the chart. The tail end of the sock yarn can be woven in now, while it is convenient. Now that the toe shaping is complete, measure from the tip of toe to needles and record the "toe length" measurement: Arrange the stitches for knitting in the round (evenly on 3 or 4 double pointed needles, 1 long circular or 2 circulars) and mark the beginning.
Foot
A decorative stitch pattern can be worked on the top of the foot, which is the second half of the stitches (the first half will become the underside when the heel is worked). If the stitch pattern doesn't repeat evenly within the number of stitches it can be edged with one or two purl stitches. ength of the heel will be the same as the toe so you will begin knitting the heel when
toe + foot + the toe length again = the total length needed
The total length should be %" to %" (approx 2cm) shorter than the length of the foot itself so that the sock stretches a little when worn. Socks are stretchy so it's better to err on the short side. I count rows for consistency.
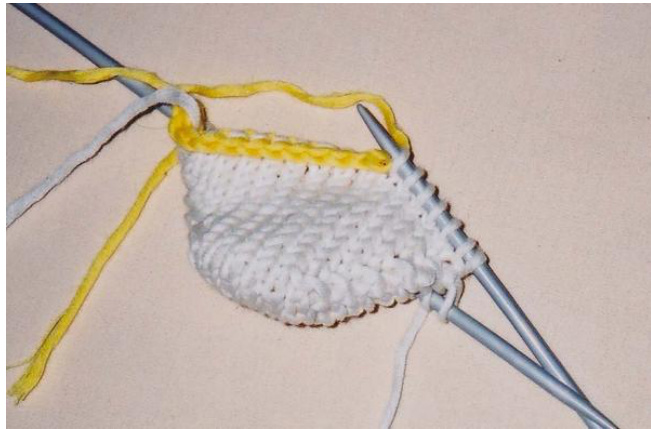
Short-Row Heel
The heel is worked in the same manner as the toe except the shaping is started on a knit row and ends with a purlrow. 1st row: K (33, 35, 25 or 26), wrap next st, and turn. 2nd row: P (32, 34, 24 or 25), wrap next st, and turn. Repeat, working 1 less st on each row until X sts remain (toe/heel reduction number from chart). The last row will be aProw. Next row: Knit X sts + 1, which will be (11, 13, 9 or 10) and turn.
Next row: Purl X sts + 2, which will be (12, 14, 10 or 11) and turn. Next row: Knit the active sts (12, 14, 10 or 11), pick up wrap with point of left needle and knit it together with next st on left needle. Turn. Next row: Purl the active sts, pick up wrap and purl it together with next st. Repeat, working 1 more st each row until all sts have been worked - the last 3 rows will be as follows: K (32, 34, 24 or 25), pick up wrap and knit together with next st, turn. P (33, 35, 25 or 26), pick up wrap and purl together with next st, turn. K (34, 36, 26 or 27), pick up wrap and knit together with next st, K to the end of the round and K the last st together with the remaining wrap at the base of Needle 1. orative stitch pattern on the top of the foot, the pattern should be worked in this rounc
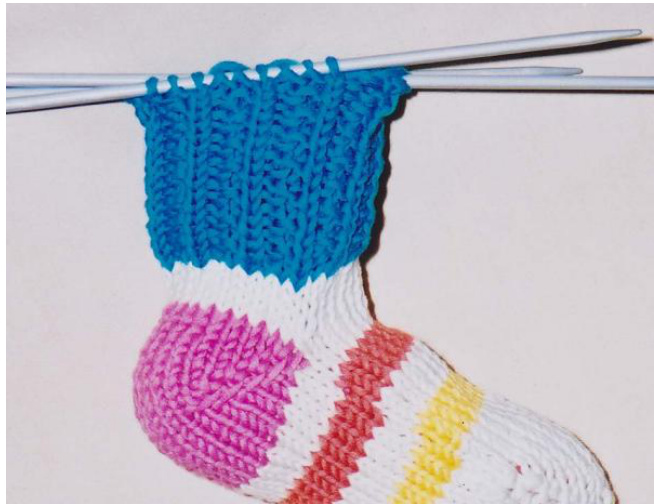
Leg
'g begins now ... after the first full round is worked as indicated at the end of the hee. Any decorative instep pattern wil now be worked over all stitches. This may require an adjustment to the total number of stitches - it's usually better to adjust by increasing rather than decreasing, especially for longer sock legs. If 1 or 2 stitches are required, work 1 round and increase by picking up a stitch through the wraps on the previous round. Any additional stitches should be increased over the heel area so the instep pattern continues evenly. Bordering purl stitches can simply be worked according to the pattern. If you have worked a plain foot and want to add a decorative leg pattern, increase as described above (i.e. in the first round of the leg) but knit 8 - 10 rounds before commencing the leg pattern. The heel ends very low on the ankle and the pattern willook better i it begins a litle higher up on the leg. The simplest leg patterns are: stockinette (K all rounds) with a ribbed cuff; no stitch count adjustment required. single rib (K1 P1; repeat around); no stitch count adjustment required. double rib (K2 P2; repeat around) Multiple of 4 stitches:
| 68 st | nos stitch count adjustment |
| 72st | nos stitch count adjustment |
| 52st | no stitch count adjustment |
| 54 st | increase 2to56sts |
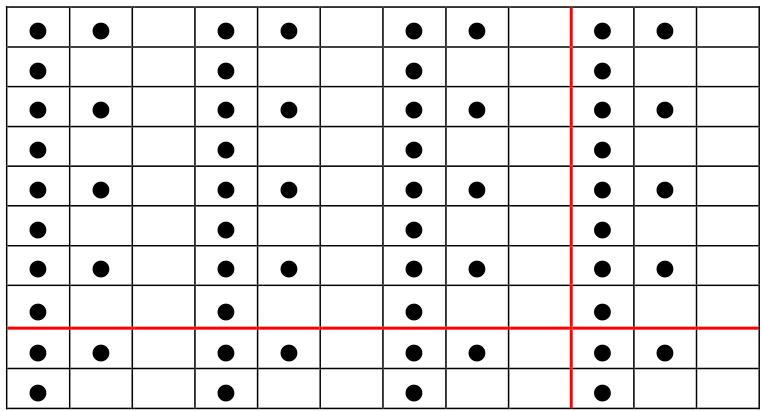
farrow rib
| Multipleof3 stitches: | 68 st | increase1to69sts |
| 72 st | no stitch count adjustment | |
| 52 st | increase2to54sts | |
| 54 st | nostitchcount adjustment |
2-round pattern: Round 1: (K2, P1) and repeat around Round 2: (K1, P2) and repeat around knit purl
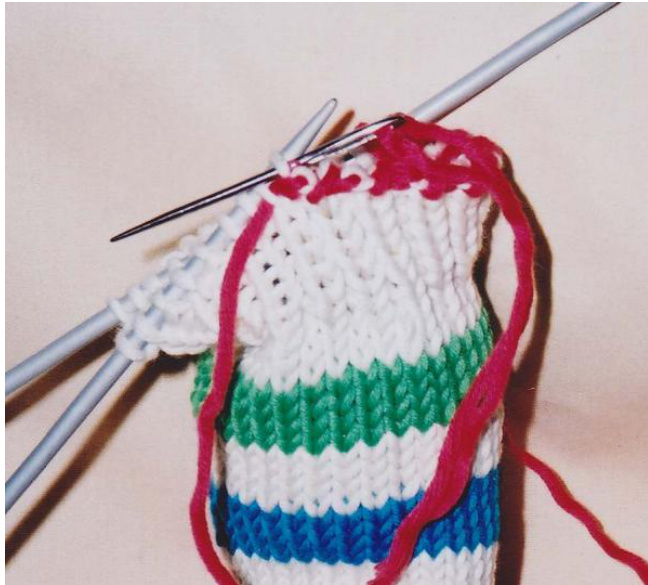
Darning Needle Cast Off
Cut yarn leaving a 48" tail. Thread through the eye of a blunt darning needle. 1. Draw yarn from back to front between 1st and 2"d st on left needle.
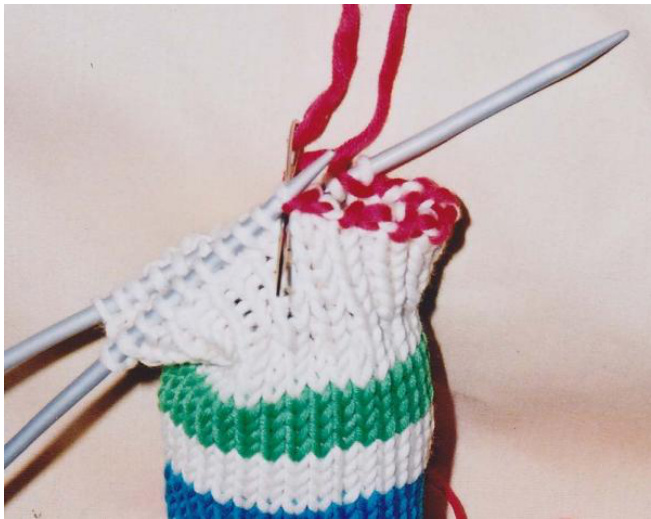
Yarn incontrast to show stitch details.If you want a thinband of colour along top edge, work 1 round in contrast and then thecastoff. 2.Draw yarn from left to right (as if to knit) through 2nd st on left needle, then 1"t st. Slip 1"t st off needle.

3. Draw yarn from right to left (as if to purl) through 2nd st

and then 1st st and slip 1st st off needle.
Repeat these 3 steps until all sts have been worked. Fasten yarn off.


