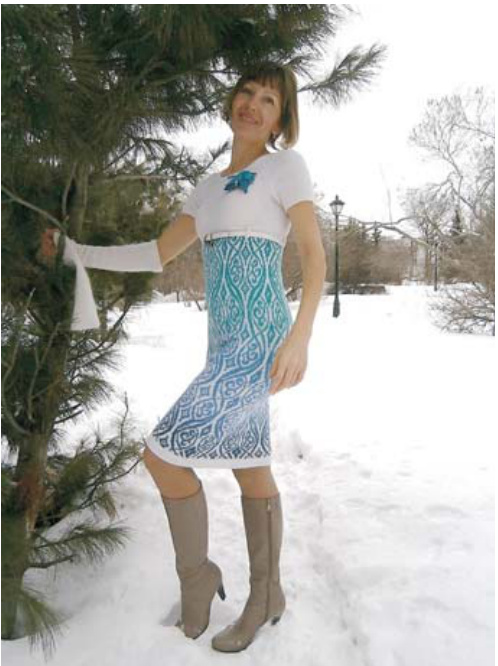
Dress <Eastern Fairy Tales> (Size S)
Materials:
fingering weight yarn, yardage 400 meters/100 gms [438 yds/3.5 oz]: 200 gms [7 oz] solid colored (color A), 200-220 gms [7 - 7.8 oz] long color repeat, sample in Aade Long Artistic 8/2 (color B) Circular knitting needles 3 mm [US2.5], 2.75 mm [US2] and 2.5 mm [US1.5] (for stranded knitting), 2.5 mm [US1.5] (for the stockinette part), 2 mm [USo] (for the trim)
Techniques used:
Gauge (10x10 cm [2.5x2.5 inches]):
double knit fabric stitch ribbing 2x2 (k2/p2) stockinette stitch stranded knitting in stockinette Faux turned linked double knit neckband Stranded part: 29 sts x 31 rounds Stockinette part: 32 sts x 45 rnds Please note: This is not a detailed set of directions on how to knit a dress in general, but rather, guidance on how to combine the charts for the stranded pattern and the waist shaping instructions for this pattern into a dress. You still have to swatch and make your own calculations to adjust the charted pattern and shaping instructions to your own size and fit it to your body measurements, and you have to be familiar with or know how to find information about fitting knitted garments and the knitting techniques used. Difficulty level: advanced Front and back are worked from the bottom up in one piece up to the armhole with an imitation seam. Using 2.5 mm [US1.5] circular needle with long cable and the Italian cast-on method, cast on 252 sts in color A. Work for 4 rows in double knit fabric stitch (\*\* see “How to? below.). Join to round and continue working in rounds. Change to 3 mm [US2.5] needle and work for 10 rows/rounds in [k2, p2] ribbing. Continue with stranded pattern from Chart 1, working 6 pattern repeats 42 sts x 62 rows/rounds + p1. This p1 at the end of every round produces an imitation seam and helps hiding the jog in the transition between rounds. Beginning from the 3' pattern repeat height-wise, start waist shaping by changing to a smaller needle size, first 2.75 mm [US2], then 2.5 mm [US1.5] for Chart 2. Chart 3 is optional for a body shape with a significant difference between waist and hip circumference. Continue in stockinette st with color A. After 10 cm (2.5 inches) of st st, divide front and back and continue working the front and back separately, shaping the armholes and neckline. The neck opening should be about 5 cm [2 in] deep, measured from the armhole. To help determine the correct row count for your neck opening, make a paper pattern in 1:1 size with the desired neckline (transferred from any garment that fits) cut out. Place this paper pattern over the already knitted up fabric as shown in Chart 4 and count rows and sts for neckline shaping. Design and pattern instructions @ 2014 Inchi. For individual, non-commercial use only! Re-publication and unauthorized transfer of this pattern or parts of it are prohibited. Translation from the Russian original @ 2014 Katharina Sokiran The sleeves are worked bottom up flat in back-and-forth rows on 2.5 mm [US1.5] needles. Using the Italian cast-on method, co the needed number of stitches needed for your arm circumference, according to your personal gauge. Work for 4 rows/rounds in double knit fabric stitch, then work in [k2, p2] ribbing. Continue in stockinette st, adding sleeve tapering as follows: Inc 1 st in every 4" round, 6 times in all. When sleeve measures 5 cm (2 inches), start shoulder shaping according to the gauge-swatch/paper pattern method shown in Chart 4 (schematic). Bind off remaining sts.
Assembling and finishing.
Using 2 mm [USo] needle, add faux turned linked double knit neckband to neck opening (see “How to?" below). If desired, knit belt loops and attach to dress where stranded part meets solid colored part. Before assembling, soft block all pieces as follows: Bathe individual pieces in luke-warm water, this will even out the stranded part. Spread out on an even surface w/o pinning and let dry. Now, assemble pieces: Close sleeve seams and set in sleeves. Paying attention to the specific care instructions for your particular yarn as given on the ball band, gently steam block the assembled dress, either through a wet cloth or using the steam mode of your iron. Please note that most types of wool will not tolerate overly high temperature settings and may shrink if steamed at too high temperatures.
Chart 4

Design and pattern instructions @ 2014 Inchi. For individual, non-commercial use only! Re-publication and unauthorized transfer of this pattern or parts of it are prohibited. Translation from the Russian original ? 2014 Katharina Sokiran
\*How to: Faux turned linked double knit neckband in rows
From the RS of the dress, pick up and knit sts around neck opening. (For a neat appearance, p/u not the selv st, but the next st after it.) Turn work. Row 1 (WS): knit = (1) garter st row visible from RS. Row 2 (RS): knit Row 3 (WS): purl of the dress, p/u and knit a corresponding number of sts around neck opening. Turn work. Row 1 (WS of this neckband, but RS of dress): purl. Row 2 (RS of this neckband, but WS of dress): knit Row 3 (WS of this neckband, but RS of dress): purl From the RS of the dress, holding needle with inside neckband in back and needle with outside neckband in front (WS on WS), bind off all sts in three-needle bind-off. If you find it easier, you can use a crochet hook instead of a third needle.
\*\*How to: Double knit fabric stitch
Video instruction can be found at http://newstitchaday.com/ double-knit-fabric-stitch/ For this dress, you will work 4 rows: Row 1 (RS): k1, [sl 1 wyib, k1] repeat to end of row Row 2 (WS): k1, [p1, k1] repeat to end of row Row 3 (RS, same as row 1): k1, [sl 1 wyib, k1] repeat to end of row Row 4 (WS same as row 2): k1, [p1, k1] repeat to end of row

Design and pattern instructions @ 2014 Inchi. For individual, non-commercial use only! Re-publication and unauthorized transfer of this pattern or parts of it are prohibited. Translation from the Russian original ? 2014 Katharina Sokiran Chart 2
| X X | XI | 59 58 | |||||||||||||||||||||||||||
| XXXXXX | X | XI | |||||||||||||||||||||||||||
| XXX | XXE | 57 | |||||||||||||||||||||||||||
| XX XXXX | |||||||||||||||||||||||||||||
| XXX | XXX | ||||||||||||||||||||||||||||
| X | XX | 5554555 | |||||||||||||||||||||||||||
| XX | XX | ||||||||||||||||||||||||||||
| X | X | ||||||||||||||||||||||||||||
| X XX | X | ||||||||||||||||||||||||||||
| XX | |||||||||||||||||||||||||||||
| XXXXX | .59187465 .432440:39373635432323302928 72625423220201918171615 413121 | ||||||||||||||||||||||||||||
| XXXXX | 98765432 | ||||||||||||||||||||||||||||
| 65 4 3 2 | - color A - color B - k2tog, knit 2 sts together (right-leaning decrease) - skp, slip one st k-wise, k1, pull slipped st over knitted one (left-leaning slipped decrease) - no stitch | Knitting symbols | XXXXXXXXXX |
Design and pattern instructions ? 2014 Inchi. For individual, non-commercial use only! Re-publication and unauthorized transfer of this pattern or parts of it are prohibited. Translation from the Russian original ? 2014 Katharina Sokiran
Chart 3
| 5.5955432555049487455443424439 | XE | XXX | XE | 57 | 56 | ||||||||||||||||||||||||||||||||||||||||||||||||||||||||||||||||||||||||||||||||||||||||||||||||||||||||||||||||||||||||||||||||||||||||||||||||||||||||||||||||||||||||||||||||||||||||||||||||||||||||||||||||||||||||||||||||||||||||||||||||||||||||||||||||||||||||||||||||||||||||||||||||||||||||||||||||||||||||||||||||||||||||||||||||||||||||||||||||||||||||||||
| XX 亿c+G9/8.60U孔04867亿亿忆7g亿872c282em | rowspan="12">XX X XXX Knitting symbols - color A - color BXXX XX XX X X | XX XXXXX | XXXXX XX | XXX X | XXX XXXXX | XX X | XX | XX | 55 | X | XX | 325 | XXX 42414039383736353433323130292827262524232221201918171615141312111098765432 | xXx .5987 987654 |
k2tog, knit 2 sts together (right-leaning decrease) skp, slip one st k-wise, k1, pull slipped st over knitted one (left-leaning slipped decrease) -nostitch Design and pattern instructions ? 2014 Inchi. For individual, non-commercial use only! Re-publication and unauthorized transfer of this pattern or parts of it are prohibited. Translation from the Russian original ? 2014 Katharina Sokiran


