Hettie
by JimiKnits
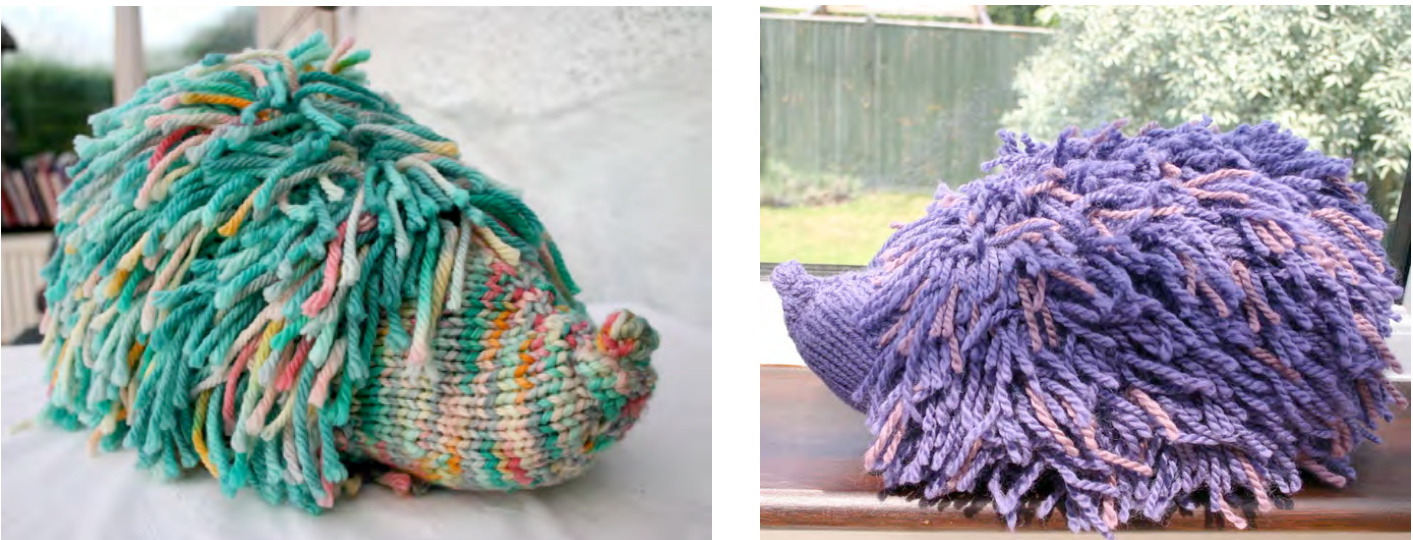
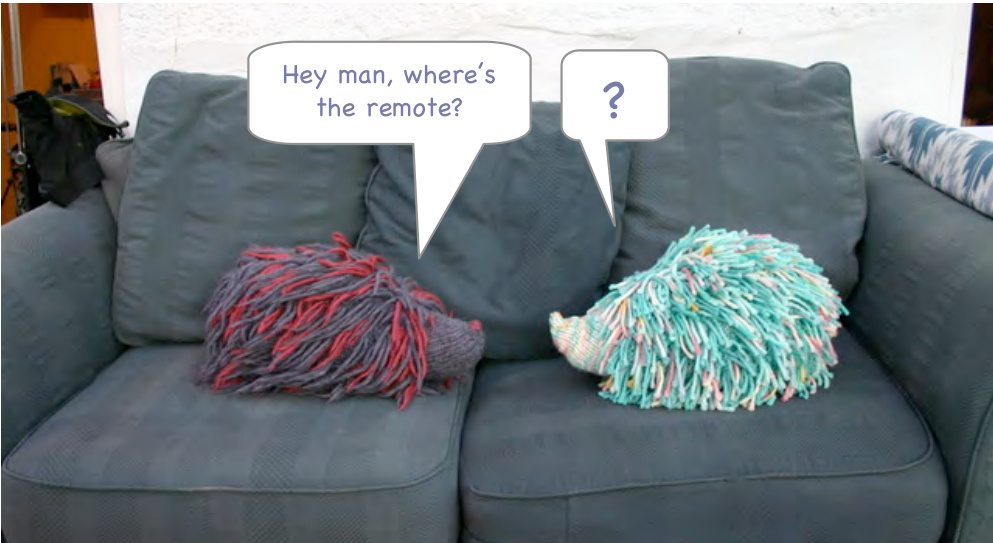
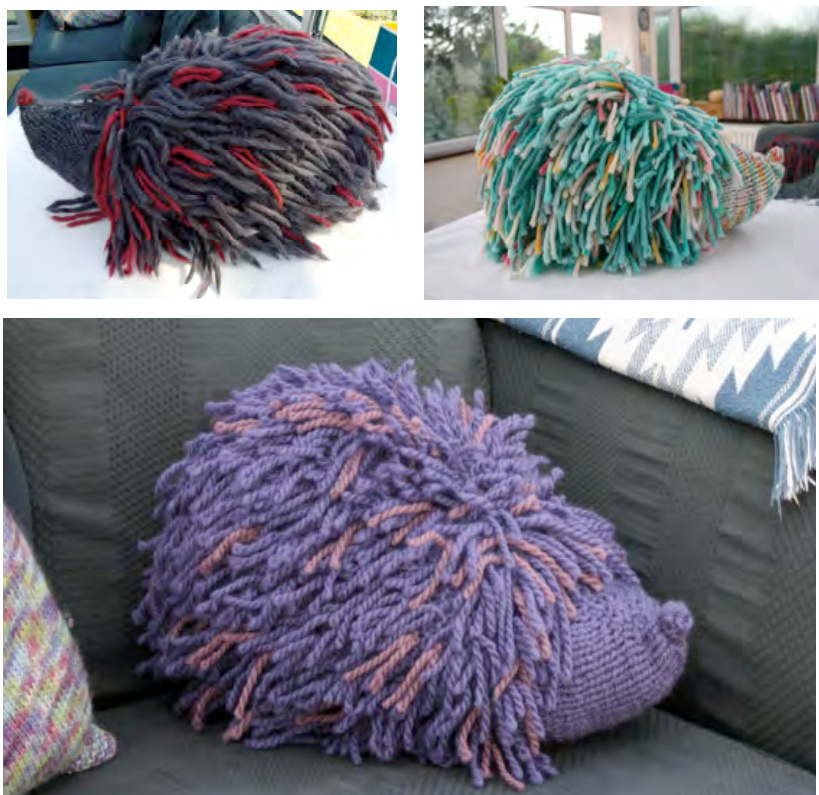
Hettie the Hedgehog is a cuddly and versatile toy, cushion, footrest or companion. The overall size is approx. 40cm wide by 25cm tall(16"x10"). Hettie was created based on my fondness for hedgehogs- but having said that, if I ever met one as big as this, I'm sure I would scream the house down!!
A NoteaboutThePattern
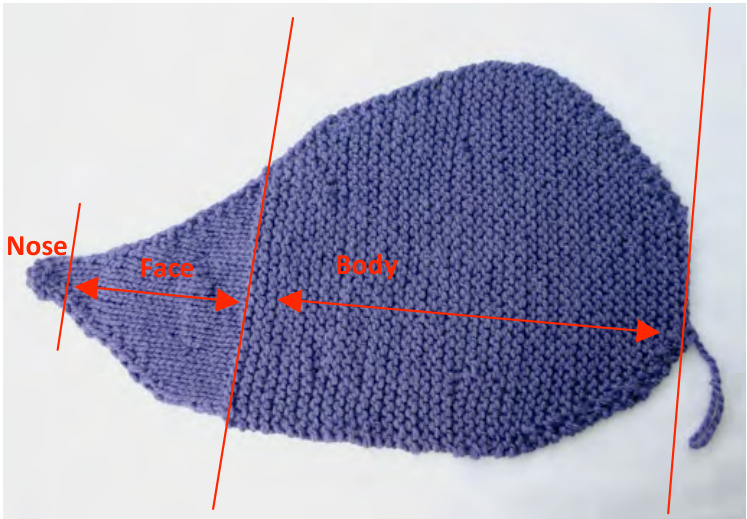
Hettie is made using 2 pieces (Side A & Side B) that mirror each other. It is knitted from the tip of the nose all the way to the rear end. There are increases, decreases and wrap & turns (short row shaping) along the way. The Face is knitted in Stockinette stitch and the rest of the body is Garter stitch. The quills are short lengths of yarn looped through the garter st 'bumps' using a crochet hook. It is then stuffed with Toy stuffing/cushion filler.
Materials
3 - 4 skeins x 100g Bulky weight yarn (4 skeins if you want extra quills, longer quills, or using a contrast colour). Suggested yarns: Drops - Andes 65% wool/35% alpaca; Drops - Eskimo 100% wool\*; Three Irish Girls - Galenas Chunky 100% merino; Three Irish Girls - Springvale Bulky 100% merino; Rowan Big Wool. Needle size: 7mm or 8mm Stitchmarkers Tapestry needle 6mm (Us: J) Crochet hook - exact size is not important 500g (17.5oz) Toy stuffing filler or cushion filler A length of worsted weight yarn of a similar colour for seaming (optional)\* 2 stitch holders or large safety pins (optional) \*Some bulky yarns are firmer and some are fluffer than others. The latter yarn types may not be strong enough to sew up seams with, so please use a Dk/Worsted weight yarn of a similar colour. In this instance, Drops Eskimo (suggested above) is not strong enough for seaming;thereforeanalternativeshouldbeused.
Gauge
10cm x 10cm (4x4 inches): 14sts x 20 rows (based on 7mm needle). Gauge is not greatly important here; different brands of thick yarns can vary in "volume". It is always best to do a swatch first to obtain YoUR gauge. Choose a needle size that gives you the best result, bearing in mind that the final piece will stretch with stuffing filler inside it.
06-27 @ Jimenez Joseph This pattern is for personal use only. Contact me on: jimiknits@yahoo.co.uk Ravelry: Jimikn
Let's Get Started!
Side A
Nose
■Cast on 4 sts ■Row 1: k1, p1, k1, p1 ■Row 2: p1, k1, p1, k1 That takes care of the nose part of Side A...Continue below fortheFace.
Face
Row 1 (right side): k1, kfb, k2 Row 2 (wrong side): Purl- do this for all wrong side rows for the Face. Row 3: k1, kfb, k3 Row 5: k1, kfb, k4 Row 7: k1, kfb, k to end of row = 8sts Row 9: k1, kfb, k to last 2 sts, kfb, k1 = 10sts Row 11:k all sts Row 13: k1, kfb, k to last 2 sts, kfb, k1 Row 15: k1, kfb, k to last 2 sts, kfb, k1 Row 16: purl RepeatRows15and 16threetimes=20sts Next row (right side): Wrap & Turn (aka Short Row Shaping) K7, place marker (pm), k6, pm, wyif (with yarn in front) slip next stitch purl wise, turn your work (wrong side facing you), wyif slip the slipped stitch back onto right hand (rh) needle, slip marker (sm), purl to next marker, sm, wyib (with yarn in back) slip next stitch purl wise, turn your work (right side facing you), wyib, slip the slipped stitch back onto rh needle, sm, k to last 2 sts, kfb, k1. Note: Wrap & Turns are notorious for leaving gaping holes in your work, so to avoid this, I would suggest that you ktbl (and/or ptbl) any of the sts that have been slipped AND the 2 sts either side of them. This will tighten the stitches and reduce the possibility of gapingholes. Next row (wrong side): purl all sts removing markers on the way. (Right side): k to last 2 sts, kfb, k1 ■(Wrong side): purl Repeat these 2 steps once more.
Body
(Garter stitch throughout) ■(Right side): k to last 2 sts, kfb, k1 (Wrongside):knit Repeat these 2 steps until body section measures 5 cm (2") long Next row (right side): Wrap & Turn K7, pm, k15, pm, wyif slip next stitch purl wise, turn your work (wrong side facing you), wyif slip the slipped stitch back onto rh needle, sm, knit to next marker, sm, wyib slip next stitch purl wise, turn your work (right side facing you), wyib, slip the slipped stitch back onto rh needle, sm, k to last 2 sts, kfb, k1. Next row (wrong side): knit all sts removing markers on the way. Knit 4 rows ■Next row (right side): k to last 2 sts, kfb, k1 Knit 3 rows Repeat the LAST 2 steps until body section measures 15cm (6") long. Ending on a wrong side row. Next row (right side): Wrap & Turn
K7, place marker (pm), k20, pm, wyif slip next stitch purl wise, turn your work (wrong side facing you), wyif slip the slipped stitch back onto rh needle, sm, knit to next marker, sm, wyib slip next stitch purl wise, turn your work (right side facing you), wyib, slip the slipped stitch back onto rh needle, sm, k to end of row. Next row (wrong side): knit all sts removing markers on the way. xt row (right side): Work garter st straight until Body section measures 20cm (8"). Ending on a wrong side ro? Next row (right side): k1, ssk, k to last 3 sts, k2tog, k1 Knit3rows Repeat these 2 steps once more. ■Next row (right side): k1, ssk, k to last 3 sts, k2tog, k1 ■Next row:knit ■Next row: k to last 3 sts, k2tog, k1 Nextrow:knit Repeat these 4 steps two more times. ■Decrease by 1 stitch at each end for every row until 13sts remain. Bindoff.
Side B
Nose
■Cast on 4sts ■Row 1: k1, p1, k1, p1 ■Row 2: p1, k1, p1, k1 That takes care of the nose part of Side B... Continue below for the Face.
Face
Row 1 (right side): k2, kfb, k1 Row 2 (wrong side): Purl - do this for all wrong side rows for the Face. Row 3: k3, kfb, k1 Row 5: k4,kfb, k1 Row 7: k to last 2 sts, kfb, k1 = 8sts Row 9: k1, kfb, k to last 2 sts, kfb, k1 = 10sts Row 11: k all sts Row 13: k1, kfb, k to last 2 sts, kfb, k1 Row 15: k1, kfb, k to last 2 sts, kfb, k1 Row 16: purl Repeat Rows 15 and16 three times=20sts Next row (right side): Wrap & Turn K1, kfb, k5, place marker (pm), k6, pm, wyif (with yarn in front) slip next stitch purl wise, turn your work (wrong side facing you), wyif slip the slipped stitch back onto right hand (rh) needle, slip marker (sm), purl to next marker, sm, wyib (with yarn in back) slip next stitch purl wise, turn your work (right side facing you), wyib, slip the slipped stitch back onto rh needle, sm, k to end of row. Next row (wrong side): purl all sts removing markers on the way. (Right side): k1, kfb, k to end of row ■(Wrong side): Purl Repeat these 2 steps once more.
Body
(Garterstitchthroughout) ■(Right side): k1, kfb, k to end of row ■(Wrong side): knit Repeat these 2 steps until body section measures 5 cm (2") long Next row (right side): Wrap & Turn K1, kfb, k5, pm, k15, pm, wyif slip next stitch purl wise, turn your work (wrong side facing you), wyif slip the slipped stitch back onto rh needle, sm, knit to next marker, sm, wyib slip next stitch purl wise, turn your work (right side facing you), wyib, slip the slipped stitch back onto rh needle, sm, k to end of row. Next row (wrong side): knit all sts removing markers on the way. ■Knit4rows ■Next row (right side): k to last 2 sts, kfb, k1 Knit 3rows RepeattheLAST2stepsuntil bodysectionmeasures15cm(6") long.Endingona wrong side row. Next row (right side): Wrap & Turn K7, place marker (pm), k20, pm, wyif slip next stitch purl wise, turn your work (wrong side facing you), wyif slip the slipped stitch back onto rh needle, sm, knit to next marker, sm, wyib slip next stitch purl wise, turn your work (right side facing you), wyib, slip the slipped stitch back onto rh needle, sm, k to end of row. Next row (wrong side): knit all sts removing markers on the way. xt row (right side): Work garter st straight until Body section measures 20cm (8"). Ending on a wrong side ro ■Next row (right side): k1, ssk, k to last 3 sts, k2tog, k1 ■Knit3rows Repeat these 2 steps once more. Next row (right side): k1, ssk, k to last 3 sts, k2tog, k1 ■Nextrow:knit ■Next row: k1, ssk, k to end of row ■Next row:knit Repeat these 4 steps two more times. ■Decrease by 1 stitch at each end for every row until 13sts remain. Bind off.
Assembly
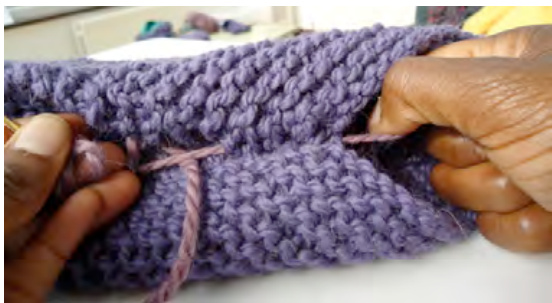
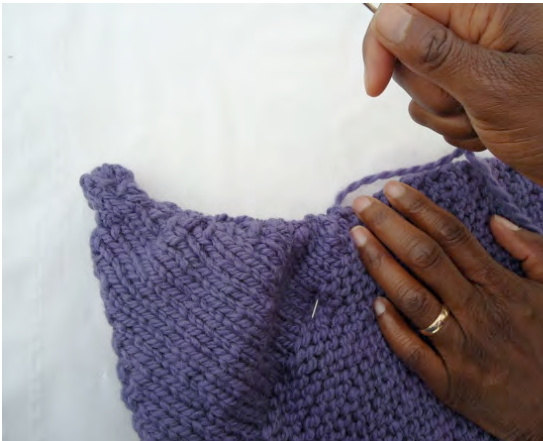
Line up sides A & B together (right sides outside). If necessary, hold them together with stitch holders or safety pins to keep them in line. Thread your tapestry needle either with the same yarn or a stronger yarn of a similar colour. Sew the two sides together starting from the base of cast off edge (the rear end!), leaving a 30cm (12") tail of sewing yarn. Work along the underside of the piece, all the way to the Nose. Note:Asyou sew,remember to tighten the seams by pulling together the tail end and the lead end of the sewing yarn, every now and then (see pic). At the Nose, tuck in any excess cast on yarn and continue sewing up the seams of the nose section. At the top of the nose, sew around the base of the nose and tighten. This will makethenoselookmorerounded. Continue sewing the seams along the top edge until you reach a quarter of the way into the Body section. Stop here for a moment: - Pull up the Nose - Pull firmly and evenly at the sewing yarn to bring up the nose (see pic). OOnce you are happy with the position of the nose, do a few tight sewing stitches in one area to anchor its position. Continue sewing the seams all the way to the top part of the cast off area. Leave a 30 cm (12") long tail of sewing yarn (you will be using this and the starter tail of sewing yarn to adjust/tighten the seams and close up the last gap). Leave a fist size gap for stuffing.
Add Quills
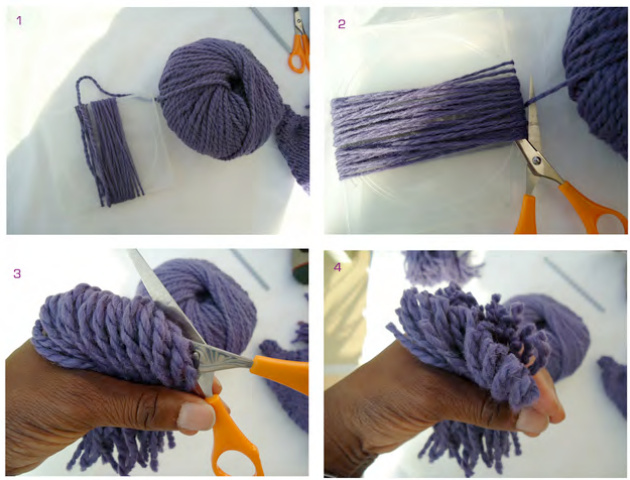
Cut several lengths of yarn about 12.5cm (5") long (or longer if you want a shaggy hedgehog and you have enough yarn!). A simple way to do this is wrap yarn a few times around a CD case, then cut it at one end', fold the yarn strands in half and cut them again3&4. Repeat this process until you have enough strands. Each strand is about 5 inches long.
With crochet hook in hand...
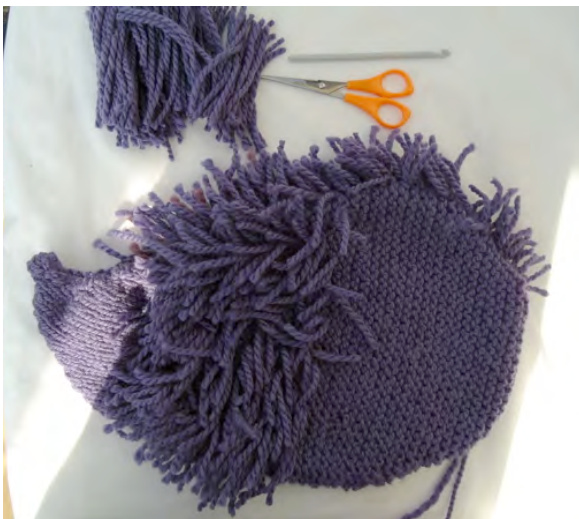
Start at the face end ofthe garter stitch body and hook a quill through the raised bumps, then hook the 2 tails through the quill's loop, pull the tails to lock the quills in position.

Do this as many times as you can, covering much of the body. Pay extra attentionto the top seam. Note:You donothave toadd quillsto EVERY garter st bump! You will get more than adequate coverage on the body by adding quills say,every 4-5 sts and every otherrowtostartwith.Youcanthengobackandaddmorequillstoareasofthe body that need it.Plus,you can always add more afteryou have stuffed it.
Optional - Contrast colour
Add quills in the same way with your contrast colour. You can even sew this colour ontothenoseforabitofcharacter!
Stuffing
Stuff the piece. Be mindful not to over-stuff your work, otherwise the stuffing will "leak' out of your knitting. The overall piece should be firm and hold its shape, yet squishyenoughtocuddle! Sew up the gap. Add more quills if necessary.
Ta daa!!
K-knit
P-purl K2tog - knit 2 stitches together SSK - slip slip knit Ktbl - knit through the back loop Ptbl - purl through the back loop W&T- wrap and turn Pm - place marker Sm - slip marker Wyif-with yarn in front Wyib - with yarn in back Kfb - knit front, then back of same stitch (1 stitch increase) Lh - left hand Rh - right hand


