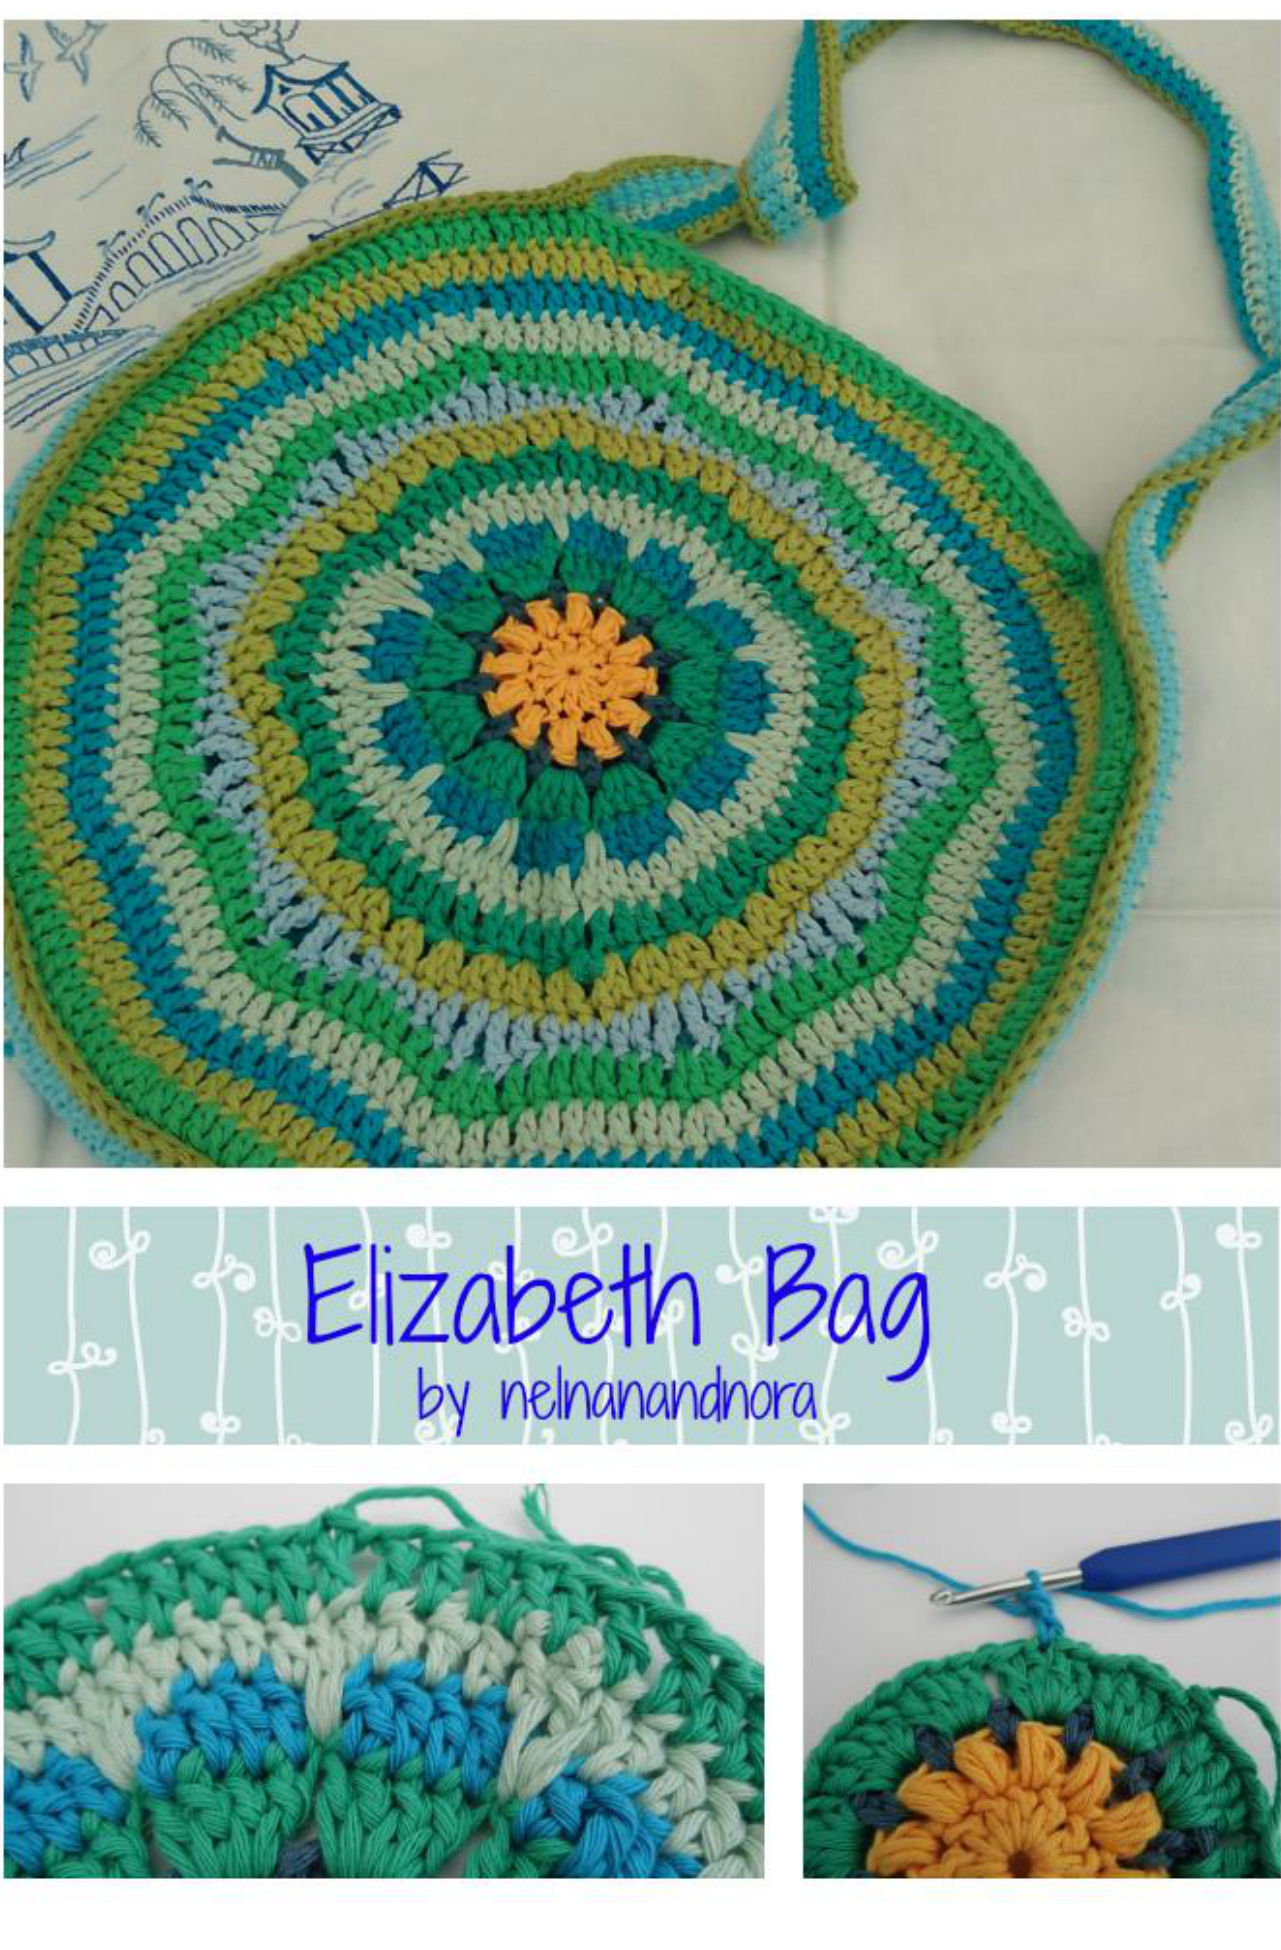
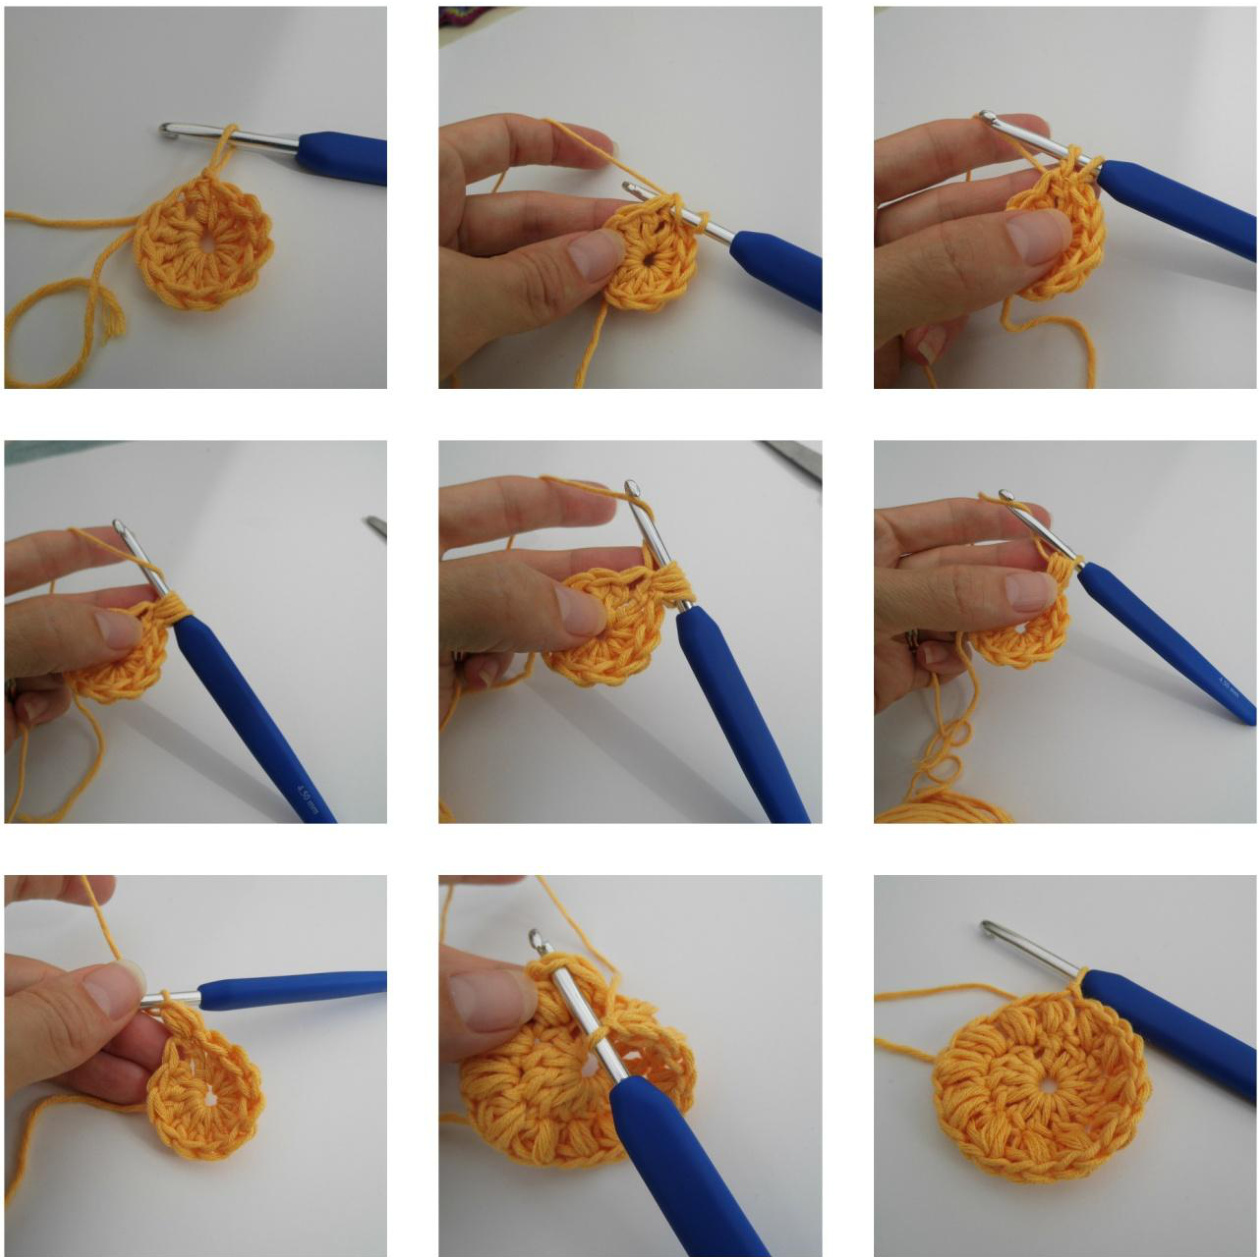
I made up the sample bag and panel in Drops Paris cotton - the same as my Vendée Sweater - and Rico Creative Cotton Aran, with a 4.5mm crochet hook. It could be made in any yarn and of your choice with an appropriate hook; the size can be varied this way or by working a larger or smaller number of rounds. I changed colour almost every round, but this is entirely up to you, as is the method by which you join in the yarn. Throughout I've linked to a technique that can be helpful for this, the standing treble (double) crochet, which allows you to join in the yarn and create a treble stitch at the same time, and full credit for that goes to Tamara Kelly from Moogly. Terms used: YOH: yarn over hook sl st: slip stitch: insert hook into stitch, yarn over hook and draw through stitch. dc: double crochet (US sc/ single crochet): insert hook into stitch, YOH, draw through stitch, YOH and draw through both loops on hook. htr: half treble (US hdc/half double): YOH, insert hook into stitch (or ring or space), yoh and draw through stitch; YOH and draw through all three loops on hook tr: treble (US dc/ double crochet): YOH, insert hook into stitch (or ring or space), yoh and draw through stitch; YOH and draw through two loops on hook, YOH and draw through remainingtwo loops dtr: double treble (US treble): YOH twice, insert hook into stitch (or ring or space), YOH and draw through stitch; YOH and draw through two loops on hook, three times Specialstitches: Puff stitch: YOH, insert hook into stitch, draw up loop, repeat twice (7 loops on hook), YOH, pull through all loops on hook ) Spike treble: Worked as a normal treble but into a stitch in the last-but-one row (so here, when working round 6, the spike stitches go into the top of round 4 instead of round 5). To begin: chain 4 and join into a ring with a slip stitch. R1: ch3 - counts as tr - or starting tr, 11tr into the ring and close with sl st to top of initial ch3 (12 tr) R2: Draw up loop on hook, YOH, insert hook into same stitch, draw up loop, repeat twice (7 loops on hook), YOH, pull through all loops on hook (this forms the initial puff stitch), ch1 YOH, insert hook into stitch, draw up loop, repeat twice (7 loops on hook), YOH, pull through all loops on hook ), ch1\* and repeat in each of the 10 remaining stitches around the circle, close with sl st to first puff stitch. Tie off yarn. (12 puff stitches, 12 ch1)
R3: in space between two puff stitches, ch3 or standing tr (counts as first dc and ch2); in each remaining space: [dc, ch2] and repeat 10 times. Close with sl st to 1" chain of initial ch3. (12dc, 12 ch-2 spaces) R4: ch3 or standing tr in a ch2-sp; 3tr in same space, ch1; (4tr, ch1) in each remaining ch2-sp; close with sl st to top of ch3. (48tr, 12ch1) R5: start in 3rd tr of any 4tr group: ch3 or standing tr; tr in next tr of previous round, ch1. tr in next 4 stitches, ch1] 11 times, tr in next 2 tr and close with sl st to top of ch3. (48tr, 12 ch1)
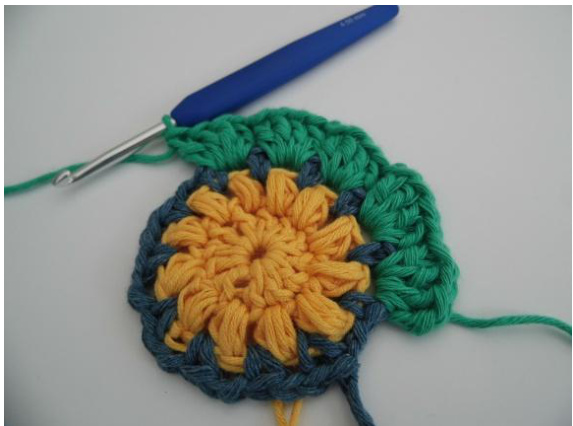
R6: ch3 or standing tr in 1" tr of 4tr group, tr in next 3 stitches, [2tr into R4 below ch1-sp (spiked tr), tr in next 4 tr], repeat [] until end; close with sl st. (48tr, 24 spiked tr)
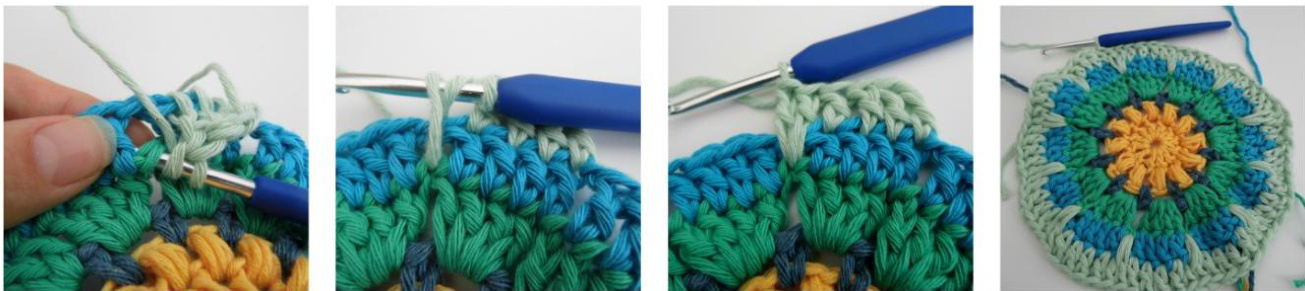
R7: ch3 or standing tr in a spiked tr, tr in each of next 5tr, ch1, [tr in each of next 6 tr, ch1] and repeat [] to end. Close with sl st (72 tr, 12 ch1) R8: ch3 or standing tr in 1" tr of 6tr group, tr in same stitch. Skip 1 stitch; 2tr in next 2 stitches, skip 1 stitch, 2tr in next stitch. [2tr in first stitch of 6tr group, skip 1 stitch, 2tr in next 2 stitches, skip 1, 2tr in next st] and repeat [] to end; close with sl st. (96tr). R9: ripple round. Join yarn in the first stitch of a group of 8 stitches from R8, ch1 (counts as dc). In next 7 stitches: htr, tr, dtr, ch1, dtr, tr, htr, dc and then [dc, htr, tr, dtr, ch1, dtr, tr, htr, dc] 11 times. Close with sl st to initial ch1. (24dc, 24 htr, 24htr, 24dtr, 12 ch1)
R10: Join in yarn and ch3 or standing tr in any ch1-sp; tr in same st. 1 tr in next 8 stitches. [2tr, tr in next 8 stitches] 11 times and sl st to close round. (120 tr) R11: Join in yarn and ch3 or standing tr in any ch1-sp; tr in same st. 1 tr in next 9 stitches. [2tr, tr in next 9 stitches] 11 times and sl st to close round. (132tr) R12: Join in yarn and ch3 or standing tr in any ch1-sp; tr in same st. 1 tr in next 10 stitches. [2tr, tr in next 10 stitches] 11 times and sl st to close round. (144tr) R13: Join in yarn and ch3 or standing tr in any ch1-sp; tr in same st. 1 tr in next 11 stitches. [2tr, tr in next 11 stitches] 11 times and sl st to close round. (156tr) R14: Join in yarn and ch3 or standing tr in any ch1-sp; tr in same st. 1 tr in next 12 stitches. [2tr, tr in next 12 stitches] 11 times and sl st to close round. (168tr). Repeat the pattern to make the reverse side, or work any 14-round circle design (for example a mandala, with extra rounds to make the size match up). To make the straps: measure with a length of yarn, tape or string the length of strap plus the distance around the bag that you require. The strap can be made in a continuous loop or with loose ends, according to your preference. Work a chain to this length (using a slightly bigger hook - 0.5mm larger than for the rest of the pattern can be helpful if you find it difficult to work into a chain or find that your chain distorts your work). If you are making a continuous loop, as here, then lay the chain flat and join with a slip stitch, then work in rounds. For a tied strap, turn at the end of the chain and work back and forth in rows until it has reached the desired width. The strap is then worked in rows of htr or dc, to the width that you require. It is then joined to the body of the bag. Line up the bag edge and strap, (using stitch markers or safety pins to hold and mark the points where the joining stops to make the opening), wrong sides together. Working through both layers (bag and strap), work a row of dc to join the two pieces. When you reach the point where the strap is no longer joined to the bag, continue working along the strap edge only, then\* (if making a continuous strap) start to work through both layers again at the next join, and work around til you reach the end of the row. Repeat on the other side. \*If you are making a tied strap, at this point, work to the end of the strap, with 2dc in each corner stitch, along the end, and back down the other side, then join the second bag panel to the strap at the point opposite the first one, continue around to the end of the joined section, around the strap end before, and continue until the starting point is reached. Finish off and weave in ends (if like me you haven't done them as you go!).

You are free to use this pattern for personal, charitable or business purposes. A donation to a charity offering support to families would be welcome but is not required.


